
Yes, you can absolutely build a patio on top of existing concrete, and it is one of the most practical upgrades a homeowner can make. The key is that your existing slab has to be structurally sound, reasonably level, and properly prepared before anything goes on top of it. If the concrete is cracked but stable, settled in one spot, or just plain ugly, you usually have options short of tearing it out and starting over. I have overlaid, tiled, bricked, and decked over old concrete slabs more times than I can count, and in most cases the existing slab made a perfectly good base. What makes or breaks the project is the inspection and prep work you do before laying a single paver or spreading a single bag of mortar. For step-by-step guidance on laying a patio on top of concrete, see our detailed how-to guide.
Can You Build a Patio on Top of Concrete? Guide & Options

When building over concrete makes sense (and when it does not)
Building over an existing slab saves you the cost of demolition, disposal, and new concrete work. A standard residential patio slab is typically 4 inches thick, which is the industry norm and meets the IRC R506.1 requirements for slab-on-ground construction. That thickness gives you a solid substrate for almost any finish material. The decision to build over versus tear out really comes down to three things: structural integrity, drainage slope, and crack severity.
Repair and overlay is almost always the right call when the slab is cracked but not moving, when settlement is minor and stable, or when the surface is just worn and ugly. Full replacement makes more sense when you have deep structural cracks with vertical displacement (one side higher than the other), when rebar corrosion staining is visible, when the slab is actively heaving from tree roots or frost, or when the concrete has crumbled and lost integrity. A rule of thumb I use: if the slab is solid underfoot when you jump on it and the cracks are not wider than about 1/4 inch with no vertical offset, you can almost certainly work with it.
| Condition | Recommended Action |
|---|---|
| Surface cracks, hairline to 1/4 in., no vertical offset | Repair and overlay or cover |
| Cracks wider than 1/4 in. with vertical displacement | Structural assessment; likely partial or full replacement |
| Minor settlement (one corner dropped 1/2–1 in.) | Mudjacking or polyjacking, then overlay |
| Active heaving (frost, roots) | Remove cause, then evaluate slab; may need replacement |
| Rebar corrosion staining | Engineer inspection; often requires partial replacement |
| Spalled, crumbling surface but solid base | Shot blast and resurface with polymer-modified topping |
| Adequate drainage slope (1/4 in. per ft) | Proceed with any overlay or cover option |
| Insufficient slope or water pools near foundation | Correct drainage first (build-up, channel drains) or replace |
Inspection and prep checklist before you touch a thing
Before you pick a surface material, spend an afternoon doing a proper inspection. I always take photos and measurements I can refer back to, because problems that seem minor at inspection become expensive failures after installation. Here is exactly what to check.
Structural integrity and settlement
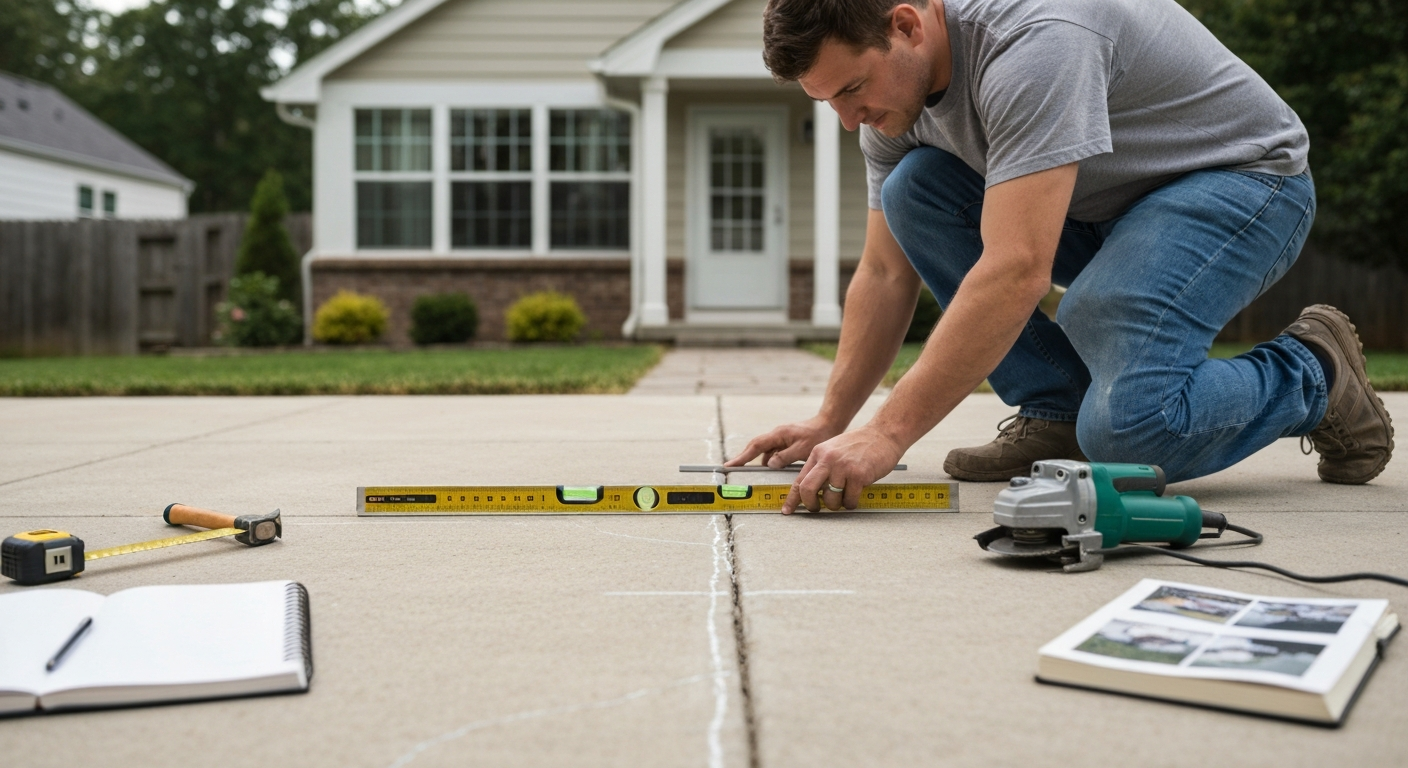
Walk every square foot of the slab and listen for a hollow sound when you knock with a hammer or your heel. Hollow spots mean the slab has lost contact with the ground underneath, which leads to cracking under load. Mark every hollow spot with chalk. Look for vertical displacement at any crack: place a straightedge across it and measure the height difference. Per ACI 224R guidance, cracks wider than about 1/4 inch (6 mm) or any crack with visible rebar staining should trigger a closer look before you proceed. If you see the slab moving or flexing when you walk near a crack, that is a red flag requiring a structural opinion.
Slope and drainage
IRC R401.3 requires that the ground around a foundation be graded so surface water drains away at a minimum fall of 6 inches within the first 10 feet. For a patio surface specifically, 1/4 inch per foot (about a 2% slope) is the practical standard that gives you reliable drainage and enough tolerance for construction variation. The minimum you can get away with is about 1/8 inch per foot, but I always aim for 1/4 inch per foot on any patio I work on. Use a 4-foot level and a tape measure or a digital level: place the level on the slab surface and measure the gap at the low end to calculate slope. If water is pooling anywhere on the existing slab, that problem will carry over to whatever you put on top of it unless you address it in the new surface build-up.
Cracking assessment
- Photograph every crack with a reference scale (a coin or ruler in the frame)
- Measure crack width at the widest point using a crack comparator card or feeler gauge
- Check for vertical displacement across each crack with a metal straightedge
- Note any staining (rust/brown = rebar corrosion; white/crystalline = efflorescence from moisture)
- Mark active cracks (ones that change width with temperature) versus dormant cracks
- Flag any crack wider than 1/4 in. or showing vertical offset for repair decision
Moisture testing
Moisture is the number-one cause of overlay and tile failures. For any bonded surface (tile, mortar-set pavers, overlays, adhesive systems), you need to know the slab's moisture vapor emission rate (MVER) or its internal relative humidity (RH). The industry standard tests are ASTM F1869 (calcium chloride test for MVER, reported in lb/1000 ft²/24 hr) and ASTM F2170 (in-situ probe for internal RH). The widely used pass/fail thresholds in the U.S. are an in-situ RH of 75% or less and an MVER of 3 lb or less per 1,000 ft²/24 hr, but always check the specific product's technical data sheet because some allow higher readings or require a specific moisture mitigation product. For a quick field check, tape a plastic sheet to the slab for 24 hours: moisture beads under the plastic mean you have a vapor issue to address.
Full inspection checklist
- Walk and tap the entire slab; mark hollow areas with chalk
- Measure and photograph all cracks (width, length, displacement)
- Check slope with a 4-foot level: confirm at least 1/4 in./ft fall away from the house
- Identify any low spots where water ponds (fill with leveling compound or build into new surface slope)
- Perform plastic-sheet moisture test; arrange ASTM F1869 or F2170 testing if bonded finishes are planned
- Inspect slab edges and perimeter for crumbling, spalling, or undermining
- Look for tree roots near or under the slab
- Check the thickness at any exposed edge (minimum 3.5 in.; 4 in. is standard)
- Photograph everything before any work begins
Repair and leveling: which method to use
Once you know what you are dealing with, pick the right repair approach. Using the wrong method wastes time and money, and a bad repair telegraphs through your new surface fast.
Crack repair
For dormant non-structural cracks (stable, no movement, no vertical offset), low-viscosity epoxy injection is the gold standard because it restores load transfer across the crack. For active cracks that open and close with temperature changes, epoxy will just re-crack because it is rigid: use a flexible polyurethane or polyurea sealant that can move with the crack. For the type of fine surface cracks you see on old patios, routing the crack with an angle grinder (a V-cut helps) and filling with a flexible sealant is fast and effective. Cracks wider than 1/4 inch or those with vertical displacement should get professional evaluation before you cover them up.
Concrete resurfacer
A polymer-modified cementitious resurfacer (products like Quikrete Concrete Resurfacer or Sakrete Flo-Coat) is perfect for slabs that are structurally sound but have a rough, pitted, or spalled surface. You clean and dampen the slab, broadcast the mixed resurfacer at 1/8 to 1/2 inch thick, and finish it with a squeegee and broom. It bonds to the existing concrete, gives you a fresh surface, and can accept stains and sealers once cured. This is not a structural fix, but for cosmetic issues it is the fastest, cheapest route.
Self-leveling underlayment
Self-leveling underlayment (SLU) from manufacturers like Mapei or ARDEX is what you reach for when the slab has low spots, an inconsistent surface, or a slope that needs correcting before tile or stone installation. Mapei, cementitious floor/overlay systems and technical guidance Mapei — cementitious floor/overlay systems and technical guidance. It flows out flat on its own to fill dips and create a level plane. Most products require a primed surface (do not skip this, the primer prevents rapid moisture loss that causes the SLU to crack) and have a maximum pour depth per lift, typically 1 to 1.5 inches. ARDEX PC-T, for example, installs from 3/8 inch up to 2 inches neat. Follow the product's technical data sheet exactly: surface prep, primer, mixing ratios, and pour temperature windows are all critical.
Mudjacking and polyjacking
When a section of the slab has settled (dropped lower than adjacent sections), you can lift it back into alignment rather than replacing it. Mudjacking pumps a cement-soil slurry through drilled holes to push the slab back up. Polyjacking (foam injection) uses expanding polyurethane foam instead: it is lighter, cures in minutes rather than days, gives finer lift control, and resists washout better. Mudjacking typically runs about $3 to $6 per square foot; polyjacking usually costs $5 to $25 per square foot depending on the job and your market. Either method is a pro job, and neither is appropriate if the slab is heavily cracked or structurally compromised. Full removal and replacement is the right call in those cases.
| Method | Best For | Typical Cost | DIY Friendly? |
|---|---|---|---|
| Epoxy injection | Dormant structural cracks | Material ~$15–$40/crack | Yes, with kit |
| Flexible sealant (polyurethane/polyurea) | Active or moving cracks | ~$5–$15/crack | Yes |
| Concrete resurfacer | Spalled/pitted surface, thin cosmetic layer | $0.15–$0.50/ft² material | Yes |
| Self-leveling underlayment | Low spots, uneven surface before tile/stone | $1–$3/ft² material | Yes, with prep |
| Mudjacking | Settled slab sections, minor lift needed | $3–$6/ft² installed | No, hire out |
| Polyjacking | Settled slab, faster cure, more precision | $5–$25/ft² installed | No, hire out |
| Full replacement | Structural failure, heaving, corrosion | $6–$12/ft² installed | No |
Getting the substrate ready for whatever goes on top
This is the step most DIYers rush, and it is where most failures start. Proper substrate prep is not glamorous work, but it is what determines whether your new surface lasts 20 years or starts failing in 2.
Cleaning
Every speck of grease, oil, paint, sealant, and efflorescence has to come off before anything bonds to that slab. Pressure wash at minimum. For oil stains, use a degreaser first, let it dwell, then scrub and rinse. Old sealers need to be stripped with a chemical stripper or mechanically removed. Any loose or flaking concrete must be removed. ICRI Guideline 310.2 defines Concrete Surface Profile (CSP) ratings from 1 to 10 and specifies which mechanical methods achieve each profile. For bonded overlays and cementitious toppings you typically need CSP 3 to 5 (achieved by diamond grinding or shot blasting); for thicker bonded overlays and toppings you may need CSP 5 to 9. Light epoxy coatings need only CSP 1 to 3. If you are setting tile with thinset, diamond grinding to achieve a clean, open-pore surface profile is usually sufficient and is a job you can rent equipment to do yourself.
Primers
Almost every overlay and SLU system requires a primer coat before application. The primer seals the concrete pores, controls substrate suction (which can cause rapid moisture loss and poor bonding), and improves adhesion. Use only the primer specified by the product manufacturer, applied at the rate they call for. Trying to skip the primer to save time is almost always a false economy.
Moisture barriers and membranes
If moisture testing shows the slab is too wet for the planned product, or if you are installing in a climate where the slab sits on grade and groundwater is a factor, you need a moisture mitigation layer. Options include two-component epoxy moisture barrier coatings (applied directly to the concrete and allowed to cure before the overlay), and uncoupling/vapor-control membranes such as Schluter DITRA, which bond to the concrete with unmodified thinset and provide both uncoupling and moisture management for tile installations. The Schluter DITRA handbook requires unmodified thinset mortar to bond the membrane to concrete (not polymer-modified) and has specific conditions for its use as a moisture layer. blank" rel="noopener noreferrer">Schluter®‑DITRA Product / Installation Information (Schluter‑Systems) states the membrane must be bonded to concrete with an unmodified thin‑set mortar and specifies the conditions under which DITRA may be used as an uncoupling and vapor‑control layer; follow the manufacturer's installation handbook exactly. Always follow the manufacturer's installation handbook exactly.
Bond coats
For cementitious overlays and toppings, a bond coat (a slurry of Portland cement, water, and sometimes polymer admixture, brushed onto the primed and dampened concrete just before the topping is applied) greatly improves adhesion. The topping must go down while the bond coat is still wet and tacky. If the bond coat dries before the topping arrives, it acts as a bond breaker. Work in manageable sections and coordinate your mixing and placing to keep that window open.
Expansion, control, and isolation joints: do not skip these
Joints are your insurance policy against cracking. Every overlay, tile installation, and structural addition over a concrete slab needs a thought-out joint strategy, and the original slab's existing joints must be honored and carried through into the new surface. Here is how it works for each type of installation.
Overlays and toppings
Bonded cementitious overlays must have the existing control and construction joints re-established at the same locations in the new topping. Sawcut or tool these joints through the full depth of the overlay to the original joint. If you do not, the overlay will crack at those locations anyway, but in a ragged uncontrolled way. At the perimeter where the overlay meets the house, a step, or another structure, install a 1/4 inch foam isolation joint before pouring to allow independent movement.
Tile and stone installations
ANSI A108 and the TCNA Handbook both require movement joints in tile installations over concrete. The TCNA's EJ171 detail specifies that movement joints be placed at all changes of plane, at perimeters, at all structural joints in the substrate, and at a maximum of 8 to 12 feet in each direction for interior work (closer spacing for exterior/exposed installations). Movement joints in the tile work must align directly over any control or construction joint in the slab. These joints are filled with a compressible sealant (silicone or polyurethane caulk) matching the grout color, not with grout.
Pavers set on mortar or thinset
The same principle applies to mortar-set or thinset-set brick and pavers: honor the slab's existing joints and establish perimeter isolation. For large paver fields, plan movement joints every 10 to 15 feet and pack them with a flexible sealant, not mortar. Dry-laid pavers on sand or pedestals naturally accommodate movement because the system is not bonded, so joint requirements are less critical, but you still want the bedding layer to end at the slab's existing control joints to prevent differential movement from telegraphing to the surface.
Decking systems and sleepers
When building a wood or composite deck over concrete on sleepers, the deck framing is not bonded to the slab, so it moves independently. No special joint treatment is needed in the slab itself, but you need to maintain clearance between the slab surface and any wood members (minimum 3/4 inch) to allow drainage and airflow and prevent rot. Sleepers should be anchored to the slab with concrete screws (Tapcon style) at 16 to 24 inch intervals to prevent lateral shifting.
Frost and freeze-thaw: what your climate means for material choice
If you live anywhere that gets below freezing in winter, freeze-thaw cycling is a critical factor in choosing and detailing your new patio surface. Water expands about 9% when it freezes. Any water that gets into the mortar bed, grout joints, or the pores of the finish material and then freezes will eventually cause spalling, cracking, or bond failure.
Material selection for cold climates
Choose materials rated for exterior freeze-thaw exposure. For tile and stone, specify frost-rated materials with a water absorption of 0.5% or less (porcelain tile meets this; many natural stones do not without sealing). For pavers, use concrete or clay pavers rated for severe weathering (ASTM C936 for concrete pavers; ASTM C902/C1272 for clay). Concrete overlays should use a polymer-modified mix rated for exterior exposure, and they benefit from an air-entraining admixture to build in freeze-thaw resistance.
Joint design for freeze-thaw zones
In cold climates, widen your movement joint spacing slightly and use a high-quality, cold-rated silicone or polyurethane sealant that stays flexible at low temperatures. Standard latex caulks get brittle and fail in cold weather. Polymeric sand in paver joints performs significantly better than plain sand in freeze-thaw conditions because it resists washout, weed penetration, and freeze-thaw disruption. Seal tile and natural stone installations with a penetrating sealer before winter to minimize water absorption.
Region-specific tips
- USDA Hardiness Zone 6 and colder (most of the northern U.S.): avoid thin mortar-set natural stone unless it is sealed annually; prefer pedestaled systems or dry-laid pavers that can flex
- Freeze-thaw zones: avoid non-frost-rated ceramic tile outdoors entirely; use only porcelain or rated natural stone
- Areas with de-icing salt use: avoid exposed aggregate or broom-finish overlays without a quality sealer; salt accelerates spalling; use a penetrating silane/siloxane sealer
- Mild climates (Zone 9+): freeze-thaw is not a factor; you have full flexibility on material choice; focus instead on UV stability and heat retention of dark surfaces
Every surface option compared: what to put on that concrete
Here is where the fun part starts. Once your slab is assessed, repaired, and prepped, you have a wide range of surface options. The right choice depends on your budget, climate, DIY skill, and how you want the space to look and feel. Below is a comparison of every practical option, followed by a deeper dive into the most popular one.
| Surface Option | Typical Cost (installed, per ft²) | Lifespan | DIY Difficulty | Freeze-Thaw OK? | Best For |
|---|---|---|---|---|---|
| Brick/concrete pavers (dry-laid on sand) | $8–$20 | 20–30+ yrs | Moderate | Yes (rated pavers) | Classic look, easy repair |
| Brick/pavers (mortar/thinset set) | $15–$30 | 25–40 yrs | Moderate-Hard | Yes with joints | Permanent, formal look |
| Porcelain/stone tile (thinset) | $15–$35 | 20–30 yrs | Hard | Yes (frost-rated only) | Modern, clean aesthetic |
| Concrete overlay/resurfacer | $3–$10 | 10–20 yrs | Moderate | Yes (polymer-modified) | Budget refresh, custom color |
| Concrete stain + sealer | $1–$4 | 5–10 yrs (re-seal) | Easy | Yes | Lowest cost refresh |
| Composite/wood deck on sleepers | $20–$45 | 15–30 yrs | Moderate | Yes | Elevated feel, warmth underfoot |
| Artificial turf | $8–$20 | 8–15 yrs | Easy-Moderate | Yes | Low maintenance, kids/pets |
| Patio cover/pergola/roof over slab | $25–$80+ | 20–50 yrs | Hard (permits needed) | N/A | All-weather use, shade |
For most homeowners wanting a classic, durable look with reasonable DIY difficulty, brick or concrete pavers are the top choice. Concrete overlays win on pure budget. Decking systems are the best option when you want a warm, wood-feel surface or need to hide a slab that is too rough to tile over cleanly. A patio roof or pergola is a separate structural project that works alongside any surface choice. If you need details on designing and constructing a cover, see our guide on how to build a roof over a concrete patio. If you are considering a roof structure, that involves footings, permits, and load checks that are beyond surface overlay work.
Brick and pavers over concrete: the full how-to
Laying brick or pavers over an existing concrete slab is one of the most rewarding DIY patio projects you can tackle. The slab does all the structural work; you are essentially creating a new decorative surface layer. There are three main installation methods to choose from depending on your goals and budget. For step-by-step instructions on how to build a brick patio on top of concrete, consult a dedicated how-to guide that walks through prep, jointing, and the three main installation methods. For step-by-step guidance and tool lists on how to lay a patio on existing concrete, consult the dedicated how-to guide. For step-by-step instructions on how to lay a patio on a concrete base, see our detailed guide on how to lay a patio on a concrete base.
Choosing your installation method
| Method | How It Works | Added Height | Permanence | Best For |
|---|---|---|---|---|
| Dry-laid on sand bed | 1 in. of coarse sand or stone dust screeded over concrete; pavers set and tamped | ~1.5–2.5 in. | Semi-permanent (removable) | DIY-friendly, large areas, budget-conscious |
| Thinset (full bond) | Polymer-modified thinset mortar applied to concrete; pavers pressed and set | ~1–1.5 in. | Permanent | Formal look, freeze-thaw climates, no flex in slab |
| Mortar bed | 1–1.5 in. mortar bed floated over concrete; brick set into wet mortar | ~2–3 in. | Permanent | Traditional brick, irregular units, slight leveling needed |
| Pedestal/raised system | Plastic or adjustable pedestals at corners; pavers rest on top | 2–12+ in. adjustable | Non-permanent | Rooftop decks, drainage beneath, precision leveling |
Materials list
- Brick or concrete pavers (measure area + 10% waste)
- Coarse washed sand or stone dust (dry-lay method) OR polymer-modified thinset (bonded method)
- Polymeric jointing sand OR sanded grout (bonded method)
- Paver sealer (optional but recommended)
- 4-ft level and string lines
- Rubber mallet
- Plate compactor (rental, for dry-lay method over larger areas)
- Wet saw or angle grinder with diamond blade for cuts
- Notched trowel (3/8 in. square notch for thinset method)
- Broom for sweeping in jointing sand
- Flexible sealant (color-matched) for perimeter and control joints
Step-by-step: dry-laid pavers on sand
- Clean the slab thoroughly (pressure wash, degrease as needed) and allow to dry completely
- Check and correct drainage slope; the sand bed must maintain the same slope as the slab (1/4 in./ft minimum)
- Install edge restraints around the perimeter: plastic or aluminum paver edging spiked into the slab with Tapcon screws or spiked into adjacent soil
- Spread 1 inch of coarse washed concrete sand or stone dust over the slab; do not use play sand (too fine, compresses unevenly)
- Screed the sand flat using 1 in. diameter conduit pipes as guides; pull off the rails and fill the channels
- Lay pavers in your chosen pattern starting from a corner or a center line; keep joints tight (1/8–1/4 in.)
- Use a rubber mallet to seat each paver; check level frequently and add or remove sand under units as needed
- Cut edge pavers with a wet saw or angle grinder diamond blade
- Compact the finished surface with a plate compactor (with a rubber pad to protect paver faces)
- Sweep dry polymeric sand across the entire surface, working it into all joints; repeat until joints are full
- Activate polymeric sand with a fine mist of water per manufacturer instructions; allow to cure
- Apply a paver sealer 48–72 hours after completion if desired
Step-by-step: thinset-bonded pavers
- Clean and profile the slab surface (diamond grind to achieve a clean, open profile; remove all sealers and oils)
- Test for moisture; in-situ RH must be at or below the thinset manufacturer's threshold (typically 75%); apply epoxy moisture barrier if over threshold
- Snap layout lines for your pattern and plan your joint locations to align with existing slab control joints
- Mix polymer-modified exterior thinset per manufacturer instructions
- Back-butter each paver and apply thinset to the slab with a 3/8 in. square-notched trowel; press paver firmly with a slight twisting motion
- Use 1/8–1/4 in. tile spacers to maintain consistent joint width
- Check for lippage with a straightedge as you go; adjust immediately before thinset sets
- Let thinset cure 24–48 hours before grouting or walking on surface
- Pack movement joints (over slab control joints and at perimeter) with backer rod and fill with flexible exterior sealant; do not use grout in these locations
- Grout remaining joints with sanded exterior-rated grout; tool joints and wipe haze before full cure
- Seal grout joints with a penetrating sealer after full cure (typically 28 days)
Jointing: sand vs polymeric sand vs mortar
Plain coarse sand in joints works but washes out with heavy rain, invites weeds, and can freeze-thaw loose in cold climates. Polymeric sand is treated with a polymer binder that activates with water and hardens to a firm, flexible joint that resists washout, weeds, ants, and freeze-thaw disruption. It costs a bit more (about $25 to $50 per 50-lb bag vs $5 to $8 for regular sand), but the performance difference is substantial. For mortar-set pavers and brick, sanded grout or mortar joints are used instead, but you must include flexible sealant at all movement joint locations.
Sealing: yes or no?
Sealing pavers is optional but genuinely extends their life and simplifies maintenance, especially in wet or freeze-thaw climates. A penetrating silane/siloxane sealer repels water and de-icing salt without changing the surface appearance. A film-forming sealer (acrylic or polyurethane) adds sheen and enhances color but must be reapplied every 2 to 3 years. Seal only after jointing sand is fully cured, and make sure the surface is completely dry. Do not seal pavers you plan to walk on with regular shoes without adding a slip-resistant additive to the sealer.
Cost, time, and DIY difficulty
For a typical 200 square foot patio, a dry-laid paver project takes one motivated DIYer about two full weekends: one for prep and repair, one for laying and finishing. Material costs run roughly $600 to $1,800 depending on paver type and quality. A thinset-bonded installation is harder and slower, typically requiring 3 to 4 days of work spread over a week to allow cure times. Professional installation of either method runs $15 to $30 per square foot installed. The dry-lay method is the better DIY starting point: any setting mistakes are easy to correct before you compact, and the system is forgiving of minor slab imperfections.
Common failures and how to avoid them
- Pavers rocking or sinking: caused by inadequate or uneven sand depth or hollow spots in slab; fix by lifting affected pavers, re-screeding sand, and resetting
- Cracked pavers over slab control joints: caused by not honoring slab joints; leave a flexible joint or gap in the paver field at every slab control joint
- Thinset bond failure (tiles or pavers popping up): caused by skipping moisture testing, using the wrong thinset, or not achieving proper surface profile; prevention is the only cure
- Efflorescence (white salt staining) on pavers: caused by moisture migrating through mortar and depositing salts; use a penetrating sealer and ensure drainage slope is adequate
- Polymeric sand washing out: caused by activating with too much water (flooding) or heavy rain within 24 hours of installation; check weather forecast before sweeping
- Paver edging shifting: caused by inadequate anchoring; use concrete screws into the slab at 12-in. intervals rather than relying on spikes into sand
Where to go from here
Building over existing concrete is almost always the practical choice when the slab is structurally sound. The inspection and prep work is where you earn your durable result: skip it and you are setting yourself up for a failure that costs more to fix than the original project. Start with a thorough assessment using the checklist above, repair what needs repairing, profile and prime the surface for whatever system you choose, and plan your joints before you set the first paver or spread the first trowel of mortar. If you are leaning toward pavers, the dry-laid method is the most forgiving DIY route and gives you a surface you can adjust and repair without heavy tools. If you want a bonded, permanent finish, make sure your moisture testing passes and honor every joint in the system. The slab you have is usually the slab you can build on.
FAQ
Can you build a patio on top of existing concrete?
Yes — in most cases you can install a new patio finish over an existing concrete slab if the slab is structurally sound, has acceptable slope/drainage, no active settlement, and can be prepared to meet the material manufacturer's substrate requirements. Common approaches include laying pavers or brick, installing tile over an uncoupling membrane, applying a cementitious overlay or stain, building a sleeper/deck system on pedestals, or adding artificial turf. If the slab has structural problems (large displacement, wide/open cracks, undermining, heavy rebar corrosion), full replacement is usually required.
How do I inspect the slab and what are the pass/fail checks before building over it?
Inspection & prep checklist: - Structural/settlement: look for vertical displacement, differential settlement, heaved corners, and step offsets >1/4 in. over short distances; measure level across slab. - Slope/drainage: confirm positive slope away from building — industry recommends ≈1/4 in./ft (≈2%) target; minimum working slope often 1/8 in./ft. - Cracking: note width, length, and active movement. Cracks >1/4 in., cracks with vertical offset, or those showing rebar corrosion warrant engineer review or replacement. - Moisture: test for moisture vapor — ASTM F2170 (in‑situ RH probes) or ASTM F1869 (calcium‑chloride) per manufacturer limits (common thresholds: RH ≤75% or MVER ≤3 lb/1000 ft²/24 hr, but verify product TDS). - Surface condition: check for spalling, scaling, laitance, oil/contaminants, and the required Concrete Surface Profile (CSP) for overlays. Photograph cracks, drainage relative to the house, and slab edges for permit/consultation.
What surface options are practical to install over concrete and how do they compare?
Surface options (summary): - Brick / pavers: Pros — durable, attractive, easy to repair; can be installed directly on mortar or on a thin-bed / pedestal system; good for freeze‑thaw if proper joints used. Cons — heavier, may require mortar or polymeric jointing; must accommodate movement joints. - Tile (ceramic/porcelain/stone): Pros — many styles, thin and low-profile; tile over uncoupling membranes (DITRA) or direct-bond with appropriate thinset. Cons — adhesives require low-slab moisture or mitigation; freeze-thaw ratings must be appropriate; grout joints and movement joints critical. - Concrete overlays / resurfacers / stains: Pros — restore finish, economical, can match slope and level; many finishes available. Cons — require correct CSP, priming, and thickness limits; overlays can delaminate if prep is poor. - Decking systems (sleepers/pedestals with wood/composite): Pros — raise finished height, conceal bad concrete, excellent drainage and air gap. Cons — more material/cost, fastener/anchoring details near structures, potential for water trapping if not detailed. - Artificial turf: Pros — quick install, hides poor finish, low maintenance. Cons — drainage must be provided, edge detailing and infill selection important. - Roof/cover/awning over concrete: Pros — protects surface, increases useability. Cons — columns/anchors need structural checks and flashing; permits often required. Choice depends on slab condition, moisture, slope, climate (freeze‑thaw), aesthetics and budget.
What are repair and leveling methods for an uneven or cracked slab?
Repair & leveling methods: - Crack repair: routing and sealing with flexible exterior sealant for non-structural cracks; epoxy injection for dormant structural cracks to restore load transfer; polyurethane injection for active, leaking cracks. - Resurfacer / overlay: apply polymer-modified cementitious overlays (adhering to TDS thickness limits) to repair spalled areas and create a uniform finish. - Self-leveling underlayment: pumpable polymer-modified self-leveler for thin levelling prior to tile or overlays; substrate prep and priming required. - Mudjacking (slab jacking): injecting cement slurry under slab to lift settled areas — economical but heavier. - Polyurethane foam (polyjacking): injected foam to lift slab — lighter, fast, fine control. - Full-depth replacement: remove and pour new slab when slab is undermined, heavily cracked, or structurally deficient. Selection depends on cause, extent, and cost.
How should I prepare the concrete surface before installing a new patio finish?
Substrate preparation checklist: - Clean: remove dirt, oil, grease, efflorescence, paint, and organic growth using pressure washing, degreaser, or appropriate cleaners. - Mechanical profile: achieve required CSP per product TDS/ICRI (diamond grind, shotblast, or scarify). - Repair & fill: fix spalls, patch voids, and treat cracks per repair plan. - Moisture testing: perform ASTM F2170 or F1869 and follow material limits; use moisture mitigation (epoxy vapor barrier or vapor suppression membrane) if needed. - Primers & bond coats: apply manufacturer-specified primer for overlays/self-levelers/adhesives. - Membranes: install uncoupling and/or waterproofing membranes (e.g., DITRA or liquid-applied membranes) where required by tile or stone system. - Bond coat: use specified unmodified or polymer-modified thinset or bond slurry per membrane/manufacturer instructions.
What are the main installation methods and materials for each surface type?
Installation methods & materials (high-level): - Brick/pavers on concrete: methods include thin-bed mortar set (mortar bed or dry-set with sand/polymeric jointing) or pedestal/sleeper system for raised pavers. Materials: cement mortar (Type S or specified mix), polymeric sand or joint mortar, edge restraint mortar, unmodified thinset when required by membrane. - Tile/stone: typical system uses uncoupling membrane (DITRA) set with unmodified thinset, followed by appropriate thinset mortar (ANSI A118.4/A118.15 polymer-modified) and grout. For direct-bond tile, use manufacturer-approved thinset and ensure substrate moisture is within limits. - Concrete overlay/resurfacer: clean & profile slab, apply primer/bond coat, mix polymer-modified overlay (microtopping or screed) to specified thickness, trowel/finish, cure per TDS. - Deck over concrete (sleepers/pedestals): set sleepers on shims or pedestals, install pressure-treated or composite decking, fasten with recommended fasteners; include drainage gap and ventilation. - Artificial turf: install drainage mat or layer of aggregate, adhesive or perimeter anchoring, turf with infill. - Roof/cover: design columns and footings or mechanical anchors into slab per structural requirements; flashing and waterproofing where roof meets house required. Follow product technical data sheets for exact materials and mixes.