The right concrete patio fix depends on what you're actually dealing with: a hairline crack gets a flexible sealant, a spalled or pitted surface gets a resurfacer, and a sunken or heaving slab needs foam lifting or full replacement before any cosmetic work makes sense. Pick the wrong repair and you'll be back out there in a season. This guide walks you through diagnosing your exact problem, prepping the surface correctly, choosing and applying the right repair product, and finishing and sealing so the fix lasts.
Concrete Patio Fix: Diagnose Cracks, Level, Patch, Resurface

Silas Morrison
2 May 2026
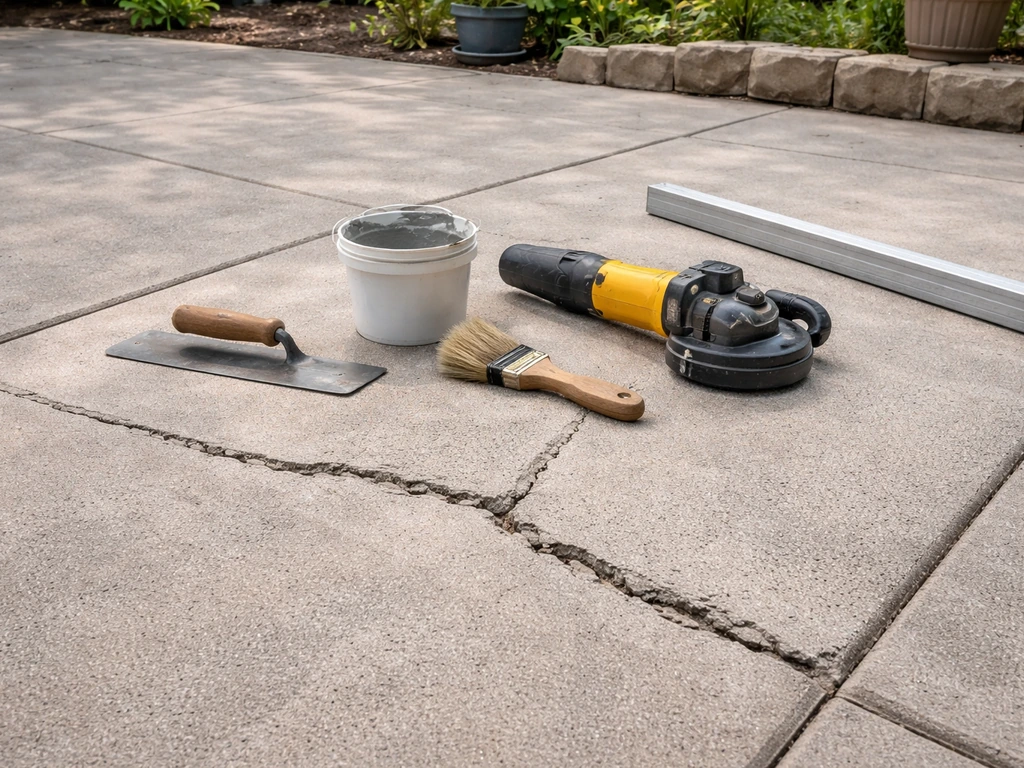
Figure out exactly what's wrong first
Before you buy anything or mix anything, spend ten minutes walking your patio and looking closely. Most patio damage falls into one of four categories, and they each call for a completely different fix.
Cracks
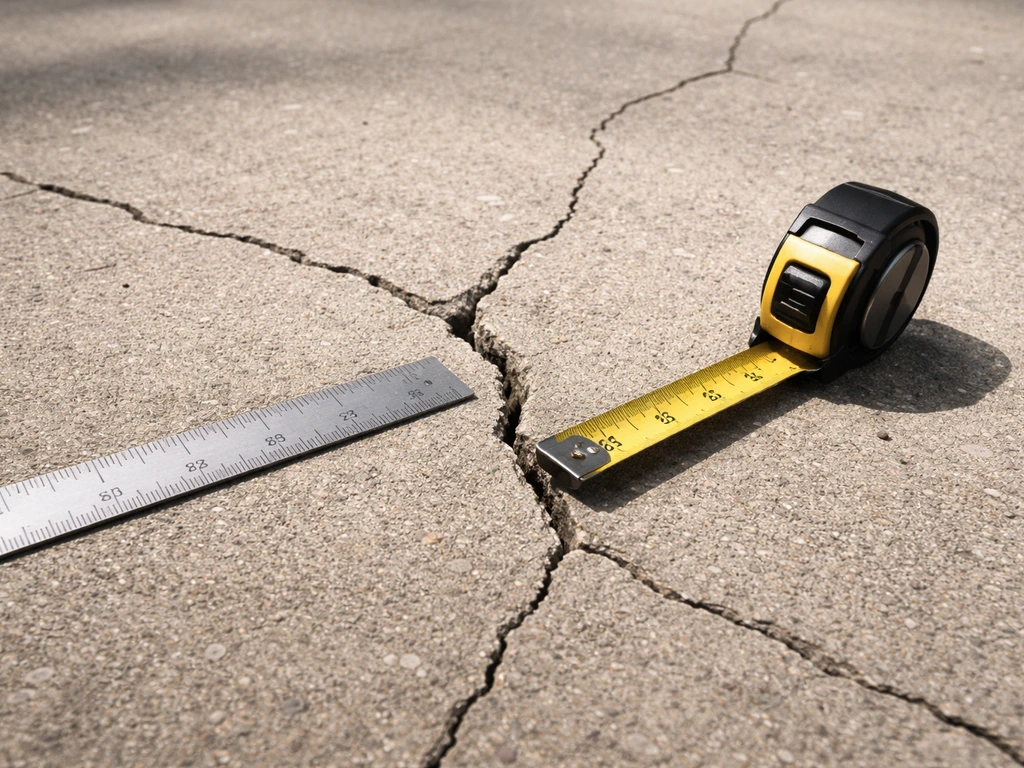
Hairline cracks (under 1/8 inch wide) are usually cosmetic and just need to be sealed so water can't get in and widen them later. Wider cracks, especially ones with vertical displacement where one edge is higher than the other, suggest movement underneath. Map cracking or crazing, which looks like a network of shallow hairline cracks covering a surface area, is typically a surface-only problem caused by curing issues or freeze-thaw wear. Run your finger across a crack: if one side is noticeably higher, you have a settling issue, not just a crack.
Spalling and surface deterioration
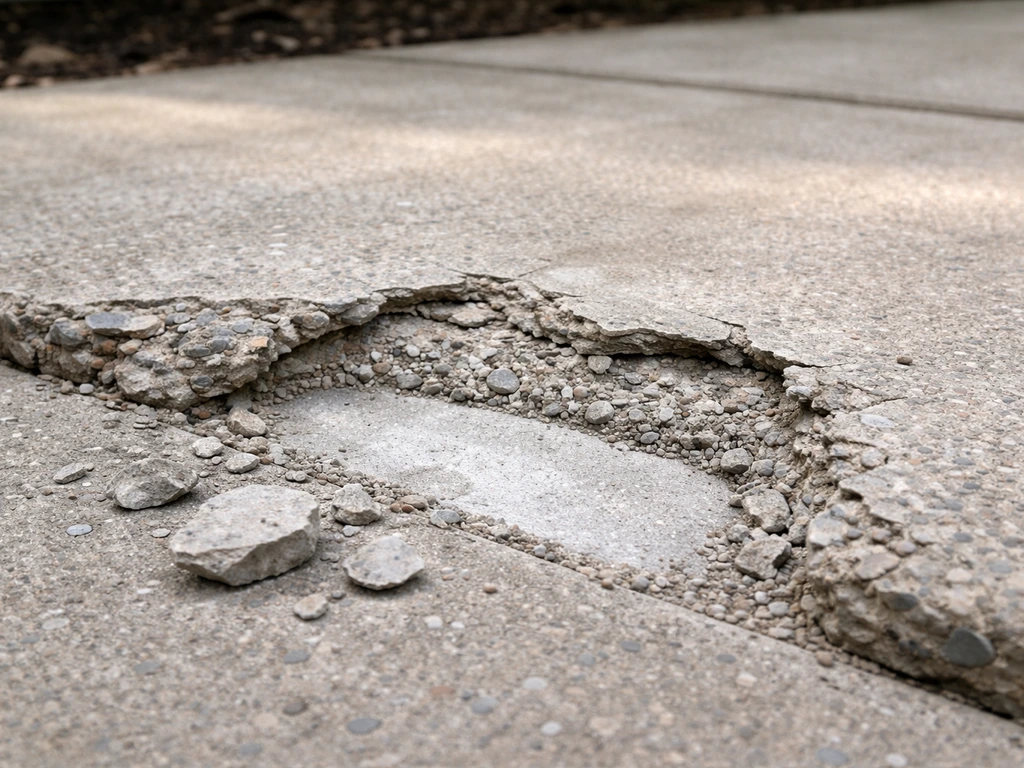
Spalling is when the top layer of concrete flakes, chips, or peels away. It starts at the surface and works deeper if you ignore it. Early spalling looks like shallow pop-outs and exposed aggregate. Advanced spalling exposes rebar, and once you see rust streaks coming off rebar, the deterioration has been going on for a while and is accelerating. Spalling and surface pitting are often caused by freeze-thaw cycles: water saturates the concrete, freezes, expands, and breaks off the surface layer. You might also see it from deicing salt damage or a bad original pour.
Sinking or uneven sections
If part of your patio has dropped lower than adjacent sections, or if one slab panel is tilted, the base underneath has shifted. Common causes include soil washout, poor compaction when the patio was originally poured, and tree root uplift (which can actually push sections up rather than down). Press down on the edges of a sunken panel. If it rocks or flexes, there's a void underneath. A repair that doesn't address the void or movement source will fail quickly.
General wear and dull, rough appearance
If the surface is just tired-looking, rough, lightly pitted, or stained but structurally sound, you're looking at a resurfacing or coating job rather than a structural repair. This is the easiest category to work with.
Diagnose what caused it (and spot the structural red flags)
Knowing the cause tells you whether a DIY fix will actually hold. Here's what to look for and what it means.
| What you see | Likely cause | DIY-fixable? |
|---|---|---|
| Hairline surface cracks, crazing | Freeze-thaw cycling, original curing shrinkage | Yes |
| Flaking/spalling surface, no rebar visible | Freeze-thaw damage, deicing salts | Yes, with resurfacer |
| Exposed or rusting rebar | Long-term moisture penetration, deep deterioration | Borderline — assess depth |
| One slab section lower than adjacent | Soil washout, poor base compaction | Yes, with foam lifting or mudjacking |
| Section pushed up, tilted | Tree root uplift, frost heave | Only after addressing root/void cause |
| Wide crack with vertical offset | Active settling or heaving underneath | Address base first, then repair |
| Uniform surface wear, dull color | Age, traffic, UV exposure | Yes, resurface or seal |
The structural red flag to watch for is vertical displacement. A crack that just runs horizontally through a slab with both edges at the same level is manageable. A crack where one side is a half-inch higher than the other means the ground underneath is moving. Patching over active movement is money wasted. If you see rebar and the rust has caused the concrete above it to delaminate in chunks, probe the surrounding area with a hammer: a hollow sound means the concrete is delaminating below the surface, and that material needs to come out before any repair goes on top. Visually bad spalling can still underestimate how much unsound concrete is actually present.
Surface prep: the step most people skip (and regret)
I'll be honest: prep is where most DIY concrete repairs fail. A bonding repair material needs to penetrate and fuse into the concrete's pore structure. If there's a layer of dirt, oil, loose concrete, or old sealer between the old concrete and your new material, the repair will pop off. Every extra hour you spend on prep pays off in years of repair life.
Remove all loose and unsound material
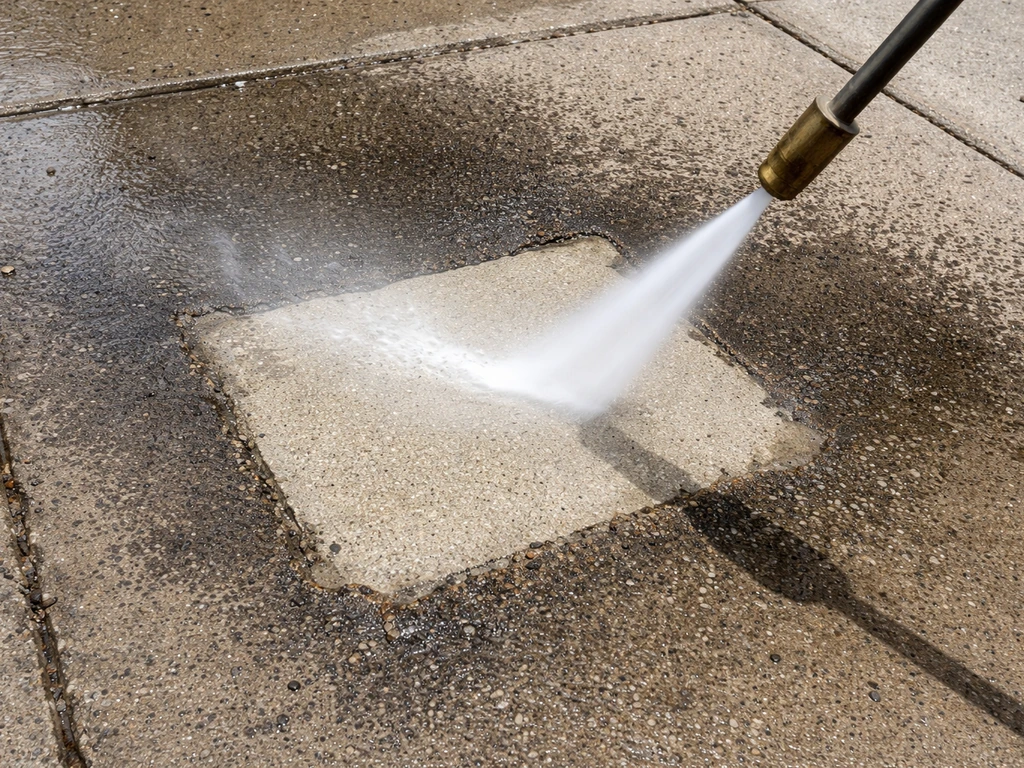
Use a hammer and cold chisel or an angle grinder with a grinding disc to chip out any concrete that sounds hollow or is already delaminating. Don't try to patch over loose material, it won't bond. GSA guidance also emphasizes removing all unsound concrete and contaminants so the repair bonds to a clean, sound substrate. For spalled areas, chip back to solid concrete, even if that means making the repair area slightly larger and deeper. Undercut the edges slightly (angle your chisel inward) so the patch has mechanical grip and won't pop out as a clean disk.
Clean the surface thoroughly
Pressure wash the entire repair area and let it dry. If there's oil or grease, scrub with a concrete degreaser first. Remove any efflorescence (the white chalky deposit) with a diluted muriatic acid wash, followed by a thorough rinse. Old sealer needs to be mechanically abraded or chemically stripped, new material won't bond to a sealed surface. If you're doing a full resurfacing job, rent a floor grinder or use a concrete scarifier to open up the surface texture across the whole area.
Apply a bonding agent or dash coat for overlays
For patch repairs deeper than about 1/2 inch, brush on a concrete bonding adhesive (like QUIKRETE Concrete Bonding Adhesive) and let it get tacky before applying your patch mix. For resurfacer products, the bonding step is usually a thin dash coat: mix the resurfacer to a slurry consistency and scrub it forcefully into the damp (not wet-puddle-wet) concrete surface with a stiff brush. QUIKRETE's Concrete Resurfacer application guidance describes working the thin dash coat into the surface, smoothing with a magnesium darby or float, and applying a broom or plastic trowel finish immediately blank" rel="noopener noreferrer">For resurfacer products, the bonding step is usually a thin dash coat. This mechanical engagement with the substrate is what makes the overlay stick. QUIKRETE's Concrete Resurfacer data sheet specifically describes this dash coat step before building to final thickness.
Choose the right repair for your damage type
Cracks: sealant or epoxy injection
For hairline to 1/4-inch cracks that show no vertical offset, a flexible polyurethane crack sealant is the right call. QUIKRETE makes a polyurethane concrete crack sealant specifically for this, it stays flexible, which is critical because concrete moves slightly with temperature. Don't use rigid patching mortar in a crack; it'll re-crack at the edges. For wider cracks or cracks in a structural application, low-viscosity epoxy injection (like the Sika Sikadur Crack Repair Kit) fills the crack and bonds both sides together. Injection ports get drilled at 45-degree angles, roughly 4 inches deep, intersecting the crack, and resin gets pushed through from the lowest or narrowest point and worked upward. Crack injection is more involved and worth researching further if you have a significant structural crack.
Spalling and pitting: patch or resurface
Isolated spalled areas (a few square feet) can be patched with a vinyl concrete patcher or polymer-modified repair mortar. Mix to a stiff peanut-butter consistency, pack it into the prepped area firmly, and trowel smooth. For widespread spalling across most of the patio surface, a full resurfacer makes more sense than patching dozens of spots. QUIKRETE Concrete Resurfacer and Sakrete Flo-Coat are both good polymer-modified, cement-based options designed for patios and driveways. Flo-Coat can go from 1/2 inch down to a feather edge in one pour. QUIKRETE Resurfacer builds at about 1/8 inch per layer and has a working time of roughly 20 minutes at 73°F, so work in manageable sections. If you have deeper pitting, there's a companion guide specifically covering how to fix a pitted concrete patio worth checking out.
Sinking sections: foam lifting or mudjacking
If a slab section has sunk and there's a void underneath, you need to fill that void before the slab will be stable. Mudjacking (pumping a slurry underneath through drilled holes) is the traditional method and is usually a pro job. Polyurethane foam lifting (sometimes called polyjacking) uses expanding foam injected through small holes to fill voids and lift the slab. Foam lifting is lighter, faster-curing, and available as a DIY option through some rental outlets, though it's more expensive per unit than mudjacking. If tree roots are causing uplift, address the root first (trim or remove) before you repair, or the repair will just fail again.
Old, worn-out surface: full resurfacing
If the slab is structurally sound but just looks rough and tired, a resurfacer is the most cost-effective approach. You're essentially giving the patio a new 1/8-to-1/2-inch wearing surface. This is also the path for old patios where surface-level crumbling has become widespread. If the surface is crumbling or failing, you'll usually be looking at patching or resurfacing rather than just sealing cracks. If you’re aiming to fix old concrete patio sections that are rough, cracked, or worn out, start by identifying the damage type so you pick the right resurfacing or patch approach. Related reading on fixing old and crumbling concrete patios covers those scenarios in more depth.
Finishing so the repair blends in
A repair that's technically solid but looks patchy is still annoying to live with. Here's how to get the finish right.
Troweling for smooth patches
For patch repairs, use a steel finishing trowel to work the surface in overlapping arcs while the material is still workable. Apply light pressure and keep the trowel angle low. If the patch starts dragging or tearing, you've waited too long, work faster next time or mix in smaller batches. For a patio (which usually has a broom finish for texture and traction), drag a soft-bristle brush across the surface just before it fully sets to match the existing texture.
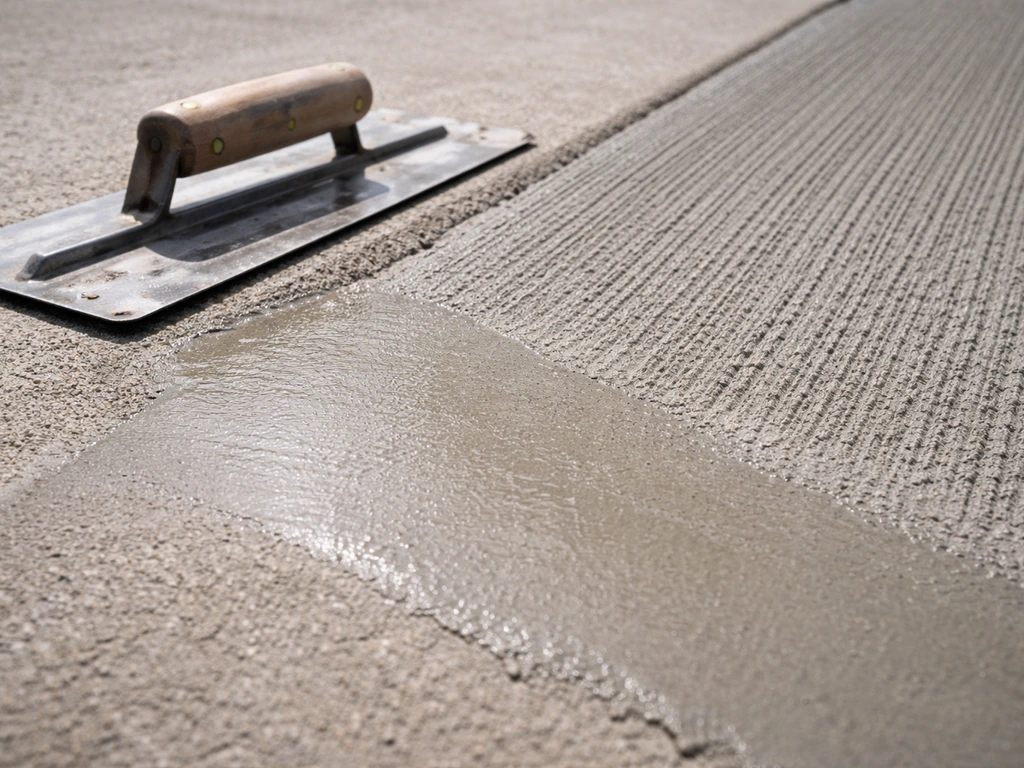
Floating and brooming resurfaced areas
For resurfacer, use a magnesium darby or long-handled squeegee to spread the material evenly and knock down high spots. QUIKRETE's application guidance specifically calls out a magnesium float for this step. Then broom-finish before it sets. Matching the existing broom direction and pressure takes a little practice, do a test stroke on a corner first.
Grinding high spots
If a patch cures slightly proud of the surrounding surface, use an angle grinder with a diamond cup wheel or a handheld belt sander to bring it level. Feather the edges by grinding a few inches into the existing concrete around the patch perimeter so there's no hard line.
Curing, sealing, and refinishing to protect the repair
Curing the repair
Concrete repair materials need moisture to cure properly. As soon as the surface is hard enough to touch without marking, start misting it lightly with water and cover with plastic sheeting or burlap. Do this for at least 24 to 48 hours, and ideally 72 hours. Don't let it dry out quickly in direct sun or wind, that's how you get shrinkage cracks in the repair itself. SikaQuick Concrete Resurfacer's data sheet specifies starting moist curing immediately after finishing. QUIKRETE's guidance echoes this: mist and protect as soon as the material can be protected without damage. Alternatively, Sakrete recommends applying their Cure 'n Seal product right after the broom finish to both cure and start sealing in one step.
Sealing for long-term protection
Seal the repaired area (and ideally the whole patio) once the repair has fully cured. For a fresh pour or repair, wait at least 28 days before applying a penetrating sealer, and make sure surface moisture is low (below about 4% moisture content). Penetrating sealers (silane, siloxane, or silane-siloxane blends) are generally the better choice for patios: they soak into the pore structure rather than forming a surface film, so they last longer and don't create a slippery sheen. Film-forming acrylics give a visible gloss and can reduce traction, which matters if your patio gets wet. If slip resistance is a concern, penetrating sealers are the safer call. Apply sealer on a dry day when air and surface temperatures are above 50°F.
Staining and refinishing
If you want the repair to blend in color-wise, or if you want to give the whole patio a fresh look, acid staining or concrete stain can be applied after the repair has cured and been sealed. Staining works best as a whole-patio treatment rather than just on the patch, since color matching a patch exactly is nearly impossible. Apply stain after the 28-day cure, clean the surface thoroughly, then apply sealer on top of the stain to lock it in. This approach transforms a patchy-looking repaired patio into something that looks intentional and finished.
Troubleshooting, tools checklist, and when to call a pro
Common problems and quick fixes
- Patch popped out after curing: bonding step was skipped or the surface had loose material. Remove, re-prep, use bonding adhesive, and re-patch.
- Resurfacer cracked while curing: dried too fast. Mist more aggressively next time and work in shade or cooler temps.
- Repair is a different color than the rest of the patio: normal — new concrete is lighter. It fades over several months, or stain the whole patio for a uniform look.
- Crack came back in the same spot: underlying movement wasn't addressed. Check for void, tree roots, or settling before re-sealing.
- Sealer turned white or hazy: moisture was trapped underneath. Strip and reapply after allowing more drying time.
Tools and materials checklist
| Item | Used for |
|---|---|
| Cold chisel and hammer (or angle grinder) | Removing loose/spalled concrete |
| Wire brush | Cleaning crack edges and repair area |
| Pressure washer | Surface cleaning before any repair |
| Concrete bonding adhesive | Adhesion for patches and overlays |
| Flexible polyurethane crack sealant | Hairline and narrow cracks |
| Vinyl concrete patcher or repair mortar | Isolated deep spalled spots |
| Concrete resurfacer (QUIKRETE, Sakrete, or Sika) | Widespread surface damage or worn surface |
| Magnesium darby or long-handled squeegee | Spreading resurfacer evenly |
| Steel finishing trowel | Smoothing patch repairs |
| Stiff brush or broom | Applying dash coat and finishing texture |
| Plastic sheeting or burlap | Moist curing |
| Penetrating concrete sealer | Long-term protection after curing |
| Angle grinder with diamond cup wheel | Grinding high spots flush |
Realistic curing and weather expectations
- Light foot traffic on patches: typically 24 hours, but 48 to 72 hours is safer.
- Full cure before sealing: 28 days for structural strength; most sealers specify this minimum.
- Don't apply resurfacer or sealers below 50°F — materials won't cure properly.
- Avoid working in direct summer sun on a hot slab — the 20-minute working window on resurfacers shrinks fast above 90°F.
- Rain within 24 hours of application will ruin a fresh repair. Check the forecast.
When to hire a pro instead
Call a professional if: the slab has significant vertical displacement across multiple panels, rebar is exposed and actively rusting across a large area, the patio is sinking and you suspect a major drainage or soil failure underneath, or the patio is more than about 30 years old and showing deterioration throughout rather than in isolated spots. Mudjacking and polyjacking are also usually better left to pros with the right equipment. Everything else on this list, including crack sealing, patching, and full resurfacing, is solidly within DIY range if you follow the prep steps carefully. If you're unsure which product and method fit your situation, this guide on how to fix a concrete patio can help you choose the right approach. The prep is the job. The actual repair material application is the easy part.
FAQ
Can I seal my concrete patio cracks and then seal the whole patio, or should I do it in a different order?
Yes, but only for hairline, non-moving cracks. The cleanest approach is to prep bare concrete, apply the polyurethane crack sealant, and then seal the entire patio after the repair cures (typically after at least 28 days). If you seal first, you can trap moisture or prevent the sealant from bonding to the concrete pores.
What if my patio already has paint, epoxy, or a thick sealer on it, will resurfacing still work?
Patch and resurfacer usually bond poorly over existing paint, epoxy coatings, or heavy sealers. Plan on mechanical abrasion (grinding or scarifying) to open the surface, and for newer or stubborn sealers, you may need chemical stripping before you start the repair prep steps.
Can I fill a crack with regular patching mortar instead of polyurethane sealant?
No. Rigid mortar, concrete caulk, or patch mix in a crack usually fails because concrete expands and contracts. For cracks without vertical offset (hairline to about 1/4 inch), use a flexible polyurethane crack sealant; for active structural cracks, epoxy injection is the correct direction.
My crack has one side higher than the other. Is there any “quick fix” that won’t fail?
If one edge is higher than the other, you have movement, and the fix must stabilize the slab (voids, washout, compaction issues, or roots). Cosmetic crack filling on a vertically offset crack typically reopens as soon as freeze-thaw or seasonal soil movement repeats.
How can I tell if my concrete is too contaminated to bond or too sealed to accept repair and sealer?
Do a simple water test. Pour a small amount of water onto the repaired or surrounding area and watch whether it quickly soaks in or beads up. If it beads, you likely have surface contamination or old sealer, and you may need deeper cleaning or removal before sealing or applying a patch.
What weather and temperature conditions should I avoid for a concrete patio fix?
Work in temperatures above roughly 50°F and avoid direct sun and wind during curing. Hot weather can cause rapid moisture loss and shrinkage cracks in the new material, while cold damp conditions can slow cure and increase risk of weak bonding.
How dry does my patio need to be before I apply a penetrating sealer?
Use a moisture check, not just “feels dry.” Penetrating sealers generally require low surface moisture (around 4% or less) to avoid trapping water and causing hazing or premature failure. If you seal too early, the sealer can seal in moisture and reduce longevity.
What should I do if my patch cures higher than the surrounding patio?
If the patch is proud or high, grinding or sanding is the right correction, but take care not to thin the overlay too much at the feather edge. Use a diamond cup wheel or belt sander to blend several inches around the perimeter, then re-check texture for drainage and traction.
My patched spots look different from the rest of the patio. How do I make it look uniform?
For patching isolated spalls, steel troweling and correct consolidation (pressing the mix firmly) matters more than matching color exactly. If you want a more uniform appearance, consider resurfacing the whole patio after the repairs cure, since exact color matching of patch areas is usually not realistic.
Will sealing make my patio slippery, and what type of sealer is safer for traction?
Yes, but traction matters. Penetrating sealers generally reduce gloss compared with film-forming acrylics, and they’re usually safer on patios that get wet. If you already have a high-gloss surface, a film-forming sealer can increase slipperiness.