Building concrete steps into a patio means treating them as one connected system, not two separate projects bolted together. Get the dimensions right (risers no taller than 7-3/4 inches, treads no shallower than 10 inches), tie the steps to the patio slab with an isolation joint so they can move independently without cracking each other, and seal everything after a full 28-day cure. The 2015 International Residential Code (IRC) sets the maximum residential stair riser height at 7-3/4 inches (196 mm). That's the short version. Below is everything you need to actually pull it off, whether you're pouring from scratch or fixing what's already there.
Concrete Steps and Patio: DIY Design and Build Guide

Silas Morrison
1 May 2026
Planning the layout before anything gets poured
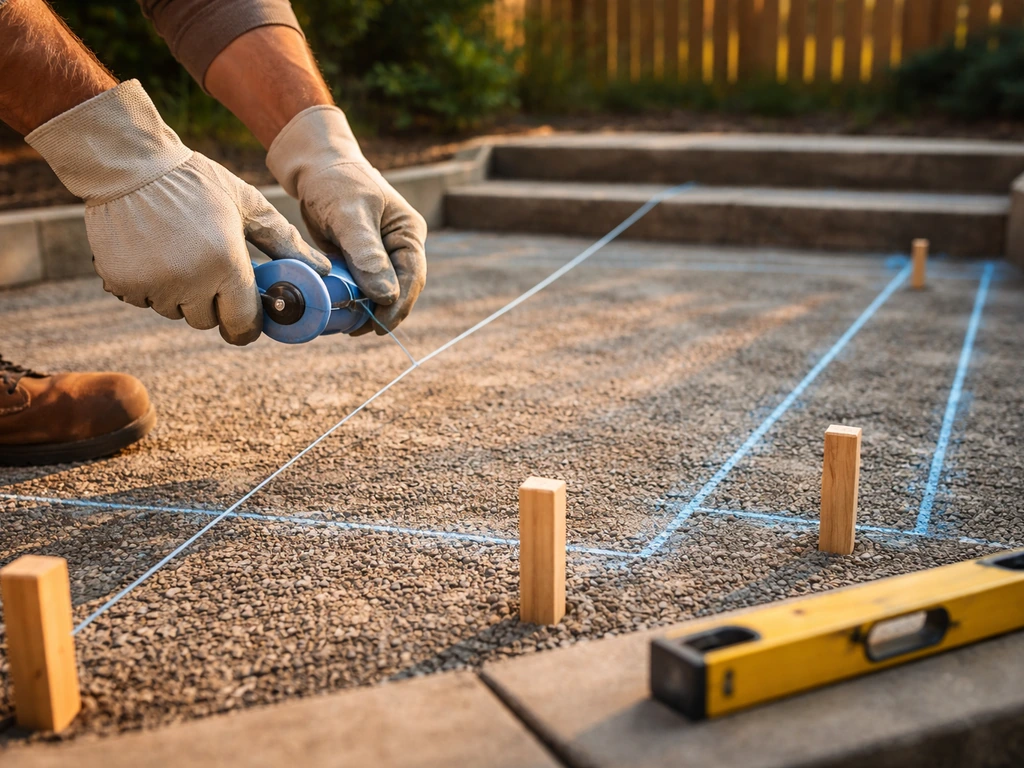
The biggest mistake people make is designing the steps as an afterthought once the patio is already laid out. Steps and patio need to be planned together because the step geometry directly affects where the patio edge lands, how much slab you need, and where grading has to go to handle drainage. Start with your total rise: measure the vertical change from the patio surface down to the yard, door threshold, or sidewalk you're connecting to. That number determines how many steps you'll need.
Divide the total rise into equal riser heights, keeping each riser at or below 7-3/4 inches (that's the IRC maximum residential riser height). Then pair each riser with a tread depth of at least 10 inches. A common rule of thumb from QUIKRETE and engineering guides is that riser height plus tread depth should add up to roughly 17-18 inches for comfortable step geometry. So a 7-inch riser pairs well with a 10-11 inch tread.
If your total rise is, say, 21 inches, three risers at 7 inches each works perfectly. If you've got a really long vertical run, consider breaking the stair into two flights with a landing in between rather than making people climb an uninterrupted stack. QUIKRETE's project guidance specifically recommends this approach, and it also gives you a natural place to handle drainage.
Plan for a landing at least 36 inches deep in the direction of travel at the top and bottom of any stair run. This is both a code requirement and a practical safety detail, especially if a door opens onto the top landing. On your layout sketch, mark where the patio edge is, where each step lands, and where the bottom tread meets grade. This tells you how far the steps will project out from the patio, which affects grading, drainage slope, and how much excavation you're looking at.
Design ideas and layouts worth considering
There are a few classic layouts that work well for residential patios. The right one depends on your available space, the direction traffic flows, and what you want the patio to look like.
- Straight run: Steps come straight off one edge of the patio. Clean, simple, works great for narrow side-yard access or a back door entry. This is the most common layout and the easiest to pour.
- Wraparound or L-shaped steps: Steps fan out from a corner of the patio, giving you two directions of entry. Great for larger patios where you want traffic to flow from the yard onto the patio from multiple angles.
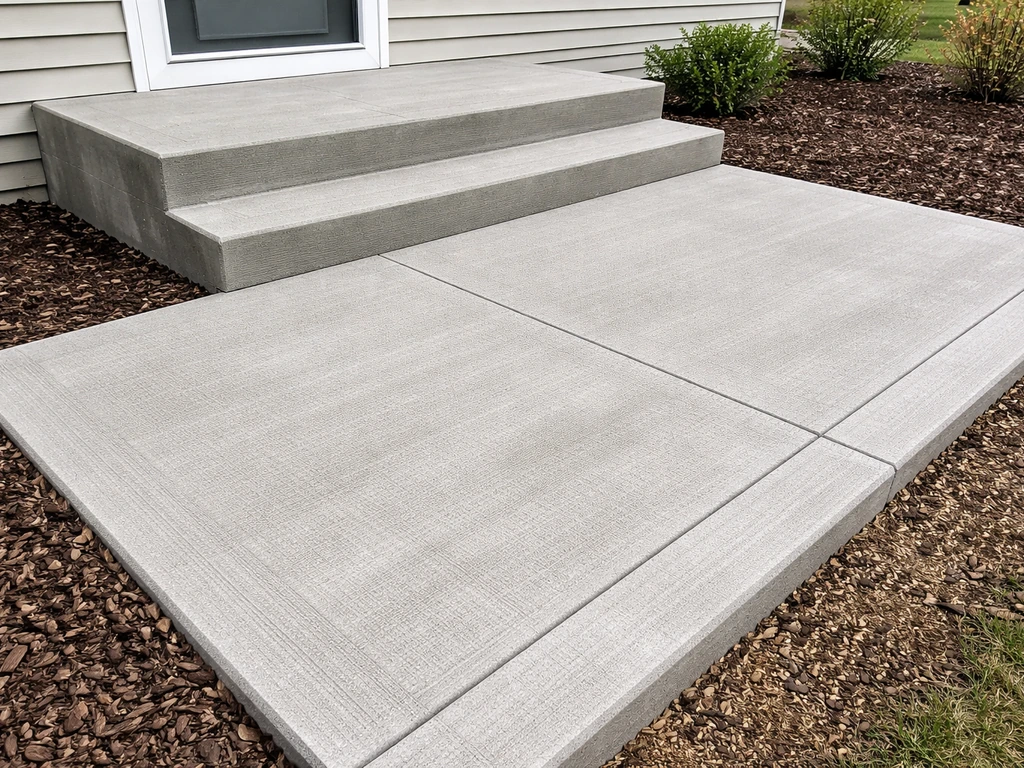
- Full-width steps: Steps run the entire width of one patio edge, turning the transition into a design feature rather than just a utility connection. This is especially popular on raised patios and pairs beautifully with stamped or colored concrete.
- Floating side steps with a landing: A platform or landing at mid-height breaks up a taller elevation change. Useful when the rise is more than 21 inches, and it gives you a place to add drainage so water doesn't pool at the base of the stair.
- Curved steps: Architecturally striking but significantly harder to form and pour. If you want this look, stamped concrete with curved risers is achievable for a skilled DIYer, but take your time on the forming work.
For purely decorative appeal, stamped steps that mirror the patio surface texture create a cohesive, high-end look. Brickform and similar decorative concrete suppliers make riser stamps and texture mats specifically for step faces and treads. You can also score the step faces and treads to mimic cut stone, or add color with integral pigment or a topical stain after the pour. If you're going this route, plan the decorative treatment before you pour, not after, because timing affects when you can stamp and texture.
Concrete steps vs. composite steps: which one belongs on your patio
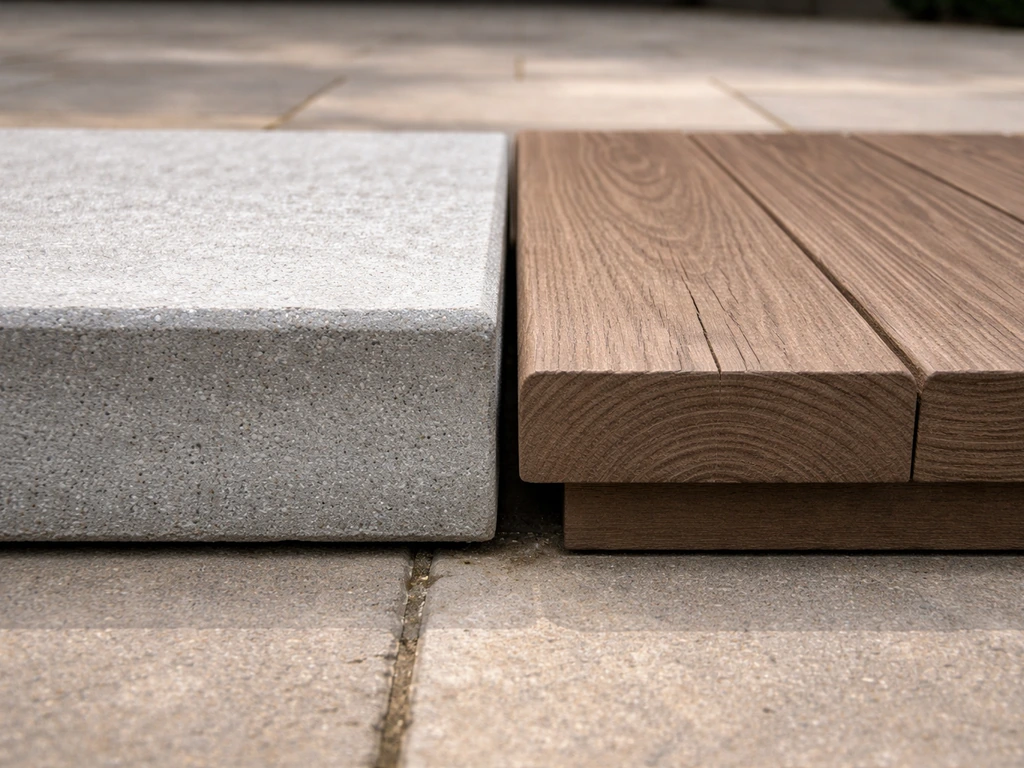
Most homeowners default to concrete steps on a concrete patio, and that usually makes sense. If you are planning patio door concrete steps, it helps to account for the door threshold height and the landing layout so everything stays safe and properly graded. But composite steps (like Trex stair treads over a concrete or steel frame) are worth at least considering, especially if you're adding steps to an existing patio rather than pouring everything new.
| Factor | Poured Concrete Steps | Composite Steps (e.g., Trex) |
|---|---|---|
| Integration with patio slab | Monolithic look; bonds directly via isolation joint | Sits on top of or adjacent to slab; requires a frame or mounting hardware |
| Upfront cost | Lower material cost; labor-intensive forming | Higher material cost; simpler assembly |
| Long-term maintenance | Seal every 1-3 years; repair cracks as needed | Minimal; clean periodically; no sealing required |
| Appearance options | Stamp, stain, broom finish, exposed aggregate | Limited to composite colors/profiles |
| Slip resistance | Controllable with broom finish or non-slip additives | Grooved profiles offer reasonable traction |
| Durability | Decades with proper drainage and sealing | 25+ year fade/stain warranty on quality brands |
| DIY difficulty | Moderate to hard (forming and pouring) | Moderate (framing and fastening) |
| Best use case | New patio builds, matching existing concrete | Retrofit on existing patios, elevated or framed situations |
My recommendation: if you're pouring a new patio, pour the steps in concrete at the same time. The look is seamless, the cost is lower, and the whole thing becomes one unified surface you can seal and finish consistently. If you already have a concrete patio and you're adding steps as an upgrade, composite steps on a simple steel or pressure-treated frame can be faster and less invasive than jackhammering or forming new concrete.
If you are considering Trex steps on a concrete patio, you can compare the materials, installation approach, and maintenance differences before deciding. For a deeper look at composite step options in this context, the topic of Trex steps on a concrete patio is worth exploring on its own.
Building the steps: dimensions, forming, and tying into the slab
Forming and dimensions
Use 2x8 or 2x10 lumber to form your risers and sides. Each step form needs to be plumb and level. Cut your side forms (called 'horses' or 'side stringers' in concrete forming) to match the stair profile, then attach the riser boards flat across the front of each step. Brace everything solidly because wet concrete exerts significant outward pressure, especially on lower steps. Don't skimp on stakes and bracing or you'll end up with bowed risers and uneven treads.
Minimum slab thickness for poured concrete steps is 4 inches, but I'd go 5-6 inches on the tread portion, especially on the bottom step where freeze-thaw cycles and foot traffic are hardest. Use 3,000 psi concrete minimum (QUIKRETE 5000 or equivalent), and add rebar or wire mesh. Horizontal rebar in the tread and vertical rebar in the riser wall, tied together, gives you the structural integrity to handle edge loading without cracking at the nose of the tread. Keep rebar at least 1.5 inches from any edge.
Tying steps to the patio slab (this is critical)
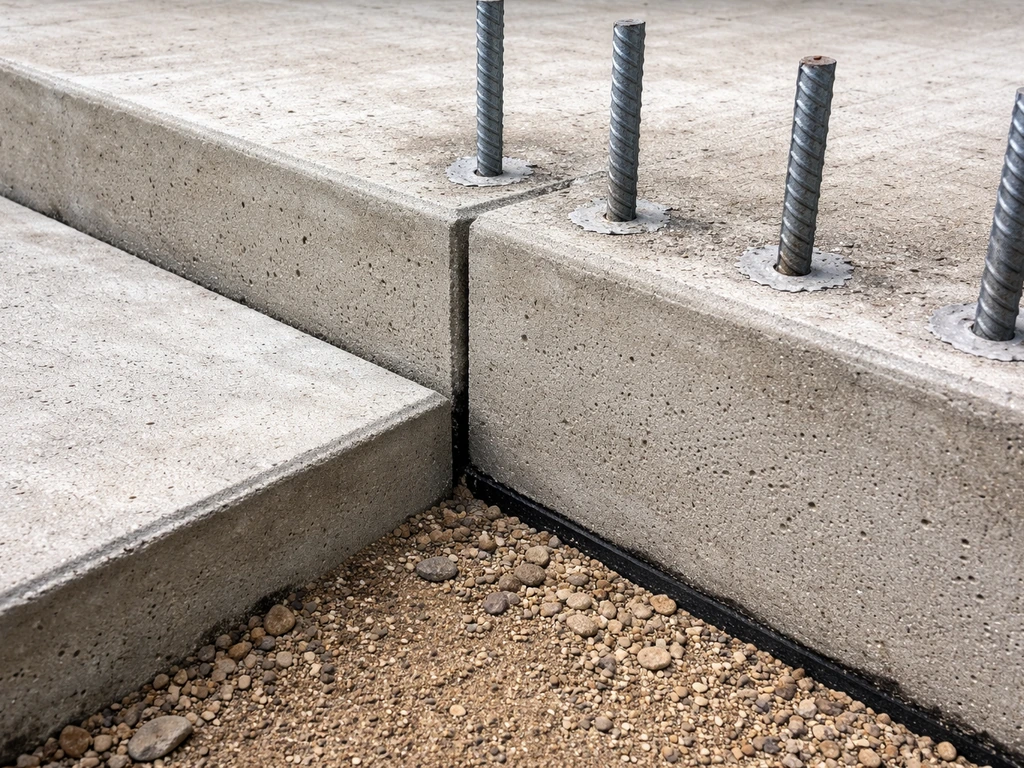
Here's where a lot of DIY step builds go wrong. People assume you should connect the step slab directly to the patio slab with rebar passing through. Don't do that. When concrete expands and contracts with temperature, two rigidly connected slabs will fight each other and one of them cracks. Instead, separate the two with an isolation joint (also called an expansion joint). Use a pre-made fiber expansion joint product like QUIKRETE's expansion joint strips, running it full depth from subbase to surface right where the step meets the patio. The isolation joint absorbs movement between the two slabs so stress doesn't transfer.
Critically: reinforcement (rebar) must NOT pass through an isolation joint. Each slab is structurally independent. The joint material itself handles the connection at the surface. This is a hard rule from structural engineering guidance, and ignoring it defeats the entire purpose of the joint. Also make sure the joint material doesn't protrude above the finished slab surface.
Drainage details
Every tread needs a slight forward pitch, about 1/8 inch per foot, to shed water off the nose of the step rather than pooling at the riser. The patio itself should slope away from any structure at 1/8 to 1/4 inch per foot. Think about where water goes when it runs off the bottom step: it should drain away from the foundation and not pool against the base of the step or the slab edge.
If you're in a freeze-thaw climate, proper drainage isn't optional. Water that sits against concrete, freezes, and expands will crack it within a few seasons. Grade the soil around the base of the steps before you pour and make sure any fill under the steps is well-compacted granular base material, not loose topsoil.
Finishing, curing, and sealing for long-term durability

Finishing the surface
Once you've screeded and floated the treads, the standard finish for plain concrete steps is a broom finish: drag a stiff-bristle concrete broom across the tread surface perpendicular to the direction of travel while the concrete is still workable. This creates fine ridges that improve slip resistance considerably, which matters a lot on steps that will get wet. The timing is everything. Broom too early and the texture smears; broom too late and the concrete is too stiff to texture. You're looking for a surface that's firm but still slightly responsive to pressure.
For stamped steps, work quickly after the concrete reaches the right consistency (firm enough to hold a stamp impression without sticking). Apply your release agent, then press the stamp mats into the tread, working from the back of the step forward to avoid stepping on freshly stamped areas. The riser faces can be textured with a flex mat or a riser stamp.
This is more complex than a flat patio stamp because of the three-dimensional geometry, so if you're new to stamping, practice on a scrap section or at minimum have your stamps, release, and tools staged and ready before the pour. For more tips specific to the finishing process, the concrete patio tips topic covers timing, tools, and common stamping mistakes.
For more tips specific to the finishing process, the concrete patio tips topic covers timing, tools, and common stamping mistakes.
Curing before you seal
This is the step most DIYers skip or rush, and it's the one that causes the most sealer failures. New concrete needs to cure fully before you apply any topical sealer. Concrete Network and multiple industry sources are consistent on this: wait at least 28 days. Concrete reaches roughly 80 percent of its design strength within 14-28 days, but the moisture content at the surface needs to drop to a level where a sealer can actually bond and cure properly.
Seal too early and you'll trap moisture under the film, which causes the sealer to cloud, peel, or blister. Keep new concrete moist for the first week (cover with plastic or burlap) to help it cure uniformly, then let it breathe for the remaining time before sealing.
Choosing and applying sealer
For exterior concrete steps and patio slabs, you're choosing between two categories: penetrating sealers and film-forming (topical) sealers. Penetrating sealers (silane-siloxane types) soak into the concrete and protect it from water and freeze-thaw damage without forming a surface film. They don't change the appearance much, they don't get slippery, and they last longer without reapplication. Film-forming acrylic sealers sit on top of the surface, enhance color and gloss, and are great for stamped or stained concrete, but they typically need reapplication every 1-3 years outdoors and can become slippery when wet.
For most plain broom-finished steps and patios, I'd lean toward a penetrating silane-siloxane sealer for protection without the maintenance headache. For decorative stamped or colored concrete, a film-forming acrylic sealer looks better but requires you to add a non-slip additive. Products like Brickform's Traction Grip (a micronized powder mixed into the sealer) are designed exactly for this, adding texture to the sealed surface so you don't end up with slippery glass-like steps. Apply sealer in thin coats using a roller or pump sprayer, work in sections, and avoid application in direct sun or temperatures below 50°F or above 90°F.
Repairing and upgrading existing concrete patio steps
If you've got existing steps that are cracked, uneven, spalling, or just look worn out, you've got options beyond demolition and a full repour. Here's how to assess what you've got and what to do about it.
Cracks and surface damage
Small hairline cracks (under 1/4 inch wide) can be filled with a polyurethane or epoxy crack filler and then resurfaced. Wider cracks need a backer rod packed in first before you apply filler, or the filler won't have proper support and will eventually shrink and separate. Before you do anything, clean the crack thoroughly: remove laitance, dust, oil, and any loose debris. TxDOT's crack repair guidance makes the point clearly that contamination is one of the main reasons crack repairs fail. Don't grind around the crack unnecessarily either, as that can weaken the bond zone for your repair material.
If the crack is at the joint between the steps and the patio slab, that's usually a normal movement crack at what should have been an isolation joint. Don't fill it with rigid concrete repair material. Fill it with a flexible backer rod and self-leveling polyurethane sealant rated for expansion joints so it can continue to move without re-cracking.
Uneven or sunken steps
If a step or tread has settled or sunk, you need to figure out why before you repair the surface. Settlement is usually either a subbase failure (the fill underneath washed out or was never properly compacted) or a drainage problem that eroded the base over time. If it's a small dip and the step is otherwise structurally sound, you can build the surface back up with a polymer-modified concrete overlay or a repair mortar.
QUIKRETE's Concrete Bonding Adhesive applied to the existing surface first improves adhesion significantly for thin overlays, and eliminates the need for mechanical roughing in many cases. Build up the repair in layers no more than 1/2 inch thick at a time, and feather the edges carefully so the tread reads as level and consistent.
Refreshing the appearance
Dull, faded, or discolored steps can be transformed with an overlay and stain without tearing anything out. Repair all cracks first, clean the surface thoroughly (acid wash or pressure wash to remove efflorescence and laitance), then apply a thin concrete overlay bonded with a bonding agent. Once cured, you can stain or stamp the overlay, then seal. Products designed as dry-bond overlays (like SEK SureBond's EZ Overlay style products) install directly onto prepared existing concrete and give you a fresh canvas. This approach is far less disruptive than demolition and makes sense when the existing step structure is sound. It's essentially the same workflow described in concrete patio resurfacing guides, just applied to the step geometry.
One practical note: if you're resurfacing both the steps and the patio together as a refresh project, address the steps first, let them cure, then do the patio surface so you can blend the color and texture at the transition without working backward onto wet material. Seal everything in one final coat at the end so the whole surface has a consistent finish. For a full overview of the pour-to-finish workflow from the start, the concrete patio process guide covers each stage in sequence.
FAQ
Can I adjust the riser height after I build the forms, if a measurement is off by a little bit?
Avoid “fixing” it one step at a time. Keep all risers equal (within about 1/8 inch if you must), because unequal risers create a stumble hazard and make the treads look uneven. If your total rise is wrong, redo the overall step count or the full layout instead of changing individual risers.
How should I form and finish the bottom step so it does not collect water or ice?
Treat the bottom tread like a drainage-critical surface. Use the forward pitch (about 1/8 inch per foot), ensure the soil below is compacted granular base, and confirm the patio slope also carries water away from the step face. If you are in a freeze-thaw area, do not rely on later caulking to “solve” ponding.
What expansion joint size and placement should I use where the patio meets the steps?
Place an isolation joint right at the step-to-patio interface and run it full depth from the subbase up to the finished surface, using a product designed for expansion joints. Keep the joint material flush or slightly recessed so it does not create a trip edge, and never run reinforcement across or through that joint.
Can I use crack filler or sealant instead of an isolation joint if I’m trying to prevent cracking?
No. Sealants and crack fillers can slow water intrusion, but they do not absorb movement like a correctly installed isolation joint. If the slabs can move independently, you need a true joint between the concrete elements and independent reinforcement.
Do I need rebar in every step tread and riser, or is mesh enough?
In most DIY residential step builds, include both horizontal reinforcement in the tread and vertical reinforcement in the riser wall (tied together) for edge loading at the tread nose. Wire mesh alone often ends up too high in the section and provides less predictable structural benefit than correctly positioned rebar.
How far from the concrete edge should reinforcement be placed, and what happens if it’s too close?
Keep rebar at least 1.5 inches from any edge, because insufficient cover increases the risk of rusting, spalling, and premature surface cracking. If you find steel too close after forming, reposition it before the pour using chairs, spacers, and properly tied supports.
What if my patio is already poured, can I tie new steps to the slab without causing issues?
You still generally want the steps structurally independent from the existing patio slab. Use an isolation joint at the interface and avoid “through-bonding” with rebar. For existing patios, composite steps on a properly supported frame can be less invasive than trying to integrate new concrete with the old slab.
How do I handle drainage if the door threshold is higher or the grade is constrained?
Start from the door threshold and re-check both the stair geometry and the slope path water will take when it leaves the bottom tread. If you cannot maintain the recommended outward patio slope, plan alternative drainage (for example, directing runoff to a safe low point or improving subgrade grading) rather than letting water pool at the step base.
Is a broom finish enough texture on exterior steps, or should I add traction grit?
A properly timed broom finish usually provides adequate slip resistance for many homes, especially if you keep the tread pitch and seal choice in mind. If your climate has frequent rain and you use a film-forming sealer, add a non-slip additive or choose a sealer that is not slick when wet.
Can I stamp or color the steps if I pour them at the same time as the patio?
Yes, but coordinate the process carefully. Stamping is a timing and workflow decision, so have mats, release, and tools staged, and protect areas you already stamped from being walked on. For best results, plan the decorative treatment in your dry layout, because texture placement must match step geometry.
What’s the safest way to cure new steps if weather is hot, windy, or rainy?
Use curing covers to keep moisture consistent during the first week, and avoid direct sun and strong wind on fresh concrete. If rain threatens before finishing is complete, slow down operations and protect surfaces without washing off cement paste. Then allow full drying time before sealing, regardless of how “dry” it looks.
How can I tell whether the surface is ready for sealer before the 28-day mark?
Do not rely only on appearance. If you test too early, you can trap moisture and cause clouding or peeling. A practical approach is to wait the full recommended period, and if you check early due to scheduling, confirm the surface is genuinely dry (not just matte) before sealing.
What’s the best sealer choice if I want it to resist freeze-thaw but not change the look?
Consider a penetrating silane-siloxane sealer. It typically protects without creating a surface film, which usually means less slipperiness risk and longer maintenance intervals. If you want color enhancement, you may need to accept a more maintenance-heavy topical system and add non-slip traction if it becomes slick.
If existing steps have cracks at the joint, can I epoxy them and move on?
Usually not. If the crack is at the joint line where movement was supposed to be allowed, rigid fillers like epoxy can fail because they prevent the intended expansion and contraction. Use a flexible backer rod and a sealant or product rated for expansion-joint movement instead.
When a tread has settled, should I just patch the low area and reseal?
Not until you identify the cause. Settlement is often from subbase washout or inadequate compaction, or from drainage that eroded support underneath. Fix the underlying grade and base conditions first, then rebuild with an overlay or repair mortar in thin layers and properly feather the edges.