Most cement patio problems fall into one of five categories: cracks, spalling or flaking, sinking or uneven slabs, crumbling edges, and a surface that looks worn out. Each one has a different fix, and using the wrong approach (like slapping patching compound over a crack that's still moving) just wastes your time and money. The good news is that most of these repairs are genuinely DIY-friendly if you prep the surface correctly and use the right materials. This guide walks you through diagnosing what you've actually got, then fixing it properly so it lasts.
Fix Cement Patio: Diagnose Cracks and Repair Step by Step

Silas Morrison
29 Apr 2026
Quick Diagnosis: Figure Out What You're Actually Dealing With
Before you buy anything or mix anything, spend 10 minutes really looking at your patio. The type of damage tells you a lot about the cause, and the cause tells you whether a DIY patch will hold or whether you've got a bigger problem on your hands.
Reading Your Cracks
Hairline cracks (under 1/8 inch wide, no vertical displacement) are almost always shrinkage cracks. Concrete wants to shrink as it cures and dries, and if it was restrained, it cracked instead. When working around silica-containing materials like concrete and mortar, CDC/NIOSH recommends preventing respirable crystalline silica exposures by controlling dust Concrete wants to shrink as it cures and dries, and if it was restrained, it cracked instead.. These are cosmetic and easy to seal. Cracks where one side is higher than the other tell a different story: that's settlement or heaving, usually from soil movement, tree roots, or freeze-thaw cycles lifting the slab. These need leveling, not just patching. A network of shallow, interconnected surface cracks (called map cracking or crazing) is a weathering and shrinkage pattern that affects only the top layer. It looks alarming but is usually a surface-only issue. Any crack wider than 1/4 inch, or one that keeps getting wider over time, deserves a harder look before you patch it.
Spalling, Holes, and Edge Problems
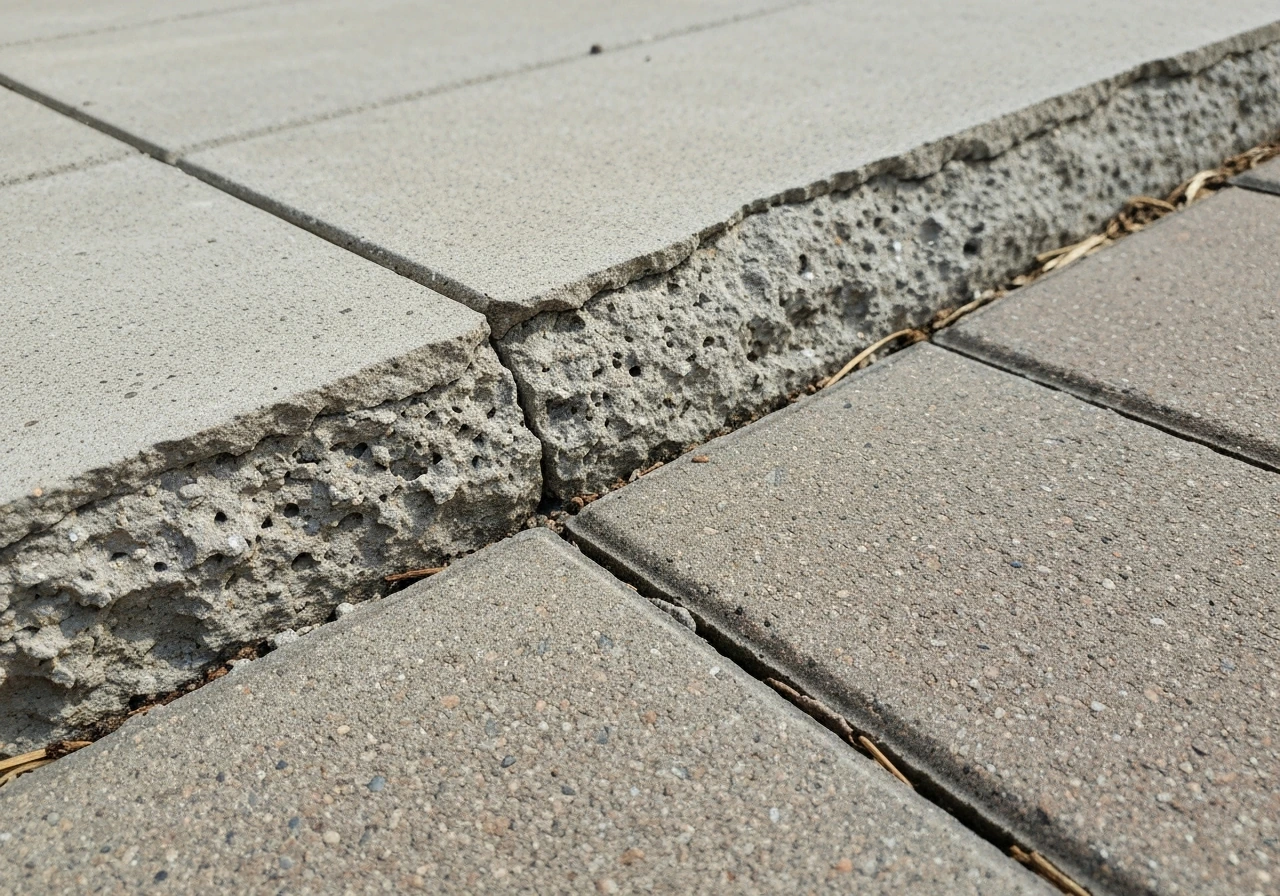
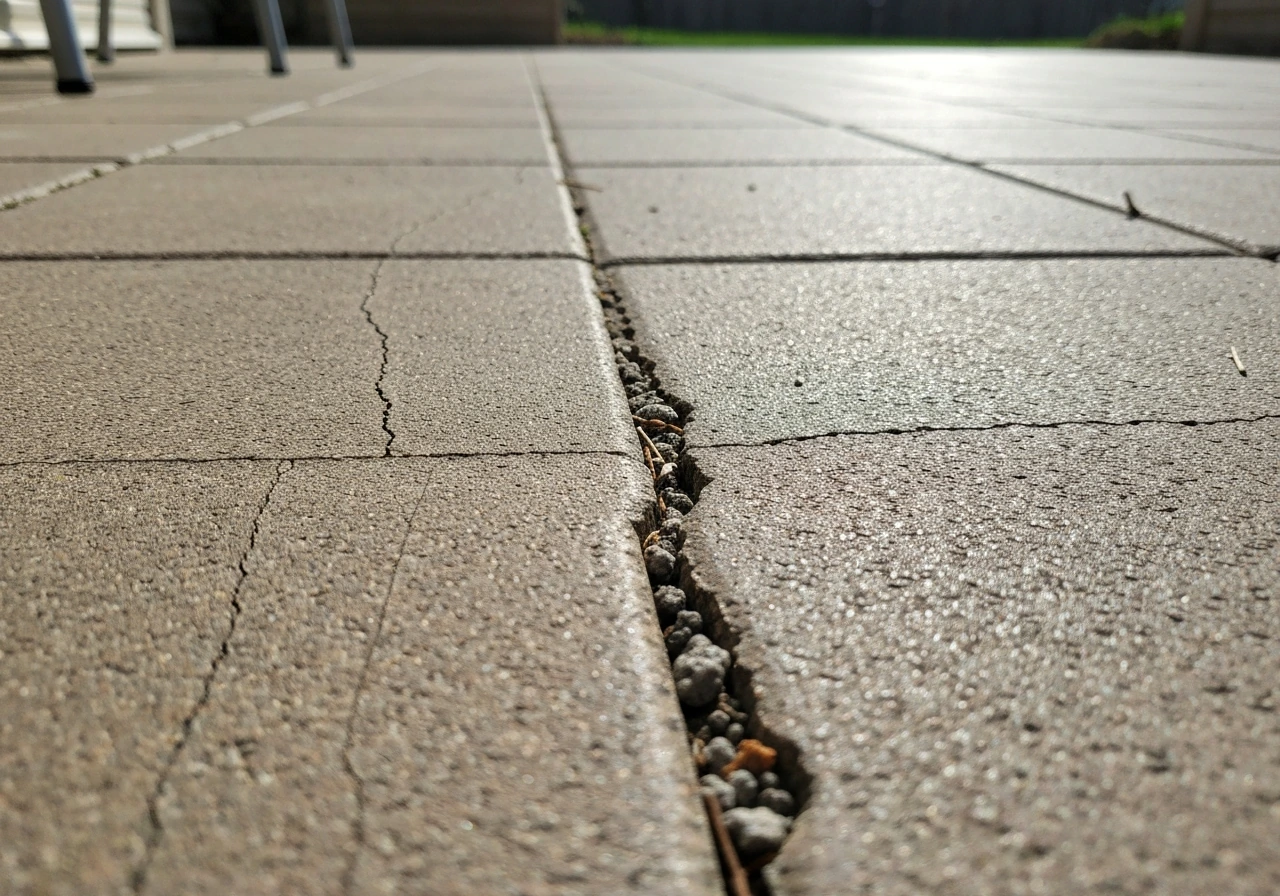
Spalling is when the surface flakes off in chunks or sheets, often leaving a rough, pitted texture. It's usually caused by freeze-thaw damage, deicing salts, or a weak surface layer from poor finishing during the original pour. Holes tend to come from severe spalling or impact damage. Crumbling edges are almost always freeze-thaw damage or just age, and they're very patchable. Spalling near joints or cracks is often caused by stress concentrating at those discontinuities, which is worth noting because you'll want to address the joint itself, not just fill the spall.
Drainage and Slope Issues
Grab a garden hose and run water across your patio. It should sheet off toward the yard or a drain, not pool anywhere. Proper slope is about 1/8 to 1/4 inch of drop per foot, running away from the house. If water sits in one spot, either the slab has settled into a low spot or it was never sloped correctly. Pooling water next to your foundation is a problem that goes beyond cosmetics.
When to Stop and Call a Pro
A few situations where I'd say skip the DIY approach: if a crack is actively widening or you can see the slab shifting seasonally, if the entire slab has heaved significantly from root or frost pressure, if there's widespread slab failure (more than 30 to 40 percent of the surface is compromised), or if water is pooling against your home's foundation and the slope can't be corrected with a surface overlay. Those point to structural or drainage issues that need a professional assessment.
Tools and Materials You'll Want on Hand

The right materials make a huge difference here. Using a generic all-purpose caulk on a concrete crack, for example, will give you maybe one season before it fails. Here's what covers most common patio repairs:
| Item | What It's For | Notes |
|---|---|---|
| Cold chisel and hammer (or angle grinder) | Removing loose concrete and opening cracks | Angle grinder with diamond blade is faster for large areas |
| Wire brush and stiff broom | Cleaning debris from repair areas | Essential before any patching |
| Pressure washer or hose with spray nozzle | Deep cleaning the surface | Required for bonding prep |
| Concrete bonding adhesive (acrylic or epoxy) | Helps patch material stick to old concrete | Don't skip this step |
| Polyurethane or epoxy crack filler | Filling active or structural cracks | Flexible options for cracks that may still move |
| Hydraulic cement or fast-setting concrete mix | Filling holes and deep spalls | Good for vertical edges and thick repairs |
| Vinyl concrete patcher | Surface spalls, shallow patches | Feathers out thin, good for surface repairs |
| Concrete resurfacer (e.g., Quikrete Concrete Resurfacer) | Resurfacing worn or crazed slabs | Covers the whole surface, 1/16 to 1/2 inch thick |
| Self-leveling concrete underlayment | Correcting low spots and drainage issues | Flows and levels itself on flat areas |
| Backer rod (foam) | Filling wide cracks or joints before sealing | Gives the sealant the right profile |
| Concrete sealer (acrylic, penetrating, or epoxy) | Final protection layer | Match sealer type to your conditions |
| Safety glasses, gloves, and N95 mask | Personal protection | Concrete dust is a real hazard |
| Margin trowel, float, and bucket | Mixing and applying patches | A margin trowel is the most useful $8 tool you'll own |
Surface Prep: The Step Nobody Wants to Do (But Has to)
Every failed repair I've ever seen came down to bad prep. The patch cured fine, but it bonded to dirt, dust, or flaky concrete instead of solid material, and it popped off within a year. Concrete prep is not optional, and it's not quick. Budget at least an hour before you even open your patching mix.
- Remove all loose material first. Chip out cracked or hollow concrete with a cold chisel and hammer, or use an angle grinder. Tap the surface with a hammer: solid concrete sounds dense, hollow or failing concrete sounds hollow and dull. Remove everything that sounds hollow.
- Widen narrow cracks slightly. A crack that's only a hairline is actually harder to fill well. Use a cold chisel or crack chaser blade to open it to at least 1/4 inch wide and 1/4 inch deep so the filler has something to grab.
- Clean the entire repair area thoroughly. Sweep out all debris, then use a pressure washer or stiff wire brush to remove dirt, oil, mold, and efflorescence (the white chalky mineral deposits). Let it dry completely.
- Apply a concrete bonding adhesive to all repair surfaces. Brush or roll it onto the cleaned area and let it get tacky (usually 15 to 30 minutes depending on the product). This creates a chemical bridge between old and new concrete. Skipping this is the number-one reason DIY patches fail.
- Dampen the repair area lightly before patching. Dry concrete will suck moisture out of your patch too fast, weakening the cure. You want the surface damp but not wet or standing water.
Fixing Cracks and Joint Issues
Not all cracks get the same treatment. Using a rigid filler in a crack that still has minor movement will cause the filler to crack again. Here's how to match the fix to what you've got.
Hairline and Shrinkage Cracks
For cracks under 1/8 inch with no vertical offset and no ongoing movement, a concrete crack filler or polyurethane sealant works well. Open the crack slightly first as described above, blow out all dust, and apply the filler with a caulk gun or pour it in. Overfill slightly, then tool it flush with a margin trowel. Let it cure fully (check the product instructions, but typically 24 hours before foot traffic). For map cracking across a large area, a full resurfacing overlay is a better option than chasing individual cracks.
Wider or Structural Cracks
Cracks wider than 1/4 inch or cracks with vertical displacement need a two-step approach. First, use foam backer rod to fill the depth of the crack, leaving the top 1/4 to 3/8 inch open. Then fill the top portion with a self-leveling polyurethane or epoxy crack sealant. This gives you a repair that has some flexibility and won't crack again with minor movement. If one side of the crack is higher than the other, you also need to grind or feather down the raised edge so there's no trip hazard.
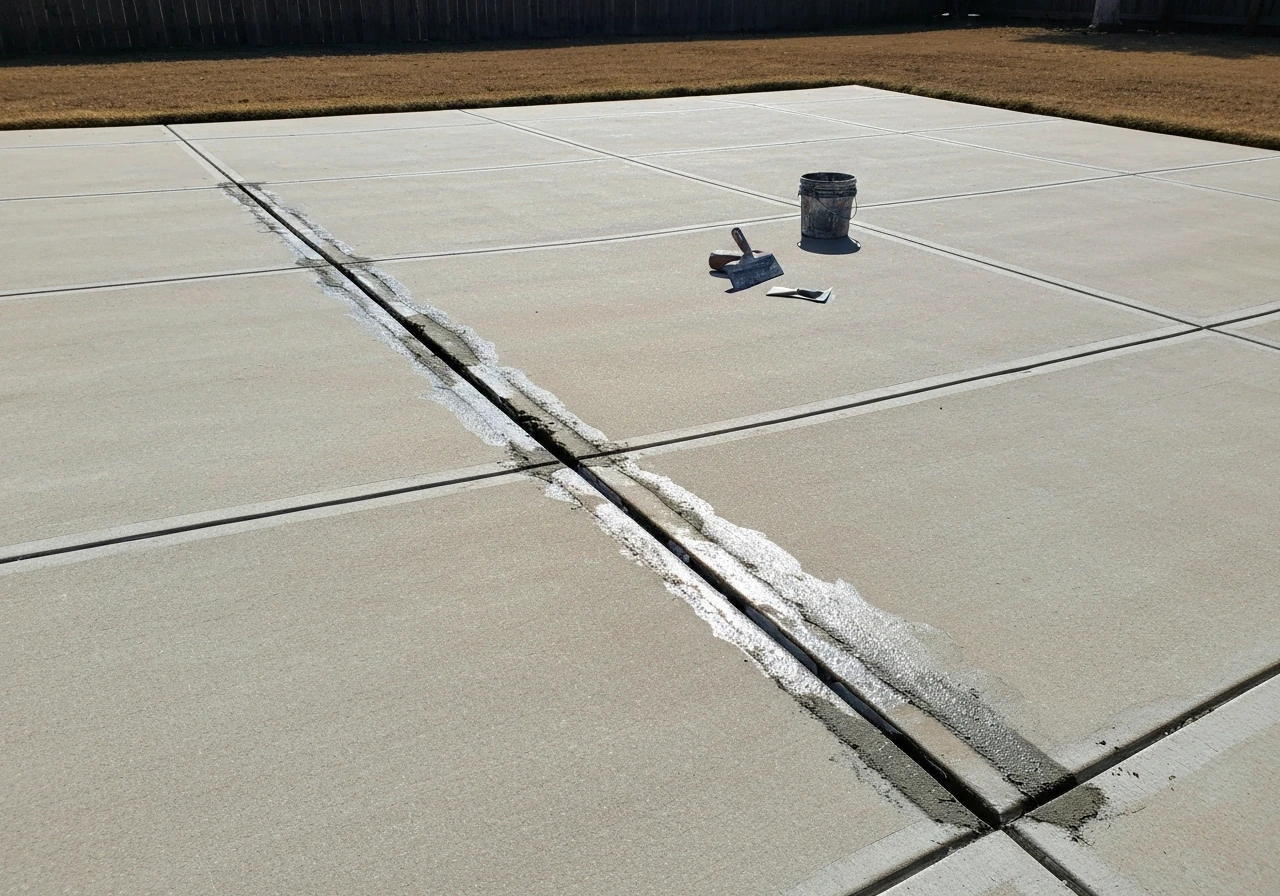
Expansion and Control Joints
Those intentional saw-cut or tooled joints in your patio are supposed to be there, and they need maintenance. If the joint sealant is cracked, brittle, or missing, water gets in, freezes, and destroys the joint edges. Clean out the old sealant completely, install backer rod, and refill with a self-leveling polyurethane joint sealant. This is inexpensive and takes under an hour per joint. Do it before winter every few years and you'll prevent a lot of edge spalling. A note on timing: plan to reseal joints every 3 to 5 years as part of regular patio maintenance.
Repairing Spalls, Holes, and Broken Edges
Spalling and pitted areas are satisfying to repair because the results are so visible. The patch system matters here: you need the right product for the depth of damage.
Shallow Spalls and Surface Pitting (Under 1/4 inch deep)
A vinyl concrete patcher is your best tool here. It's a polymer-modified repair mortar that can feather down to very thin edges, which regular concrete can't do. After prepping and applying bonding adhesive, trowel the vinyl patcher into the spalled area and feather the edges out. Work in thin lifts if the area is deeper than 1/4 inch, letting each layer set before adding the next. Finish with a damp trowel or float to match the surrounding texture as closely as you can.
Deep Holes and Broken Edge Sections
For holes deeper than an inch or broken edge sections, use a hydraulic cement or a fast-setting concrete mix. For edges, build a simple wood form around the area to hold the patch in shape while it cures. Apply bonding adhesive first, pack the material in firmly (no air voids), and trowel smooth. Fast-setting mixes can reach working strength in 15 to 60 minutes, so have your tools and forms ready before you mix. For very deep repairs (over 2 inches), fill in layers rather than all at once so the material cures evenly without cracking from internal heat. If you plan to do a larger concrete repair, knowing how to use a cement mixer for patio work can make mixing consistent and faster.
Curing Patches Properly
Concrete patches fail most often because they dried too fast, not because the material was bad. After any patch, cover the area with plastic sheeting or damp burlap for at least 24 to 48 hours to slow moisture loss. Keep foot traffic off for 24 hours minimum, and don't let vehicles on a fresh patch for at least 7 days. In hot or windy weather, mist the patch lightly every few hours for the first day.
Leveling a Sinking or Uneven Slab
A slab that's settled or heaved is one of the more involved repairs, but there are real DIY options depending on how severe the problem is.
Minor Low Spots and Drainage Fixes
If you have a low spot that's pooling water but the slab itself is otherwise solid, a self-leveling concrete underlayment can fill it in. Clean and prep the area, apply bonding adhesive, then pour the self-leveling material. It flows to fill the low area on its own. You can build it up from about 1/4 inch to roughly 1 to 1.5 inches depending on the product. Once cured (usually 24 hours), it's a solid base that can be sealed or surfaced. For larger areas that need more slope correction, a concrete resurfacer applied with a squeegee can build a slight grade if you feather it progressively toward the high side.
Sinking Slabs: Mudjacking or Foam Lifting
If a full slab panel has sunk (especially one side relative to another), you're looking at mudjacking or polyurethane foam lifting. Mudjacking involves drilling small holes through the slab and pumping a cement-soil slurry underneath to raise it. Foam lifting uses expanding polyurethane foam injected through small holes, which sets in minutes and is lighter than the slurry (less likely to cause further settling). Both are typically contractor jobs, though some advanced DIYers tackle foam lifting with rental equipment. These repairs cost $500 to $1,500 for a typical patio section depending on your area, which is usually far less than replacement. If the slab is cracked in multiple pieces or has large voids underneath, replacement may be the only lasting solution.
Correcting Drainage for Good
Once you've leveled the surface, verify your slope again with a hose. If the patio still drains toward the house, consider adding a linear channel drain at the edge closest to the foundation to intercept runoff. Keeping water away from your foundation matters more than how the patio looks, so don't skip this step if drainage is the underlying issue.
Refinishing: Grinding, Stain, Paint, and Sealing
Once the structural and cosmetic repairs are done, refinishing is what makes everything look like it belongs together and protects the work you've done. A patched patio that isn't sealed will just deteriorate again faster.
Surface Grinding and Resurfacing
If your patio surface is rough, pitted over a large area, or has mismatched patches, grinding or resurfacing gives you a uniform base to work with. Rent a concrete grinder with a diamond cup wheel to knock down high spots, remove coatings, and open up the surface. OSHA notes that cutting, sawing, sanding, drilling into, and grinding concrete can result in exposures to respirable crystalline silica dust concrete grinder. For widespread surface deterioration or map cracking, a concrete resurfacer (applied with a squeegee at about 1/16 to 1/4 inch thick) is the most cost-effective way to get a fresh, even surface. You mix it to the consistency of thick paint, pour it on a dampened surface, and squeegee it into the texture you want. It's one of the more gratifying DIY jobs because the transformation is dramatic.
Stain and Paint Options
If you want to update the appearance while you're at it, this is the right moment. Acid stain creates a variegated, natural-stone look by chemically reacting with the concrete, and it's permanent. Water-based concrete stain is easier to apply and comes in a wider color range. Concrete paint (also called patio paint or masonry paint) gives a solid color and is the most beginner-friendly option. All of these should go on a clean, fully cured surface after repairs, and all of them need a topcoat sealer to protect the color. If making the patio look genuinely attractive is your goal, the topics of decorating and improving a cement patio's appearance are worth exploring alongside this repair work. If you want the patio to look finished, these tips for improving a cement patio's appearance pair well with the repair steps above. If you're starting from scratch and wondering how to make a cement patio, the same principles of proper slope and curing will guide the process.
Choosing and Applying the Right Sealer
Sealer is the last step and one of the most important for long-term durability. Here's a quick comparison of your main options:
| Sealer Type | Best For | Finish | Reapply Every |
|---|---|---|---|
| Acrylic sealer | General protection, budget-friendly, over stain or paint | Satin to glossy | 2 to 3 years |
| Penetrating silane/siloxane | Wet climates, freeze-thaw zones, natural look | No sheen (invisible) | 3 to 5 years |
| Epoxy coating | High-traffic areas, garages, heavy wear | High gloss | 5 to 10 years (but prep is demanding) |
| Polyurethane sealer | Over decorative stain or paint, UV resistance | Satin to gloss | 3 to 5 years |
Apply sealer only to a clean, dry surface. Two thin coats beat one thick coat every time. A thick coat traps air, bubbles, and peels within a season. Use a roller with a 3/8 inch nap for smooth to lightly textured surfaces, and apply the second coat perpendicular to the first for even coverage. Don't seal when temperatures are below 50 degrees Fahrenheit or above 90 degrees, and check the weather: you need at least 24 hours with no rain after application.
Keeping It in Good Shape Long Term
Repairs hold longer when you follow a basic maintenance schedule. The biggest enemies of a concrete patio are water infiltration, freeze-thaw cycles, and deicing salts. Controlling those three things extends the life of any repair dramatically.
- Reseal the surface every 2 to 3 years with an acrylic sealer, or every 3 to 5 years with a penetrating sealer. Check by dripping water on the surface: if it soaks in rather than beading, it's time.
- Inspect and reseal expansion and control joints every 3 to 5 years. Clean out cracked sealant completely before reapplying.
- Avoid deicing salts (sodium chloride, calcium chloride) directly on the patio. Use sand for traction instead. Even on a sealed surface, repeated salt exposure breaks down the top layer over time.
- Keep gutters and downspouts directed away from the patio. Standing water is the single biggest cause of concrete deterioration.
- Trim back tree roots that are pushing under the slab. A root barrier installed before replanting prevents the problem from coming back.
- Check the perimeter of the slab each spring after freeze-thaw season. Small edge cracks are easy to fix when caught early and become expensive when ignored.
The work you've done to diagnose, prep, patch, level, and seal your patio is also a great foundation for bigger upgrades down the road, whether that means adding a decorative surface treatment, building out a new section, or simply enjoying a patio that looks and performs the way it should. Take the time to do each step right, and you won't be back out here with a trowel next spring fixing the same spot.
FAQ
Can I just pour concrete patch over a crack without widening it first?
Usually no. Many crack fillers and sealants need the crack opened slightly so they can bond to clean concrete on the sides, not just sit on the surface. If the crack is hairline, lightly widen and clean it, then fully blow out dust before filling.
What should I do if the crack is still moving or widening seasonally?
If you see seasonal movement (edges shift, crack width changes), use a repair system that tolerates movement, like a backer-rod plus a flexible self-leveling polyurethane or epoxy sealant. Avoid rigid patch materials in active cracks, because they tend to split again.
How do I tell whether I have settlement that needs leveling versus just a surface crack?
Run a straightedge across the slab and check if one side consistently sits higher or lower. Then recheck drainage with a hose. If water pools in the same location while the slab is uneven, leveling or slab lifting is usually the real fix, not crack sealing.
Is map cracking (crazing) something I should fill in individually?
Often no. When the pattern is shallow and limited to the surface layer, a full resurfacing overlay gives a more uniform look and reduces the risk of chasing many small cracks. Filling individual crazing lines can create visible ridges without improving performance.
Do I need to remove sealant from joints completely before resealing?
Yes. Old joint sealant must be cleaned out down to sound material, then backer rod installed, before applying new self-leveling polyurethane joint sealant. If you reseal over failed or brittle material, water can still enter and freeze-thaw the joint edges.
How long should I wait before putting furniture or a grill back on the patio after repairs?
For most crack and patch repairs, plan for at least 24 hours before foot traffic. Keep vehicles off for about a week, and if the weather is hot or dry, curing and bond strength can take longer, so give yourself extra time before heavy loads.
What’s the best way to prevent patched areas from drying too fast?
Mist and cure with moisture retention. Cover fresh patches with plastic sheeting or damp burlap for 24 to 48 hours to slow evaporation, especially in wind or direct sun. Skipping this step is a common reason patches debond early.
Should I use caulk, patch compound, or polyurethane sealant for concrete cracks?
Caulk designed for general indoor use or generic caulk over concrete cracks typically fails quickly. For concrete, choose concrete-appropriate fillers or polyurethane/epoxy systems, and match rigidity versus flexibility to whether the crack is still moving.
How deep should I fill a crack before adding the top sealant?
For wider cracks that need flexibility, fill most of the depth with foam backer rod, leaving the top section open for the self-leveling sealant (commonly leaving about the top 1/4 to 3/8 inch). This design reduces overfilling and improves bond where movement occurs.
What if I can’t correct slope with simple resurfacing or patching?
If the patio still drains toward the foundation and the slab cannot be feasibly corrected, you may need drainage interventions like a linear channel drain at the foundation-side edge, and in severe cases a professional assessment. Surface overlays alone can hide the problem temporarily but not stop infiltration.
How do I avoid hollow or failing patches in spalled areas?
Use bonding adhesive and pack repair material firmly to eliminate air voids, work in thin lifts if the depth is more than about 1/4 inch, and tool for good edge feathering. Deep, one-time pours and poor bonding prep are frequent causes of loose patches.
When should I consider grinding versus resurfacing?
Choose grinding when you mainly have high spots, coatings, or texture mismatches that can be leveled mechanically. Choose resurfacing when deterioration or crazing is widespread across the surface, since an overlay creates a consistent base without individually fixing many small defects.
Can I seal the patio immediately after leveling or patching?
No. Seal only after the repairs are fully cured and the surface is clean and dry. If you seal too soon, moisture can get trapped, which can weaken bonding and lead to premature peeling.
What’s the most common mistake when applying sealer?
Applying one thick coat. Two thinner coats provide better coverage and reduce bubbling and peeling risk. Also avoid applying when temperatures are below 50°F or above 90°F, and ensure at least 24 hours without rain after application.