You can absolutely build a concrete patio yourself. The realistic version: it takes a weekend of prep, one long pour day with helpers, and a week of curing patience.
How to DIY Concrete Patio: Step-by-Step Build Guide

Silas Morrison
22 Jun 2026
A standard 10x12 ft patio is very doable for a first-timer if you respect the order of operations: plan the size and get any required permits, excavate and compact a solid gravel base, set your forms level with the right slope for drainage, place reinforcement, pour and finish the concrete before it sets on you, cut control joints within hours of finishing, and seal the slab once it's fully cured.
Skip any of those steps and you'll be dealing with cracking, heaving, or puddles. Do them right and you'll have a slab that lasts 20-plus years.
Start here: planning your patio project
Before you touch a shovel, spend real time on this phase. The decisions you make now affect every step downstream, and fixing a bad plan mid-pour is not an option.
Size and location
Map out your patio on the ground with stakes and string before committing to anything. A common first patio is around 10x12 or 12x16 feet. Bigger is fine but requires more concrete volume and more helping hands on pour day. Think about traffic flow from the door, sun exposure, and where water will drain after rain. You want to slope the slab away from the house, typically about 1/8 inch per foot, so water doesn't pool against your foundation.
Permits and setbacks: check before you dig
I know nobody wants to hear this, but permits are real and skipping them can bite you hard. Requirements vary widely by jurisdiction. Some areas don't require a permit for a simple ground-level patio. Others do.
Prince George's County, MD, for example, requires a building permit for residential patios at 500 square feet or larger, or if you're adding stairs or ramps due to elevation changes. Rosemount, MN requires permits for any concrete slab and enforces setbacks of at least 5 feet from side and rear lot lines, and 15 feet from street-side lot lines.
Some municipalities like Bartlett, IL go a step further and require a base inspection before you pour and a final inspection to close the permit. Call your local building department, tell them what you're doing, and get the answer in writing if you can. A quick call now saves a massive headache later.
Budget and timeline
A rough budget for a 12x16 ft DIY pour typically runs between $800 and $2,000 depending on your region, the cost of ready-mix or bagged concrete, gravel, and whether you rent a concrete mixer or order a truck. Ready-mix delivery is usually the smarter call for anything over about 1 cubic yard since mixing that volume by hand or with a small mixer is exhausting and risks inconsistent batches. Timeline-wise, plan for one to two days of excavation and base prep, one full pour day (start early), and then seven days of curing before heavy foot traffic. Total elapsed time from start to usable patio: about 10 days minimum.
Tools, materials, and concrete mix choices

Tools you'll need
- Tape measure, stakes, and mason's line for layout
- Shovel and flat spade for excavation
- Plate compactor (rent one — don't skip this)
- Circular saw or hand saw for cutting form boards
- Level and a long straightedge or screed board
- Magnesium bull float for smoothing after screeding
- Hand float and steel trowel for final finish
- Edger tool for rounded slab edges
- Groover tool or rented early-entry saw for control joints
- Concrete screed (a 2x4 works fine for shorter spans)
- Wheelbarrow and hoe for moving and mixing if using bags
- Rubber boots, gloves, and eye protection (concrete is caustic)
Materials list
- Crushed gravel or compacted stone for the base (minimum 4 inches, some codes require more)
- 2x4 or 2x6 lumber for forms (2x6 if pouring 5 inches thick)
- Duplex nails and wood stakes to hold forms
- 6x6 W1.4/W1.4 (10/10) welded wire mesh or fiber reinforcement (see below)
- Concrete mix: ready-mix truck for large pours, bagged 4000 psi mix for smaller jobs
- Curing compound or plastic sheeting for the 7-day cure
- Penetrating silane-siloxane sealer for after cure
- Optional: concrete stain, decorative aggregate, or stamping tools
Choosing your concrete mix
For a residential patio, a 4000 psi mix is the standard target. Most ready-mix suppliers offer this as a default exterior slab mix. If you're in a climate that freezes and thaws repeatedly, specify air-entrained concrete.
Air entrainment creates microscopic bubbles that give water somewhere to expand when it freezes, dramatically reducing surface scaling and cracking. The FHWA recommends 5 to 7 percent air content for freeze-thaw exposed concrete, and many suppliers target 5 to 8 percent for exterior slabs in cold climates. When ordering, just ask for an air-entrained mix with 5 to 6 percent air content, your ready-mix supplier knows exactly what that means.
To figure out exactly how to order concrete for a patio, tell the supplier your slab size, thickness, and whether you need air-entrained concrete.
For smaller patios where you're mixing bags yourself, use a name-brand 5000 psi bagged mix and add a liquid air-entraining admixture like Sika Air-360 if you're in a freeze-thaw zone. Follow the product dosage directions carefully, add it to the water, not directly to the dry cement.
Reinforcement: mesh vs. rebar vs. fiber
| Reinforcement Type | Best For | Cost | Notes |
|---|---|---|---|
| 6x6 10/10 welded wire mesh (WWM) | Standard residential patios | Low | Required by some municipal codes; must be positioned in the middle of the slab thickness |
| #3 or #4 rebar on 18-inch grid | Heavier-use or larger patios | Moderate | Better crack resistance than mesh; more labor to install |
| Fiber mesh (polypropylene) | Secondary crack control | Very low | Poured directly into mix; reduces plastic shrinkage cracking but not a structural substitute for steel |
Bartlett, IL's municipal code specifically calls out 6x6 10/10 wire mesh placed in the horizontal center of the concrete as its baseline requirement. That's a reasonable minimum for most residential patios. You can use chairs or small rocks to hold the mesh up so it ends up centered in the slab when you pour, not lying on the bottom. Some pros prefer rebar for any slab larger than 200 square feet, but mesh is fine for typical backyard use.
Site prep and excavation
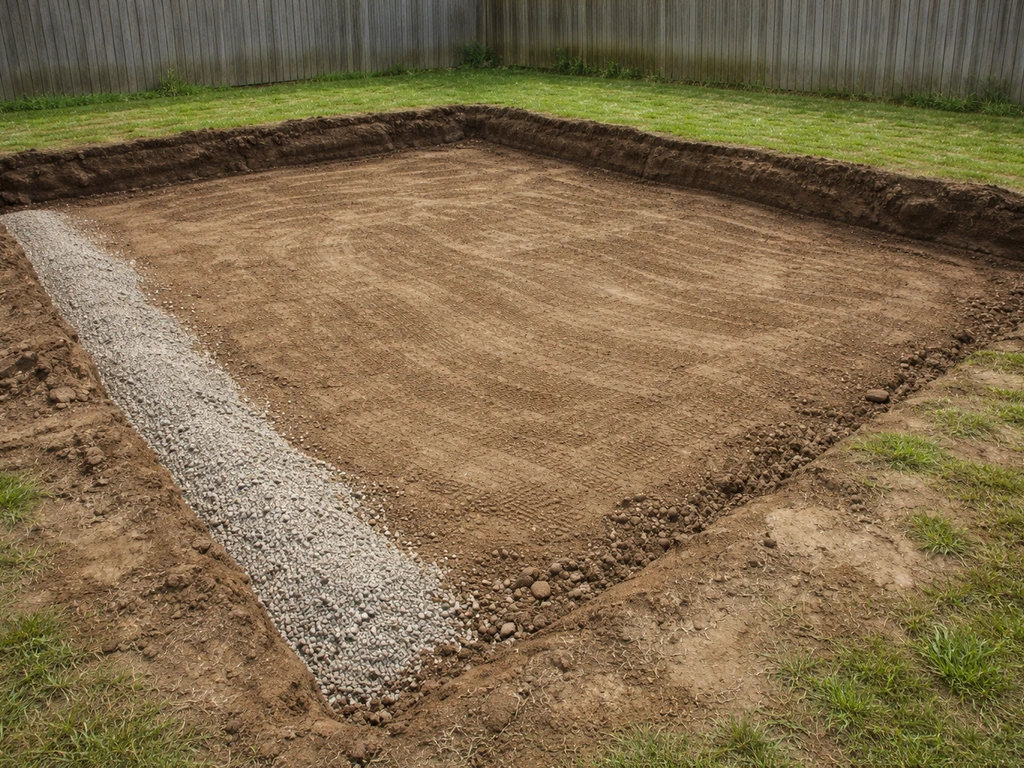
This is the step most DIYers underinvest in, and it's the most common reason patios fail. A concrete slab is only as stable as what's under it. If your subgrade is soft, wet, or poorly compacted, the slab will settle unevenly and crack. Period.
How deep to excavate
Add up your slab thickness plus your gravel base to get your total excavation depth. If you are wondering how to take up a concrete patio later, the excavation depth and base layers you build now will affect how hard it is to break it up and remove it. A standard residential patio uses a 4-inch concrete slab over a 4-inch compacted gravel base, so you're digging down 8 inches below your finished surface elevation.
Some jurisdictions, like Darien, IL, specify 5 inches of concrete over 4 inches of gravel, so check local requirements before you finalize your depth. Your finished slab surface should sit a bit proud of the surrounding grade so water runs off, and it should be level with or just below any door threshold it meets.
Grading and drainage
Slope matters more than most beginners realize. Aim for a cross-slope of 1/8 inch per foot away from the house. That's subtle enough that you won't notice it visually but strong enough to shed water. Use a line level or a digital level on a long straightedge to check your excavated base slope before adding gravel, because it's much easier to grade dirt than to try to fix a poured slab.
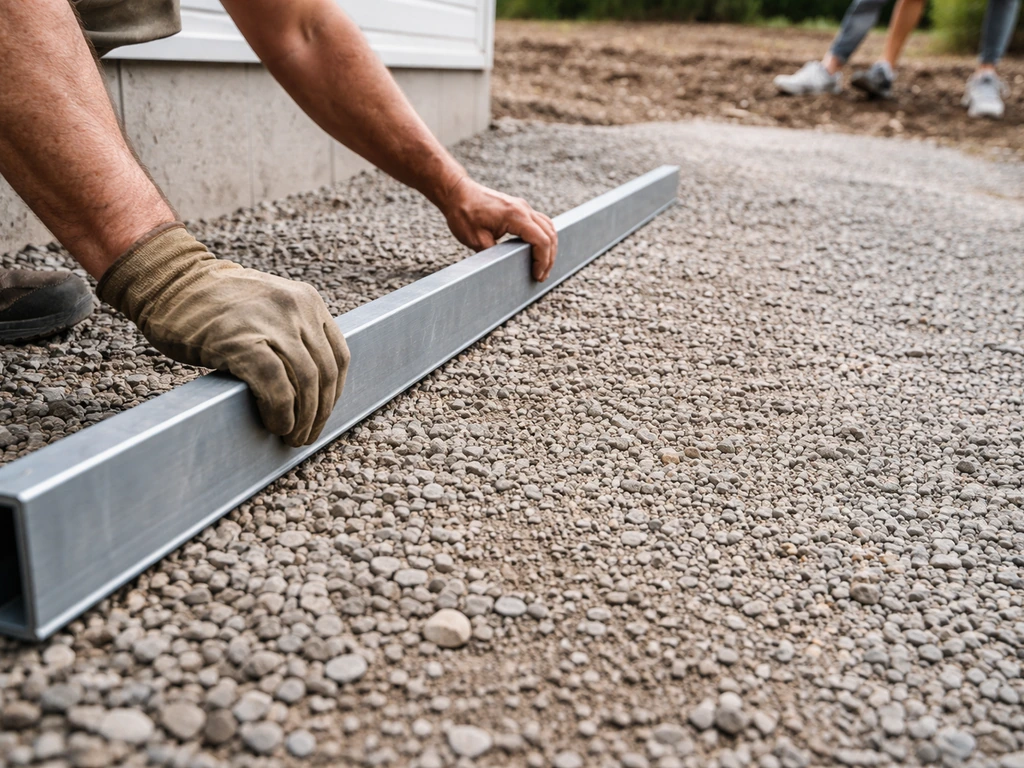
Subbase compaction
Spread 4 inches of crushed stone (3/4-inch crushed gravel or compactible base material, not pea gravel) and compact it with a plate compactor. If you're covering a large area, add the gravel in 2-inch lifts and compact each layer before adding the next. Rent a plate compactor from your local equipment rental, it costs about $80 to $120 per day and makes an enormous difference.
If your native soil is clay-heavy, consider laying a geotextile fabric between the soil and gravel to prevent clay migration up into your base over time. Once your gravel is compacted, it should feel almost like walking on pavement when you step on it. Common field verification for compaction includes nuclear density gauge or sand cone tests, and acceptance ranges are often around 90, 95% of maximum dry density depending on the project or specification.
Forming, layout, and reinforcement setup
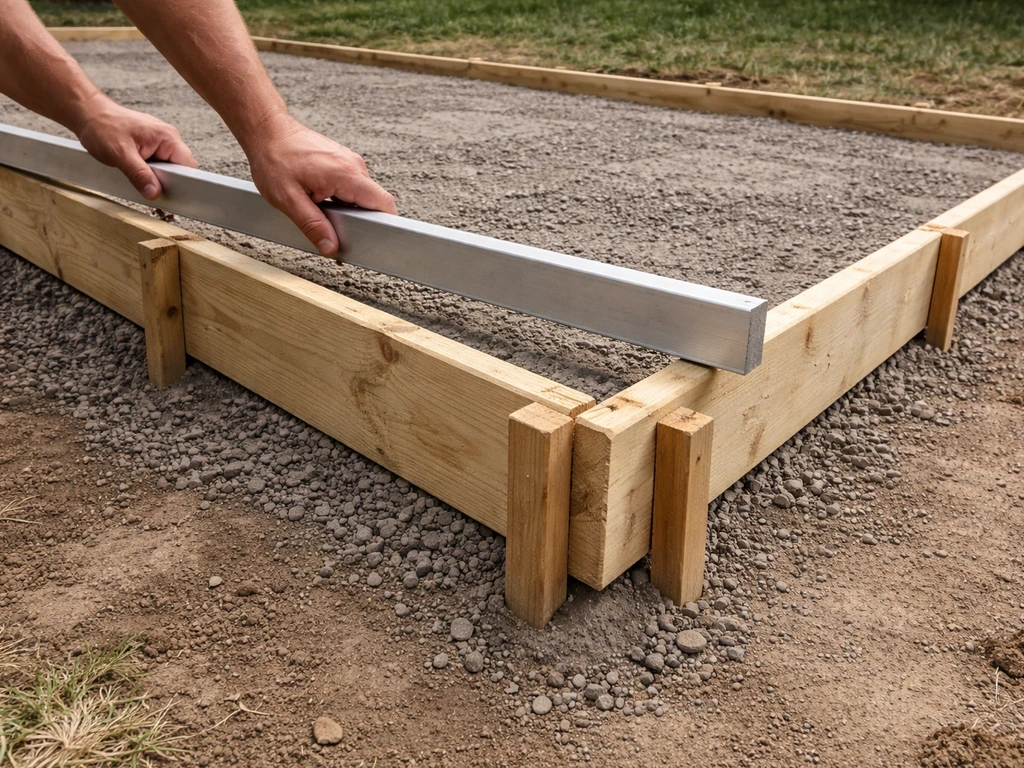
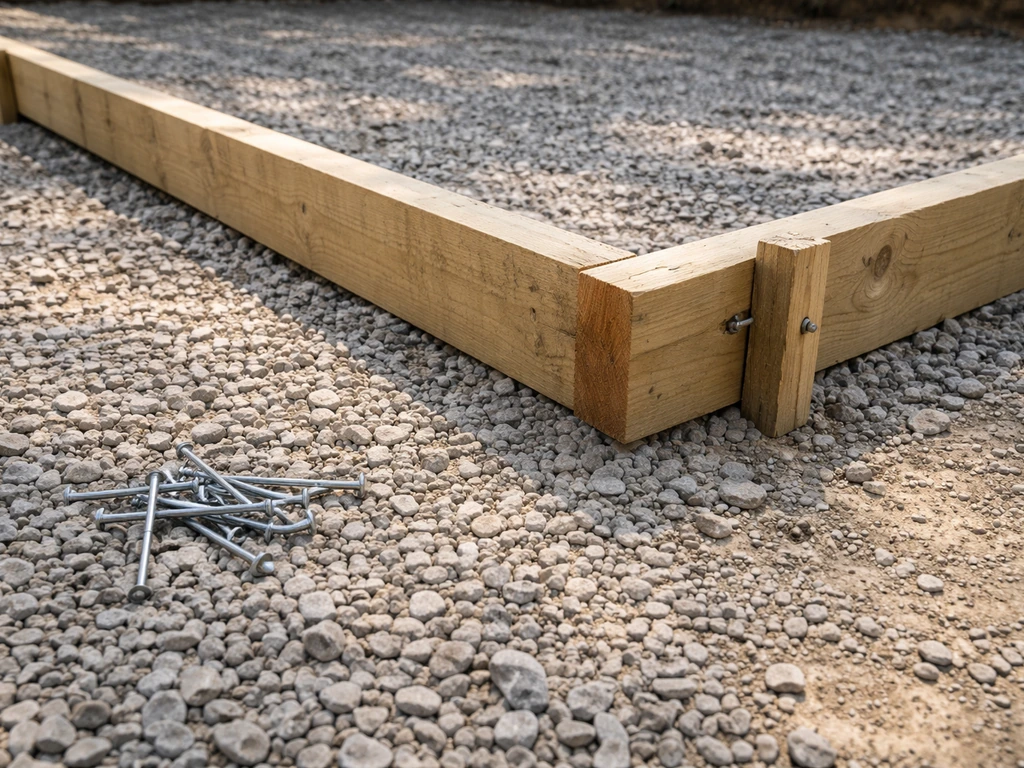
Building your forms
Forms are the mold your concrete fills. Use straight, knot-free 2x4s (for a 4-inch slab) or 2x6s (for a 5-inch slab) staked to the ground with wood stakes every 3 to 4 feet. Drive the stakes just outside the form and nail through them into the form board. The tops of your forms set the finished slab elevation, so get them right. Check that the forms are level across the width of the patio (side to side) and that you've built in your drainage slope in the long direction away from the house. Use a long straightedge and level across multiple points to verify.
Squaring the layout
Use the 3-4-5 triangle method to get your corners square: measure 3 feet along one side and 4 feet along the adjacent side; the diagonal between those two points should be exactly 5 feet if the corner is 90 degrees. For larger patios, scale it up to 6-8-10 or 9-12-15 for better accuracy. Spend the time to get this right before you set the first stake permanently.
Installing reinforcement
Once your forms are set, lay your wire mesh inside the form area. Overlap mesh sheets by at least 6 inches at the seams and tie them with wire. Use 1.5-inch plastic or wire chairs every 4 to 5 feet to hold the mesh up so it sits in the center of the slab thickness, not on the ground, not near the top. This center placement is where the reinforcement actually does its job. If you're using rebar instead, lap bars by at least 18 inches at splices and tie them with wire ties. If you're using fiber mesh, hold off until pour time and add it to the ready-mix truck or your mixer per the product instructions.
Isolation joints at the house
Place a 1/2-inch-thick strip of pre-molded expansion joint material along any edge where your slab will meet the house foundation or an existing slab. This isolation joint lets the new slab move independently and prevents it from cracking where it contacts a fixed structure. This is a small step that a lot of DIYers forget, and the crack that shows up along the house wall six months later is almost always because they skipped it.
Pouring, screeding, and finishing the slab
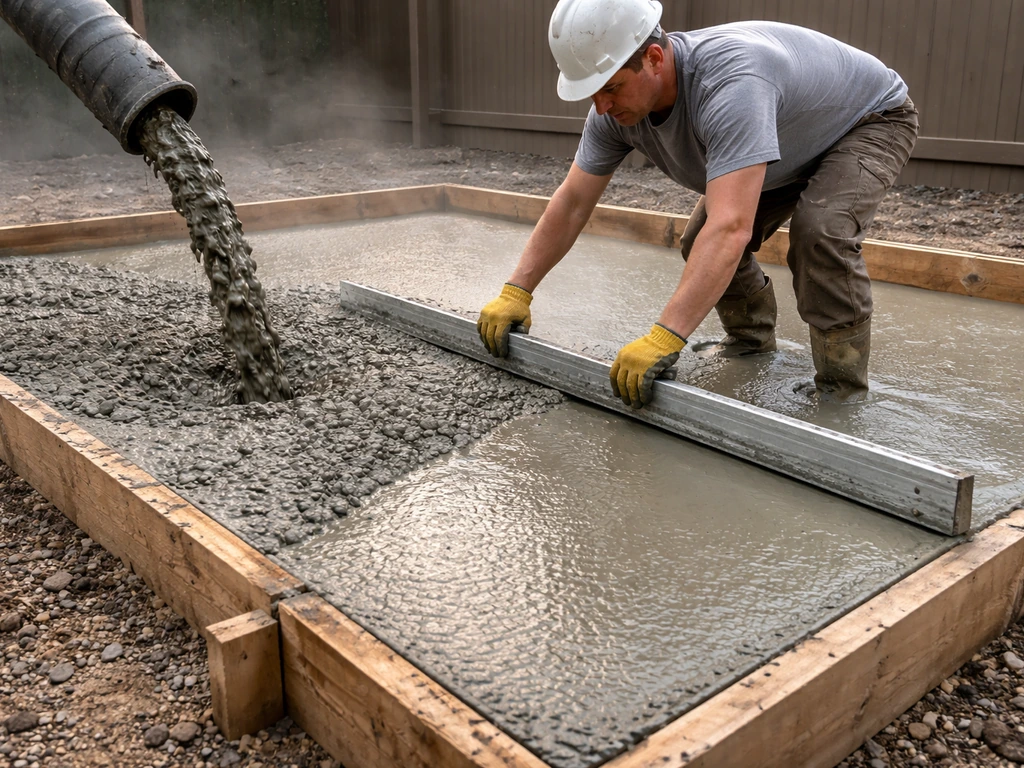
Pour day is where all the prep pays off. Start as early as possible in the morning, especially in warm weather. Concrete in a mixer truck sets faster than you expect, and if you're pouring in full summer sun, you may have less than 45 minutes of workable time after the truck leaves. Have at least two helpers lined up. This is not a solo job.
Placing the concrete
Pour concrete starting at one corner and work across the slab, using a rake or shovel to push it into place. Don't add water to the mix to make it easier to work with, that weakens the concrete significantly. Let the truck driver handle slump adjustments if needed. Fill the forms to just above the top, working the concrete around the reinforcement mesh with a shovel or vibrator. A concrete vibrator (usually rentable) helps consolidate the mix and eliminates voids near the forms, though it's optional for smaller residential pours.
Screeding
Once a section is filled, screed it immediately. Drag a straight 2x4 or aluminum screed bar across the top of the forms using a back-and-forth sawing motion to strike off the excess concrete and bring the surface level with the form tops. Work in 4 to 6 foot sections. You want the surface flat, not necessarily smooth, that comes next.
Bull floating
Right after screeding, use a magnesium bull float to eliminate ridges, fill low spots, and close the surface. Push and pull the bull float across the concrete in long sweeping strokes with the leading edge slightly raised. This is also what starts to bring cement paste to the surface for finishing. Do this promptly after screeding, the window closes as the concrete stiffens.
Waiting for bleed water
After bull floating, you'll see water rise to the surface (bleed water). Do not start finishing operations until this bleed water has completely evaporated. Finishing too early traps that water under the surface, which causes delamination, dusting, and a weak top layer. In hot or windy conditions, bleed water evaporates fast. In cool, humid conditions it can take an hour or more. Touch the surface gently with your finger, if it still feels slippery or soupy, wait.
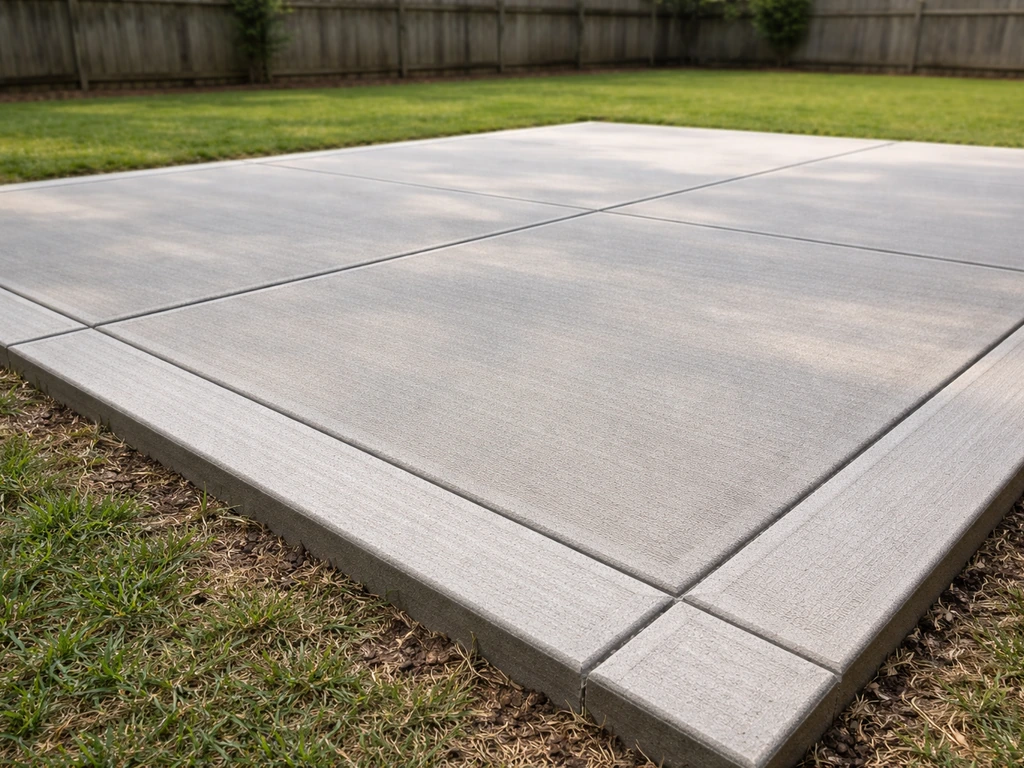
Edging and texturing
Once bleed water is gone and the concrete has firmed up slightly, run an edging tool along all the form edges to create a rounded edge that's more durable and less prone to chipping than a sharp corner. For texture, a broom finish is the most practical DIY choice: drag a soft push broom lightly across the surface in one direction for a non-slip texture. A stiff broom gives more texture; a soft one gives less. Broom after the final hand floating but before the concrete gets too stiff to mark.
Control joints: how to prevent cracking where you don't want it
Concrete shrinks as it cures, and that shrinkage creates stress that leads to cracks. Control joints are planned weak points in the slab that guide where the concrete cracks, keeping it in straight lines you chose rather than random diagonal fractures through your beautiful new patio. Done right, the cracks happen inside the joints where they're invisible and manageable.
Joint spacing and depth
The ACI 360 rule of thumb used most often in residential work is that control joint spacing in feet should not exceed 2 to 3 times the slab thickness in inches, with a practical cap of around 10 to 15 feet. For a 4-inch slab, that means joints every 8 to 12 feet. For a 5-inch slab, space them up to 10 to 15 feet apart. Cut the joints to a depth of about one-quarter of the slab thickness: about 1 inch deep for a 4-inch slab.
Timing your cuts
This is the most time-sensitive part of the whole project. Saw-cut joints need to be made within roughly 6 to 18 hours after finishing, depending on temperature and humidity. Cut too late and you miss the window, the concrete cracks randomly before you get there. Cut too early and you damage the edges of the cut.
In hot weather, you may need to cut within 4 to 6 hours. In cool weather, you might have up to 24 hours. The goal is to cut before stress cracks initiate but after the concrete has enough strength to hold a clean edge. Most rental centers offer early-entry saws that are lighter than full-size concrete saws and can be used sooner after pour.
A standard circular saw with a diamond blade works too if the slab has firmed enough.
You can also use a hand grooving tool to create joints the same day as the pour while the concrete is still fresh, press it in along a straightedge guide. This is the easiest approach for small patios and eliminates the timing anxiety of sawcutting.
Fill the joints after curing
Once the slab has cured for at least a week, fill the saw cuts with a flexible polyurethane or backer-rod-backed sealant rated for concrete joints. This keeps water, debris, and weed seeds out of the joint while still allowing the slab segments to move independently.
Curing: the step most people shortchange
Curing starts the moment you finish the surface and needs to continue for a minimum of 7 days for exterior flatwork per ACI 308 guidance. Curing is simply keeping the concrete moist and at a reasonable temperature (above 50 degrees F) so the chemical hydration process can complete properly. Concrete that dries out too fast is weaker, more porous, and more prone to surface cracking.
Your easiest options: cover the slab with plastic sheeting anchored at the edges, or apply a spray-on curing compound right after the final finish. If you use plastic, go back every day and re-wet the surface if it's dried out underneath. Do not let it bake uncovered in the summer sun for a week and call it cured. Keep foot traffic off for at least 24 to 48 hours and no vehicles for at least 7 days.
Sealing, staining, and making your patio look great long-term
Once the slab has cured for 28 days (that's when concrete reaches most of its design strength), you can apply a sealer and any decorative finishes. This is the step that separates a patio that looks good for a year from one that looks good for a decade.
Penetrating sealers: the best long-term protection
A penetrating silane-siloxane sealer chemically reacts inside the concrete pores and dramatically reduces water absorption, some products claim reductions of up to 95 percent. Unlike topical coatings, penetrating sealers don't create a film that peels or turns slippery. They're the best choice for any outdoor slab exposed to rain, freeze-thaw cycles, or de-icing salts. Products like Foundation Armor SX5000 WB are water-based versions that are low-VOC and easy to apply with a pump sprayer. Apply on a dry day with the slab surface temperature below 90 degrees F. Apply in two thin coats rather than one heavy coat for best penetration.
In freeze-thaw climates, sealing is not optional, it's the primary defense against the surface scaling and spalling that happens when water infiltrates the slab, freezes, and expands. If you already have an air-entrained mix AND a good penetrating sealer, your patio has the best available protection from cold-climate damage.
Staining and decorative options
If you want color, acid stain or water-based concrete stain can be applied to a cured, clean slab before or instead of a penetrating sealer. Acid stain creates a variegated, marbled look by chemically reacting with the concrete. Water-based stain gives more consistent color. Either option requires the surface to be clean, free of curing compound, and not previously sealed. After staining, apply a clear topical sealer (acrylic or epoxy) to lock in the color and protect the finish. Stamped or exposed aggregate finishes need to be planned before the pour, not added later, but staining is always a post-cure option if you want to upgrade a plain broom-finished slab.
If cracks or surface issues appear
Hairline shrinkage cracks in the first few weeks are common and usually cosmetic, especially if your control joints are in the right places. Wider cracks (more than 1/8 inch) or cracks that show vertical displacement need attention. For hairline cracks, a penetrating sealer will fill and stabilize them. For larger cracks, use a concrete crack filler or polyurethane caulk before sealing. If cracking is severe or the slab has significant uneven settling, that's a base compaction problem and may require removal and repour in the worst sections. That's why doing the base prep right the first time is so much cheaper than fixing it later.
Your DIY patio workflow at a glance
- Call your local building department to confirm permit and setback requirements before you start
- Stake out the patio footprint and confirm layout is square using the 3-4-5 method
- Excavate to the required depth (typically 8 inches for 4-inch slab over 4-inch base)
- Spread and compact gravel base in 2-inch lifts using a plate compactor
- Set and level forms with the correct drainage slope away from the house
- Install isolation joint material along any existing structure
- Place wire mesh on chairs so it sits centered in the slab thickness
- Order or mix concrete (4000 psi, air-entrained in freeze-thaw climates)
- Pour, rake, screed, and bull float in sections as quickly as possible
- Wait for bleed water to evaporate before finishing
- Edge and broom-texture the surface
- Cut or groove control joints within 6 to 18 hours of finishing
- Begin curing immediately: cover with plastic or apply curing compound and keep moist for 7 days
- After 28 days, apply penetrating silane-siloxane sealer for long-term protection
- Fill control joint saw cuts with flexible joint sealant
The honest truth is that building a concrete patio yourself is one of the more satisfying DIY projects you can tackle as a homeowner. It's physical, it has a clear beginning and end, and the result is permanent and useful. The things that go wrong on DIY pours are almost always the same: weak or uncompacted base, skipped control joints, finishing over bleed water, or adding water to the mix on site. If you want a dependable result, the key details in how to design a concrete patio are the same from layout to curing DIY pours. Avoid those four mistakes and you'll end up with a slab you're genuinely proud of.
FAQ
Can I DIY a concrete patio if I will park or drive on it sometimes?
If you only need a patio-level surface (no heavy loads), compacted gravel plus reinforcement is usually enough. If you expect things like a shed, hot tub, masonry grill island, or frequent vehicle traffic, plan for thicker slab or additional support, and consider local engineer or code requirements for load capacity. Don’t assume a standard 4-inch slab is adequate for concentrated loads.
What should I do where my new patio meets an existing slab, driveway, or foundation?
Yes, but you should not rely on joints alone. Any patio abutting a deck, garage apron, or walkway should have an isolation gap at the contact edges, use a proper expansion joint strip there, and treat that interface like a separate slab area so the different sections can expand and contract without pushing cracks into each other.
Is pea gravel okay under a DIY concrete patio?
Avoid pea gravel for the base, it doesn’t compact into a firm, interlocking layer and can lead to pumping and settlement. Use 3/4-inch crushed stone or a compactible base material, compact in 2-inch lifts, and verify density by how it feels underfoot (it should feel hard like pavement).
Can I pour a concrete patio if rain is in the forecast?
You can pour during rain only if you have a plan to protect the fresh surface and you can control runoff, but typical guidance is to avoid rain events right after finishing. Light drizzle that doesn’t disrupt finishing is less risky than a steady rain that can wash paste or create puddles. If rain is possible, schedule a sooner start and keep plastic sheeting ready for quick coverage after finishing if needed.
What should I do if the concrete arrives too stiff to work with?
Do not add water to the mix on site. If the concrete feels too stiff for your placement time, ask the ready-mix supplier driver to manage slump (if allowed by their process), and make sure you have enough help and correct tools staged before the truck arrives. Adding water increases shrinkage and lowers strength.
How soon can I walk on or use my new patio?
If you’re short on curing time, you can’t safely “rush” to use it like normal. After 24 to 48 hours you can usually walk on it carefully, but keep vehicles and heavy loads off for at least a week. Also protect from sun and wind, curing failures often show up weeks later as dusting or surface cracking.
What’s the best way to make control joints on a tight schedule?
Most DIYers should plan control joints before the pour schedule so they are cut on time, not after the fact. If sawcutting timing is stressful, hand grooving the same day works for smaller slabs, but you still need a straight guide and consistent groove depth (about one-quarter of the slab thickness).
Can I seal the patio earlier than 28 days?
Sealers can be applied after at least a week, but for best performance, wait for full cure (commonly 28 days) so moisture and hydration products have stabilized. If you seal too early you can trap moisture and get hazy spots or reduced penetration. Clean the surface thoroughly first, especially if you used curing compound or had dusting.
How do I decide whether a crack is cosmetic or a sign of a base problem?
For cracks, first determine if they are purely shrinkage or if the slab has vertical movement. Hairline shrinkage cracks that stay flat are usually handled with a joint-filling approach before sealing. If you notice lifting, rocking, or offset edges, that suggests foundation or base issues, filling alone won’t fix the root cause.
Can I add color or stain to a patio later if I already poured and cured it?
Yes, but only if you do it after curing and only if the slab surface is suitable. Staining or color work requires a clean, fully cured surface with no curing compound residue and no prior sealer (or you must remove it). After color, apply a clear topical sealer compatible with the stain so water doesn’t attack the porous surface.