
Landscaping around a concrete patio means combining edging, planting beds, hardscape transitions, drainage management, and optional decorative work into one cohesive plan. Done right, it makes the patio feel intentional and connected to the rest of the yard, protects the slab from root and water damage, and adds privacy and shade where you actually want them. Done wrong, it sends water toward your foundation, cracks your slab with invasive roots, and leaves you repairing things every spring. This guide gives you the measurements, materials, and step-by-step sequences to do it right the first time.
How to Landscape Around Concrete Patio: Edging, Plants & Drainage

Silas Morrison
16 Jul 2026
What this project actually solves
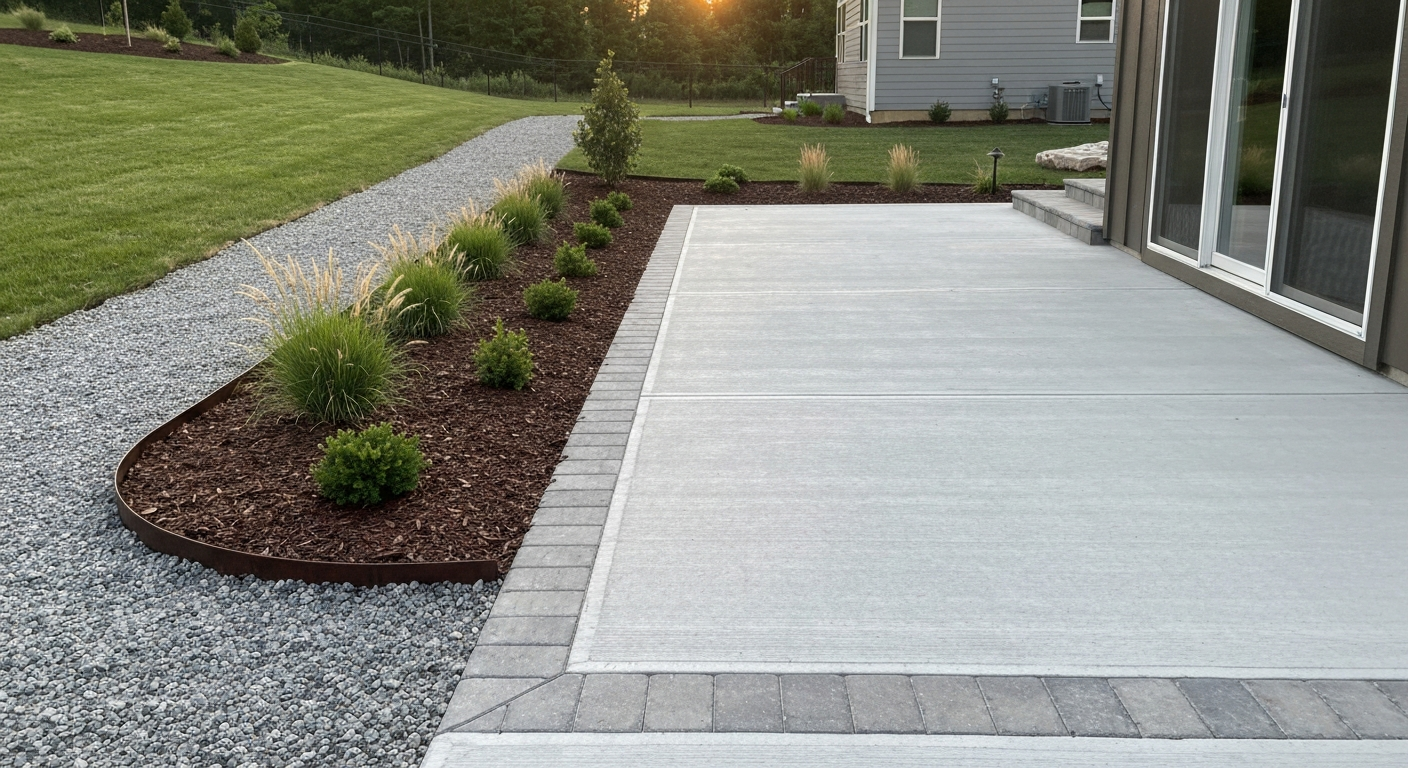
Most homeowners come to this project because their patio looks bare or unfinished, water ponds near the slab, or the edge between concrete and lawn is a muddy, crumbling mess. Those aren't just cosmetic complaints. Water pooling against a slab accelerates surface scaling and can undermine the base over time. A raw, undefined edge invites grass to creep under the concrete and makes mowing a chore. Landscaping solves these structural and aesthetic problems at the same time: proper grading and drainage protect the slab; defined edging stops grass invasion; planting beds add beauty and microclimate benefits like shade and wind buffering; and hardscape transitions like gravel or pavers create clean, durable paths between the patio and the rest of the yard.
I've worked on patios where the original contractor left the slab sitting flush with the surrounding soil, no slope, no edge definition, nothing. Within two seasons the grass had crept under the slab and the edge was heaving. Good landscaping around that concrete would have prevented most of those problems. That's the frame for everything in this article: we're not just making it look nice, we're making it last.
Site assessment before you dig anything
Before you buy a single bag of mulch, spend an hour walking the site and taking notes. Everything downstream depends on what you find here.
Slope and drainage
Measure your existing slab slope with a 4-foot level and a tape measure. The industry target for exterior concrete patios is 1/4 inch of drop per foot of run (about 2%), though the code-allowed minimum is 1/8 inch per foot. A patio that already drains away from the house is a good start. But also check the surrounding grade: the International Building Code requires the ground immediately adjacent to a foundation to drop at least 5% (roughly 6 inches) over the first 10 feet away from the wall. If your landscaping plan involves raising soil levels around the patio perimeter, you cannot let that new soil undo the designed drainage slope. This is one of the most common mistakes I see: people build beautiful planting beds right up against the slab edge and end up channeling water toward the foundation instead of away from it.
Concrete condition
Walk the slab and map every crack, spall, or settlement issue you find. See Pavement crack mapping & measurement approaches, FHWA overview (crack mapping techniques) for standard methods to map and document cracks blank" rel="noopener noreferrer">Pavement crack mapping & measurement approaches — FHWA overview (crack mapping techniques). Use a digital caliper or a crack gauge to measure crack widths. Hairline cracks under about 0.01 to 0.02 inches are typically cosmetic and can be monitored and sealed. ACI guidance (Serviceability behavior and tolerable crack widths) lists suggested tolerable residual crack widths by exposure, for example about 0.012 in (0.30 mm) for humid/soil exposure and about 0.016 in (0.41 mm) for dry air/protected surfaces blank" rel="noopener noreferrer">Serviceability behavior and tolerable crack widths (summary of ACI 224 guidance) — American Concrete Institute. Cracks wider than 1/8 inch, especially any with vertical displacement (one side higher than the other, measurable with a straightedge), active widening, or moisture seeping through, deserve a professional evaluation before you invest in landscaping that could mask a structural problem. Also note spalling (surface layer loss, often from freeze-thaw or deicing salts), efflorescence (white salt deposits indicating moisture migration), and any map or crazing cracks across the surface. Photograph everything with a ruler in frame and date the photos. If something gets worse over a season, you'll want that baseline.
Utilities, sun, shade, and soil
Call 811 (USA) before any digging deeper than a few inches. Mark utilities on your site sketch. Then track sun and shade through the day: a south-facing patio edge that gets full sun all afternoon is a very different planting environment than a north-facing edge that's shaded by the house. Check soil texture by squeezing a moist handful: sandy soil drains fast and needs organic amendment; heavy clay drains slowly and can hold water against the slab edge. Take note of any downspouts or surface drainage from neighboring lots that currently runs toward the patio, because your landscape plan will need to address those flows.
Design decisions and layout planning
The best patio landscapes match the scale of the space. A 10x12 patio doesn't need a 4-foot-wide planting bed on every side. I usually recommend starting with one focal side (typically the side most visible from inside the house or from a seating area) and keeping other edges simpler. Decide early on your maintenance tolerance: ornamental grasses and native shrubs need maybe one annual cutback; perennial flower beds need weeding, deadheading, and dividing. If you want something you barely have to think about, go with structural plants, gravel, or large-format pavers.
Think about the transitions, too. Where does the patio meet the lawn? Where does it meet a path? Where does it meet a fence or structure? Each of those transitions is an opportunity to add definition. A poured concrete border, a steel edge, or a row of pavers all send a clear visual signal about where one material ends and another begins. Decide on your style (formal and geometric vs. relaxed and curved) before you buy materials, because that choice drives everything from the edge type to the plant palette.
For plant selection near concrete, keep these rules in mind: avoid aggressive root systems (silver maple, willows, bamboo) within 10 to 15 feet of the slab. Ornamental grasses, compact shrubs, perennials, and groundcovers are generally safe choices. If you want trees nearby, choose slow-growing, small-caliper species with non-invasive roots and keep them at least 6 to 8 feet from the slab edge.
Tools and materials checklist by task
| Task | Key Tools | Key Materials |
|---|---|---|
| Edging and borders | Spade, mallet, rubber mallet, drill with masonry bit, level, string line, tape measure | Steel/aluminum edging, pavers, timber sleepers, masonry spikes, concrete anchors, polymeric sand |
| Planting beds | Spade, trowel, garden fork, wheelbarrow, hose/irrigation | Topsoil, compost, bark mulch (2–3 in), root barrier sheeting, plants |
| Hardscaping (pavers/gravel/stepping stones) | Plate compactor, hand tamper, rubber mallet, level, saw (wet tile saw or angle grinder) | Crushed stone base (4–6 in for pedestrian), coarse sand bedding (1 in), pavers, polymeric sand, edge restraint |
| Screening/privacy | Drill, impact driver, level, post anchor/base, saw | Pressure-treated lumber, concrete post anchors, lattice panels, fence panels, hardware cloth |
| Staining and sealing | Pressure washer, acid brush or pump sprayer, roller/nap cover, paint pad | Concrete cleaner/degreaser, acid or water-based stain, penetrating or film-forming sealer, painter's tape |
Preparing the existing concrete
Whatever you're adding around the patio, the slab surface condition matters. If you're going to stain, seal, or attach anything to the concrete, prep is the step most people rush and then regret. Start with a thorough cleaning: sweep off debris, then pressure wash the entire surface at 2,500 to 3,000 PSI. For oil spots, use a concrete degreaser and let it dwell 10 to 15 minutes before scrubbing and rinsing. If there's efflorescence, a diluted muriatic acid wash (10:1 water to acid) applied with a plastic sprinkler can will dissolve it. Rinse thoroughly and let the slab dry completely before any stain or sealer application.
For cracks, the repair approach depends on width. Hairline cracks can be filled with a penetrating concrete crack sealer applied by squeeze bottle or caulk gun. Cracks in the 1/16 to 1/4 inch range respond well to a polyurethane or epoxy crack filler, slightly overfilled and then ground flush when cured. Cracks wider than 1/4 inch, or any with differential height (one side raised compared to the other), need professional assessment before you proceed. Don't cover a structural problem with landscaping and call it done.
If you plan to attach screen frames, post anchors, or border forms to the slab, mark anchor locations, drill with a hammer drill and masonry bit (typically 1/2 inch for wedge anchors), and blow out the holes with compressed air before setting hardware. Anchor pullout strength depends heavily on proper hole depth and clean holes, so don't shortcut this step.
Installing borders and edging: options and step-by-step
Edging does two jobs: it keeps planting beds, gravel, and mulch from migrating onto the concrete, and it creates a clean visual line. The right edging choice depends on your style, budget, and whether the concrete will have hardscape material set right up against it. Edging and bordering the concrete patio is worth doing thoughtfully since it shapes the entire look of the finished space. For a step-by-step walkthrough on materials and installation, see how to edge concrete patio. For step-by-step methods and material choices on how to border concrete patio, see our detailed edging guide.
Steel or aluminum edge
This is my go-to for clean, modern looks. Commercial 1/8-inch steel edging or heavy-gauge aluminum holds a crisp line for years. For a straight run along a concrete patio, cut the edging to length with a metal-cutting blade, set it at the desired height (top should be flush with or 1/8 inch above mulch/gravel level), and anchor it with 12-inch steel spikes every 18 to 24 inches driven at an angle into the compacted soil. Where the edging runs parallel to the concrete slab, leave a 1/4-inch gap to allow for minor slab movement without buckling the edging.
Paver or masonry border
A single row of pavers set tight to the slab edge creates a soldier course that both defines the transition and provides a stable mowing edge. Excavate a trench 4 to 6 inches deep along the slab perimeter, lay 3 inches of compacted crushed stone base, then set pavers in 1 inch of coarse sand bedding. The top of the paver border should sit flush with or very slightly below the patio surface. Sweep polymeric sand into the joints and compact lightly. For the pavers to stay put without drifting away from the slab over time, install a continuous HDPE or aluminum edge restraint on the outer (away-from-patio) side, spiked at 8 to 12 inches on center into the compacted base.
Timber or sleeper border
6x6 pressure-treated landscape timbers or railroad tie-style sleepers give a warmer, more rustic look. Lay them in a trench so the top is at or just above grade. Anchor to the ground with 3/8-inch rebar stakes (18 to 24 inches long) driven through pre-drilled holes in the timber every 4 feet. For corners, half-lap the timbers and secure with 10-inch timber screws. Keep timber ends at least 1 inch away from direct contact with the concrete slab edge to prevent moisture trapping and wood rot.
Poured concrete curb
If you want a permanent, maintenance-free border, a small poured concrete curb (typically 4 inches wide by 4 to 6 inches deep) poured monolithically or adjacent to the existing slab is very durable. Set forms, pour a dry mix or standard 3,000 PSI mix, and finish the top surface. If poured separately from the existing slab, use a 1/2-inch expansion joint material between the curb and the patio edge to allow independent movement. This is the most labor-intensive option but the longest-lasting.
Building planting beds next to concrete
The biggest mistake people make with planting beds adjacent to concrete is mounding soil right up against the slab edge. That traps moisture, encourages weed intrusion under the slab, and promotes surface scaling at the slab edge, especially in freeze-thaw climates. Keep finished soil level at or slightly below the slab surface, not above it. If you need to add soil volume, build the bed outward from the slab, not upward against it.
For bed construction, excavate 8 to 12 inches deep to remove existing sod and poor soil. Backfill with a mix of 50% quality topsoil and 50% compost for most ornamental plantings, or a faster-draining mix (add 20% coarse perlite or grit) for Mediterranean-style plants or succulents. Avoid heavy clay-only backfill adjacent to a slab: when clay saturates, it expands and can exert lateral pressure on slab edges over time.
Plant spacing from the slab matters. Small perennials and groundcovers can go as close as 8 to 12 inches from the edge. Compact shrubs (ultimate spread under 3 feet) should be planted at least 18 to 24 inches from the slab edge. Medium shrubs (3 to 5 foot spread) need 3 feet of clearance. Trees of any size should be a minimum of 6 to 8 feet from the slab, and that's only for well-behaved, slow-growing species. Apply 2 to 3 inches of bark mulch over the bed, keeping it at least 2 inches away from plant stems and from the concrete edge.
Drainage and root protection
Drainage is the unsexy part of this project, but it's the part that determines whether your patio and landscaping hold up over 10 years or start causing problems in year three. Start by confirming your finish grade drains away from the house at the minimum 5% slope (6 inches over 10 feet) required by IBC Section 1804.4. If your site is flat or drains toward the structure, you need to correct that before adding any landscaping features. Even a well-designed planting bed becomes a problem if it's sitting in a low spot that collects water.
For areas that regularly hold water, a French drain is the most practical solution for most DIYers. Dig a trench 12 to 18 inches deep and 6 to 8 inches wide, sloping away from the patio at 1% minimum (1 inch per 8 feet). Line the trench with filter fabric, add 2 to 3 inches of washed crushed stone, lay 4-inch perforated pipe (perforations down), cover with more stone, wrap the fabric over the top, and backfill. Route the discharge to a catch basin, daylight at a lower point in the yard, or a dry well. If you have a downspout near the patio, tie it into solid pipe (not perforated) and run it at least 6 feet away from the slab before discharging or transitioning to perforated.
Root barriers are worth installing whenever you're planting shrubs or small trees within 4 to 6 feet of the slab edge. Use 24- to 36-inch deep HDPE root barrier sheeting installed vertically in a narrow trench between the plant location and the concrete. Overlap sections by at least 3 inches and seal with the manufacturer-supplied tape. The top of the barrier should sit at or just above finish grade so roots can't go over the top. This is cheap insurance against the cracked slab repairs that can cost several times more than the barrier itself.
Hardscape transitions: pavers, gravel, mulch, and stepping stones
Where the concrete patio meets a path, lawn, or another outdoor area, the transition material makes a big difference in both appearance and function. The key is keeping all transition hardscape slightly below the slab edge (1/4 to 1/2 inch lower is ideal) so water sheds off the slab and onto the adjacent material, not back toward the house.
Pavers adjacent to or over concrete
If you're setting sand-set pavers next to (not over) the concrete, excavate to allow for 4 to 6 inches of compacted crushed stone base (target 98% standard Proctor density per ICPI Tech Spec 2) plus 1 inch of coarse sand bedding plus the paver thickness. The finished paver surface should be 1/4 inch below the concrete slab surface. Install a continuous edge restraint (HDPE plastic for pedestrian loads, aluminum or steel for heavier use) on all exposed paver edges, spiked at 8 to 12 inches on center. Fill joints with polymeric sand, sweep in, compact lightly, and wet to activate. Mortar-set pavers directly over an existing cured slab are an option but require the slab to be at least 28 days old and structurally sound.
Gravel and decomposed granite
Loose gravel transitions are cost-effective and drain extremely well. Excavate 4 to 5 inches, install a layer of weed barrier fabric (commercial-grade non-woven geotextile, not cheap plastic sheeting), add 3 to 4 inches of 3/8-inch or 1/2-inch washed gravel or decomposed granite, and edge it with steel or aluminum edging on all sides except the concrete. Without solid edge restraint, gravel migrates quickly onto the patio surface and into planting beds.
Stepping stones
Stepping stones create a natural path look and work well leading away from a patio into a garden or lawn. Lay them on a 2-inch sand or compacted stone dust base, set so the top surface is 1/2 inch above the surrounding lawn grade (lawn mower clearance). Space centers at 18 to 24 inches for a comfortable walking stride. For a transition from concrete patio to stepping stone path, align the first stone so it sits flush with or just below the slab edge, with a consistent joint width between the concrete and stone.
Weed control in all hardscape zones
Geotextile fabric under gravel and pavers, polymeric sand in paver joints, and pre-emergent herbicide applied in spring and fall are your three main weapons. Don't rely on fabric alone in mulched beds: mulch breaks down over time and creates a seedbed on top of the fabric. Replenish mulch to maintain 2 to 3 inches annually.
Decorative scoring, staining, and sealing
If your patio looks dull or you want to coordinate it visually with new landscaping, decorative scoring, staining, and sealing can completely transform the surface without replacing it. These steps should be sequenced carefully and ideally completed before or independently from planting and edging work, since staining involves chemicals you don't want on plants or in new soil.
Scoring depth and patterns
Decorative scoring on a cured patio is done with a 4-inch angle grinder fitted with a diamond blade or a concrete scoring machine. The target depth for decorative grooves is approximately 1/4 inch. This is shallow enough to create a clean visual pattern (simulating tile, stone, or geometric designs) without functioning as a structural control joint. Keep decorative grooves shallower than one-quarter of the slab thickness (T/4) unless you intend them to act as control joints. Common patterns include a grid of 12x12 or 18x18 inch squares, diagonal diamond patterns, or a random flagstone simulation. Snap chalk lines for guides, cut slowly, and vacuum or blow out the dust before staining. For a step-by-step walkthrough on tools, blade choices, and cutting technique, see our guide on how to score a concrete patio.
Stain types and timing
Acid-reactive stains (metal salts in an acid carrier) chemically bond with calcium hydroxide in the concrete and produce a permanent, variegated, translucent color. Water-based stains are pigment-and-resin systems that sit in the surface and offer more color consistency and predictability. For new concrete, wait a minimum of 28 days before applying either type: fresh concrete contains too much moisture and residual alkalinity, which causes uneven color and can trap moisture under a sealer. Always do a test patch in an inconspicuous area before staining the full slab. The test patch will show you how the specific concrete mix accepts color, which varies significantly from slab to slab.
Sealer types and schedule
After staining, apply a sealer to protect the color and the surface. Penetrating sealers (silane or siloxane chemistry) absorb into the concrete and provide water and stain repellency without a surface film. They typically last 5 to 10 years but don't change the appearance much. Film-forming acrylic sealers create a glossy or satin surface sheen, enhance color, and protect against water and mild chemicals, but need recoating every 1 to 3 years depending on UV exposure and traffic. For a wet or pool-adjacent patio, check the sealer manufacturer's data for SCOF (static coefficient of friction) values on wet surfaces. Industry guidance recommends a wet SCOF of at least 0.5 to 0.6 to reduce slip risk. If your chosen sealer doesn't meet that, add non-slip aggregate to the final coat.
Screening and privacy solutions
Privacy is one of the most requested upgrades for existing patios, and there are more options than most people realize, from permanent framed screens to removable panels to living plant screens. Screening in a patio creates an enclosed, room-like space that functions differently from an open slab, and if you're considering that level of enclosure, it's worth checking local building codes early: many jurisdictions require permits for screen rooms, roofed patios, or any structure attached to the house, and there may be setback rules from property lines.
Anchoring posts to concrete
Any freestanding screen panel, fence section, or privacy wall adjacent to or on the patio needs a secure anchor point. For posts set into the slab, surface-mount post bases (Simpson Strong-Tie or equivalent) anchored with wedge anchors are the DIY-friendly option. Drill a 1/2-inch hole to the anchor's required depth (typically 3.5 to 4 inches into the slab), blow out the hole, set the anchor per manufacturer specs, and tighten to the specified torque. Confirm your slab is at least 3.5 inches thick before using this method. For panels that sit adjacent to the slab in the ground, set posts in concrete footings below frost depth.
Screen panel options
Framed fiberglass or aluminum screen panels are the most durable choice for a screened-in patio enclosure. Build the frame from pressure-treated or aluminum framing, attach screen using a spline roller and rubber spline, and seal all joints with exterior caulk. Removable wood or composite lattice panels mounted between posts give privacy with less commitment and can be taken down for winter in cold climates. Sliding privacy panels on top-hung track hardware allow you to open or close sections as needed, which is a nice feature for multi-use patios. For living screens, columnar evergreens (Emerald arborvitae, Sky Pencil holly) planted 2 to 3 feet on center in a row 3 to 4 feet from the patio edge create effective screening within 3 to 5 years.
Ventilation matters in fully screened spaces. Plan for at least one operable screen panel or door in addition to any fixed sections. Building codes in many areas require screening to allow a minimum of 10% to 15% of the wall area to be openable for natural ventilation in a porch or enclosed outdoor space. Verify local requirements before finalizing your design.
Recommended installation sequence
Trying to do everything at once on a landscaping project like this leads to stepping on fresh work, compacting newly amended soil with wheelbarrow traffic, and staining concrete that hasn't been prepped. Here's the order I follow on these projects, and it's worked consistently well:
- Site assessment and utility marking (Day 1, 1–2 hours)
- Concrete cleaning, crack repair, and surface prep (Day 1–2, 2–4 hours depending on slab condition)
- Decorative scoring if planned (Day 2, after surface is clean and dry, 2–4 hours)
- Rough grading and drainage work: French drains, downspout re-routing, grade correction (Day 2–3, variable)
- Border and edging installation along the slab perimeter (Day 3, 2–4 hours)
- Planting bed excavation, root barrier installation, and backfill with amended soil (Day 3–4)
- Hardscape transitions: base prep, compaction, paver or gravel installation (Day 4–5)
- Staining the concrete slab if planned (Day 5–6, after all adjacent hardscaping is done; protect fresh stain from debris)
- Sealing the slab (Day 6–7, after stain is fully cured per manufacturer instructions, typically 24 hours minimum)
- Planting (after slab is sealed and sealed surface is dry)
- Mulching beds (after planting)
- Screen or privacy structure installation (after hardscaping, so you have clean access for post setting)
- Final grade check, cleanup, and documentation photos (Day 7–10)
Realistic time investment for a medium-sized project (200 to 400 square foot patio with edging, one planting bed, gravel transition, and basic stain/seal): plan for 3 to 5 full weekend days spread over 2 to 3 weeks to allow concrete repair, stain, and sealer cure times. Rushing the cure times is where most DIY projects go sideways.
Finishing touches and ongoing maintenance
Once the project is done, a simple seasonal maintenance routine keeps everything looking good and extends the life of every element you've installed.
| Task | Frequency | Notes |
|---|---|---|
| Reseal concrete (acrylic/topical sealer) | Every 1–3 years | Check for wear, chalking, or water no longer beading; clean before recoating |
| Reseal concrete (penetrating silane/siloxane) | Every 5–10 years | Surface should still repel water; re-apply when water no longer beads |
| Re-mulch planting beds | Annually (spring) | Top up to maintain 2–3 in depth; keep mulch away from slab edge and plant stems |
| Inspect and reset edging | Spring and fall | Check for frost heave, displacement, or gaps at concrete joint |
| Prune shrubs and plants near slab | As needed, typically spring/fall | Keep plants from overhanging slab and directing water toward foundation |
| Check French drain and catch basin | Spring (after thaw) and fall | Flush with hose, remove debris from grates, check outlet for blockage |
| Polymeric sand in paver joints | Every 2–3 years or after erosion | Sweep in new sand and wet to reactivate; prevents weed growth and ant damage |
| Winter prep (cold climates) | Pre-freeze | Avoid deicing salts on stained/sealed concrete; use sand or magnesium chloride instead of sodium chloride |
Common pitfalls and how to fix them
Water pooling near the slab
Usually caused by raised bed soil levels adjacent to the slab, compacted clay backfill, or a clogged French drain. First, check if the bed soil level is sitting above the slab edge and regrade it to slope away. If pooling persists, confirm the French drain is functional (flush with a garden hose from the upper end and watch for flow at the outlet). In worst cases, a catch basin installed at the low point with solid pipe directing water to daylight is the most permanent fix.
Edging failure and migration
Steel or plastic edging that was set in uncompacted soil will migrate or tilt within a season. Reset it: pull the edging, compact the soil with a hand tamper, re-set the edging at the correct height, and drive new spikes into the compacted material. For edging along concrete, make sure there's a slight gap (1/4 inch) to allow for thermal movement.
Staining and sealer mistakes
Applying stain to insufficiently cured concrete (less than 28 days old) produces blotchy, unpredictable color that can't be corrected easily. Applying a sealer over a damp surface causes white haze (blushing) that may require stripping and reapplication. Applying sealer in direct hot sun causes it to cure too fast, leaving bubbles or lap marks. Always apply sealers in temperatures between 50 and 90 degrees Fahrenheit, in the shade or on an overcast day, in thin coats.
Root damage to concrete
If you're noticing slab lifting or cracking near established trees or large shrubs, the cause is almost certainly root pressure. At this point, the options are root pruning by a certified arborist combined with slab repair, or removal of the offending plant. Installing root barriers after the fact requires significant excavation and may damage the plant anyway. Prevention is far cheaper and easier than repair.
When to call a professional
Call a structural engineer or licensed concrete contractor if you find cracks wider than 1/4 inch with vertical displacement, evidence of ongoing slab movement, significant undermining of the base (you can probe under the slab edge with a rod), or foundation wall cracks that correlate with patio drainage patterns. Don't invest in a full landscape project on top of a slab that has an unresolved structural issue.
DIY decision checklist and quick measurements guide
Use this as a pre-project checklist and quick reference while you're on-site measuring and making decisions.
| Item | Target / Minimum | Notes |
|---|---|---|
| Slab drainage slope | 1/4 in per foot (2%) recommended; 1/8 in per foot (1%) minimum | Measure with 4-ft level and tape |
| Ground slope away from foundation | 5% (6 in over 10 ft) minimum per IBC 1804.4 | Do not let new landscaping reduce this slope |
| Crack width: monitor vs. repair vs. professional | < ~0.01 in = monitor; 1/16–1/4 in = seal/repair; > 1/4 in or displaced = pro eval | Use digital caliper or crack gauge |
| Planting distance from slab: perennials/groundcovers | 8–12 in minimum | More for clumping or spreading types |
| Planting distance from slab: compact shrubs (< 3 ft spread) | 18–24 in minimum | Check mature spread, not nursery pot size |
| Planting distance from slab: medium/large shrubs | 3–5 ft minimum | Root barrier recommended |
| Planting distance from slab: trees | 6–8 ft minimum (small, slow-growing only) | Avoid aggressive-rooted species entirely |
| Root barrier depth | 24–36 in deep | Top at or above grade; overlap sections 3 in |
| Paver base depth (pedestrian) | 4–6 in compacted crushed stone | Plus 1 in bedding sand |
| Edge restraint spike spacing | 8–12 in O.C. into compacted base | Per ICPI guidance |
| Mulch depth in planting beds | 2–3 in | Keep 2 in away from slab edge and plant stems |
| Decorative score depth (cured slab) | ~1/4 in | Do not exceed T/4 without engineering review |
| Minimum concrete age before staining | 28 days | Always test patch first |
| Sealer application temperature | 50–90°F | Avoid direct sun; apply in thin coats |
| Post anchor hole depth (wedge anchor in slab) | Typically 3.5–4 in into slab | Confirm slab thickness first; blow out holes |
| Permit check: screened rooms or attached structures | Required in most jurisdictions | Check with local building department before starting |
That list covers the vast majority of decisions you'll face on a patio landscaping project. Print it out, take it to the site, and update it as you go. The measurements and minimums are based on IBC requirements, industry standards from ICPI and ACI, and practical experience, so you can rely on them as your baseline rather than guessing. The goal is a finished space that looks great, drains correctly, and doesn't create problems for your slab or your foundation five years from now.
FAQ
What is the first thing I should check before landscaping around an existing or new concrete patio?
Perform a site assessment: document as-built slab elevations and slope with a 10‑ft level or laser level, map cracks and distress (photo with scale), check slab age and cure (new concrete <28 days needs cautious staining/sealing), identify adjacent foundation walls/doors, note surface drainage, and locate utilities. Verify finish slope away from the house meets practice and code: aim for 1/4 in/ft (≈2%) target for patios and at minimum 1/8 in/ft (≈1%) for runoff; coordinate with IBC/building‑science guidance requiring ~5% slope for the first 10 ft away from the foundation where applicable.
What tools and materials should I have on hand for landscaping and working around a concrete patio?
Essential tools: laser or 10‑ft level, measuring tape, straightedge, digital caliper/crack gauge, wheelbarrow, shovel, hand trowel, edging tool, rubber mallet, saw (circular or wet saw with diamond blade) or grinder for cured scoring, broom, pressure washer. Materials: topsoil/soil amendment, crushed stone/aggregate for bases, paver edging (aluminum/steel/HDPE), landscape fabric, mulch/gravel/paver units, polymeric sand or mortar (for joints), concrete repair caulk/epoxy, stain/sealer (manufacturer TDS), fasteners/anchors for edge restraint, screening materials (lattice, framing, screening fabric), downspout extensions. PPE: gloves, eye protection, hearing protection, respirator for cutting or staining.
How should I plan edges and borders so they don’t damage the concrete or trap water?
Sequence and measurements: keep soil and planting media at least 1–2 in below the concrete top of slab to avoid wicking and edge freeze issues; do not mound soil against slab edge. Install a continuous edge restraint where pavers meet concrete—anchor into the concrete with concrete screws/anchors every 8–12 in for plastic edging or per manufacturer spacing for metal/stone restraints. Maintain positive drainage: grade adjacent beds to slope away from slab (minimum 1/8 in/ft, target 1/4 in/ft) and install a 2–4 in compacted crushed‑stone strip (drainage buffer) along the slab edge when soils are poorly draining.
What are safe planting choices and root‑protection practices near a patio to avoid slab damage?
Select smaller, non‑invasive root species and place large trees ≥10–15 ft from slab edge depending on species root characteristics. Use root barriers (plastic or fabric) for closer plantings and ensure planting beds have at least 12–18 in of good engineered planting soil to reduce the need for deep root foraging near the slab. Avoid planting directly against the slab edge—leave 2–3 ft buffer of gravel/mulch or install a shallow planting bed separated by a minimum 2–4 in crushed stone buffer to protect slab edges and maintain drainage.
How do I construct planting beds next to concrete without creating moisture problems or undermining the slab?
Build beds with a defined edge and drainage layer: excavate to remove at least 6–8 in of native compacted soil, place 2–4 in of compacted crushed stone for drainage, add engineered planting soil above that (do not pack soil against the slab face above the top edge). Slope the bed surface away from the slab at 1/8–1/4 in/ft. Install fabric or a shallow root barrier at the slab interface if using moisture‑retaining soils. For raised beds against patios, build a framed raised bed with a minimum 4–6 in wall height above patio surface to prevent soil contact with concrete.
What are recommended methods and measurements for decorative scoring, control joints, staining, and sealing?
Control joints: for structural control joints, saw to a depth of at least one‑third slab thickness (T/3) when possible; early sawing window typically 8–12 hours with conventional saws (weather dependent) or 1–4 hours with early‑entry systems—judge by surface condition to avoid raveling. Decorative scoring: keep decorative grooves shallow (~1/4 in) and use a groover on fresh concrete or diamond blade/grinder on cured slabs; avoid cutting to control‑joint depths unless engineered. Staining: wait ~10–28 days (commonly 28 days) for new concrete per product TDS, always test patch, follow manufacturer for application and neutralization for acid stains. Sealing: choose penetrating (silane/siloxane) for long life (recoat ~5–10 years) or film‑forming acrylics for color/enhancement (recoat 1–3 years); check the sealer’s slip data and apply non‑slip additives where needed.