
To make concrete forms for a patio, cut 2x4 or 2x6 lumber to your layout dimensions, stake the boards level and plumb at the slab perimeter, brace every 2 to 3 feet so they hold pour pressure, check for square and slope (at least 1/8 inch per foot away from your house), then leave them in place until the concrete reaches enough strength to stand on its own, typically 24 to 48 hours. Recommended practice is to use at least 1/8–1/4 in/ft slope away from buildings; see International Residential Code, Chapter 4 (Drainage R401.3) for the 6 in/10 ft (≈1/8 in/ft) requirement and common 2% (≈1/4 in/ft) guidance The International Residential Code — Chapter 4 (Drainage R401.3) specifies a 6-inch fall in 10 feet (≈1/8 in/ft) away from structures and notes that some jurisdictions use a 2% (≈1/4 in/ft) minimum for impervious surfaces within 10 feet.. That's the core of it. Everything else, choosing the right form material, handling curves, placing reinforcement, pouring in sequence, and pulling forms cleanly, is what this guide walks through, step by step.
How to Make Concrete Forms for Patio: Step-by-Step DIY Guide

What this guide covers and who it's for
This is a complete, hands-on walkthrough for DIY homeowners who want to build a concrete patio from scratch. I've written it for people who are comfortable with basic carpentry and yard work but may never have poured concrete before. You'll find a planning checklist, material comparisons, exact framing measurements for straight and curved edges, base prep, reinforcement, pouring and finishing steps, form removal, and a troubleshooting section for the things that actually go wrong. If you're also thinking about modular molds or precast concrete squares, there's a section for that too. By the end, you'll know whether to tackle this yourself or bring in help, and what to do next for sealing, staining, or stamping.
Planning checklist before you buy anything
Skipping planning is the number-one reason patio projects stall halfway through. Run through this list before you order a single board or bag of concrete.
- Measure the finished patio area in feet (length x width). Add 6 inches on each side to account for form boards sitting outside the slab edge.
- Check local permit requirements. Many U.S. jurisdictions exempt at-grade slab-on-grade patios from permits, but some cities (Los Angeles, for example) may require plan review for new or attached patio work. Call your local building department or check their website before you dig. Setback rules from property lines matter too.
- Confirm drainage slope. The IRC requires finished grade to fall at least 6 inches in the first 10 feet from the foundation, with impervious surfaces sloped at least 2% away from the building. For a patio, plan for 1/8 to 1/4 inch of drop per foot running away from the house.
- Decide on slab thickness. For a pedestrian patio, 4 inches is the standard minimum. If a vehicle will ever roll across it, go 5 to 6 inches.
- Estimate concrete volume. Multiply length (ft) x width (ft) x thickness (ft, so 4 inches = 0.333 ft), then divide by 27 for cubic yards. Add 10% for waste and low spots.
- Set a realistic budget. Lumber, stakes, gravel, concrete, mesh or rebar, and rental equipment all add up. A typical 12x16-foot DIY patio runs $600–$1,500 for materials depending on your region and finish choices.
- Map out your timeline. Allow one full weekend for excavation and base prep, another for setting forms and pouring, plus 7 days of curing before putting furniture on the slab.
- Line up help. Pouring and screeding concrete is not a solo job. You need at least one other person for any slab over 60 square feet.
Materials, tools, and what they'll cost you
You have three main form material options: dimensional lumber, metal stakes and banding, or plastic/modular molds. Each has its place, and the right choice depends on your patio shape, budget, and whether you plan to reuse the forms.
| Form Type | Best For | Pros | Cons | Approx. Cost |
|---|---|---|---|---|
| 2x4 or 2x6 lumber | Straight-edge rectangular patios | Cheap, easy to cut, widely available, reusable 3–5 times | Warps with moisture, not great for tight curves | $0.50–$1.50 per linear foot |
| Flexible 1/4" plywood or kerfed boards | Gentle to moderate curves | Bends easily, clean edge profile | Requires more stakes, less reusable | $1–$2 per linear foot |
| Metal form stakes + aluminum banding | Long straight runs and sweeping curves | Very straight, rigid, good for large pours | Higher upfront cost, requires bender for tight curves | $2–$5 per linear foot |
| Plastic/rubber modular molds | Patterned slabs, concrete squares, decorative layouts | No carpentry skills needed, reusable dozens of times | Limited to mold shape, slower layout for large areas | $15–$60 per mold panel |
| Ready-made modular form systems | Grid or square-pattern patios | Fast layout, built-in joint spacing | Can look uniform, higher per-sq-ft cost | $1.50–$3 per sq ft of mold |
Tool list
- Tape measure (25 ft minimum) and chalk line
- Mason's string line and line level
- Circular saw for cutting form boards
- Drill/driver and 3-inch screws or duplex (double-headed) nails
- 4-lb sledgehammer for driving stakes
- Plate compactor (rent for ~$80–$120/day) for base compaction
- Concrete mixer (rent for ~$60–$100/day) or ready-mix truck for larger pours
- Bull float (48–72 inch blade) and hand float
- Screed board (a straight 2x4 works fine)
- Edger and jointer tools
- Wire cutters and tie wire for mesh
- Safety glasses, work gloves, rubber boots, and knee pads
Site prep and building the concrete base
The base is what keeps your patio from cracking and settling. For detailed, step-by-step instructions on how to make a concrete base for patio, see our dedicated guide. Concrete Patio Construction: Techniques and Specifications, National Patio Construction Authority notes that design practice and agency specs commonly call for a compacted granular subbase (crushed stone or gravel) beneath slab-on-grade; 4 inches is the standard minimum compacted base for pedestrian slabs, with thicker bases (6–8 in) for vehicular loads or poor subgrade conditions Concrete Patio Construction: Techniques and Specifications — National Patio Construction Authority. I've seen homeowners spend all their time on forms and pour directly on soft topsoil. Two winters later, the slab looks like a crumpled piece of paper. Do the base right and the rest is much more forgiving.
- Mark the perimeter with stakes and string. Account for the slab thickness (4 inches), base gravel (4 inches minimum for pedestrian slabs, up to 8 inches for poor soil conditions), and any sand leveling layer (optional, 1 inch max).
- Excavate to the required depth. For a standard 4-inch slab on a 4-inch gravel base, dig down 8 to 9 inches below finished grade. Remove all sod, roots, and loose debris.
- Check subgrade bearing. Probe the soil with a rod. If it sinks more than a few inches without resistance, you may have soft spots that need overexcavation and fill with compacted gravel.
- Spread and compact crushed stone or gravel (3/4-inch clean crushed stone works well). Target a 4-inch compacted layer for pedestrian use. Compact with a plate compactor to approximately 95% of standard Proctor density — in practice, this means running the compactor over the area in overlapping passes until the surface stops visibly deflecting.
- Check your slope. Set a string line from the house outward and use a line level to confirm at least 1/8 inch per foot of fall away from the foundation. Mark high and low points so you know where your form stakes will need adjustment.
- If your soil drains poorly, add a 1-inch sand leveling course on top of the gravel. This helps you fine-tune level and form a consistent bottom for the slab.
Framing straight-edge forms: exact measurements and method
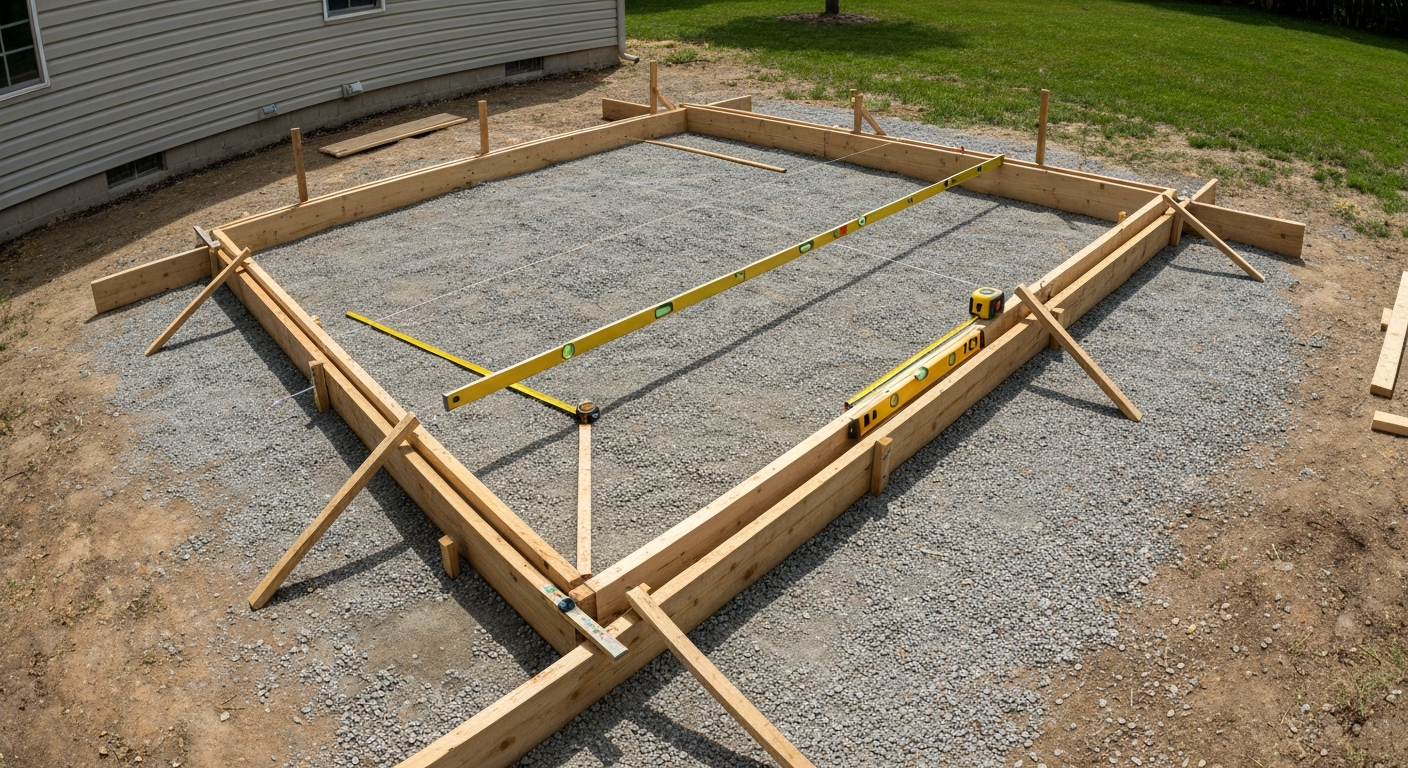
For a rectangular or L-shaped patio, 2x4 boards are fine for a 4-inch slab. See the separate guide on how to frame for concrete patio for step‑by‑step instructions and diagrams. The board face acts as your slab edge, so the nominal 3.5-inch height of a 2x4 works if you're slightly proud of finished grade. Use 2x6 boards (5.5-inch face) for a 6-inch slab or any situation where you need extra height to set a screed.
- Lay out the perimeter using a chalk line or mason's string. Establish a baseline along the house foundation (your starting edge), then measure out to full width.
- Check for square using the 3-4-5 triangle method: mark 3 feet along one baseline, 4 feet along the perpendicular, and confirm the diagonal measures exactly 5 feet. For larger slabs, scale up to 6-8-10 or 9-12-15 for accuracy.
- Cut form boards to length. Butt joint the corners: the long boards run full length, the short (perpendicular) boards fit between them. Overlap direction matters for a tight corner without gaps.
- Set the first board along the house. Push it tight to the foundation or against an isolation joint strip (more on that below). Drive a 2x2 wood stake or 18-inch metal form stake every 24 inches along the outside face of the board. Stakes should be flush with or just below the top of the form board.
- Drive stakes with a sledgehammer. They need to go at least 12 inches into the ground, and ideally deeper on sandy or loose soil.
- Screw or nail the board to each stake with two 3-inch screws. Do not nail from the outside of the stake through into the board — you want to be able to pull the stakes easily later. Drive screws from the board side into the stake.
- Set the opposite parallel board. Use a level and tape measure across the top edges to confirm both boards are at the same height (accounting for your slope). Adjust by pushing stakes deeper or shimming the board up with a scrap piece of wood.
- Set the two end boards to complete the rectangle. Check square again with the 3-4-5 method, or measure diagonals — they should be equal within 1/4 inch.
- Add bracing stakes at every butt joint and at any board longer than 8 feet. On long runs, add kicker braces (a short angled stake screwed from the back of the form stake to the ground) to resist lateral pressure during the pour.
Framing curved edges: flexible plywood, kerfed boards, and metal banding
Curves are where a lot of DIYers give up and just make a rectangle. But a curved front edge or rounded corner is very achievable with the right material. The key is picking the method that matches how tight the curve is.
Gentle curves: 1/4-inch bending plywood
For curves with a radius of 3 feet or more, rip 1/4-inch plywood into 4-inch-wide strips. These bend easily and hold their shape when staked. Soak the strips in water for 30 minutes if the curve is still resisting. Use stakes every 12 to 18 inches along the curve, tighter spacing than straight runs, because each stake is doing more work against spring-back. Layer two strips together if you need more rigidity.
Tighter curves: kerfed boards
Take a 2x4 and make a series of parallel saw cuts (kerfs) on the back face, spacing them 1 to 2 inches apart, cutting to within about 1/4 inch of the front face. The front face stays intact and the board now bends. The tighter you want the curve, the closer together your kerfs should be. A curve of 18 to 24 inch radius is achievable with 1-inch kerf spacing. Stake every 12 inches.
Large-radius or heavy curves: metal form banding
Metal banding (thin steel or aluminum form stakes combined with flexible metal strip forms) is what contractors use for long sweeping curves. The metal strip is rigid enough to hold pour pressure but flexible enough to follow a smooth arc. Bend the strip around wooden or metal stakes driven every 18 to 24 inches. Secure with form wire or clips. This method gives the cleanest edge profile and is easiest to strip cleanly after the pour.
Laying out a curve
Use a stake at the center point of your arc and a string or rope at the desired radius length to scribe the curve onto the ground with spray paint or sand. This gives you a consistent reference line for placing your form material. Alternatively, use a garden hose laid on the ground to visualize and adjust the shape before committing to stakes.
Using modular molds and concrete squares
If a poured slab isn't your goal and you'd rather create a grid pattern or individual concrete square stepping stones, plastic or rubber molds let you work section by section. For instructions on how to make concrete patio furniture, see our step-by-step guide to casting concrete furniture using modular molds. For step-by-step instructions on how to make a patio with concrete mold, see the how to make a patio with concrete mold guide. This is a great approach for patios that would be awkward to pour all at once, or for adding a decorative look without stamping tools. For step-by-step instructions on how to make a patio with concrete squares, see the dedicated section on modular molds and concrete squares. If you want step-by-step instructions on how to use concrete molds for patio projects, see the modular molds section.
- Prepare the base the same way as for a full slab: excavate, add compacted gravel, and check your slope.
- Lay out the mold grid using a chalk line or string grid. Most modular systems use a set square pattern — typically 12x12, 16x16, or 24x24 inch squares — so establish your starting corner at the house and work outward.
- Set each mold level individually. Use a hand level or torpedo level on each form panel. Adjust the sand or gravel below as needed. This is slower than screeding a flat base, but you have more control.
- Fill each mold with a stiff concrete mix (a slump of 2 to 3 inches works better than a wet mix here, as it holds its shape when the mold is lifted).
- Strike off the top flush with the mold edge using a small float or screed board.
- Allow concrete to firm for 30 to 60 minutes (or per mold instructions), then carefully lift the mold straight up. Set it in the next position. The formed square should hold its shape.
- After all squares are placed and cured, fill joints with polymeric sand, decomposed granite, or leave open for ground cover depending on your preference.
- If you're working with precast square pavers and setting them into a sand bed rather than forming them in place, the approach is different — that's more of a paver installation than a forming project.
Modular molds save time on carpentry but require patience with leveling each individual panel. They work best for patios under 200 square feet or for accent areas alongside a larger slab.
How to set forms and stakes correctly
Setting forms is really two jobs at once: you're building a mold and you're setting the finished elevation of the slab. For a step-by-step tutorial on how to set forms for a concrete patio, see how to set forms for concrete patio. Get one wrong and the pour will show it permanently.
Stake types and spacing
- 2x2 wood stakes (12–18 inches long): cheap, easy to cut, work well in firm soil. Drive with a 4-lb sledge.
- Metal form stakes (16–24 inches, pre-drilled): stronger, won't rot if they get wet during the pour, easier to pull cleanly. These are worth renting or buying in bulk for larger jobs.
- Spacing: every 24 inches for straight runs, every 12–18 inches for curves or on soft soil.
- Depth: at minimum, stakes should be driven so the top of the stake is flush with or just below the top edge of the form board. The stake must penetrate firm soil — if it wobbles, it's not deep enough.
Controlling elevation with batter boards
For larger patios where you can't easily see one side from the other, set up batter boards at each corner: two stakes set back 3 to 4 feet from the corner with a horizontal board across them at your target elevation. String lines stretched between batter boards give you a consistent height reference along every edge, even after the form boards are in place and you're moving around the site.
Squaring and slope check
Before you pour, confirm the form is square (equal diagonals) and that you have your drainage slope built in. Stretch a string line across the top of the form from the house side to the far edge. Use a line level or a 4-foot level with a ruler under one end. At 1/8 inch per foot, a 12-foot-wide patio should have a total drop of 1.5 inches from house to outer edge. Mark both ends of each form board with a pencil line at the correct height so you can check it hasn't shifted after staking.
Reinforcement and joint placement
Concrete is strong in compression but weak in tension. Reinforcement keeps shrinkage cracks from opening up into ugly faults, and control joints give the slab a place to crack predictably rather than randomly.
Wire mesh vs. rebar
| Option | Specification | Best For | Placement | Cost |
|---|---|---|---|---|
| Welded Wire Fabric (WWF) 6x6-W1.4 | Light-duty (formerly 10/10 mesh) | Standard pedestrian patios | Mid-depth to upper 1/3 of slab, on chairs 2–3 ft apart | ~$0.15–$0.25/sq ft |
| WWF 6x6-W2.9 | Heavier mesh | Larger slabs, occasional vehicle traffic | Same as above, closer chair spacing | ~$0.25–$0.40/sq ft |
| #3 Rebar (3/8") | Deformed bar | Heavier loads, expansive soils | 12–24" on center grid, mid-depth on chairs | ~$0.40–$0.70/linear ft |
| #4 Rebar (1/2") | Heavier bar | Vehicle traffic, structural loads | 12–18" o.c., mid-depth or upper zone | ~$0.60–$1.00/linear ft |
| Synthetic fiber (polypropylene) | 0.5–1.5 lb per cubic yard | Plastic shrinkage crack reduction | Added to mix at batch plant or mixer | ~$5–$15 per cubic yard added |
For most residential pedestrian patios, 6x6-W1.4 welded wire fabric is sufficient. Place it on plastic chairs (not directly on the gravel) at roughly the middle of the slab depth, or in the upper one-third per your local spec. Support chairs every 2 to 3 feet. Overlap adjacent mesh panels by at least 6 inches and tie laps with wire. Use plastic-coated chairs to avoid rust stains bleeding through the surface later.
Control joints and expansion joints
For a 4-inch slab, place control joints (contraction joints) at maximum intervals of 8 to 12 feet in each direction, that's the ACI/PCA rule of 2 to 3 times the slab thickness in inches, expressed in feet. Each joint should be at least 1 inch deep (one-quarter of 4 inches). You can tool them in during finishing with a jointer, or saw-cut them within 4 to 18 hours of finishing (earlier if it's hot, later if it's cool). Early-entry saws can cut as soon as 1 to 2 hours after finishing on a hot day, the goal is to cut before random cracking starts but late enough to avoid raveling the saw cut edges.
Where the slab meets the house foundation, a wall, or an existing slab, install an isolation (expansion) joint using pre-molded foam backer rod or 1/4-inch premolded joint filler. This lets the slab move independently without cracking at those fixed boundaries. Run it the full depth and width of the joint, and leave it in permanently.
Pouring and finishing: your step-by-step checklist
Concrete doesn't wait for you to figure things out. Have everything staged and your crew briefed before the truck arrives or you start mixing. Concrete is forgiving up to a point, and then it isn't.
- Order concrete. For a patio, specify 3,000 to 4,000 psi at 28 days, 3- to 4-inch slump, and air entrainment of 4 to 7% if you're in a freeze-thaw climate or will use deicing salts in winter.
- Moisten the base before pouring. Dry gravel can pull moisture from the mix too fast. A light misting is enough — you don't want standing water.
- Start pouring at the far corner from your truck or mixer access and work toward the exit. This avoids rolling equipment over freshly placed concrete.
- Spread and consolidate as you go. Use a rake or come-along hoe to distribute concrete to the form corners and edges. Work it against the forms to fill any voids.
- Screed the surface. Drag a straight 2x4 board across the tops of the form boards using a back-and-forth sawing motion. Fill low spots and push excess ahead of you. Do a second pass to flatten ridges.
- Float with a bull float immediately after screeding. Push and pull in overlapping arcs perpendicular to the screed direction to close surface voids and flatten the surface further.
- Wait for bleed water to evaporate. This is critical. Do not trowel or float again while the surface is still shiny with bleed water — you'll seal moisture into the surface and cause scaling later. Timing varies: 20 minutes in dry/hot conditions, up to 2 hours in cool/humid weather.
- Edge the perimeter. Run an edger tool along all form board edges. This creates a slightly rounded, durable edge that won't chip when forms are removed.
- Cut or tool control joints. Use a jointing tool to indent joints at your planned spacing. If you're saw-cutting later, mark the locations now with a chalk line.
- Finish the surface texture. A broom finish (drag a stiff broom across the surface in one direction) is the standard non-slip texture. Smooth trowel finish is possible but slippery when wet — not recommended for outdoor patios. Rock salt texture, exposed aggregate, or stamped patterns require additional tools and timing.
- Begin curing immediately after finishing. Cover with plastic sheeting, wet burlap, or apply a liquid curing compound. Keep the surface moist for at least 7 days. Don't let it dry out in the first week — this is when most shrinkage cracking happens.
Removing forms, cleaning them, and reusing them
Wait at least 24 hours before removing straight form boards from a standard mix in moderate temperatures (60 to 80°F). In cold weather, wait 48 to 72 hours. The concrete edge should be firm enough that a thumbnail doesn't leave a mark. If it's still denting, leave the forms in place.
- Remove stakes first by rocking them back and forth and pulling straight up. Metal stakes with a clip at the top make this much easier.
- Pry form boards away from the slab edge gently. Use a flat pry bar, not a hammer. Work along the board rather than levering at one point — you can spall the edge of the slab if you force it.
- Inspect the slab edge. Small surface voids (bug holes) are normal and cosmetic. Larger honeycombing (pockets where concrete didn't consolidate) should be filled with a dry-pack mortar within the first 24 to 48 hours while the concrete is still green and will bond well.
- Backfill along the edges with soil or gravel after the slab has cured at least 7 days. Tamp gently to avoid undermining the edge.
- Clean form boards immediately. Scrape off concrete with a putty knife before it fully hardens (within the first hour or two of removal is easiest). Coat with a light oil or form release before storing. Well-maintained lumber forms can be reused 3 to 5 times.
Common problems and how to fix them
Things go wrong on almost every concrete pour. Here's what to watch for and what to do about it.
| Problem | Cause | Fix |
|---|---|---|
| Form blowout (board pushes out during pour) | Insufficient stakes or bracing, overly wet mix | Re-stake before pour; use kicker braces; reduce slump; if blowout happens during pour, push board back and add emergency stake immediately |
| Low spot in finished surface | Uneven base, inadequate screeding | Fill while still plastic (within 30 min) by adding fresh concrete and re-screeding; after curing, use a cementitious overlay for minor depressions |
| High spot or ridge | Screed board rocked over a high stake | Grind down after curing with an angle grinder and diamond cup wheel |
| Surface scaling (skin peeling off) | Finishing over bleed water, or deicing salts on non-air-entrained concrete | Remove loose material, apply penetrating sealer; prevent by air-entraining mix in freeze-thaw climates |
| Random surface cracks | Drying too fast, missing control joints, insufficient curing | Fill hairline cracks with concrete crack filler or polyurethane sealant; add missing control joints with a concrete saw |
| Surface air voids (bug holes) | Insufficient consolidation near forms | Cosmetic only if small; fill with grout or epoxy filler after curing if appearance matters |
| Freeze-thaw spalling | Non-air-entrained concrete in cold climate, or deicing salt use | Resurface with a concrete overlay; prevent with 4–7% air-entrained mix and penetrating sealer applied annually |
Decorative options and what to do next
A plain broom-finished slab is durable and functional, but it doesn't have to stay plain. The finishing stage, and the weeks after curing, are when you have the most options. If you’re interested in furniture, see a related how-to on how to make a concrete patio table for step-by-step instructions and design tips.
- Sealing: apply a penetrating silane/siloxane sealer or an acrylic surface sealer after 28 days of curing. This protects against moisture, staining, and freeze-thaw damage. Reapply every 2 to 5 years depending on traffic and climate.
- Staining: acid stain or water-based concrete stain can transform a plain gray slab into a rich, variegated surface. Best applied to a clean, unpainted, unsealed slab at least 28 days after pouring.
- Stamping: stamped concrete patterns (stone, brick, wood plank) must be done during the finishing window, before the concrete sets. This adds complexity and requires rental of stamp mats and a release powder — plan this before you pour, not after.
- Overlays: if your existing slab is sound but dull or mildly damaged, a micro-topping or self-leveling overlay (typically 1/4 to 1/2 inch thick) can resurface the entire patio for a fraction of the cost of replacement.
- Adding decorative joints: saw-cut patterns into the surface after curing to mimic tile or stone layouts, then fill with a contrasting colored grout or epoxy.
Wood vs. metal forms vs. plastic molds: which should you use?
This is the question I get most often. Here's my honest decision guide based on project type.
| Situation | Best Choice | Why |
|---|---|---|
| Simple rectangular patio, first-time builder | 2x4 or 2x6 lumber forms | Cheapest, easiest to work with, widely available, forgiving of small errors |
| Large rectangular patio (200+ sq ft) | Lumber forms with metal form stakes | Metal stakes hold better on long runs and pull cleanly without splitting |
| Patio with gentle curves or rounded corners | 1/4" bending plywood strips or kerfed 2x4s | Inexpensive and flexible enough for most residential curves |
| Tight curves or circular features | Metal form banding (steel or aluminum strip) | Consistent arc, holds pressure well, professional edge result |
| Decorative grid pattern or stepping stone look | Plastic/rubber modular molds | No carpentry required, reusable, built-in pattern |
| Irregular natural stone look | Rubber stamp molds with standard slab pour | Stamping during finishing gives the best appearance for organic patterns |
When to call a pro instead
I'll be straight with you: most standard rectangular patios up to about 300 square feet are well within DIY reach if you're organized and have a helper. But there are a few situations where hiring a contractor is the smarter call. If your patio needs to drain across a slope toward a structure, or if it attaches to a deck that bears loads, you may need an engineer's input. Pours over 400 to 500 square feet are very difficult to finish before the concrete gets too stiff, especially in warm weather, that's when experienced finishers earn their money. Complex curved designs with multiple radii also become a geometry problem that's hard to solve for the first time under time pressure. And if your local permit requires a plan review or engineered drawings, a licensed contractor simplifies that process significantly.
Safety checklist and realistic project timing
Personal protective equipment
- Rubber or PVC boots when working in fresh concrete — wet concrete is caustic and causes chemical burns on prolonged skin contact
- Chemical-resistant gloves (nitrile or rubber, not fabric)
- Safety glasses during mixing and when using power tools
- Knee pads for finish floating and edging work
- Dust mask or N95 respirator when mixing dry concrete or cutting cured concrete with a saw
- High-visibility vest if working near a driveway or roadway
Weather and curing windows
- Ideal pouring temperature: 50 to 85°F air temperature. Below 40°F, concrete won't cure properly without cold-weather protection. Above 90°F, the mix stiffens fast and you'll struggle to finish it.
- Avoid pouring in direct sun on hot, windy days without a windbreak. Evaporation from the surface can cause plastic shrinkage cracking within minutes of screeding.
- Don't pour if rain is forecast within 24 hours. Rain on fresh concrete dilutes the surface and weakens it.
- Keep the slab moist for 7 days minimum. Don't put furniture or foot traffic on it for 24 to 48 hours. Full design strength takes 28 days.
Realistic time estimates by phase
| Phase | Estimated Time (12x16 ft patio) | Crew Needed |
|---|---|---|
| Layout and planning | 2–4 hours | 1 person |
| Excavation (manual) | 4–8 hours | 1–2 people |
| Base gravel and compaction | 3–5 hours (includes compactor rental) | 1–2 people |
| Form building and setting | 3–5 hours | 1–2 people |
| Reinforcement placement | 1–2 hours | 1 person |
| Concrete pour and finishing | 4–6 hours (fast-moving) | 2–3 people minimum |
| Curing period | 7 days (passive, just keep it moist) | — |
| Form removal and cleanup | 1–2 hours | 1 person |
| Sealing (optional, after 28 days) | 1–2 hours | 1 person |
Total active work on a 12x16 patio runs roughly 20 to 35 hours spread across two weekends. The pour day is the most physically and mentally demanding, plan it when you have help, good weather, and no other commitments that afternoon. Everything before and after that day is manageable at your own pace.
FAQ
What are the first planning steps before making concrete forms for a patio?
Confirm local permit and setback requirements with your building department. Decide patio size, thickness (typically 4" for pedestrian patios; 5–6" for light vehicle access), slope (at least 1/8"/ft; 1/8–1/4"/ft away from the house), and finish options (broom, stamp, stain). Locate underground utilities before digging, choose drain/grade strategy, and create a simple site plan with dimensions and joint layout. Estimate materials, tools, time (a weekend for a small patio by two people; longer for prep/curing), and whether you need a mixer or ready-mix truck.
What materials and tools do I need to make and set forms?
Materials: dimensional lumber for forms (2x6, 2x8 or 2x10 depending on height), 1x4 or 2x4 for bracing, 4" gravel/crushed stone for base, landscape fabric (optional), form stakes (rebar or 1/2" x 24" galvanized spikes), tie wire or screws, release agent, welded wire fabric or rebar, contraction joint material or saws, expansion joint filler. Tools: circular saw, hammer, cordless drill, level and straightedge, builder’s level or string line, tape measure, stakes and mallet, plate compactor or hand tamper, wheelbarrow or concrete pump, finishing tools (screed board, bull float, magnesium float, edger, trowel, jointer/saw), safety gear (gloves, goggles, respirator for dust). Optional: form boards bending tools, plywood for curved templates, modular plastic molds.
What is a concise planning checklist I can follow?
1) Check permits/zoning and utilities. 2) Mark patio outline and slope away from structures (1/8–1/4"/ft). 3) Choose slab thickness and reinforcement. 4) Calculate materials (concrete volume, gravel, lumber). 5) Order concrete or arrange mixer. 6) Gather tools and forms. 7) Excavate to required depth (slab thickness + base + gravel compaction). 8) Compact subgrade and place gravel base (4" min for pedestrian). 9) Set and brace forms, add reinforcement supports. 10) Pour, screed, finish, joint, and cure. 11) Remove forms and clean up after cure. 12) Seal/stain or repair as desired.
How do I frame straight-edged forms step by step?
1) Cut form boards to length and set them on compacted base at desired elevation. 2) Use string lines and batter boards to establish exact layout and slope. 3) Position form boards with the top face at final slab elevation; align with a level or transit. 4) Drive stakes outside the form every 2–3 ft, toe-screwing them into the ground and nailing/screwing the form to the stakes. 5) Brace forms with diagonal 2x4s to resist concrete pressure—attach to form and drive stakes or cross-brace to adjacent stakes. 6) Check for straightness with a long straightedge and adjust to maintain tight, straight faces. 7) Apply form-release agent to inside face before placing concrete.
How do I frame curved forms (gentle and tight radii)?
Answer":"For gentle curves (large radii): use 1x6 or 2x6 flexible lumber or kerf-cut 2x material. Cut short kerfs on the back side every 2–4" to allow bending, then clamp to curved guide stakes. For tighter curves: use thin plywood or flexible form tubing, or rip 2x stock thinner (1x) and use multiple stakes and continuous bracing. Build a plywood template or use a flexible metal garden edge as a guide, then fasten form boards to the template. Place stakes closer (12–18" o.c.) and add frequent cross-bracing to maintain radius against concrete pressure. Consider modular plastic molds specifically made for curves if repeating patterns are needed.
When should I use modular plastic molds or concrete squares instead of wood forms?
Use modular plastic molds when creating decorative pavers, stamped/segmental patterns, or when you want faster placement with consistent joint shapes. They are convenient for curved/irregular patterns and small renovations. Use wood or metal forms for monolithic slabs, straight edges, and when you need rigid elevation control. Call a pro if you need structural slab design, complex drainage, heavy vehicular load, or if the patio will be attached to a structure requiring flashing/detailing.