Yes, you can absolutely paint a cement patio, and when you do it right, the results last for years. The key is that painting concrete is about 80% preparation and 20% actual painting. Skip the prep and you'll be peeling up bubbled, flaking paint within a season. Do it properly, and a good coat of exterior masonry paint can transform a dull, stained slab into a clean, attractive outdoor floor that holds up to foot traffic, rain, and UV exposure.
How to Paint a Cement Patio: Step-by-Step Guide

Silas Morrison
3 May 2026

Is Painting Your Cement Patio Actually a Good Idea?
Painting is one of the most affordable ways to refresh a tired patio, but it's worth being honest about what you're getting into before you crack open a bucket. Paint is a surface coating, which means it sits on top of the concrete rather than soaking in the way a stain does. That makes it more vulnerable to peeling if moisture is present, if the surface isn't clean, or if you use the wrong product. That said, for most homeowners with a structurally sound slab in decent shape, painting is a completely reasonable choice.
Painting works best when your patio is in reasonably good condition with only minor cracks or surface wear, when you want a solid opaque color rather than a translucent or decorative effect, and when you're prepared to reapply every few years as needed. If your patio has severe spalling, deep structural cracks, or significant heaving, painting won't fix those problems and may actually hide them until they get worse. In those cases, repair comes first, or you may want to explore other resurfacing options. If you're interested in decorative effects like a faux stone or tile look, those are separate techniques that build on the same prep foundation covered here.
One other thing to consider: if your patio has an existing coating that's peeling or failing, you need to deal with that before adding a new layer. Painting over a failing coating just gives the new paint something else to peel off of. I've made that mistake once, and once was enough.
Prep Checklist: Cleaning, Stripping, and Testing the Surface
Good prep is non-negotiable. Concrete is porous and loves to hold onto oil, dirt, efflorescence, and old coatings, all of which will prevent paint from bonding properly. Here's what needs to happen before a single drop of paint touches the surface.
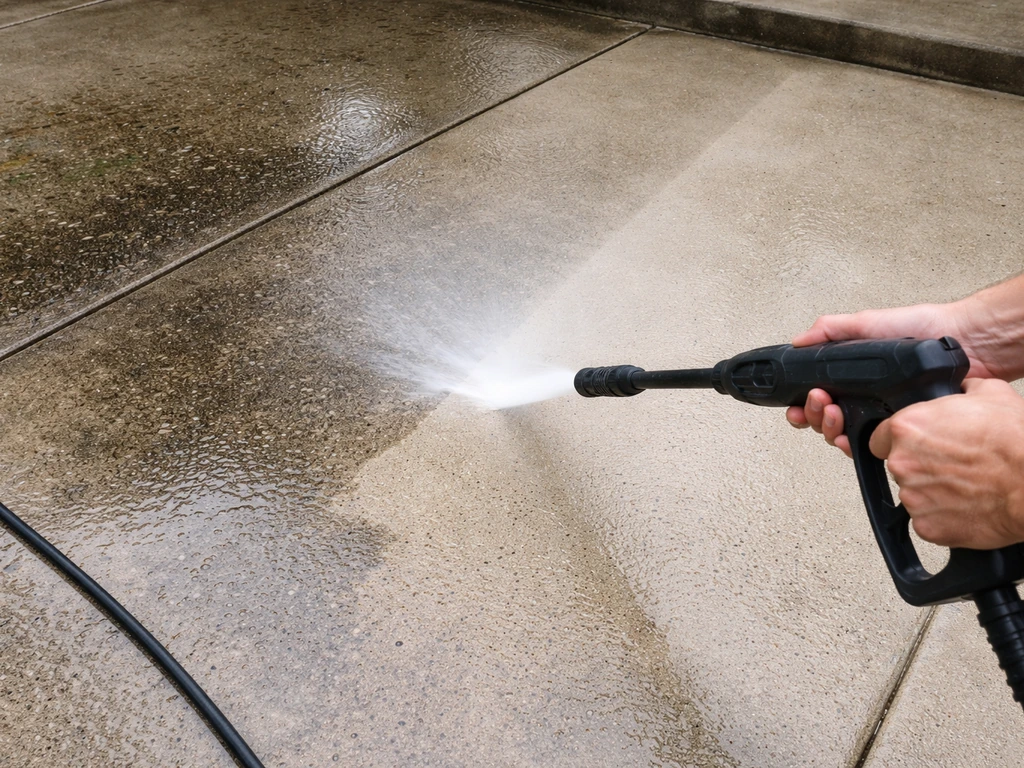
Clean the patio thoroughly
Start with a solid pressure wash using at least 3,000 PSI. This removes loose debris, surface dirt, and biological growth like mold and mildew. For oil stains (common near grills or outdoor kitchens), use a concrete degreaser or a dedicated oil stain remover and scrub it in with a stiff brush before rinsing. If you see white powdery deposits, that's efflorescence, and it needs to be treated with a diluted muriatic acid solution or a commercial efflorescence remover. Rinse everything thoroughly and let it dry completely before moving on.
Remove old coatings and peeling paint

If there's an existing painted or sealed surface, you need to assess its condition honestly. If the coating is peeling, bubbling, or flaking in any area, you need to strip it. Use a floor grinder, chemical paint stripper rated for concrete, or a combination of both depending on how stubborn the old coating is. For large areas, renting a walk-behind floor grinder or shot blaster is worth every dollar. After stripping, do the water bead test: pour a small amount of water onto the surface. If it beads up, there's still sealer or residue present and the surface isn't ready to accept paint. If it absorbs quickly and darkens, you're in good shape.
Test for moisture
This is the step most DIYers skip and later regret. Concrete holds a surprising amount of internal moisture, especially in shaded areas, recently poured slabs, or climates with high ground moisture. The most reliable method for testing is using in-situ relative humidity probes following ASTM F2170 standards, which measure moisture inside the slab rather than just at the surface. The general threshold to target is concrete RH below 85% before applying any coating. A simpler DIY version of moisture testing is taping a piece of plastic sheeting (about 18 by 18 inches) to the surface, sealing the edges, and leaving it for 24 hours. If moisture condenses under the plastic, you have a vapor emission problem that needs to be addressed with a moisture-blocking primer or vapor barrier treatment before painting.
- Pressure wash at 3,000+ PSI and degrease any oil stains
- Treat efflorescence with a diluted acid wash or commercial remover
- Strip all peeling, bubbling, or failing old coatings completely
- Perform the water bead test to confirm the surface is free of sealer
- Test for subsurface moisture using plastic sheet method or in-situ RH probes
- Allow the slab to dry at least 24 to 48 hours after washing before painting
Crack Repair and Leveling Before You Paint
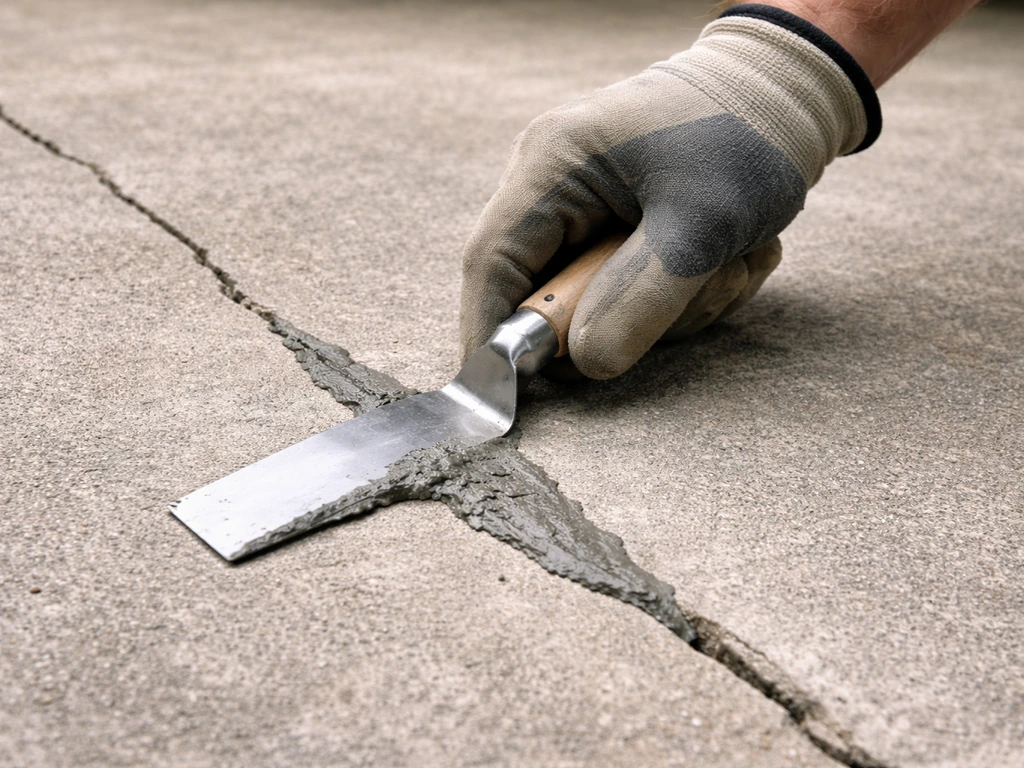
Paint will bridge hairline cracks temporarily, but anything wider than about 1/8 inch needs to be filled before you paint or it'll crack right through the new finish within a season. Use a polyurethane or epoxy-based concrete crack filler for cracks that are stable (not actively moving). For wider gaps, use a concrete patching compound. Work the filler into the crack with a putty knife or margin trowel, slightly overfilling, then scrape flush once cured. For cracks that are actively growing due to ground movement, consider consulting a contractor, because paint won't solve that.
Surface leveling matters too. If your patio has low spots, rough texture from spalling, or uneven areas from previous patching, a concrete skim coat or resurfacer product (like a self-leveling underlayment or a bag-mixed concrete resurfacer) can smooth things out before paint goes on. Follow the product's mixing and application directions carefully, and let it cure fully, usually 24 to 72 hours depending on depth and temperature, before proceeding. A smooth, even surface not only looks better when painted, it also holds up longer because paint won't pool in low spots or thin out unevenly over high ones.
Choosing the Right Paint, Primer, and Sealer System
Not all paint is the same, and using interior latex or standard exterior house paint on a concrete patio floor is a common and expensive mistake. Patio floors face a unique combination of abuse: foot traffic, standing water, UV exposure, freeze-thaw cycles, and the alkaline chemistry of concrete itself. You need products formulated specifically for this environment.
| Product Type | Best For | Durability | Typical Cost |
|---|---|---|---|
| Masonry/Concrete Floor Paint (latex or acrylic) | Most DIY patio repaints; solid color finish | Good (3 to 5 years with sealer) | $30 to $60 per gallon |
| Epoxy Concrete Floor Paint (2-part) | High-traffic patios, garages with patio use | Excellent (5 to 10 years) | $50 to $100+ per gallon |
| Elastomeric Masonry Paint | Patios with minor surface cracking; flexibility needed | Very good; bridges hairline cracks | $40 to $75 per gallon |
| Concrete Stain (acid or water-based) | Decorative/translucent look; not a solid color | Good when sealed | $20 to $50 per gallon |
For most homeowners painting a residential cement patio, a high-quality 100% acrylic masonry or concrete floor paint is the right starting point. It's easier to apply than two-part epoxy, more forgiving on imperfect surfaces, and still delivers solid durability when used with a primer and topcoat sealer. If your patio sees very heavy use or you want the longest possible lifespan between repaints, a two-part epoxy system is worth the extra effort and cost.
Don't skip the primer
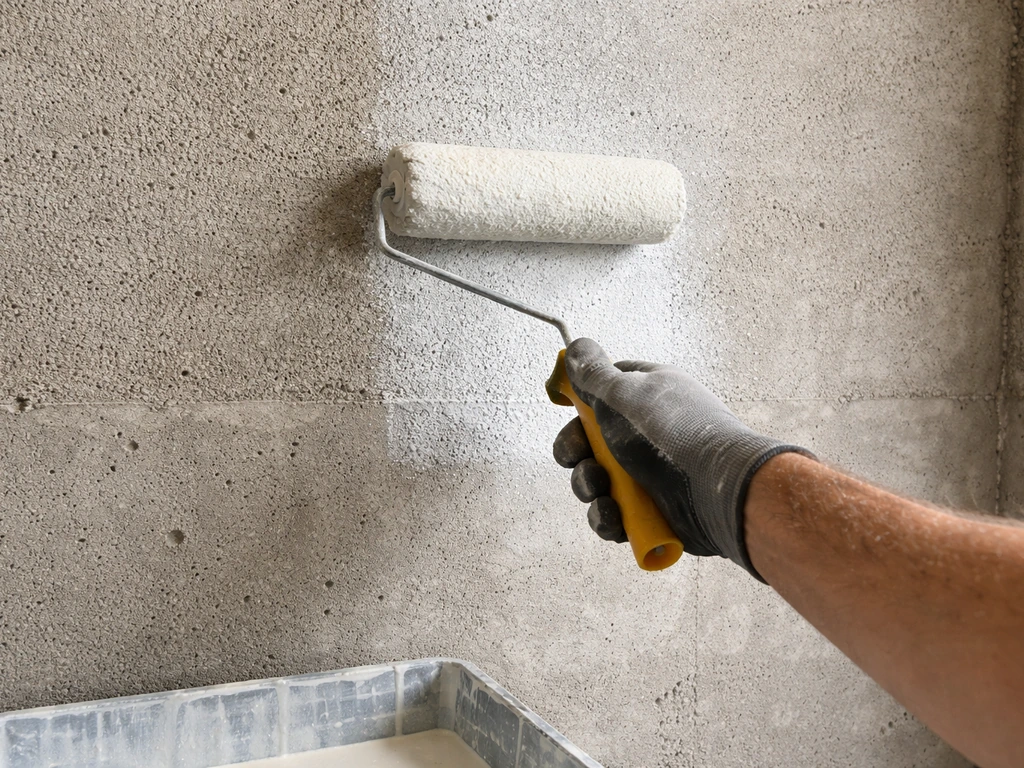
A dedicated concrete bonding primer is essential, not optional. It locks down any remaining dust, seals the porous surface so paint doesn't get absorbed unevenly, and dramatically improves adhesion. Look for a masonry primer labeled for exterior concrete or block. BEHR PRO Concrete & Masonry Bonding Primer is described by the manufacturer as an interior/exterior acrylic primer formulated to seal above-grade concrete and block blank" rel="noopener noreferrer">a masonry primer labeled for exterior concrete or block.. If you tested positive for moisture vapor in the previous step, use a moisture-blocking or vapor-reducing primer instead. Apply it according to the manufacturer's directions and let it cure fully before painting.
How to Paint Your Cement Patio Step by Step
Once the surface is clean, repaired, primed, and dry, you're finally ready to paint. This step-by-step approach also works for painting concrete patio blocks with the right primer and exterior masonry paint. This is the satisfying part, but technique still matters for getting an even, durable coat.
Tools you'll need
- 9-inch or 18-inch roller frame with a 3/8-inch to 1/2-inch nap roller cover (thicker nap for rougher texture)
- Angled trim brush (2.5 to 3 inch) for edges and corners
- Paint tray or 5-gallon bucket with roller grid
- Painter's tape for edges adjacent to walls, steps, or other surfaces
- Stir sticks and a drill-mounted mixing paddle
- Drop cloths to protect surrounding areas
Application process
- Stir the paint thoroughly for at least two minutes before and periodically during application. Concrete paint settles fast.
- Cut in edges and corners with a brush first, working about 3 to 4 inches in from walls and steps.
- Load the roller generously without overloading it. Roll in a W or N pattern across a manageable section (about 3 by 3 feet), then back-roll to even out.
- Work in sections moving away from your exit point so you don't paint yourself into a corner.
- Apply the first coat and let it dry to the touch (usually 2 to 4 hours depending on humidity and temperature).
- Inspect the first coat for thin spots, roller texture issues, or missed areas. Lightly sand any drips or ridges if needed.
- Apply a second coat in the same manner, ideally working perpendicular to your first coat direction for more even coverage.
- Most quality concrete floor paints need a minimum of two coats. High-traffic areas benefit from three.
A note on sprayers: you can use an airless sprayer for large patios and it speeds things up considerably, but back-rolling (rolling through the sprayed paint while wet) is important for concrete floors to ensure the paint penetrates the texture. Spraying alone tends to leave the paint sitting on top of the surface texture peaks without filling the valleys, which leads to uneven wear.
Drying, Curing, and Getting the Weather Timing Right
Drying time and cure time are two different things, and confusing them is one of the most common reasons painted patios fail early. Dry to the touch means you can walk on it without leaving marks. Fully cured means the paint has reached its full hardness and chemical resistance. Most acrylic concrete paints are dry to the touch in 2 to 4 hours and ready for light foot traffic in 24 hours, but they don't reach full cure strength for 7 to 30 days depending on the product and conditions.
During those first 7 days especially, avoid dragging furniture, setting down heavy planters, or letting standing water sit on the surface. I usually tell people: light foot traffic only for the first week, then treat it normally after that. Two-part epoxy paints have longer cure times on average but also harder final surfaces.
Weather timing matters a lot for outdoor work. The ideal painting conditions for exterior concrete are an air temperature between 50 and 90 degrees Fahrenheit, a surface temperature in a similar range, relative humidity below 85%, and no rain in the forecast for at least 24 to 48 hours after application. Never paint on a surface that's in direct hot sun, as the paint can dry too fast and not bond properly. Early morning on a partly cloudy day is often the best window. Avoid painting if rain is expected within 4 to 6 hours, or if temperatures will drop below 50 degrees that night.
Sealing and Ongoing Maintenance

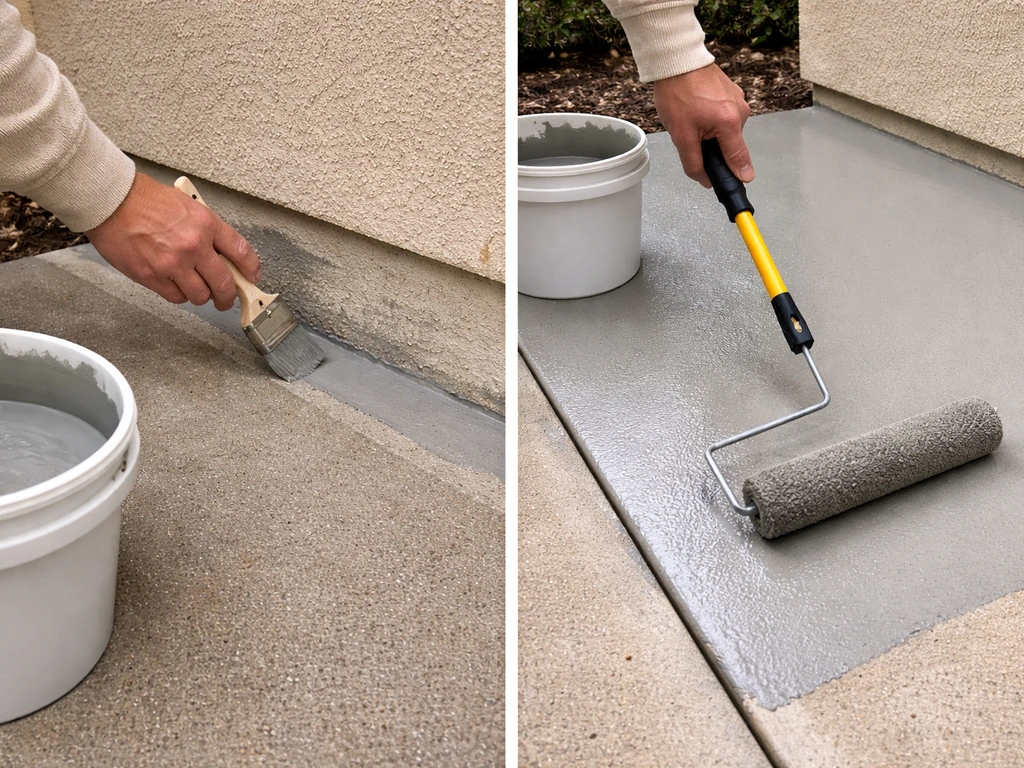
Adding a clear topcoat sealer over your finished paint dramatically extends its life, especially on outdoor surfaces exposed to sun, rain, and foot traffic. Use an exterior-rated clear concrete or masonry sealer, either a penetrating sealer or a film-forming acrylic topcoat depending on the sheen you want. Apply it with a roller after the final coat of paint has cured for at least 24 hours, following the manufacturer's instructions for recoat timing. The sealer protects against UV fading, water infiltration, and surface abrasion.
For ongoing maintenance, sweep the patio regularly to prevent grit and debris from acting as sandpaper underfoot. Clean spills promptly, especially anything acidic like citrus drinks or fertilizers. Reapply sealer every 1 to 2 years depending on wear and sun exposure. Inspect the surface each spring for any areas where paint is beginning to lift or chip and touch those up before they spread. A spot repair with matching paint is much easier than a full repaint, but only works if you catch it early.
If you choose a solid masonry paint and maintain it properly, a full repaint is typically needed every 3 to 5 years. Epoxy-painted surfaces can go longer, sometimes 7 to 10 years, before needing attention. The biggest variable is sun exposure: south-facing patios in sunny climates will need more frequent maintenance than shaded patios in mild regions.
Common Mistakes to Avoid
- Painting over a wet or damp slab: even a few hours after rain isn't enough. Wait at least 24 to 48 hours of dry conditions.
- Skipping the primer: bonding primer isn't optional on porous exterior concrete.
- Using interior or non-masonry paint: it will fail fast under outdoor patio conditions.
- Applying only one coat: two coats minimum, three in high-traffic areas.
- Painting in hot direct sun or high humidity: both cause adhesion problems and uneven drying.
- Not testing for existing sealers: painting over an intact sealer is almost always a failure waiting to happen.
- Moving furniture onto the patio too soon: give the paint the full cure window it needs.
Painting a cement patio is a satisfying weekend project when you follow the right sequence. The prep takes most of the time, but it's what makes the difference between a paint job that looks great for a season and one that lasts for years. Start with a clean, dry, repaired surface, prime it, apply two or more coats of the right exterior concrete paint, seal it, and you'll have a patio you're genuinely proud of. For a faux tile look, you can use the same concrete patio painting foundation, then add tile-pattern stencils and grout-line details on top of the base coat.
FAQ
Can I paint a cement patio that gets wet or stays damp after rain?
Remove and replace any wet or failing patch first, then let the slab dry fully. If the patio has chronic dampness from the ground or landscaping, paint may keep failing even if you do everything else right, so consider a moisture-mitigating sealer system or addressing drainage and grading before repainting.
What should I do if the patio cracks keep coming back?
You usually should not paint over cracks that are actively moving. If you see cracks widen, shift, or you can’t stop them from reappearing after patching, fill and paint will only be cosmetic. In that case, repair the underlying movement or consult a contractor, then repaint after the fix cures fully.
Do I need a clear sealer on top of the paint?
A 2-step approach usually works best: prime with the correct concrete bonding primer, then apply your masonry or concrete floor paint, and finally top with an exterior clear sealer for outdoor durability. Skipping the sealer can reduce UV and water protection and shorten the repai interval.
Is it okay to spray the paint on, or should I always roll it?
Yes, but control the sheen and recoat timing. Use a roller for the topcoat to even out roller marks and improve coverage over texture, then avoid walking through the wet layer before it has flashed. If you use a sprayer, still plan to back-roll to get paint into the surface profile.
How long should I wait between coats, and what if the surface feels tacky?
Not necessarily. Many concrete paints and primers require a specific dry or cured window before recoating. Follow the product recoat instructions, and if you see tackiness, trapped moisture, or dull uneven areas, wait longer rather than rushing to the next coat.
Can I do spot repairs if only part of the paint starts lifting?
If a small section has peeled, scrape and grind the loose edges back to firm, bonded material, then clean, prime that area (using the same type of bonding primer), and blend with paint and sealer. Full color matching is easier if you do touch-ups on the same day the rest of the finish was applied.
What’s the best way to fix spalling or pitted areas before painting?
For patching, use a concrete patching compound for holes and wider gaps, then feather-skim so it is flush with the surrounding concrete. Allow proper cure before priming, because patches that are still releasing moisture can cause bubbling or early failure under the new paint.
What if I see white powder on my patio, should I just paint over it?
If you have efflorescence or salt-like white deposits, treat and remove it completely and rinse thoroughly, then dry. Painting over active efflorescence can trap salts under the coating, leading to blistering and powdering within months.
How do I know whether I can recoat my patio paint or if I must strip it?
If you used an epoxy system and it’s chalking or wearing unevenly, it may be better to abrade and recoat rather than full removal, but only if the surface is properly cleaned and still well-bonded. If areas are flaking or you can lift edges with a scraper, stripping is usually required.
Will exterior house paint last on a cement patio in freezing weather?
Choose coatings based on slab exposure. If freeze-thaw is a concern or your patio has regular standing water, prioritize products labeled for exterior concrete floors and follow the primer and sealer guidance, since standard exterior house paint is not designed for that alkalinity and wear.
Can I paint in the evening or on a cool day, and how does it affect cure time?
Yes, but plan for longer cure. Cooler temperatures slow chemical cure and can make you think the paint is dry to the touch while it is not fully hardened. Stay within the recommended temperature range, and extend the no-heavy-traffic period when conditions are cooler or more humid.
What should I do if the plastic sheeting test shows moisture under it?
If your plastic sheet test shows condensation, moisture is migrating to the surface and paint failure is likely without a moisture-blocking or vapor-reducing primer and proper sealer. You may also need a system designed for high vapor emission, plus potential drainage or grading work.