You pour a concrete patio by excavating and compacting the site, building wood forms set to a slight slope away from the house, laying a gravel base with reinforcement mesh, then placing and finishing a 4-inch concrete slab before curing it for at least 7 days. That's the whole process in one sentence, but every one of those steps has details that determine whether your patio lasts 30 years or starts cracking in the first winter. Here's exactly how to do it right.
How to Pour a Concrete Patio: Step-by-Step Guide

Silas Morrison
6 May 2026
Plan your layout and calculate how much concrete you need
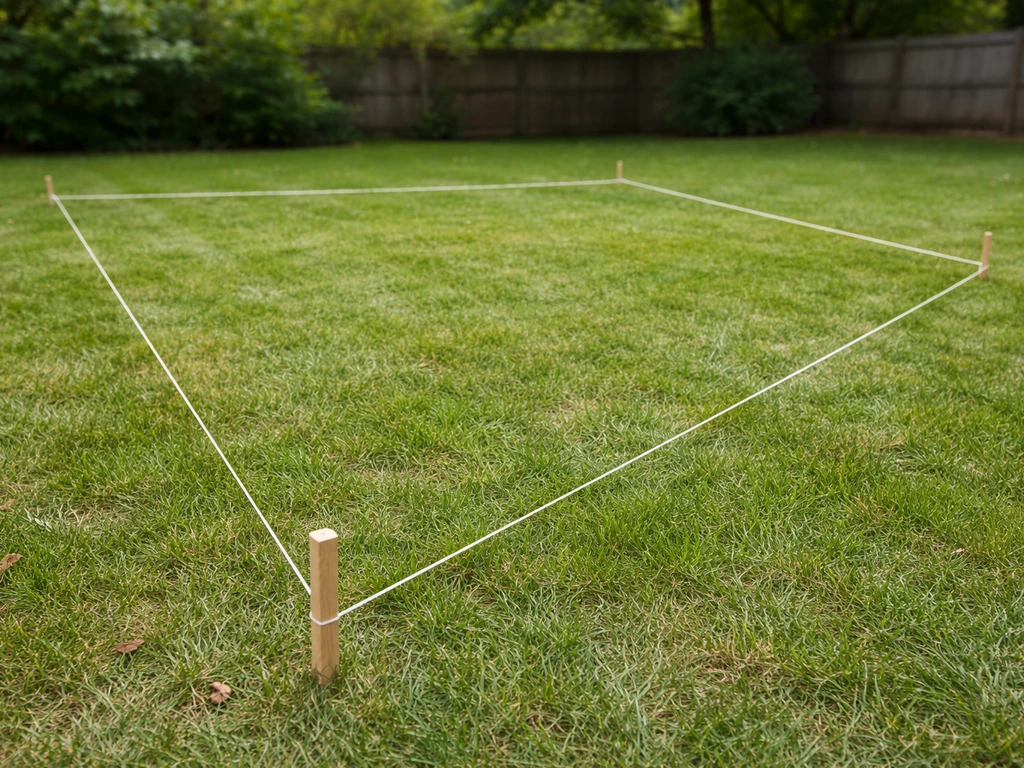
Start by marking out your patio dimensions with stakes and string line. Walk the space, think about furniture placement, and settle on final dimensions before you touch a shovel. Once you have your length and width, calculating concrete volume is straightforward: multiply Length (ft) x Width (ft) x Thickness (ft) to get cubic feet, then divide by 27 to convert to cubic yards. For a standard 4-inch thick slab, use 0.33 as your thickness figure. So a 12x16 patio works out to 12 x 16 x 0.33 = 63.4 cubic feet, divided by 27 = roughly 2.35 cubic yards. Always order or mix about 10 percent more than your calculated volume to account for waste, spillage, and slight variations in depth.
For most residential patios with foot traffic and patio furniture, 4 inches is the right thickness. If you plan to park a vehicle on it or build a raised section with heavier loads, bump that up to 5 or 6 inches. Decide this before you calculate materials because it changes everything downstream, including excavation depth and gravel base volume.
While you're planning, decide whether you're pouring this all in one shot or breaking it into sections. A large patio, say anything over 400 square feet, gets very difficult to place and finish solo before the concrete starts to set. Pouring in sections with planned construction joints is a smarter approach for big projects, and you can read more about that strategy in a dedicated guide on pouring a large concrete patio in sections. If you're dealing with a large area, learning how to pour a large concrete patio in sections can help you place and finish everything before the concrete sets pouring a large concrete patio in sections. Pouring in sections also helps you manage timing, finishing, and curing so each area is formed and completed before the concrete sets.
Site prep: grading, excavation, and compaction
This is the part most DIYers underestimate, and it's where most patio failures start. Poor compaction under a slab leads to settling, cracking, and an uneven surface. Do this right and everything else gets easier.
First, strip all the sod and organic topsoil from the patio area. You cannot pour concrete over living organic material. It compresses and decomposes over time, which creates voids that cause the slab to crack and sink. Dig down until you hit firm subsoil. The total depth you need depends on your slab thickness plus your gravel base. For a typical 4-inch slab with a 4-inch gravel base, you're digging about 8 inches below your finished slab surface. If drainage is a concern in your area or you're building on clay-heavy soil, bump that gravel base up to 6 or even 8 inches.
After excavating, compact the native subgrade with a plate compactor. Rent one from your local equipment rental for the day. Don't skip this step or try to substitute a hand tamper on anything larger than a very small slab. Make multiple passes in different directions until the soil feels firm and unyielding. If you hit any soft spots, dig them out and fill them with compactible gravel, then compact again. Soft spots become cracks.
Build your forms and set the right slope
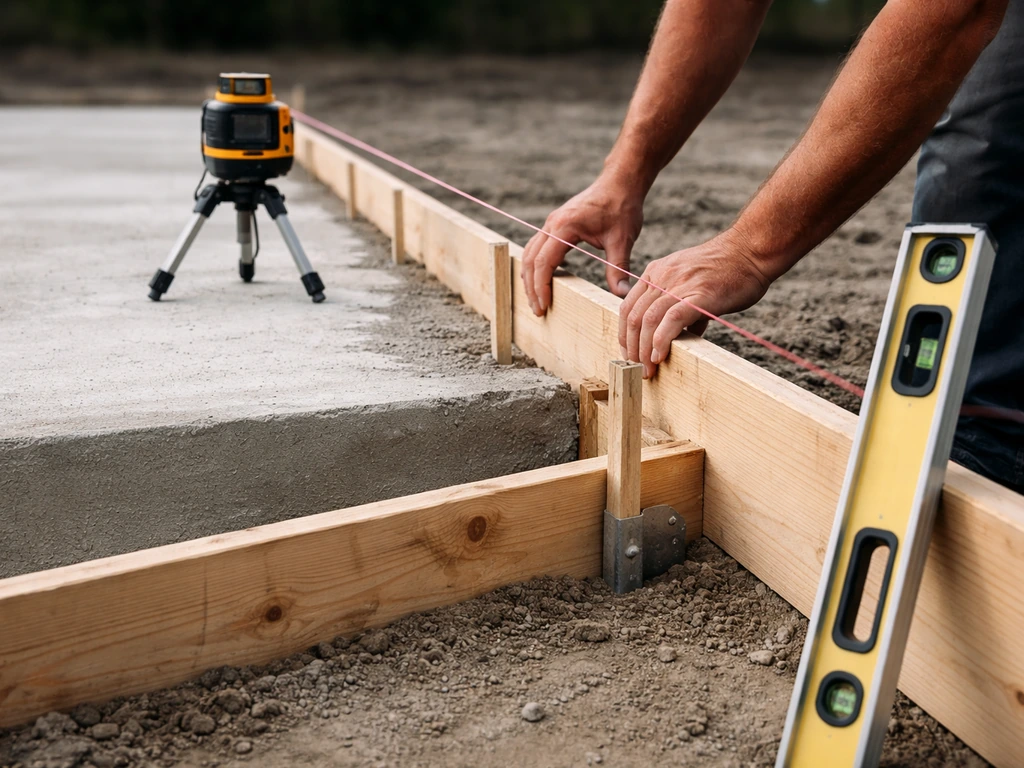
Forms are the mold your concrete pours into, and they also define your finished slab height and slope. Use 2x4 or 2x6 lumber depending on your slab thickness. For a 4-inch slab, 2x4s work fine. For anything thicker, use 2x6s or double up your boards. Drive wooden stakes every 2 to 3 feet along the outside of the forms and screw through the stakes into the form boards to lock them in place.
Slope is non-negotiable for drainage. You need a minimum slope of 1/8 inch per foot away from your house, and 1/4 inch per foot is even better. That means on a 12-foot-deep patio, the far edge should sit at least 1.5 to 3 inches lower than the edge closest to the house. Set your forms with a level and a long straightedge, checking your slope as you go. Pour concrete that sits perfectly level, and you'll have a patio that puddles every time it rains. This same slope principle applies when you are figuring out how to slope an existing concrete patio that drains toward your house.
Extra considerations for a raised patio
A raised concrete patio adds complexity because you're essentially building above existing grade. This requires stronger perimeter formwork that can handle the lateral pressure of wet concrete, and often means you need to account for the elevation change at the patio edge with a step, retaining wall, or thickened edge. The perimeter forms for a raised patio need to be staked or braced more heavily since the concrete will push outward much more aggressively than on a slab-on-grade pour. Wet concrete is heavy, and a form blowout mid-pour is a nightmare.
For a raised patio, plan for a thickened perimeter edge, at least 6 to 8 inches deep around the outside, to act as a grade beam. This edge sits in contact with the soil and provides structural support so the elevated section doesn't crack away from its perimeter over time. If the elevation difference is more than 8 to 10 inches, seriously consider a separate retaining wall with the patio slab poured behind it rather than relying on thick concrete alone to hold everything in place.
Base, reinforcement, and subgrade prep
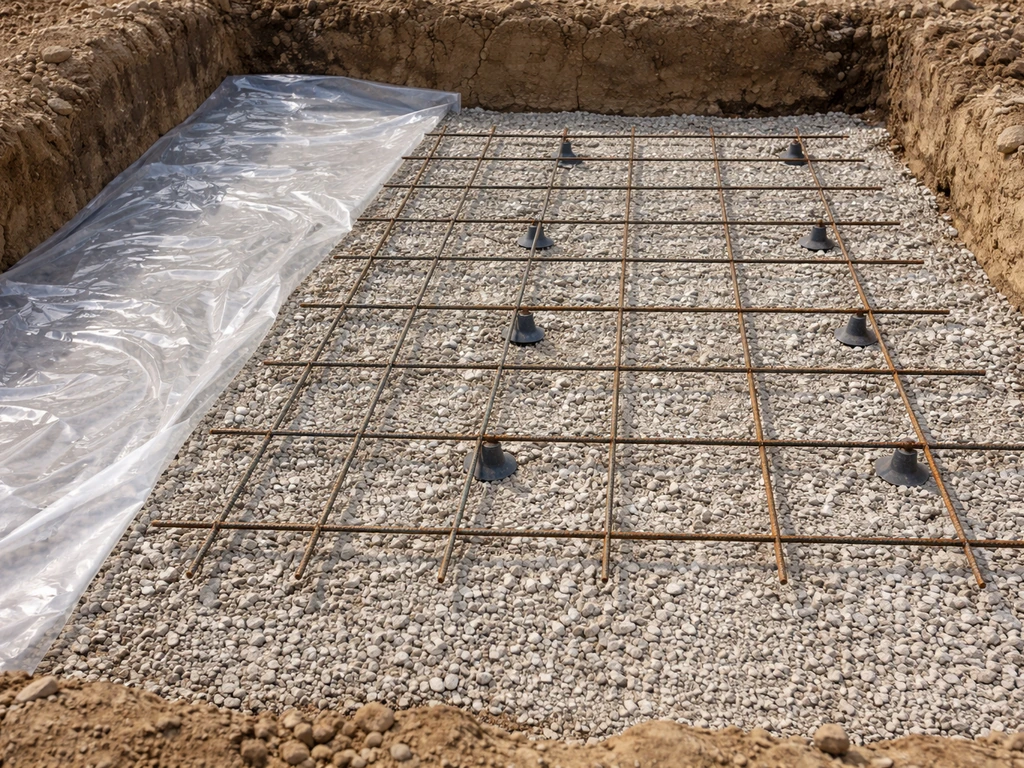
Once your forms are set, fill the excavated area with compactible gravel or crushed stone. Spread it in layers no more than 3 to 4 inches thick, compacting each layer before adding more. Your finished gravel surface should be flat, well-compacted, and consistent in depth. A 4-inch gravel base is minimum for most patios; 6 to 8 inches is better on clay-heavy or frost-prone sites.
In most regions, laying a 6-mil polyethylene vapor barrier over the gravel before pouring is a good idea. It reduces moisture migration up through the slab, which matters if you ever plan to cover the surface or if the patio is adjacent to a conditioned space.
Now place your reinforcement. For a standard residential patio, 6x6 welded wire mesh or #3 rebar on 18-inch centers works well. The key mistake most people make is letting the mesh sit directly on the gravel, which means it ends up at the very bottom of the slab and does nothing. Position the mesh so it sits roughly in the middle of the slab thickness. The easiest way to do this is to rest it on small stones or purpose-made plastic chairs spaced every few feet. When you pour, the mesh should be floating at about mid-depth, not resting on the base.
Mixing and placing concrete
For patios up to about 1.5 to 2 cubic yards, you can mix bags of Quikrete or Sakrete using a rented mixer. Beyond that, order ready-mix concrete from a local supplier. Ready-mix is almost always a better choice for anything patio-sized because the truck delivers it at the right consistency, and you're not exhausted from mixing before you even start the pour. For a standard patio, specify 3,500 to 4,000 PSI concrete with air entrainment if you're in a freeze-thaw climate.
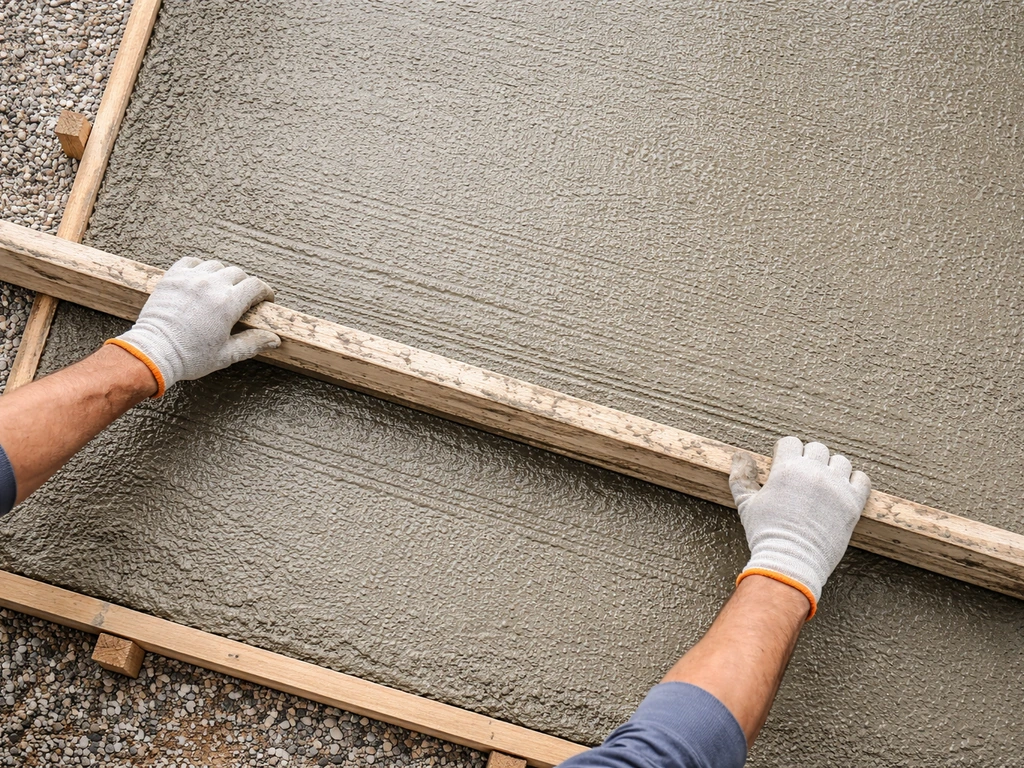
Start placing concrete at the corner farthest from your access point and work toward the truck or mixer. Use a shovel to move concrete around inside the forms, but don't drag it excessively, which can cause segregation of the mix. Use a 2x4 or a purpose-built screed board to strike off the concrete level with the tops of your forms. Set the screed across both form edges and pull it toward you in a side-to-side sawing motion to level and compact the surface as you go.
As you screed, use a concrete rake or come-along to fill low spots and push out excess. After screeding, run a bull float over the entire surface in long, overlapping passes. The bull float embeds the aggregate and brings a thin layer of cement paste to the surface, which is what you'll finish later. Keep the leading edge of the float slightly raised so it doesn't dig in.
If you're mixing concrete from dry bags, work in sections so you don't outpace yourself. Each bag of 80-pound Quikrete yields about 0.6 cubic feet, so you'll need roughly 45 to 50 bags per cubic yard. It's a lot of work. For anything bigger than a small garden pad, rent a mixer or call the ready-mix truck.
Finishing and controlling drainage
Wait. This is the part where most beginners make mistakes. After the bull float pass, you have to wait for the bleed water to evaporate before you do any trowel finishing. Bleed water is the sheen you see on the surface after placing. Working the surface while bleed water is still present dilutes the cement paste, weakens the surface layer, and causes scaling and dusting later. Wait until the sheen disappears and the surface is firm enough that pressing your finger in leaves a slight impression but doesn't sink more than about 1/4 inch.
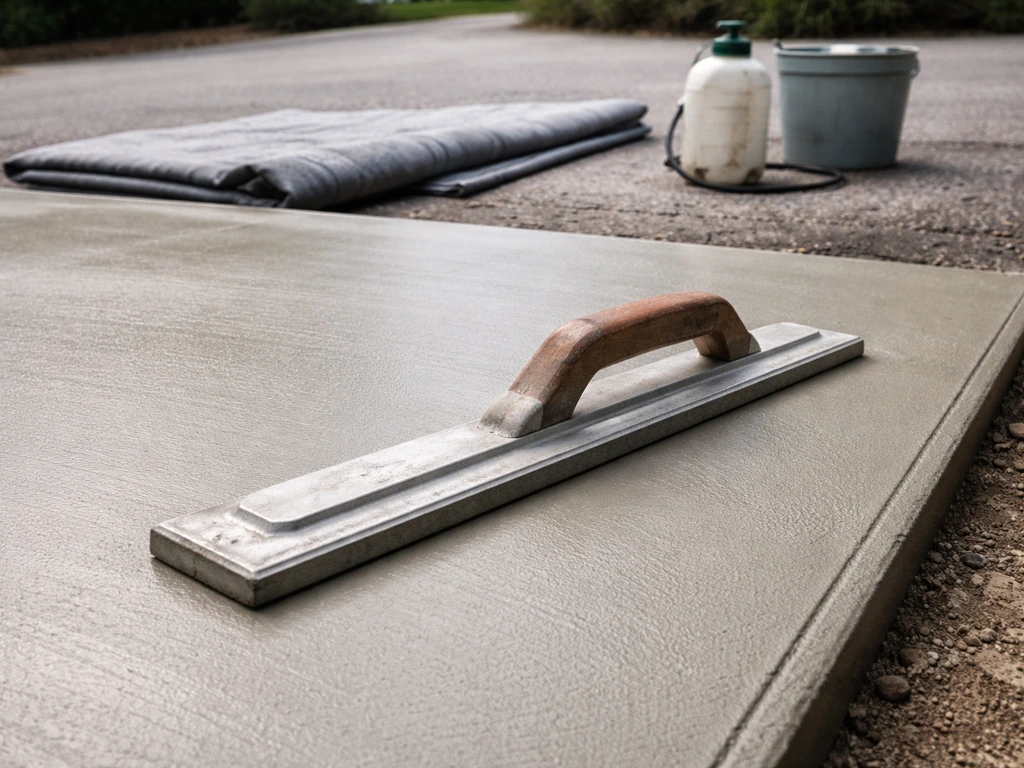
Once it's ready, run a magnesium or wood float over the surface to smooth it out and close up any voids. For a patio surface you want to walk on without slipping, follow the float with a broom finish. Pull a stiff-bristled push broom across the surface in one direction to create a light texture. The broom lines should run perpendicular to the direction people walk for maximum traction. If you want a smoother decorative finish, use a steel trowel, but know that a slick troweled finish on an outdoor slab can be dangerously slippery when wet.
Before the concrete stiffens completely, use an edging tool to round the exposed perimeter edges of the slab. This prevents chipping and gives the patio a clean, professional look. Run the edger back and forth along the inside of the forms until you get a consistent rounded edge.
Double-check your slope before walking away. Water should sheet off the surface toward the low edge. If you see any low spots that might pond water, you have a short window to address them before the concrete sets permanently.
Cut control joints in the right places
Concrete shrinks as it cures and moves as temperatures change. Control joints give the concrete a predetermined place to crack so those cracks happen where you want them, in a straight line, rather than randomly across your slab. ACI 360R is a concrete slabs-on-ground technical guide that discusses slab cracking behavior and jointing considerations control joints give the concrete a predetermined place to crack. Space control joints no more than 10 feet apart in each direction. On a 12x16 patio, you'd put one joint running lengthwise and possibly one crosswise, dividing the slab into sections no larger than roughly 10x10 feet.
You can form control joints while the concrete is still fresh using a jointing tool, pressing it along a straightedge to score a line. Alternatively, use a concrete saw to cut joints within 24 hours of pouring, while the concrete is hard enough not to ravel but hasn't yet fully cured. Each joint needs to be at least 1/4 the depth of your slab. For a 4-inch slab, that means joints at least 1 inch deep. Shallower joints won't guide the cracks effectively.
Curing, protecting, and finishing up
Curing is how concrete gains its strength. The chemical hydration reaction that hardens concrete needs moisture, and if the slab dries out too fast, you end up with weaker concrete that's prone to surface dusting and cracking. The standard guidance is to cure for at least 7 days, keeping the surface continuously moist the entire time.
The easiest way to cure a patio slab is to spray it with a curing compound immediately after finishing while the surface is still slightly damp. Curing compounds form a membrane that seals in moisture and require no further attention beyond keeping traffic off the slab. Alternatively, cover the slab with plastic sheeting or wet burlap and keep it moist, rewetting it daily or whenever it starts to dry out. Either method works, but the curing compound is more forgiving if you forget to check on it.
Remove forms after 24 to 48 hours. The concrete is hard enough by then to hold its shape, but still early in its strength development, so don't put heavy loads on it yet. Light foot traffic is usually okay after 24 to 48 hours. Keep furniture off the slab for at least 7 days, and don't park vehicles on it for 28 days. Concrete reaches roughly 70 percent of its design strength at 7 days and approaches full strength around 28 days.
Once fully cured, applying a penetrating concrete sealer is one of the best things you can do to extend the life of your patio. A good sealer blocks moisture, oil, and stains from penetrating the surface and reduces freeze-thaw damage. Apply it after 28 days when the concrete is fully cured and the surface is clean and dry.
Quick-reference: what you need for a standard 4-inch patio slab
| Item | Spec / Recommendation | Notes |
|---|---|---|
| Slab thickness | 4 inches | 5-6 inches for heavier loads or raised sections |
| Gravel base | 4-6 inches of compacted crushed stone | 8 inches on clay or frost-prone soils |
| Concrete strength | 3,500-4,000 PSI | Air-entrained if in freeze-thaw climate |
| Reinforcement | 6x6 wire mesh or #3 rebar at 18-inch centers | Elevate to mid-slab depth with chairs or stones |
| Slope | 1/4 inch per foot away from house | Minimum 1/8 inch per foot |
| Control joint spacing | Max 10 feet in each direction | Minimum depth 1/4 of slab thickness (1 inch for 4-inch slab) |
| Cure time | 7 days moist curing minimum | Full strength at 28 days |
A well-poured concrete patio is genuinely a project most motivated homeowners can complete themselves. Many homeowners also ask whether they can pour their own concrete patio, and the short answer is yes if you plan the layout, prep the base correctly, and cure it properly can i pour my own concrete patio. The steps aren't complicated, but the order matters and the details add up. Get the base right, slope the forms correctly, keep the mesh elevated, don't over-finish too early, and cure it properly. Do those things and you'll have a patio that holds up for decades.
FAQ
Can I pour a concrete patio directly over compacted dirt or existing concrete?
For soil, you should not skip the gravel base and compaction. For existing concrete, you usually need to evaluate cracking, unevenness, and thickness, then decide whether you are overlaying or doing a full demo, because bonding and drainage behavior differ. If you have any soft spots under the old slab, your new pour can still settle and crack.
What happens if my patio slope is slightly wrong (too flat or slopes toward the house)?
If it is too flat, you will get puddling and faster freeze-thaw deterioration. If it slopes toward the house, you can create moisture migration and staining at the foundation. A practical check is to use a long level and measure the far edge drop before pouring, then re-check after forms are fully braced.
Do I need control joints on every patio, even small ones?
Yes, joints are important even on smaller slabs, because concrete shrinkage is unavoidable. The practical rule used in the article, keep joints no more than about 10 feet apart in each direction, still applies. Also plan for at least one joint line that divides large rectangles, so cracks do not wander.
Can I skip reinforcement mesh or rebar if the patio is only a few inches thick?
Skipping reinforcement increases the chance of wider cracking and slab movement, especially on sites with movement, clay soils, or frost exposure. Even with reinforcement, it needs to be elevated to mid-depth. If you cannot support it properly, you may still improve performance by using thicker slab or better base preparation, but not by leaving the mesh on the ground.
How do I keep concrete from cracking if I live in a freeze-thaw area?
Use air-entrained concrete as recommended, keep the gravel base deep enough for your conditions, and ensure the slab drains away from structures. Also keep curing moisture for at least a week, because premature drying can create early surface weakness that worsens during freeze-thaw cycles.
How long should I wait before walking on it, and when is it safe to add furniture or grills?
Light foot traffic is generally acceptable after about 24 to 48 hours, but you should still avoid point loads. Keep patio furniture and anything heavy off until at least 7 days, because uneven early loads can create small depressions that later become trip hazards or collect water.
What is the correct way to finish for traction, and can I make it too smooth?
For outdoor traction, a broom finish creates texture for walking in wet conditions. If you finish too smooth with a steel trowel, the surface can become slippery when wet and may also trap water at microscopic low areas. If you want a smoother look, use a lighter broom or a finish texture that still leaves visible traction lines.
Should I use a plastic sheet under the slab instead of a vapor barrier, or is there a difference?
A 6-mil polyethylene vapor barrier is specifically intended for moisture migration control under the slab. Regular thin plastic might tear or not cover properly, and it can shift during base work. If you use plastic, overlap seams and protect it during reinforcement placement so it stays in place before the pour.
Do I need expansion joints where the patio meets a house or garage?
When a slab abuts a structure, the joint detail matters because the slab will move slightly as temperatures change. Plan for a compressible joint filler or deliberate joint approach so the patio is not rigidly tied into the building. This reduces the risk of cracking or transferring movement to the foundation edge.
How do I handle a patio that includes steps or a raised section without relying only on thick concrete?
For larger elevation changes, thickened edges alone may not control cracking. If the step height or difference exceeds roughly 8 to 10 inches, the safer approach is often a separate retaining wall with the slab poured behind it, so the wall carries lateral pressure and the slab can be detailed with proper joints.
What should I do if it rains shortly after I pour and finish?
Avoid working the surface once bleed water has started the normal finishing window, and prevent runoff from washing paste off the surface. If heavy rain hits before finishing is complete, you may need to re-evaluate the surface quality because washout and scaling can occur. After the pour sets, focus on proper curing (curing compound or keeping it covered and moist) rather than re-troweling.
Is curing compound always better than wet burlap or plastic sheeting?
Curing compound is more forgiving because it is less work to maintain, but it still requires you to apply it correctly right after finishing when the surface is slightly damp. Wet burlap or plastic can also work well if you rewet daily and keep it sealed against drying. The best choice is the one you can maintain reliably for the full curing period.