You can absolutely lay tile over an existing concrete patio, and when it's done right, it holds up beautifully for decades. The keys are making sure your concrete is structurally sound, prepping the surface properly, choosing outdoor-rated tile and the right thinset, building in expansion joints, and sealing everything when you're done. Skip any of those steps and you'll be pulling up cracked or popped tiles within a season or two. This guide walks you through every phase so you don't learn those lessons the hard way.
How to Lay Tile Over a Concrete Patio Step by Step

Silas Morrison
21 Jun 2026
First: Is Your Concrete Patio Actually Ready for Tile?
Before you buy a single tile, spend some time honestly evaluating your concrete. Not every slab is a good candidate, and tiling over a bad one just buries the problem. Here's what you're checking for:
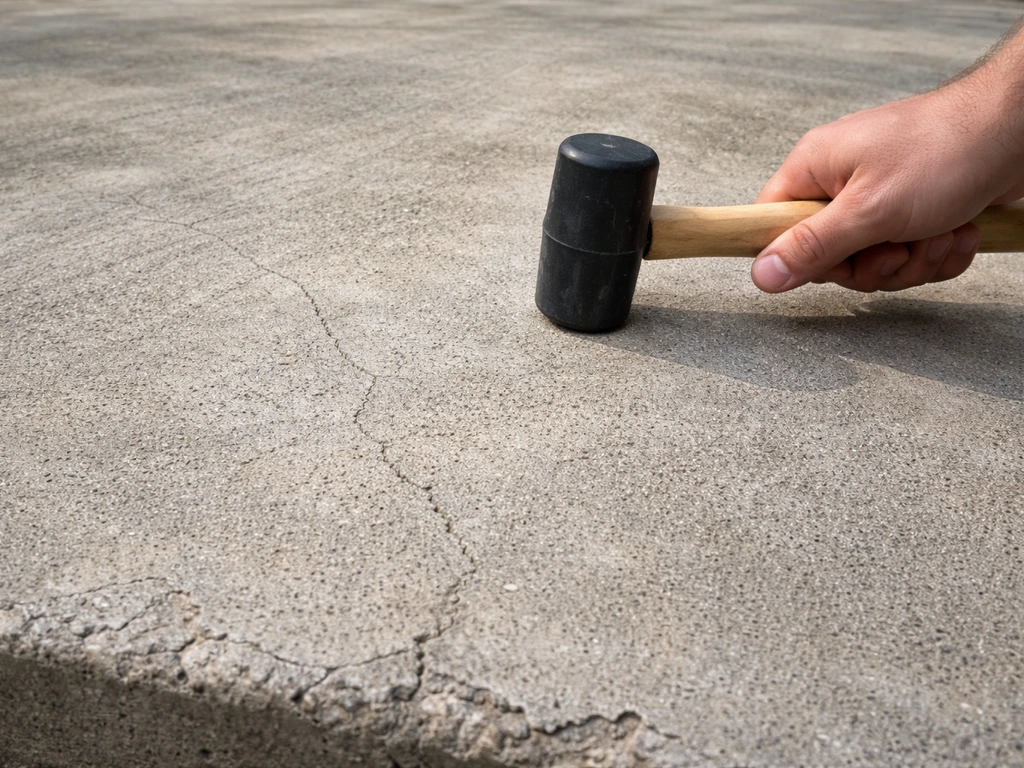
- Structural integrity: Walk the slab and listen for hollow spots. A hollow thud underfoot usually means the concrete has separated from its base, which causes movement that will crack your tiles. Tap with a rubber mallet if you're not sure.
- Cracks: Hairline cracks (under 1/8 inch) can be addressed with a crack isolation membrane. Wide, moving, or step cracks (where one side is higher than the other) are a red flag and need real structural repair before you tile.
- Surface level: Use a 6- or 10-foot straightedge. The TCNA and most mortar manufacturers call for no more than 3/16 inch of variation over 10 feet for tile installation. More than that and you're grinding or self-leveling before you start.
- Slope and drainage: Your concrete should already slope away from the house, ideally about 1/8 inch per foot. Adding tile raises the surface, so confirm that drainage still works and that water won't pool against a door threshold.
- Moisture: Press plastic sheeting flat to the concrete, tape the edges, and leave it for 24 to 48 hours. If moisture collects underneath, you have a vapor drive issue you need to address before tiling.
- Efflorescence: That white chalky residue means salts are migrating up through the slab with moisture. Scrub it off with a mild acid wash and neutralize it, and get serious about waterproofing before you tile.
If the slab is heaving, severely cracked, or sitting on unstable ground, tiling over it is money down the drain. But a slab that's solid, reasonably flat, and just a little rough or stained? That's a great candidate.
Choose Your Tile, Mortar, and Waterproofing System
Picking the Right Tile for Outdoor Use
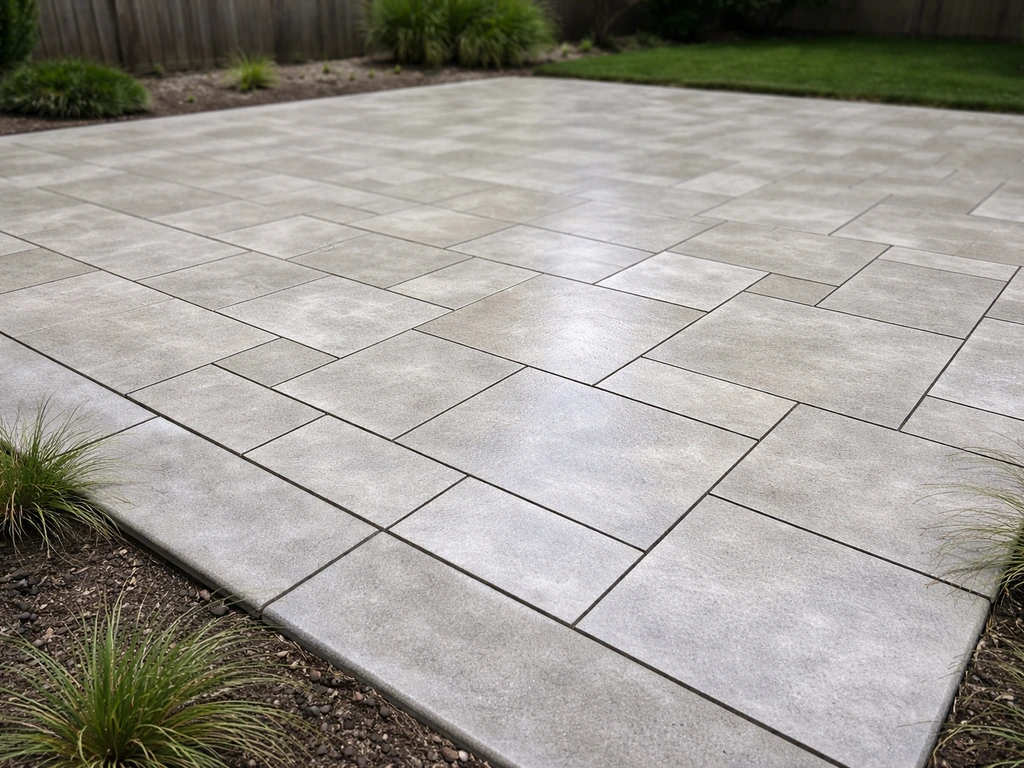
Not all tile is rated for exterior use, and this matters a lot in climates with freezing winters. You want tile that has passed ASTM C1026 freeze-thaw cycling tests, which means it won't absorb enough water to crack when temperatures drop. Porcelain tile (water absorption under 0.5% per ASTM C373) is the gold standard for outdoor patios because of its density and frost resistance. Slate and travertine can work but require more sealing attention. Ceramic tile is generally not recommended for outdoor use in freeze-thaw climates because of higher absorption rates. Whatever you choose, look for a coefficient of friction (COF) rating of at least 0.6 for wet outdoor surfaces.
For size, larger format tiles (18x18 or 24x24) look great on patios but demand a flatter substrate. If your slab has moderate variation, a 12x12 tile is more forgiving. Pairing your tile with the right grout joint width (typically 3/16 to 1/4 inch for outdoor tile) also helps accommodate minor movement.
Thinset and Mortar: What to Actually Buy
For direct-bond tile installations over concrete, use a polymer-modified thinset rated for exterior use. The TCNA calls for high mortar contact, typically better than 95% coverage, on exterior tile applications, so you need a mortar that stays workable long enough to get full back-buttering coverage. Avoid cheap unmodified mortars for the tile-bonding layer on an outdoor patio. If you're using an uncoupling membrane like Schluter DITRA, the mortar rules change: you bond DITRA to the concrete using an unmodified thinset meeting ANSI A118.1, then use a modified thinset (like Schluter's ALL-SET, which meets ANSI A118.4T, A118.11, and A118.15) to set the tile on top of the membrane.
Waterproofing and Crack Isolation: Do You Need It?
Outdoors, the honest answer is: yes, almost always. A liquid-applied waterproofing and anti-fracture membrane (like Custom Building Products CBP-232, which meets ANSI A118. 12) gives you two things at once: it seals the concrete against moisture migration and gives the tile assembly some tolerance for minor in-plane cracking. You brush or roll it on, let it cure, and tile directly over it.
For slabs with a history of cracking or movement, or in areas with significant freeze-thaw cycling, consider a full uncoupling membrane like Schluter DITRA instead. DITRA's polypropylene matrix with anchoring fleece decouples the tile from the concrete, which means small concrete movements don't transfer directly into tile stress. It also [provides waterproofing and vapor pressure equalization](https://eu. schluter.
com/en-GB/uncoupling-316/e/22049/ditra? search=DITRA), which matters on a patio that sees rain and temperature swings.
| Option | Best For | Key Standard | Tile Bonding Mortar |
|---|---|---|---|
| Modified thinset direct bond | Sound, flat concrete with no crack history | ANSI A118.4 | Modified thinset (ANSI A118.4) |
| Liquid anti-fracture membrane (e.g., CBP-232) | Minor existing cracks, moisture concerns, most outdoor slabs | ANSI A118.12 | Modified thinset over membrane |
| Uncoupling membrane (e.g., Schluter DITRA) | Active cracks, movement-prone slabs, high freeze-thaw climates | ANSI A118.12 / DITRA spec | Unmodified to bond membrane, modified for tile on top |
Prep the Concrete Surface
Surface prep is where most DIY tile jobs either succeed or fail. I've seen people spend hours on layout and installation only to have tiles pop off in year two because they skipped the grinder and just swept the slab. Don't do that.
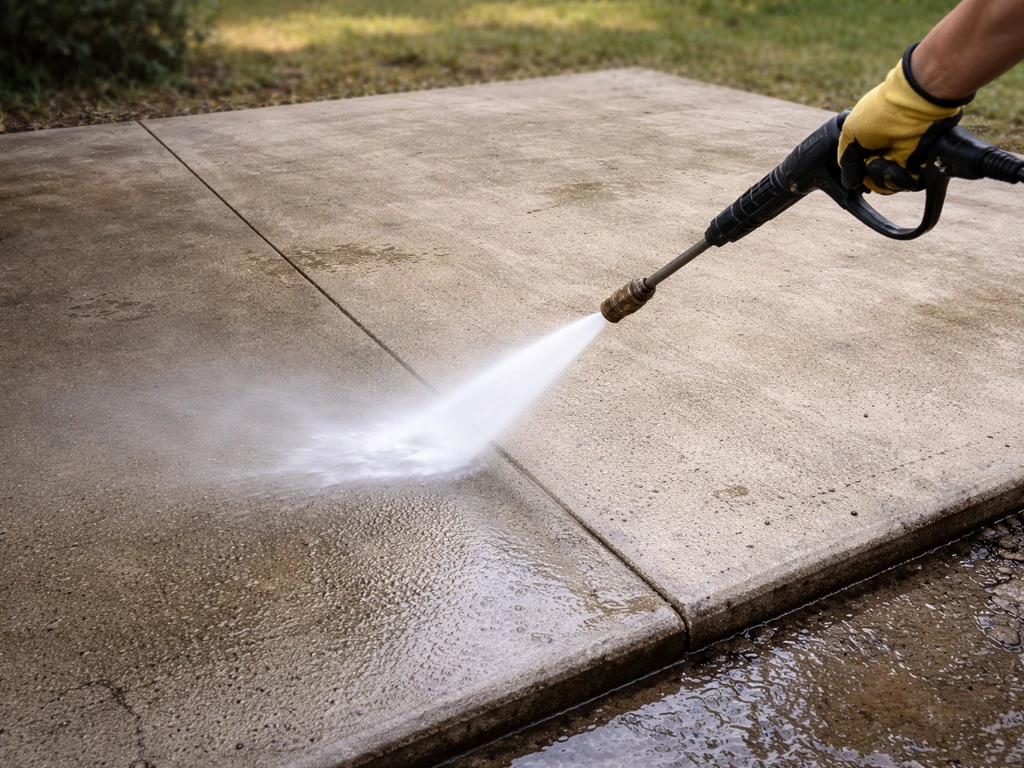
Clean It Thoroughly
Start with a pressure washer to remove dirt, algae, and loose debris. If there's grease or oil (common on patios near grills or driveways), use a degreaser and scrub it in before rinsing. Any residue that prevents bonding will eventually cause a tile to fail. If you see efflorescence, treat it with a diluted muriatic acid solution (typically 1 part acid to 10 parts water), scrub, rinse thoroughly, and neutralize with a baking soda and water solution. Let the slab dry completely, at least 24 to 48 hours.
Repair Cracks and Level Low Spots
Fill cracks wider than a hairline with a polyurethane or epoxy crack filler rated for concrete. Let it cure fully before tiling over it (or over your crack isolation membrane). For areas that are low or uneven beyond the 3/16-inch-per-10-foot tolerance, use a Portland cement-based self-leveling underlayment rated for exterior use. Mix it according to the manufacturer's instructions, pour it into the low area, and spread with a gauge rake. Most exterior self-levelers cure in 2 to 4 hours before you can tile.
Profile the Surface for Better Bond
If your concrete is very smooth (like a broom-finished or troweled slab), the thinset needs something to grip. Use a floor grinder with a diamond cup wheel to open up the surface, or apply a concrete bonding primer according to your mortar manufacturer's recommendations. A slightly rough surface, what tile pros call a concrete surface profile (CSP) of 3 to 5, gives the thinset mechanical bite. After grinding, vacuum thoroughly and wipe down with a damp sponge. Don't grind and leave a layer of concrete dust sitting there.
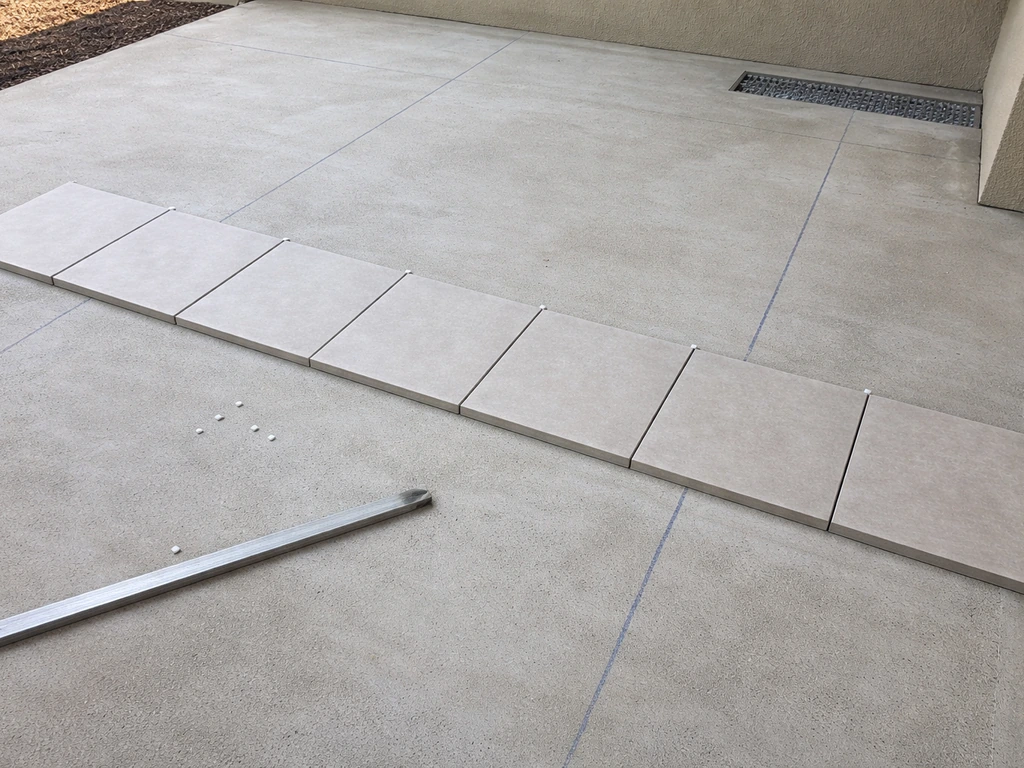
Plan Your Layout, Do a Dry Fit, and Handle Edges and Drains
Good layout planning before you mix any mortar saves you from ugly surprises. Start by finding the center of your patio and snapping chalk lines to create quadrants. Dry-lay a row of tiles in each direction, with spacers, to see how the field plays out at the edges. You want edge cuts to be at least half a tile wide. A thin sliver of tile at the border looks bad and pops loose easily. If the math doesn't work, shift your starting point a few inches and re-check.
Slopes, Drains, and Transitions
On a patio, you're working with a sloped surface, which complicates layout. Plan tile runs so joints align with the direction of drainage where possible, and make sure no tile is creating a dam that redirects water somewhere it shouldn't go. If you have a floor drain or linear drain, plan your tile cuts to meet the drain cleanly. Drain flanges are usually adjustable in height, so account for the added thickness of your tile assembly (thinset plus tile, or thinset plus membrane plus thinset plus tile) when setting the drain height. The finished tile surface should be flush with or very slightly above the drain grate so water flows toward it naturally.
Expansion Joints Are Not Optional Outdoors
This is the part most DIYers skip and later regret. The TCNA's EJ171 guidance calls for movement joints in exterior tile assemblies every 8 to 12 feet in each direction, as well as at the perimeter where tile meets walls, posts, or fixed structures. These joints get filled with backer rod and an elastomeric sealant meeting ASTM C920 (think structural silicone or polyurethane caulk, not standard grout). Plan where these joints fall before you start setting tile. They should align with existing control joints in the concrete underneath whenever possible. If you try to add them after the fact, you'll be cutting into finished tile with an angle grinder, which is miserable.
Install Waterproofing or Underlayment, Then Set the Tile
Applying a Liquid Membrane (if using one)
Roll or brush on your liquid anti-fracture membrane (like CBP-232 or a similar ANSI A118.12-rated product) in two coats, letting the first coat dry to a light color before applying the second. Pay extra attention to any repaired cracks, corners where the slab meets a step or wall, and areas around drains. Embed waterproofing fabric tape at those joints and corners while the first coat is still wet. Let the second coat cure fully before tiling, typically 2 to 4 hours in warm weather.
Installing an Uncoupling Membrane (DITRA)
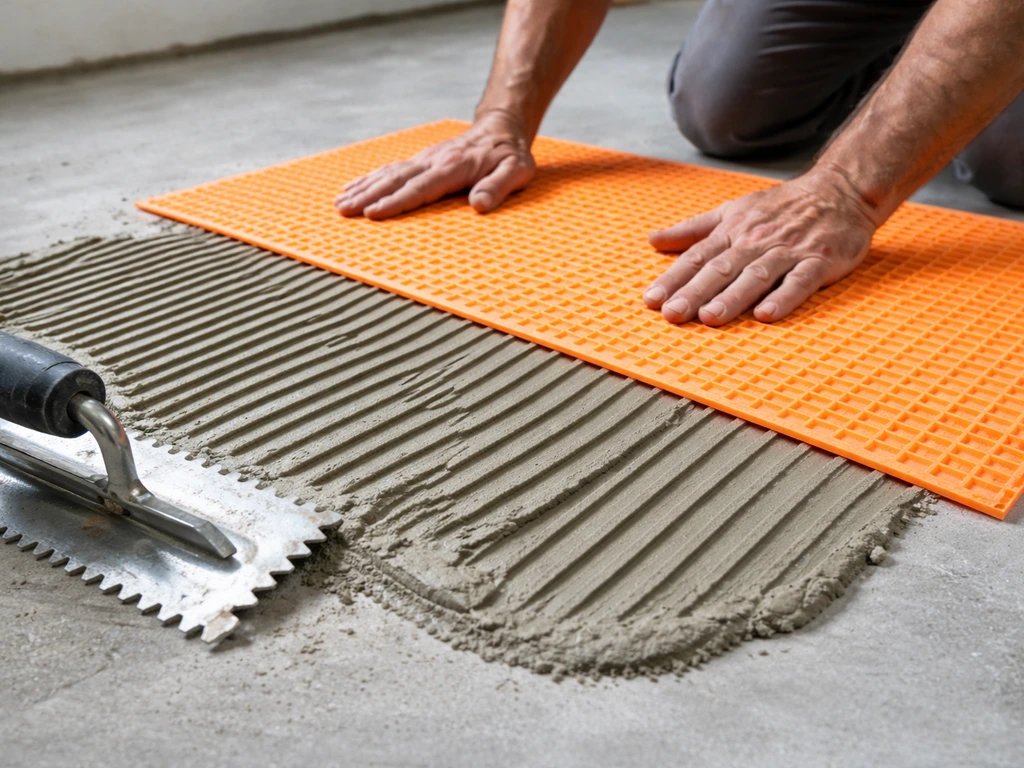
Spread unmodified thinset (ANSI A118.1) over the concrete with a 3/16-inch V-notch trowel, lay the DITRA membrane fleece-side down, and press it firmly into the mortar with a grout float or straight board. Stagger seams between sheets. Let the membrane mortar cure before setting tile on top, usually overnight. Then set your tile using modified thinset on top of the DITRA surface, following the same trowel and back-butter technique described below.
Setting the Tile
This is where getting 95-plus percent mortar contact really matters for exterior tile. Use a notched trowel appropriate to your tile size (a 1/2-inch square-notch is common for 12x12 and larger tiles). Spread the thinset on the substrate, then comb it in one direction. Back-butter the tile itself with a thin layer of thinset, and set it with a slight twist to collapse the ridges and maximize contact.
Every few tiles, lift one and check the back: you want full coverage, no voids. Voids trap water, which freezes and pops tiles off in cold weather. Use tile spacers to maintain consistent grout joint width, and check your work with a level and straightedge frequently. Tap each tile gently with a rubber mallet to seat it, and adjust before the thinset sets.
Most thinsets give you 20 to 30 minutes of open time before they skin over.
- Mix thinset to a peanut butter consistency, no slumping off the trowel.
- Spread a manageable section (2 to 3 square feet at a time until you get a feel for the open time).
- Comb thinset in one direction with your notched trowel.
- Back-butter each tile with a thin skim coat of thinset.
- Set tile with a slight twist and firm pressure.
- Lift a tile every few placements to verify full mortar contact.
- Tap tiles level with a rubber mallet, check with straightedge.
- Leave gaps at expansion joint locations, do not fill with thinset or grout.
Grout, Seal, Caulk, and Finish the Details
Choosing and Applying Grout
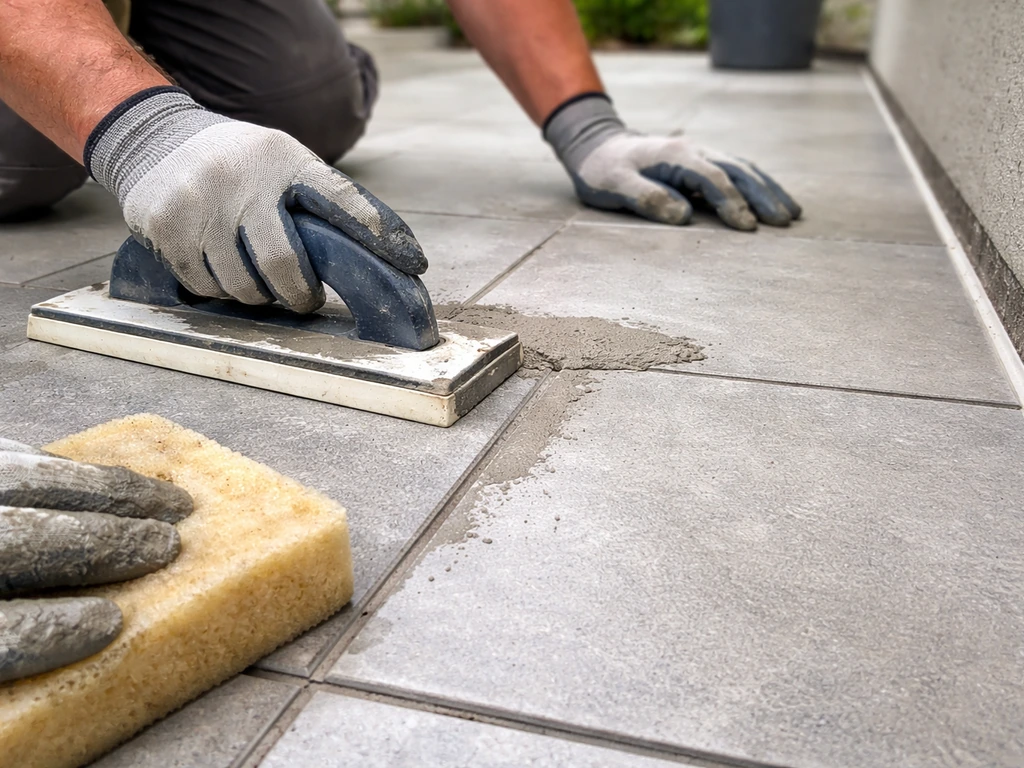
For outdoor tile, use a sanded grout for joints 1/8 inch or wider. Epoxy grout is tougher and more stain-resistant, but it's harder to work with and tends to be overkill for most residential patios unless you're dealing with a heavily used area. Let the thinset cure for at least 24 hours (check the manufacturer's spec, some want 48) before grouting. Mix grout to a thick peanut butter consistency. Work it into the joints diagonally with a rubber grout float, pressing firmly to eliminate voids. Remove the excess in a diagonal stroke before it haze-dries. Clean the tile surface with a lightly damp sponge, rinsing the sponge frequently. Don't flood the joints with water, that weakens the grout.
Filling Expansion Joints and Transitions
Once the grout is cured (typically 24 to 72 hours), go back to your movement joints. Press backer rod (a closed-cell foam rope) into each joint to create a backing about 1/4 inch below the tile surface, then apply your ASTM C920 elastomeric sealant (a color-matched urethane or silicone caulk) over the backer rod. Tool it smooth and let it cure. At transitions where tile meets a door threshold, step edge, or wall, use the same approach: caulk, not grout. Grout is rigid and will crack at those joints every time.
Sealing the Tile and Grout
If you used porcelain tile, the tile itself doesn't need sealing because it's nearly impervious. But the grout does. Apply a penetrating grout sealer after the grout has fully cured (check the package, often 72 hours minimum for exterior use). For natural stone tile like slate or travertine, seal the tiles themselves with an appropriate stone sealer before grouting to prevent grout staining, and seal again after. For the best results when installing slate tile on a concrete patio, plan to use a penetrating grout sealer and stone sealer in the right order. Wipe up any sealer that pools on the surface within the application window so it doesn't leave a haze.
Curing Time, Ongoing Maintenance, and Fixing Common Problems
How Long Before You Can Use the Patio
Most modified thinsets reach working strength in 24 to 48 hours, but exterior installations in cooler weather (below 50°F) or high humidity slow that down considerably. Don't walk on the tile or set furniture on it until the thinset has had at least 24 hours to cure, and don't expose it to rain or freezing temperatures for at least 72 hours if possible. Full cure is typically 28 days for Portland cement-based mortars and grouts, which is when the assembly reaches its maximum strength. You can use the patio before that, just treat it gently.
Routine Maintenance to Keep It Looking Good
- Re-seal grout joints annually, or every two years if you used a high-quality penetrating sealer.
- Check expansion joint caulk each spring. If it's cracking or pulling away, dig it out and re-apply.
- Clean the tile with a pH-neutral cleaner. Avoid acidic cleaners on grout or natural stone.
- Clear debris from drain areas so water can always move freely off the patio.
- Inspect for any new cracking in the grout that might indicate slab movement below.
Troubleshooting the Problems That Show Up Later
Hollow or loose tiles almost always mean inadequate mortar contact during installation, either not back-buttering, using too small a trowel notch, or letting the thinset skin over before setting the tile. The fix is to remove those tiles, clean off the old mortar, and reset them with proper technique and full coverage. If it's just one or two tiles, this is manageable. If it's a large area, something systemic went wrong, possibly a bonding issue with the concrete surface, and you need to remove and re-prep more aggressively.
Cracked tiles in a pattern that follows grout joints usually signal slab movement being transmitted into the tile assembly. This is exactly what a crack isolation membrane or uncoupling membrane is designed to prevent. If you direct-bonded tile over a slab that cracks seasonally, you may need to remove the affected area, add a membrane, and reset.
Lippage (one tile edge higher than its neighbor) comes from not checking your work with a straightedge as you go and from inconsistent mortar coverage. Minor lippage under 1/32 inch is barely noticeable; anything more can be a tripping hazard on a patio. Efflorescence reappearing through grout joints after installation means moisture is still migrating through the slab: re-evaluate your waterproofing approach and consider a vapor-control membrane on a future repair.
Grout cracking at perimeter joints, around drains, or where tile meets a wall means you grouted where you should have caulked. Those joints move. Chip out the cracked grout, clean the joint, and fill it with backer rod and ASTM C920 elastomeric sealant. This one comes up constantly on outdoor tile jobs, and the fix is straightforward once you know what caused it.
When to Call a Pro
If your slab has major structural issues, significant heaving, or is clearly moving or settling, tiling over it yourself is likely to end in failure regardless of how careful you are. A concrete contractor or structural engineer should evaluate the slab first.
Similarly, if you're dealing with large format tile (24x24 or bigger), complex drain or slope situations, or a patio directly below a living space where waterproofing failure has real consequences, a professional tile installer who works regularly on exterior projects is worth the cost. The tile-specific work itself, including choosing materials, spec'ing the right membrane, and installing properly, is genuinely doable as a DIY project on a straightforward patio slab. But know your slab's limits and your own.
To wrap up the full process, follow a step-by-step plan for how to install ceramic tile on a concrete patio, from prep and waterproofing through setting and finishing how to install ceramic tile on concrete patio.
FAQ
Can I lay tile over a cracked concrete patio? What if the cracks move?
Yes, but only if it stays structurally sound. If the slab is cracked in a way that changes seasonally, has heaving, or looks like it has settled, tile can still fail even with good waterproofing. In those cases, you typically need an uncoupling or crack isolation membrane, and you should consider a slab evaluation before investing in materials.
What if my concrete patio is sealed or painted?
Not always. If the concrete is sealed or painted, thinset may not bond reliably. Grind the surface to remove the coating and expose clean concrete, then confirm the surface profile is appropriate (usually CSP 3 to 5). If you cannot remove the coating completely, ask the coating manufacturer or switch to a bonding primer specifically approved for thinset adhesion.
Should I grout over concrete control joints and expansion gaps?
If the patio has existing gaps where the concrete has control joints, you generally do not grout those joints. Keep movement joints as movement joints in the tile assembly, fill the void with backer rod, then use an elastomeric sealant rated for exterior use (ASTM C920). Grouting over them is a common cause of cracking at the perimeter and along joints.
How do I prevent tiny sliver tiles at the edges?
Dry-lay is more than a comfort step, it is how you avoid narrow border tiles and bad alignment around drains. A practical target is keeping edge cuts at least about half a tile wide, and adjusting your centerline so major grout joints fall where you want them. Also dry-lay with spacers and the tile thickness you will actually install to account for layout shifts.
Which thinset should I use if I am not using an uncoupling membrane?
Thinset type depends on whether you are bonding directly to concrete or over an uncoupling membrane. Direct-bond exterior installations use a polymer-modified thinset rated for outdoor use. If you are using a membrane like DITRA, the mortar to bond the membrane to concrete is typically unmodified, and the mortar used to set the tile on top is typically modified. Mixing these up is a frequent setup error.
How do I make sure the tile slope still drains correctly?
Yes, but do it early. If you wait until after thinset skins over or after tiles are set, adjusting slope and drain alignment gets difficult and you risk damaging bond. Use a straightedge and level as you go, and when checking your drain, remember the assembled thickness includes thinset plus tile (and membrane layers if used).
Can I use sanded grout outdoors, and how do I prevent grout failure?
Yes, if you choose the right grout and manage curing. Outdoor grout often works best with sanded grout when joints are 1/8 inch or wider, and you should avoid hosing water onto fresh joints, it can weaken grout. For freezing climates, also plan the installation window so rain and freezing temperatures are minimized during initial cure.
How can I verify I have 95% mortar contact before it’s too late?
Check the mortar coverage by lifting a tile from an area you have already set, look for near full coverage, and correct trowel size or technique if you see voids. Use back-buttering, comb in one direction, and set with a slight twist to collapse ridges. Voids are the usual reason hollow tiles later crack, pop, or freeze and fail in winter.
If my tiles crack, should I just re-seal or re-grout?
You can, but it will not fix a slab movement issue. If cracks in the concrete telegraph through grout or tile in a regular pattern, caulk and sealer cannot stop structural movement. The right repair depends on cause, often it means removing the affected section and adding a crack isolation or uncoupling membrane before re-setting.
How long should I wait before walking on the patio or letting it get wet?
Most thinset and grout need time in cool or humid conditions, and temperatures below freezing will disrupt curing. A practical rule is to avoid foot traffic and heavy setup until the manufacturer’s minimum cure is met, and avoid rain and freezing as long as possible, commonly at least 72 hours for outdoor exposure planning. If you must work in cooler weather, allow extra cure time beyond typical warm-day estimates.
My grout cracked at the perimeter and around the drain. What should I do now?
If you used a membrane or liquid waterproofing, you still need to finish movement joints correctly. Chip out cracked grout at joints that should have been caulked, then re-seal with backer rod and ASTM C920 elastomeric sealant. This is different from grout, and it is the main reason outdoor patios stop cracking at perimeter transitions.
Do I need to seal porcelain and natural stone tile after installation?
For porcelain, sealing tile is usually unnecessary, but grout still needs sealing, especially to reduce staining and water absorption. For slate or travertine, seal the stone before and after grouting, and follow the correct order so the grout does not permanently stain porous tile surfaces. Also avoid leaving sealer puddles, they can leave haze.
Can I fix loose or hollow tiles without redoing the entire patio?
If it is a small area with isolated tiles, you might be able to reset without replacing everything. However, if the hollow-sounding problem is widespread, you likely have a bonding or prep issue across the slab, and patch repairs will often repeat the same failure. A quick diagnostic is to compare failure locations with slab cracks, drainage patterns, and your prep method, then decide if you are patching or redoing.