You can tile an outdoor concrete patio by bonding exterior-rated tile directly to a clean, flat, structurally sound concrete slab using a polymer-fortified thinset mortar, planned movement joints every 8 to 12 feet, and a sanded exterior grout or epoxy grout sealed for weather resistance. The process works whether you're tiling a brand-new slab or upgrading an existing one, the difference is mostly in how much prep work you'll need upfront. If you want the full, step-by-step process, follow these guidelines for how to install ceramic tile on a concrete patio how to install ceramic tile on concrete patio.
How to Tile a Concrete Patio: Step-by-Step DIY Guide

Silas Morrison
14 Jun 2026
Tiling over existing concrete vs. a new slab: decide this first
Before you buy a single tile, figure out which situation you're actually in. This one decision changes how much prep time you'll spend and whether the project is even DIY-viable.
If you're working with a new slab, the main thing to know is that fresh concrete needs to cure fully before you tile, at least 28 days. A new slab is your best-case scenario: no old coatings to strip, no mystery cracks to evaluate, and a surface you can assess from day one. The trade-off is patience.
If you're tiling over an existing concrete patio, you need to honestly evaluate what's underneath. Existing slabs can be sealed, painted, cracked, heaved, contaminated with oil or grease, or just plain uneven. None of those problems are necessarily deal-breakers, but they all require specific prep steps. Skipping them is the number one reason exterior tile jobs fail within a few years.
| Situation | Main advantage | Main challenge | DIY viability |
|---|---|---|---|
| New slab (28+ days cured) | Clean slate, easy to assess | Must wait; plan joints from scratch | High — ideal starting point |
| Existing slab in good shape | Structure already there | Cleaning, checking flatness/cracks | High — with proper prep |
| Existing slab with minor cracks or coating | Salvageable with work | Stripping, patching, leveling | Medium — adds time and cost |
| Existing slab with heaving, major cracking, or poor drainage | Might be reusable | Structural issues need fixing first | Low — consider pro evaluation |
The bottom line: if your existing slab is structurally solid, drains away from the house, and passes the flatness test below, you can tile over it. If it's heaved, has large structural cracks, or pools water, fix those problems before tiling, or the tile will just fail on top of a broken foundation.
Assess the slab before anything else
This is the step people rush through, and it's where most outdoor tile failures start. Give yourself an afternoon to really look at the slab. Here's what to check.
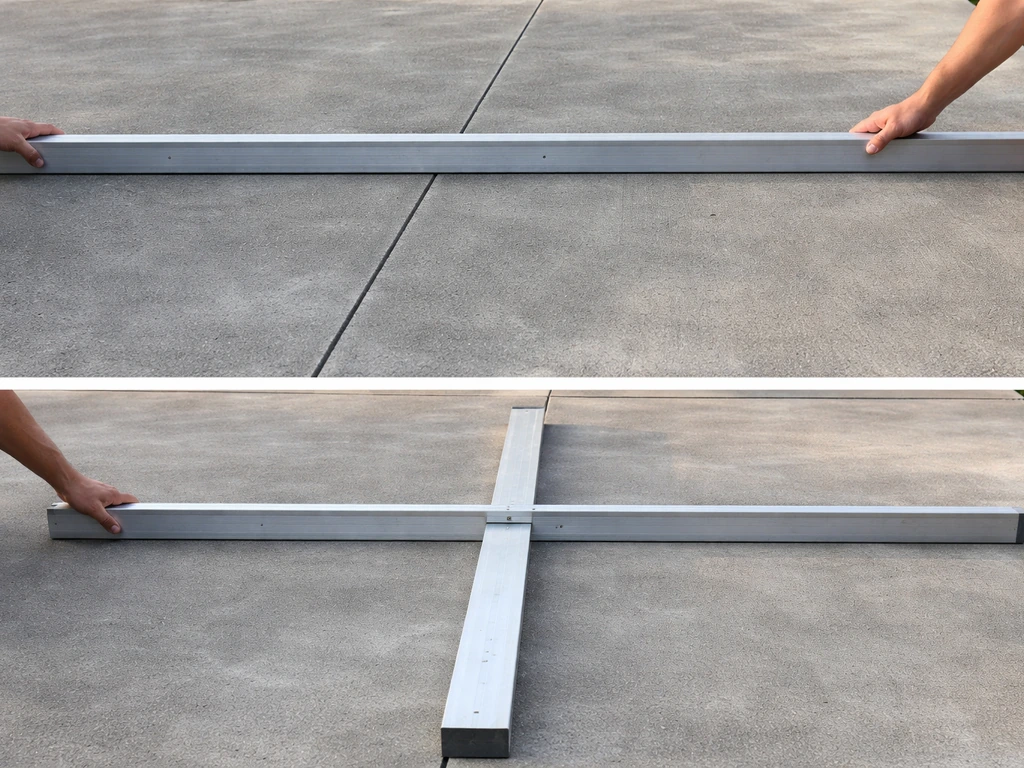
Flatness
Grab a 10-foot straightedge or a long level and drag it across the slab in multiple directions. The industry standard for tile-ready substrates is no more than 1/4 inch of variation in 10 feet. The CBP 09 30 00 ceramic tiling specification also describes the common [10-foot straightedge flatness check with a maximum 1/4 inch variation](https://installfloors. org/wp-content/uploads/2020/09/CBP-09-30-00-ceramic-tiling.
pdf) for tile-ready substrates, with tighter tolerances for large-format tile. If you're planning to use large-format tile, anything with an edge 15 inches or longer, [that tolerance tightens to 1/8 inch in 10 feet](https://cdn-global. laticrete. com/-/media/project/laticrete-international/shared/files/support-and-downloads/technical-datasheets/tds128.
pdf? rev=6dbcb0ec9eee4c618014a630c60daa07). Mark any low spots or humps with chalk. Low spots get filled with a floor-leveling compound.
High spots on concrete need to be ground down. Neither is a huge deal, but both need to happen before you set a single tile.
Cracks
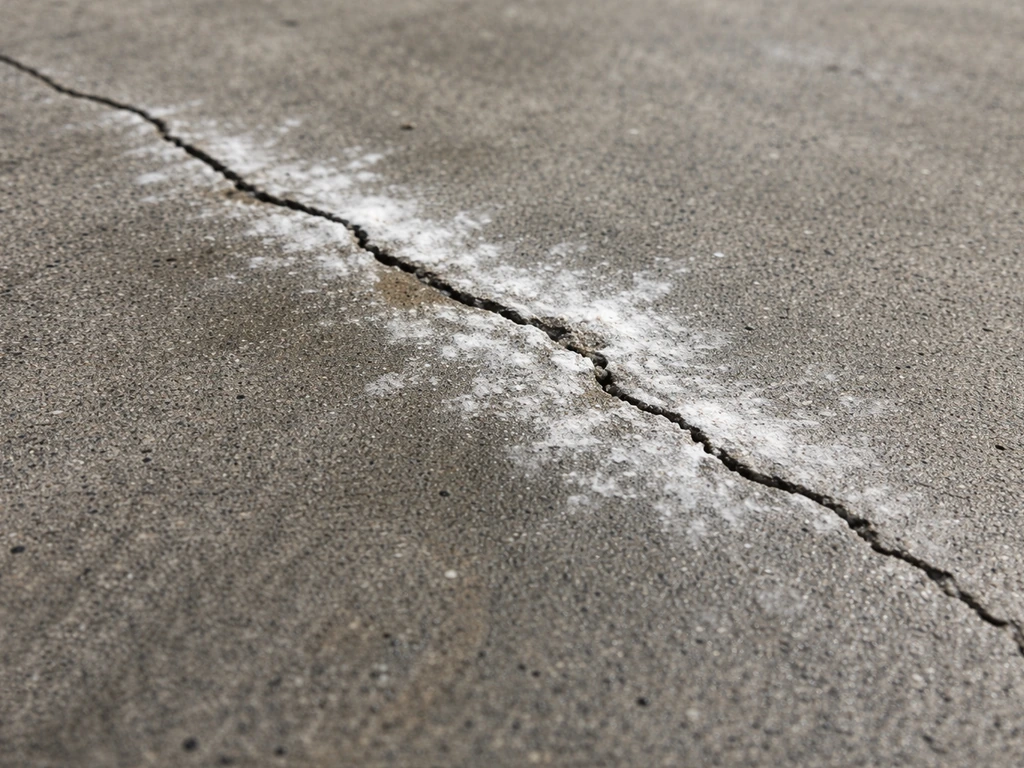
Hairline cracks that aren't moving and aren't wide are generally okay to tile over if you use an uncoupling membrane (more on that in the materials section). Active cracks, ones that are still widening or where one side has heaved above the other, need to be stabilized or professionally repaired first. Any existing control joints or saw-cuts in the slab are a non-negotiable: those joints must be carried through into the tile installation as movement joints. You cannot bury them under solid grout. That's one of the most common reasons exterior tile lifts and cracks.
Moisture and efflorescence
Look for white mineral deposits (efflorescence) on the surface, that's a sign moisture is migrating up through the slab. It needs to be removed with a diluted acid wash and the source of the moisture should be addressed before tiling. You can also do a plastic sheet test: tape a 2-foot square of plastic sheeting flat on the slab and leave it for 24 hours. If there's condensation underneath, you've got a moisture issue that needs to be managed with a moisture membrane before tiling.
Surface contamination and coatings
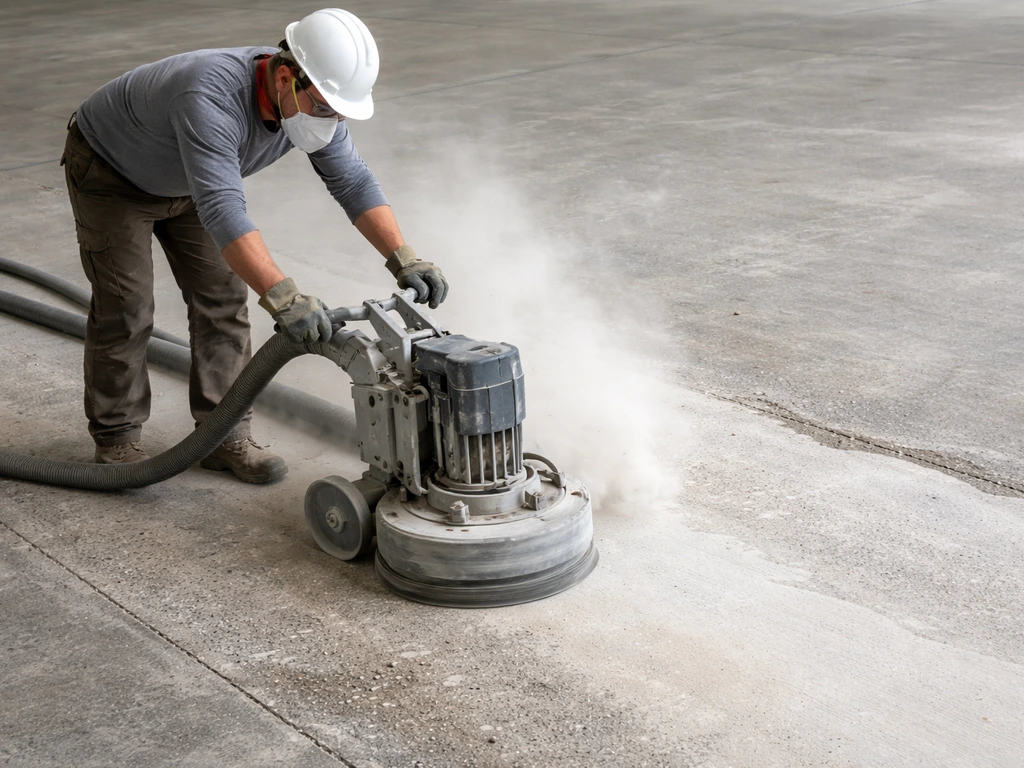
Thinset needs to bond to bare, clean concrete, not to paint, sealer, oil stains, or adhesive residue. Any coating on the slab has to come off. Use a concrete grinder or shot blaster to remove coatings and open up the concrete surface. For oil or grease stains, degrease thoroughly and test adhesion before proceeding. Bonding to a contaminated surface is a guaranteed path to tile failure.
Everything you'll need: materials and tools
Materials
- Exterior-rated tile with a low water absorption rating (porcelain, slate, travertine, or ceramic rated for outdoor use) — for freeze/thaw climates, look for tiles rated with a water absorption of less than 0.5% (vitreous or impervious)
- Polymer-fortified (modified) thinset mortar rated for exterior use
- Concrete primer/bonding agent to improve adhesion and slow absorption
- Uncoupling membrane (optional but strongly recommended for existing slabs with minor movement or cracks)
- Exterior-rated sanded grout or epoxy grout for joints 1/8 inch and wider
- Elastomeric sealant (ASTM C920-rated) for movement joints, with backer rod
- Self-leveling floor compound for low spots
- Tile and grout sealer rated for exterior/wet applications
- Tile spacers (sized for your chosen joint width, typically 3/16 inch to 3/8 inch for outdoor tile)
- Grout float and margin trowel
Tools
- 10-foot straightedge or long level
- Chalk line and tape measure
- Angle grinder or concrete grinder (for high spots and coating removal)
- Wet tile saw (essential for outdoor projects with lots of cuts)
- Angle grinder with diamond blade (for notched cuts)
- Notched trowel (size depends on tile format; a 1/2-inch square-notch is common for large outdoor tile)
- Rubber mallet and tile leveling system or tile wedges
- Bucket, mixing paddle, and drill for thinset
- Bucket and sponges for grout cleanup
- Knee pads (you'll thank yourself)
- Safety glasses and dust mask for cutting and grinding
Plan your layout and movement joints before you mix anything
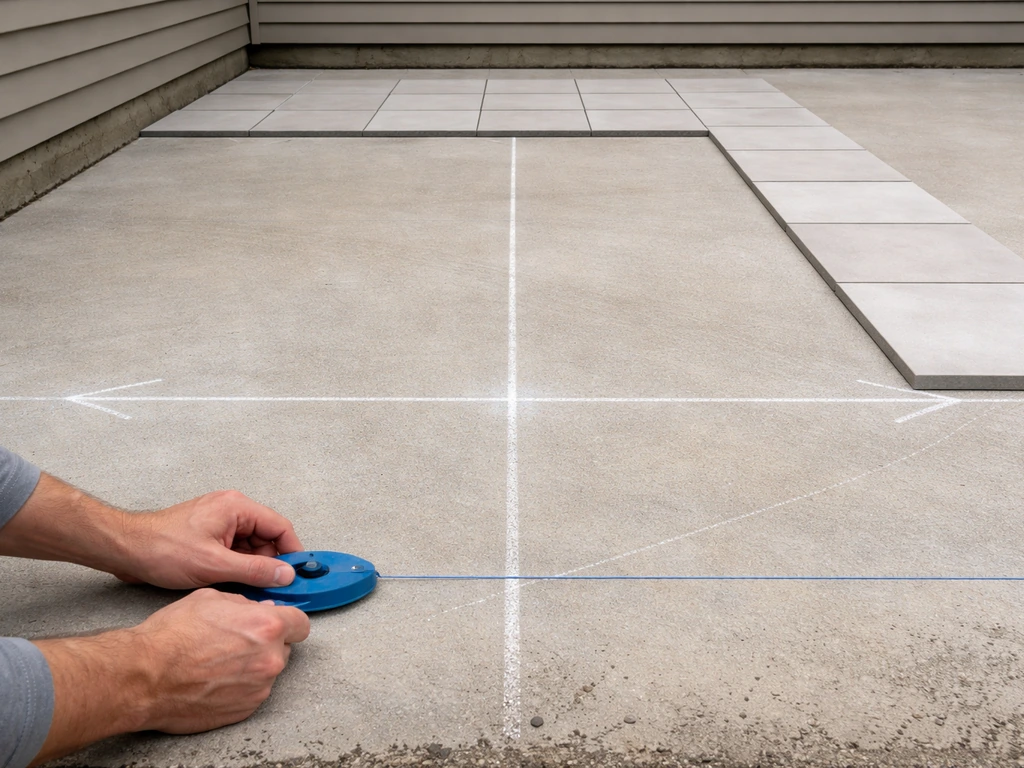
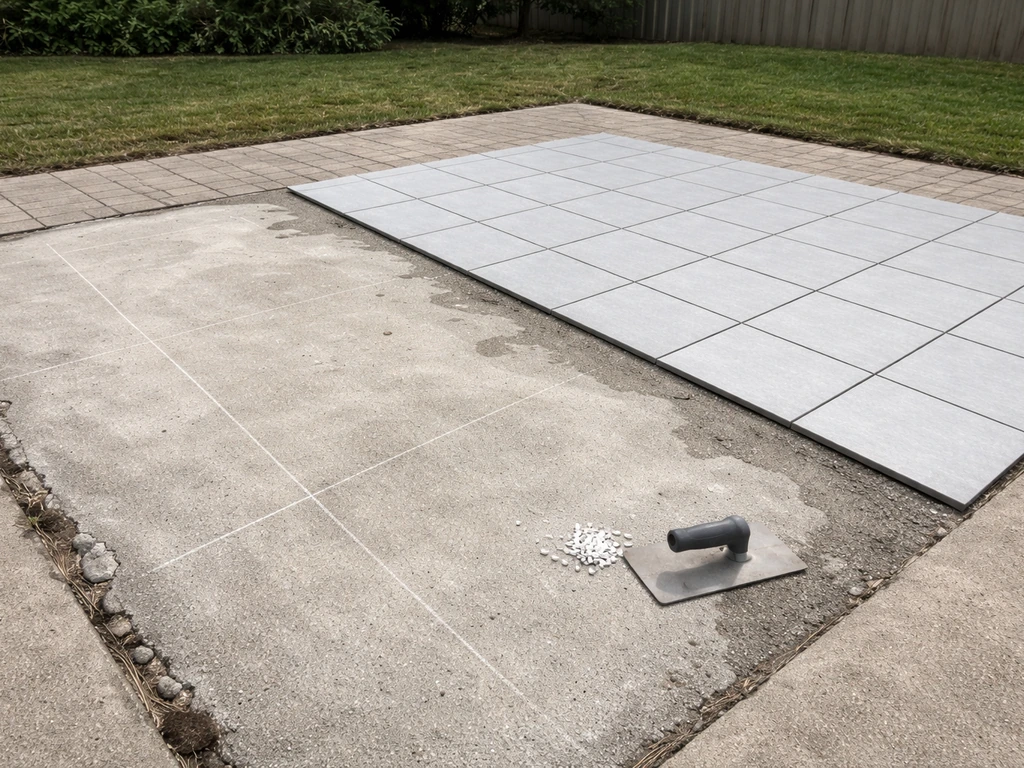
Good tile layout is done on paper (or at least in chalk) before a single tile gets set. Start by finding the center of the patio and dry-laying a row of tiles in both directions to see how your cuts work out at the edges. You want the cut tiles at the borders to be at least half a tile wide, anything narrower looks bad and is more likely to crack. Adjust your starting point to balance the cuts.
For outdoor patios, you also need to plan for a slight slope away from the house, typically 1/8 inch per foot is standard for drainage. If your existing slab already has this, great. If not, you can build slope into your thinset bed, but that gets complicated fast. It's worth addressing in the leveling compound stage.
Movement joints: don't skip this
Exterior tile installations expand and contract with temperature swings far more than interior floors do. The industry standard (per TCNA EJ171) is to install movement joints every 8 to 12 feet in exterior applications, closer to 8 feet if the patio gets direct sun, uses dark tiles, or is in a climate with big temperature swings. These joints are filled with an ASTM C920-rated elastomeric sealant (not grout) over a backer rod to prevent three-sided adhesion. Think of them like expansion joints in a sidewalk, they let the system breathe.
Also plan movement joints at the perimeter where the tile meets any wall, post, or step, and (critically) directly over any existing control joints in the concrete slab below. Mark all of these on your layout plan before you start setting tile. Trying to add them after the fact means cutting into set tile, which is miserable.
How to install the tile, step by step
- Clean the slab completely. Sweep, then scrub with a concrete cleaner or degreaser. Let it dry fully. If there's efflorescence, treat it with a diluted acid wash first, then rinse and dry.
- Grind down any high spots and fill any low spots with a self-leveling compound. Let the compound cure per manufacturer instructions before proceeding.
- Apply a concrete primer/bonding agent to the slab. This step improves thinset adhesion and prevents the dry concrete from pulling moisture out of your thinset too quickly — which weakens the bond. Let it reach the tack stage per the product instructions.
- If using an uncoupling membrane, embed it into a layer of unmodified thinset spread on the primed slab, using a 3/16-inch V-notch trowel. Roll it flat and let it cure overnight.
- Snap chalk lines for your layout. Mark the positions of all movement joints.
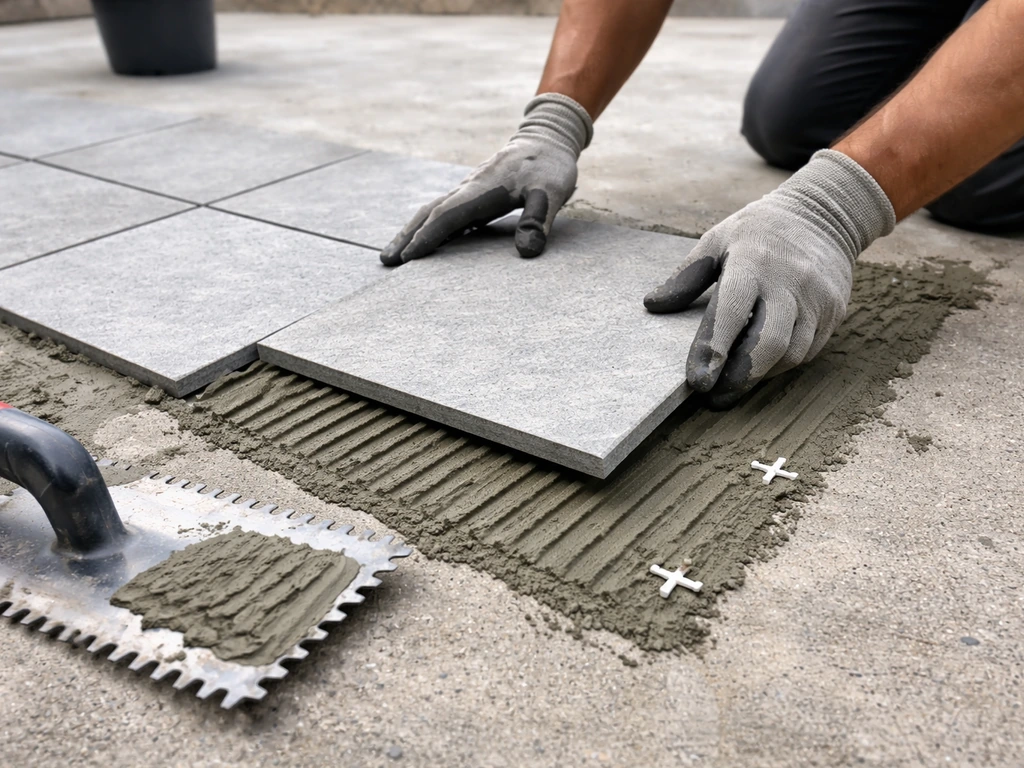
- Mix your polymer-fortified thinset to a peanut butter consistency — it should hold a notch shape without slumping. For exterior work, don't mix more than you can use in about 20 to 30 minutes.
- Spread thinset with your notched trowel, holding it at a consistent 45-degree angle to get full, even ridges. For outdoor tile, also back-butter each tile — spread a thin skim coat of thinset on the back of the tile before pressing it down. This is how you hit the 95% coverage requirement for exterior applications.
- Press each tile firmly into place with a slight twist, then check with a straightedge. Use a rubber mallet to seat tiles evenly. Use a tile leveling system to prevent lippage between adjacent tiles.
- Leave all movement joint locations empty — no thinset, no grout. Use tape to keep thinset out of those channels as you work.
- Continue setting tiles, checking flatness frequently. Let the thinset cure for at least 24 hours (longer in cooler temps) before grouting.
- Cut border tiles with a wet saw. For notch cuts around posts or steps, use an angle grinder with a diamond blade.
A note on thinset coverage
Pull up a tile every 15 to 20 minutes and check the back. You want to see thinset covering at least 95% of the tile surface with no voids, especially near the edges and corners. If you're seeing bare spots, you need to either back-butter more aggressively, use a larger notched trowel, or slow down. Hollow spots under outdoor tile lead to cracking and water infiltration, they're not something to fix later.
Grouting and sealing for outdoor durability
Wait a full 24 hours after setting tile before you grout, 48 hours is better in cool or humid weather. Use a sanded grout for joints wider than 1/8 inch (which is most outdoor installations). For high-traffic areas or patios with very tight grout lines, epoxy grout is a stronger option that resists staining and moisture better, though it's harder to work with and has a strict working time that varies by temperature.
Mix grout to a smooth, lump-free consistency and work it into the joints with a rubber float at a diagonal angle to the tiles. Pack the joints fully, then use the edge of the float to scrape off excess. Clean the tile surface with a barely damp sponge in circular motions, wring the sponge out almost completely before each pass. Change your rinse water often. Don't wait too long: grout haze that sits on tile for hours becomes significantly harder to remove. Do a final buff with a dry cloth once the haze starts to dull.
For movement joints, once the grout has cured, install your backer rod (sized slightly larger than the joint width so it compresses snugly) and then tool in your ASTM C920 elastomeric sealant. This is not optional on an outdoor patio, those joints need to flex with the seasons.
Cure times before sealing
Cement-based grout needs to cure for a minimum of 72 hours at 70°F before you apply a penetrating sealer. If you used epoxy grout and a sealer is still required (often it isn't, since epoxy is already dense), allow a full 10 days at 70°F before sealing. Apply a penetrating tile and grout sealer rated for exterior use. Follow the manufacturer's application instructions, usually two thin coats with a 5 to 10 minute window between them, then wipe off any excess before it hazes.
Common problems and how to fix them
Lippage (uneven tile edges)
Lippage is when the edge of one tile sits higher than the adjacent tile. It's a flatness problem, either the substrate wasn't level, you didn't check often enough during setting, or the thinset was applied unevenly. A tile leveling system during installation is the best prevention. After the fact, slight lippage can sometimes be ground down with a diamond hand pad, but significant lippage means removing and resetting tiles.
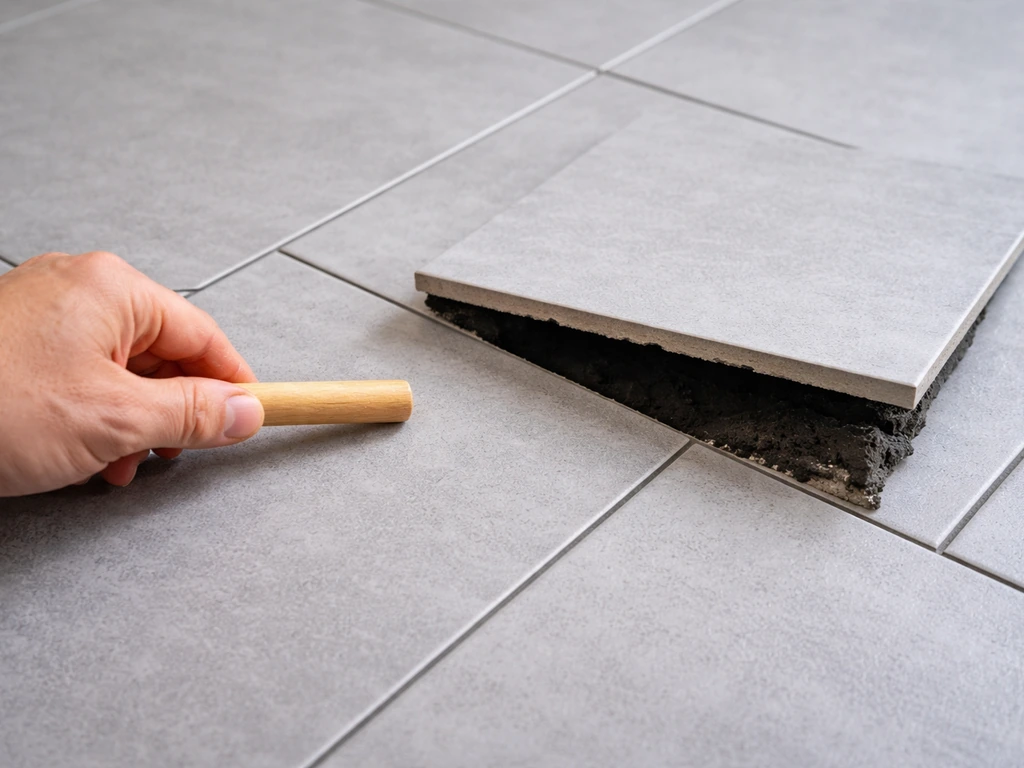
Hollow spots (tiles that sound hollow when tapped)
Walk the finished installation and tap each tile with a wood dowel or the handle of a screwdriver. A hollow sound means poor thinset coverage underneath. Those tiles need to come up, the area needs to be re-thinsetted with better coverage, and the tile reset. Don't ignore hollow tiles on an outdoor patio, water gets under them, freezes, expands, and pops the tile off.
Tiles lifting or cracking after installation
If tiles start lifting within the first season, the most likely causes are: insufficient movement joints allowing thermal stress to build up, thinset bonding to a contaminated or sealed surface, or inadequate thinset coverage leaving voids. If you are still deciding on the system, see how movement joints factor into how to lay porcelain tile on concrete patio so thermal stress and cracking do not build up. Sporadic cracking along existing concrete control joints that were grouted over (instead of turned into movement joints) is a telltale sign of that specific mistake. The fix requires removing the affected tiles, assessing the substrate, and reinstalling with proper movement joints.
Water intrusion and efflorescence returning
If you see white mineral deposits reappearing in grout lines after installation, moisture is still migrating through the slab. Make sure the patio has proper slope for drainage, that the grout and tile are properly sealed, and that your movement joint sealant is intact. Reapply sealer annually on outdoor patios in wet climates.
When to call a professional
Be honest with yourself about a few situations: if the concrete slab has structural cracks where one side has heaved above the other, a contractor needs to assess whether the slab can be repaired or needs to be replaced. If the patio has serious moisture coming up from below (chronic efflorescence, visible dampness), that source needs to be identified and corrected before tiling, and that often involves drainage solutions that go beyond the scope of a tile installation. And if the slab lacks any slope away from the house, fixing that correctly during tiling is tricky enough that professional help is worth considering. A failed tile job costs more to fix than doing it right the first time.
What tile type should you use outdoors?
The most popular options for outdoor concrete patios are porcelain, slate, travertine, and exterior-rated ceramic. Porcelain is the most durable across freeze/thaw cycles because of its very low water absorption (under 0. 5%), making it the safest choice in cold climates. Slate and travertine bring a natural stone look and work well in moderate climates, but they require more careful sealing and are more susceptible to freeze damage if not properly maintained.
If you're installing travertine tile on a concrete patio, focus first on leveling the slab and planning movement joints so the stone won’t crack as temperatures change. Ceramic tile can work outdoors if it's specifically rated for exterior use, but many ceramic tiles are not and will absorb water and crack in cold weather. Each material has its own installation nuances, the thinset, grout, and sealer choices can differ depending on which you pick.
Regardless of material, always check the tile's PEI (Porcelain Enamel Institute) wear rating and slip resistance (coefficient of friction) for outdoor use. An outdoor patio tile should have a COF of at least 0.60 for wet conditions.
FAQ
Can I tile an outdoor concrete patio with indoor ceramic tile?
Yes, but only if the tile is labeled for exterior use and your grout and sealer system matches. Many “indoor” tiles and cement-based grouts can absorb water and fail during freeze-thaw. Verify both the tile’s exterior rating and the grout type (sanded or epoxy where needed), then plan movement joints at the same spacing you’d use on a new build (8 to 12 feet, closer to 8 feet in harsh sun or cold).
How long should I wait after pouring new concrete before tiling?
Do it after the concrete is fully cured and after any moisture or coating issues are corrected. For new slabs, plan on waiting at least 28 days before tiling. If you find moisture migration signs (efflorescence or condensation on a plastic sheet test), you’ll need a moisture management membrane or a drainage correction before setting tile, otherwise the thinset and grout can fail even if the wait time was correct.
What if my concrete patio is painted or sealed, can I tile over it?
If the concrete has paint or sealers, remove them completely down to bare concrete. Pressure washing alone is usually not enough because it may leave residue that interferes with thinset bonding. Use a grinder or shot blaster, then do a quick adhesion check before you start (set a small test area and confirm it bonds strongly). Skipping this is one of the fastest ways to get tiles debonding outdoors.
Can I fix an out-of-level or uneven patio just with extra thinset?
A leveling compound is fine for filling low areas, but it needs a clean, properly prepared surface to bond. Avoid trying to “solve” major slope problems by building up thinset everywhere, that can create an uneven bed thickness and reduce performance. If the patio lacks the needed drainage slope, address it in the leveling compound stage or consider professional help rather than relying on thinset thickness changes.
What should I do if I have cracks in the concrete before tiling?
Don’t ignore thin cracks, especially outside. Hairline cracks may be tileable with the right system, such as an uncoupling membrane, but active or heaving cracks need stabilization or repair first. A good rule of thumb is: if one side has moved relative to the other, treat it as structural and stop the DIY tile step until it’s assessed.
What if I have existing control joints, can I grout over them?
Use expansion joints, not grout, for movement. Grout does not flex, so you must carry existing control joints through and fill movement joints with a backer rod plus an elastomeric sealant rated for exterior use. Tool the sealant properly after grout cures, and never “bridge” those joints with grout because that often leads to cracking and tile lift along the joint line.
How do I know the thinset coverage is good enough for outdoor tile?
After setting tile, test for bonding by removing one tile from a representative spot and checking coverage. Outdoor tile failures often come from voids, especially near edges and corners, so thinset coverage should be at least about 95% with no bare areas. If coverage is low, switch to a larger notched trowel or increase your technique and back-butter as needed before continuing.
Should I check for hollow spots before the grout fully cures?
Yes. After grout cures, you can still have hollow tiles trapped under grout that later let water in, so always tap-check right after installation. If you hear a hollow sound, remove that tile, remove compromised thinset, re-thinset the area with correct coverage, and reset. Waiting to discover it later is especially risky outdoors because freeze-thaw can amplify the damage.
Do I need to seal outdoor grout every year?
For outdoor patios, reapply penetrating sealer as recommended for your specific product, and in wet climates plan on doing it annually. Don’t seal until cement grout has fully cured (minimum 72 hours at 70°F, longer if cool or humid). If you used epoxy grout, sealing may be less necessary, but if the manufacturer calls for it, follow their curing window and recoat schedule.
What’s the best way to handle lippage on a patio?
Lippage is not just a cosmetic issue. If neighboring edges are uneven, water can run into micro-gaps and movement joints can be harder to maintain. For small high spots, a diamond hand pad may work, but major lippage means correcting the substrate or resetting tiles. Use a tile leveling system during install to prevent the problem rather than trying to grind it away later.
Why does outdoor patio tile lift within the first season?
If tiles lift in the first season, first suspect movement joint setup, substrate moisture, and thinset bond quality. Common specific causes include missing movement joints or grouting over them, installing over contaminated surfaces (paint/sealer/oil residue), or not achieving near-full thinset coverage. The remedy usually involves removing affected tiles, correcting the substrate problem, and reinstalling with the correct movement joint design.
What does it mean if efflorescence keeps coming back after I tile?
White deposits showing up again can mean moisture is still migrating, even if the initial cleaning worked. Confirm drainage slope, verify that the grout and any required sealer are functioning, and inspect movement joint sealant for gaps or separation. If efflorescence returns persistently, you likely need a moisture source investigation below the slab, not just more sealing.
Which tile type is safest for freeze-thaw climates?
If you want to reduce crack risk, use the tile type and slip needs as well as the joint strategy. Porcelain is generally the most forgiving in freeze-thaw because of low water absorption, but slate and travertine require careful maintenance and sealing. Regardless of material, confirm the outdoor slip resistance and wear rating, and keep movement joints consistent with patio conditions.
How do I choose outdoor tile for traction around pools or wet entryways?
Yes, choose based on slip in wet conditions and thickness, not just look. For outdoor patios, target a tile with a coefficient of friction around 0.60 or higher for wet areas, then consider texture or finish that won’t become slick when algae or rinse water is present. Also confirm the PEI wear rating is appropriate for foot traffic outdoors.