Building a cement patio from scratch is absolutely a DIY-able project, but it rewards planning far more than muscle. You'll need to excavate 8 to 10 inches deep, lay a 4 to 5-inch compacted gravel base, build simple 2×4 wood forms, mix or order concrete, pour and screed it to a 4-inch slab, broom-finish the surface, and then cure it for at least 7 days before putting any weight on it. That's the whole job in a sentence. The sections below walk you through every step with the numbers and decisions that actually matter.
How to Make a Cement Patio From Scratch Step by Step

Silas Morrison
4 May 2026
Planning, Sizing, and Layout
Before you touch a shovel, get your dimensions locked down on paper. Sketch the patio footprint, measure it carefully, and note where the house wall, any door thresholds, and yard drainage sit. A realistic minimum for a useful outdoor seating area is 10 × 10 feet, though most people find 12 × 16 feet or larger far more livable. The size matters for more than just comfort: any patio larger than 10 × 10 feet requires control joints to prevent random cracking, which affects how you lay out your forms.
Once you have dimensions, calculate materials. QUIKRETE's online concrete calculator is a reliable way to figure out how many 80-lb bags you'll need based on your slab's length, width, and 4-inch thickness. For larger patios, ordering ready-mix by the cubic yard is almost always smarter than mixing bags yourself. As a rough rule: one 80-lb bag covers about 0.6 cubic feet of finished concrete, so a 12 × 16-foot slab at 4 inches thick needs roughly 64 cubic feet, which is about 107 bags. That's a lot of mixing. Ready-mix starts making sense at around 1 cubic yard (27 cubic feet) of concrete or more.
Mark your layout with stakes and mason's line. Set the line at finished slab height on the house side, then drop it 1/8 inch per running foot as you move away from the house. That 1% slope is QUIKRETE's recommended grade for patios, and it's what keeps rainwater draining away from your foundation instead of pooling against it. A 12-foot-deep patio should drop 1.5 inches from the house edge to the outer edge. Check your slope with a level and tape measure as you set the string lines, because correcting it after the forms are in is annoying.
Site Prep: Excavation, Grading, and Compaction
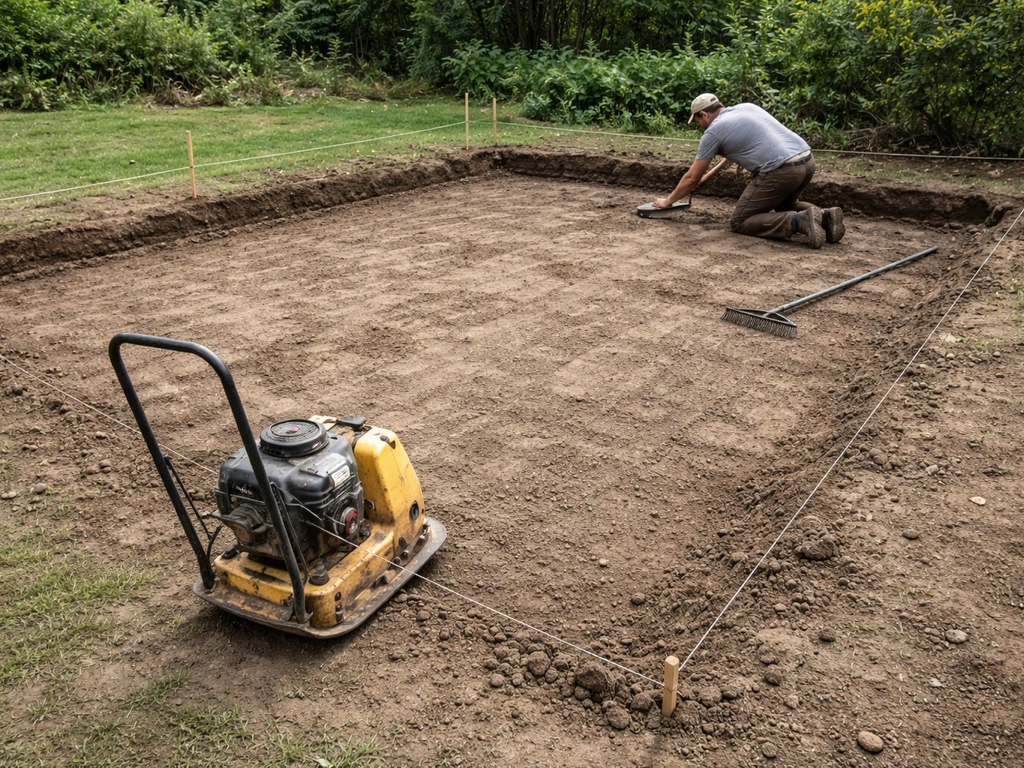
This is the part most DIYers underestimate, and it's where most patio failures start. A concrete slab is only as stable as what's under it. You need to excavate all the topsoil and organic material, because organic material compresses and rots over time, causing the slab to settle unevenly. Dig down far enough to fit your gravel base and your 4-inch slab: that typically means excavating 8 to 10 inches below finished grade. Mark that depth on your stakes so you can check as you dig.
Once the area is excavated and the subgrade soil is exposed, compact it. Rent a plate compactor for this; your feet and a hand tamper won't get the job done properly on any patio larger than a small stoop. After compaction, spread your gravel base. QUIKRETE specifies about 5 inches of compactible gravel (crushed stone or compactible road base, not pea gravel), and you should compact this layer as well.
QUIKRETE also recommends using a tamper or compaction step during site prep, after placing a compactible gravel subbase, to help the concrete slab perform as intended compact this layer as well.
A compacted 4 to 5-inch gravel base gives you drainage, frost protection, and a stable load-bearing surface all at once. Rake it flat, check your slope across the gravel with a level, and make sure it mirrors the 1/8-inch-per-foot pitch you set with your string lines.
Building Forms, Adding Reinforcement, and Handling Drainage
Forms are the wooden frame that holds wet concrete in shape until it hardens. For a standard 4-inch patio slab, 2×4 lumber is the right choice: it's 3.5 inches tall, which gives you your target slab thickness when the form sits on your compacted gravel base. Fasten the 2×4 forms together at the corners with 3-inch screws, and stake them into the ground every 2 to 3 feet using wooden or steel stakes. Check that your forms are straight and hold your intended slope before you mix or order a single bag of concrete.
For larger slabs, dividing the pour area into sections using 2×4 dividers is smart. It gives you manageable workable areas, and those interior 2×4 dividers double as permanent control joints, which you'll need anyway. For a 4-inch slab, control joints should be spaced no more than 8 to 12 feet apart in each direction. Joints need to be cut at least 1 inch deep, and at least 1/4 the slab thickness. If you use a grooving tool during the finishing stage instead of cutting with a saw, time it carefully: in hot weather, you may have only 6 to 12 hours after finishing before the concrete stiffens past the point where the joint will function properly.
Where your patio meets the house wall or any existing structure, don't let the concrete bond directly to it. Glue a 1/2-inch-thick asphalt-impregnated fiber board (isolation joint material) to the structure first. This lets the slab move independently through freeze-thaw cycles without cracking or pushing against your foundation.
Reinforcement is worth adding for most residential patios. Wire mesh (6×6 10/10 welded wire mesh) is budget-friendly and easy to lay across the form area. Position it on small concrete or plastic chairs so it sits in the middle of the slab thickness, not lying flat on the gravel. Rebar (3/8-inch or 1/2-inch) at 18-inch centers in a grid pattern is stronger and preferred on clay soils or areas with frost heave. Either option significantly reduces cracking over the life of the slab.
Drainage deserves one more mention here: your 1/8-inch-per-foot slope handles surface drainage. The compacted gravel base handles subsurface drainage. If your yard has a drainage problem, address it with a French drain or grading before you pour, not after. Concrete on a wet, saturated subgrade will heave and crack no matter how well you pour it.
Mixing Concrete: Ratios, Water Control, and Ready-Mix vs. Bag Mix
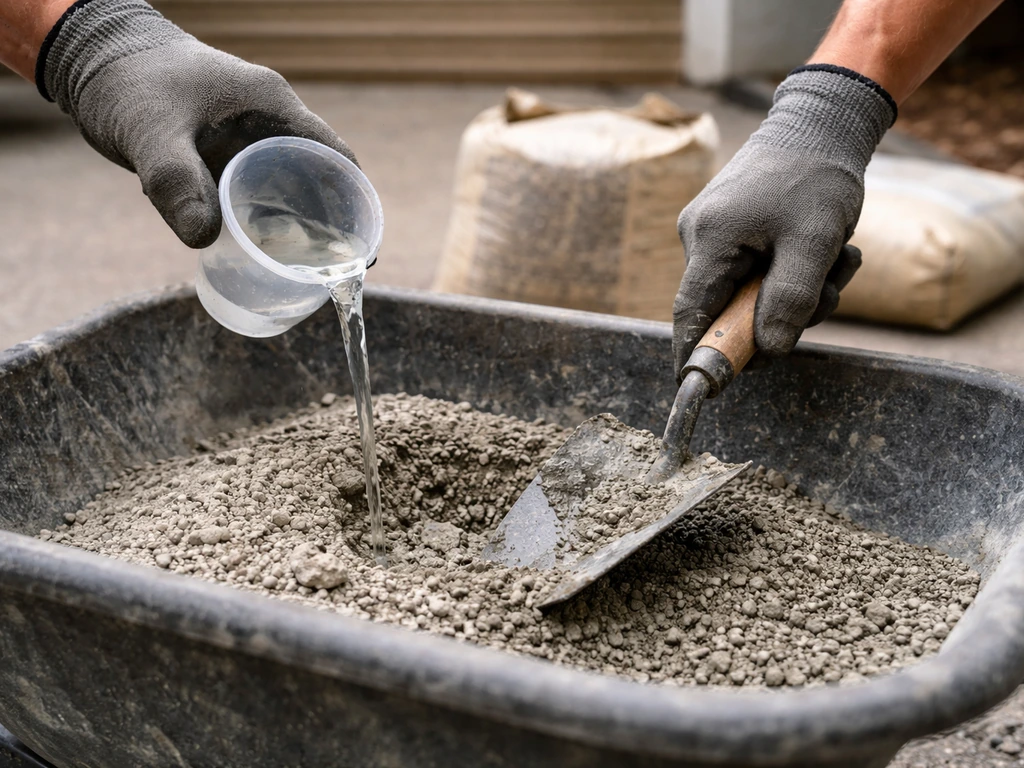
Here's where people get into trouble fast: adding too much water. It makes the mix easier to work with, but it kills strength. Adding just one extra quart of water per 80-lb bag can reduce compressive strength by up to 40%. That's not a rounding error, it's the difference between a 4,000 psi slab and a 2,400 psi slab that dusts and flakes within a few years. QUIKRETE's mix achieves around 4,000 psi with 4 quarts (about 6 pints) of water per 80-lb bag. The allowable range is 6 to 9 pints per bag, so start at the low end and add water in small amounts until you reach a workable but stiff consistency that holds its shape when squeezed.
For mixing small amounts (say, under half a cubic yard), a rented electric or gas-powered cement mixer handles the job well. Add most of the water first, then the dry mix, then adjust with small amounts of water. For anything you'd describe as a "real patio," seriously consider ordering ready-mix concrete. A ready-mix truck delivers concrete already mixed to the right water-to-cement ratio, and it saves you hours of labor. Specify a 4,000 psi mix with a 4-inch slump for a patio, and make sure you have enough hands to spread and screed it quickly: ready-mix starts stiffening within 60 to 90 minutes of being batched.
| Factor | Bag Mix (DIY) | Ready-Mix Truck |
|---|---|---|
| Best for | Small patios under ~50 sq ft | Any patio larger than ~50 sq ft |
| Cost | Lower upfront, higher labor | Higher delivery fee, lower labor |
| Mix quality control | Variable (depends on water added) | Consistent, pre-specified mix |
| Time pressure | Work section by section | Must pour entire load quickly |
| Equipment needed | Mixer rental + wheelbarrow | Wheelbarrow + crew of 2–3 |
| Strength potential | Up to 4,000 psi if mixed correctly | 4,000 psi reliably |
If you're mixing bags yourself, a 4,000 psi concrete mix has a standard ratio of roughly 1 part cement : 2 parts sand : 3 parts coarse aggregate by volume, plus the correct water amount. Pre-mixed bags like QUIKRETE Concrete Mix already have the aggregate blended in, so you just add water. Don't try to stretch the mix by adding extra sand or gravel unless you actually know what you're doing with mix design: you'll just end up with weaker concrete.
Pouring, Screeding, and Finishing the Slab
Pour concrete into the forms starting at the far corner and working back toward your access point. Use a shovel or rake to spread it roughly level and fill all corners. Don't let concrete drop more than about 3 to 4 feet or you can cause segregation (the aggregate separates from the paste). Work it around your reinforcement so there are no voids underneath the wire or rebar.
Screeding comes immediately after spreading. Pull a straight 2×4 or metal screed board across the top of your forms in a sawing back-and-forth motion to strike off excess concrete and bring the surface level with the form tops. This is where your form heights earn their keep: if your forms are set correctly, the screed board does the grading for you. Work quickly and have a helper add or remove concrete in front of the screed as needed.
After screeding, run a bull float over the surface in long, overlapping passes. The bull float pushes larger aggregate slightly below the surface and brings a thin layer of cement paste up, creating a smoother base for your final finish. Work while the concrete is still plastic and wet, because once it starts to stiffen you'll drag and tear the surface.
Wait for the bleed water to evaporate from the surface before doing any final finishing. You'll see a wet sheen that gradually disappears. Rushing the finish while bleed water is present is one of the most common mistakes on DIY slabs, and it causes surface scaling and dusting later. Once the sheen is gone and the concrete has stiffened enough to hold a light footprint without sinking more than about 1/4 inch, you're ready to finish.
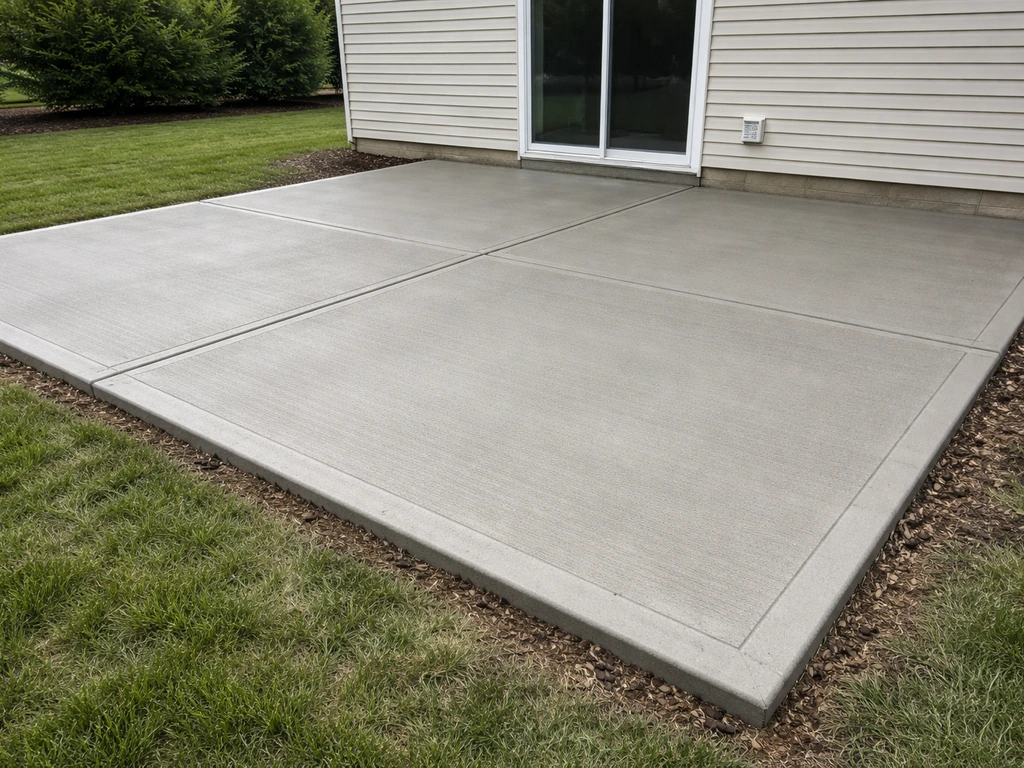
Run your edger along all the form edges to create a rounded, clean edge that resists chipping. Then cut your control joints with a grooving tool. Finally, drag a stiff-bristle broom across the surface in one direction to create a broom texture. For a patio, broom finish is the right call: it's slip-resistant when wet, easy to achieve, and holds up well.
If you broom too early the surface tears; too late and the bristles barely mark it. Aim for a surface that holds a slight broom impression without the concrete slumping back. Once you're happy with the texture, you're done touching it. You can also improve the look of your finished patio with staining, stamping, or decorative finishes designed for concrete.
Curing It Right and Working Around the Weather

Curing is not optional. Concrete doesn't dry, it cures through a chemical reaction called hydration, and that reaction needs moisture to complete. If you let the surface dry out too fast, the concrete never reaches its design strength. Cure exterior concrete flatwork for a minimum of 7 days at temperatures above 50°F. The FHWA notes that typical curing periods vary by cement type, and that the curing period is 7 days for concrete containing portland cement other than Type III (with Type III being shorter) 7 days for exterior concrete curing based on cement type. Below 50°F, hydration slows dramatically, and below freezing it essentially stops.
The easiest curing method for a DIYer is to keep the slab moist by covering it with plastic sheeting or wet burlap, or by applying a spray-on curing compound right after finishing. Curing compounds (specified to ASTM C309) seal the surface and prevent moisture loss without the hassle of keeping it wet. If you go the wet method, mist the slab 2 to 3 times a day and keep it covered. Don't let it dry out and re-wet repeatedly, that causes surface crazing.
Weather timing is the most underrated part of patio planning. The ideal pour conditions are overcast skies, temperatures between 50°F and 80°F, low wind, and no rain expected for at least 24 hours. Hot, sunny, or windy days accelerate surface drying and give you less time to work, which often leads to bad finishes or cracking. Cold days slow the set, which sounds helpful but can actually cause problems if temperatures drop below 50°F overnight before the concrete has gained enough strength. If you're pouring in cold weather, plan to cover the slab with insulating blankets after finishing.
After the 7-day cure, the slab will be strong enough for foot traffic and light furniture. Full design strength takes about 28 days. Applying a penetrating concrete sealer after the 28-day mark is a smart move that protects against staining, freeze-thaw damage, and surface wear. That's a separate project on its own, but it's the right next step once the cure is complete.
Common Mistakes and How to Troubleshoot Them
Most patio problems show up months or years later, but they're almost always caused by decisions made during the pour. Here are the most common ones and what to do about them.
| Problem | Root Cause | Fix or Prevention |
|---|---|---|
| Slab cracks randomly | No control joints, or joints cut too late | Add joints at 8–12 ft intervals before the next pour; saw-cut existing slab and fill with joint compound |
| Surface dusts or flakes | Too much water in the mix, or finished while bleed water was present | Seal the surface to slow further deterioration; plan the next pour with strict water control |
| Uneven surface / low spots | Poor screeding or forms not set to correct grade | Grind high spots or apply a concrete overlay; prevent with tighter form-setting next time |
| Slab heaving or cracking at edges | Inadequate base compaction or no isolation joint | Address drainage issues, compact base thoroughly, and install isolation joint at house wall |
| Concrete set too fast to finish | Poured in hot or windy conditions | Work in smaller sections; use a set retarder additive in hot weather |
| Concrete didn't harden properly | Poured in cold weather without protection | Keep slab above 50°F with insulating blankets; use hot water in the mix in cold conditions |
If you've already got an existing patio with surface damage or cracks, that's a different project from building new. If your existing cement patio is cracked or uneven, repairing it may involve resurfacing, patching the damaged areas, or fixing the underlying base before you refinish it fix cement patio. Repairs like resurfacing, filling cracks, and fixing uneven sections all have their own techniques. Similarly, if your finished slab looks plain and you want to add color, texture, or patterns, there are plenty of ways to decorate a cement patio after the cure is complete, from staining and stamping overlays to pavers laid over the top.
Your Next Steps Before the Pour
Here's a simple pre-pour checklist to run through before you order concrete or mix a single bag. Getting all of this done ahead of time is what separates a smooth pour day from a chaotic one.
- Confirm final patio dimensions and calculate concrete volume (use a concrete calculator for bag count or cubic yards).
- Check local permit requirements: many municipalities require a permit for a concrete patio, especially if it's attached to the house.
- Call 811 (US) at least 3 business days before digging to have underground utilities marked.
- Order or purchase all materials: gravel, forms lumber (2×4s and 3-inch screws), wire mesh or rebar, isolation joint board, mixing water, and concrete.
- Rent equipment: plate compactor, cement mixer (if mixing bags), bull float, screed board, edger, and grooving tool.
- Check the 5-day weather forecast and pick a pour day with temperatures between 50°F and 80°F, no rain, and low wind.
- Line up at least one helper for the pour day; two helpers is better for patios larger than 10 × 10 feet.
- Set and check all forms for level, slope, and squareness the day before the pour.
Pour day itself goes fast once the concrete starts flowing, so do all your prep the day before. Have your tools laid out, your forms double-checked, your gravel base compacted and damp, and your reinforcement in place. The actual pouring, screeding, and finishing of a medium-sized patio usually takes 3 to 6 hours with a small crew, and then the waiting game begins. Stick to the 7-day cure window, stay off it, keep it moist, and you'll end up with a slab that's built to last for decades.
FAQ
Do I need a vapor barrier or plastic under the gravel base for a cement patio?
Usually not for a typical outdoor patio with a compacted gravel base, but if your yard has very poor drainage or high groundwater, consider additional subgrade drainage measures (like improving grading or adding a drain) rather than trapping moisture under the slab. Adding plastic under the gravel can sometimes create a moisture “pocket” that increases heaving risk if water accumulates above it.
What’s the best slab thickness if my patio might see a grill or hot tub?
A standard 4-inch slab works for typical seating and light loads, but concentrated heavy point loads can crack or settle. For heavier equipment, plan footings or thicker localized areas (or consult a local structural/loads guide), and in all cases keep reinforcement positioned at mid-depth using chairs to reduce cracking under those localized loads.
Can I pour on top of existing concrete or a driveway slab?
Often not as a standalone fix. If you can’t remove the old slab, you still need to address voids, unevenness, and the subgrade movement risk, then use an isolation approach so the new concrete can move independently. In many cases resurfacing or patching is better than casting a new slab directly over an unstable surface.
How do I handle patio edges that don’t have full form support, like steps or irregular curves?
Use solid, braced forms for the entire pour perimeter, and support any curved edges with smaller stakes or braces so the form doesn’t bow. For steps or transitions, treat them as a separate pour area or use dividers and joints intentionally, otherwise the concrete can break at the weakest change in thickness.
Should I use a slip-resistant finish other than broom texture?
Broom finish is the most DIY-friendly for slip resistance, but if you want a decorative top layer (stain, stamp, overlays), confirm the timing requirements and whether the finish is meant for the slab surface at the right stiffness. Decorative systems can be sensitive to curing and surface hardness, so test a small area before finishing the whole patio.
How can I tell if I’m finishing too early or too late?
Too early looks like tearing or dragging as you work, and later you’ll notice the surface won’t hold the broom marks or joints cleanly. A practical check is to wait until bleed water has disappeared, then aim for a stiffened surface where a light footprint doesn’t sink more than about a quarter inch.
What should I do about control joints in a patio with a complicated layout?
Don’t just space joints by the “overall” dimensions, lay out joints to reflect the actual pour sections created by your forms and any thickness changes. Keep joint cutting consistent (depth and spacing), and for larger areas use interior dividers as permanent joint locations so cracks are guided instead of random.
Is wire mesh enough, or do I need rebar for every patio?
Wire mesh helps, but it only works as intended if it’s correctly supported at mid-slab depth. Rebar is often preferred on clay soils or in areas prone to frost heave, especially when you expect colder conditions or more movement. If you’re unsure, prioritize correct placement and support (mesh chairs or rebar chairs) before adding more steel.
Can I cure by wetting the slab and covering it, and will that cause staining?
Wet curing with plastic or wet burlap is effective, but repeated wetting that dries out too much and then re-wets can lead to surface crazing. If you use coverings, keep them in place for the full cure window and avoid letting the concrete repeatedly cycle from dry to soaked; a spray-on curing compound is another option that reduces this risk.
Do I need a sealer after curing, or can I skip it?
You can skip it, but sealing is a practical step for protecting against staining, freeze-thaw wear, and everyday surface scuffing. If you seal, wait until the full curing window has passed (about 28 days for design strength) and use a penetrating sealer meant for exterior flatwork, so you don’t trap moisture or create a slippery surface.
What’s the most common DIY mistake that leads to weak concrete?
Adding extra water. Even a small increase in water can lower compressive strength and shorten the slab’s service life. Start at the low end of the allowed water range, add in small increments for workability, and stop as soon as the mix holds its shape when squeezed.
How long should I keep people off the patio and when can I move heavy items onto it?
Plan on at least 7 days before allowing typical foot traffic, and remember full design strength takes about 28 days. For heavy loads or concentrated weight (chairs with small feet, grills, planters, furniture legs), wait for the longer time or increase safety by using load-distributing pads so you don’t damage corners and edges early.