You can build a raised concrete patio either by pouring a new elevated slab on a built-up subbase or by bonding a concrete overlay over an existing slab to gain height. Both approaches work, but they demand different prep, thickness, and reinforcement strategies. Get those details right and you end up with a solid, level surface that drains well and won't crack apart in a few winters. Skip them and you're looking at settling, water pooling, and a patio that costs twice as much to fix as it did to build.
How to Make a Raised Concrete Patio: Step-by-Step Guide

Silas Morrison
13 Jun 2026
What 'raised' actually means for a concrete patio
The word 'raised' covers two pretty different situations, and knowing which one applies to you changes almost every decision you'll make.
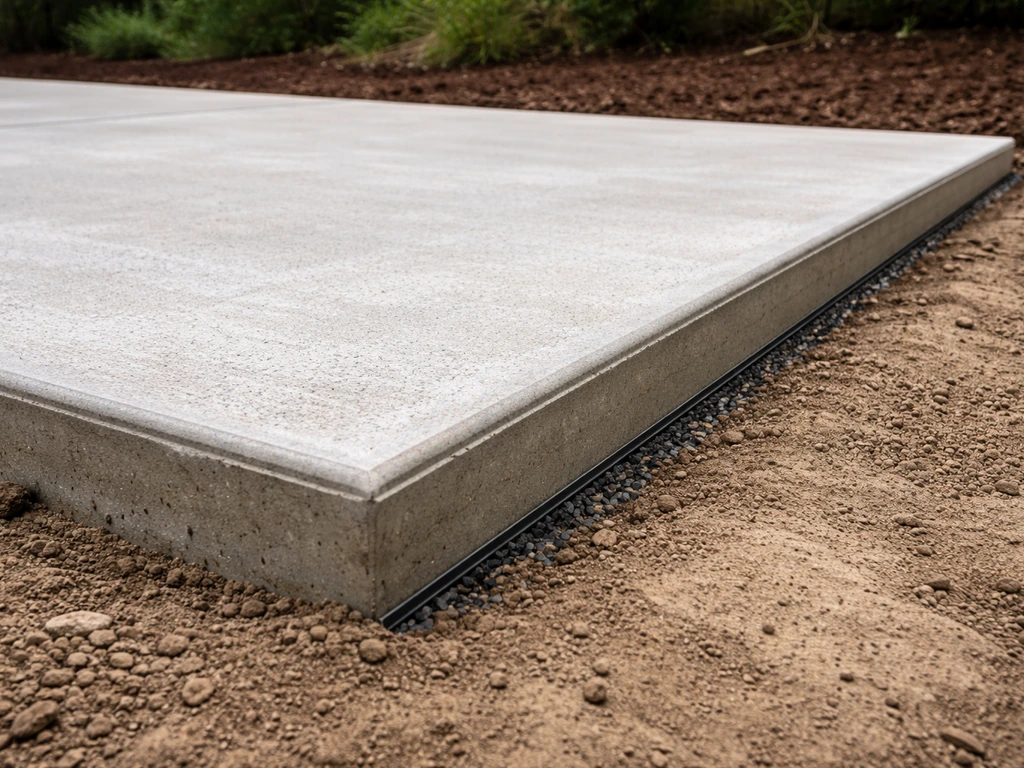
The first scenario is a new elevated slab: you're building a patio that sits higher than the surrounding grade, usually because the yard slopes away from the house, you want a flush transition to a door threshold, or you simply want a defined platform. Here you're compacting a gravel subbase up to the target elevation and forming around it before you pour.
The second scenario is adding height over an existing concrete slab. Maybe your current patio is low, uneven, or you want to bring it flush with a new door or deck. In that case you're looking at a bonded concrete overlay, sometimes called a topping slab. The minimum practical thickness for a structural bonded overlay is about 2 inches, though 3 to 4 inches gives you far more durability and room for proper reinforcement. Thinner overlays (under 2 inches) are mostly cosmetic and won't handle real foot traffic or furniture loads for long.
A third option worth mentioning: if your existing slab has settled or become uneven, mudjacking or polyurethane foam lifting can raise specific sections back up without new concrete. That's a different repair path, and it's worth looking at guides on how to raise the level of a concrete patio and how to level a concrete patio before committing to a full overlay or new pour.
Planning and site prep before anything else
Good planning here saves you money and prevents the most common failures: poor drainage, unexpected height conflicts, and forms that shift mid-pour.
Measure your height target first
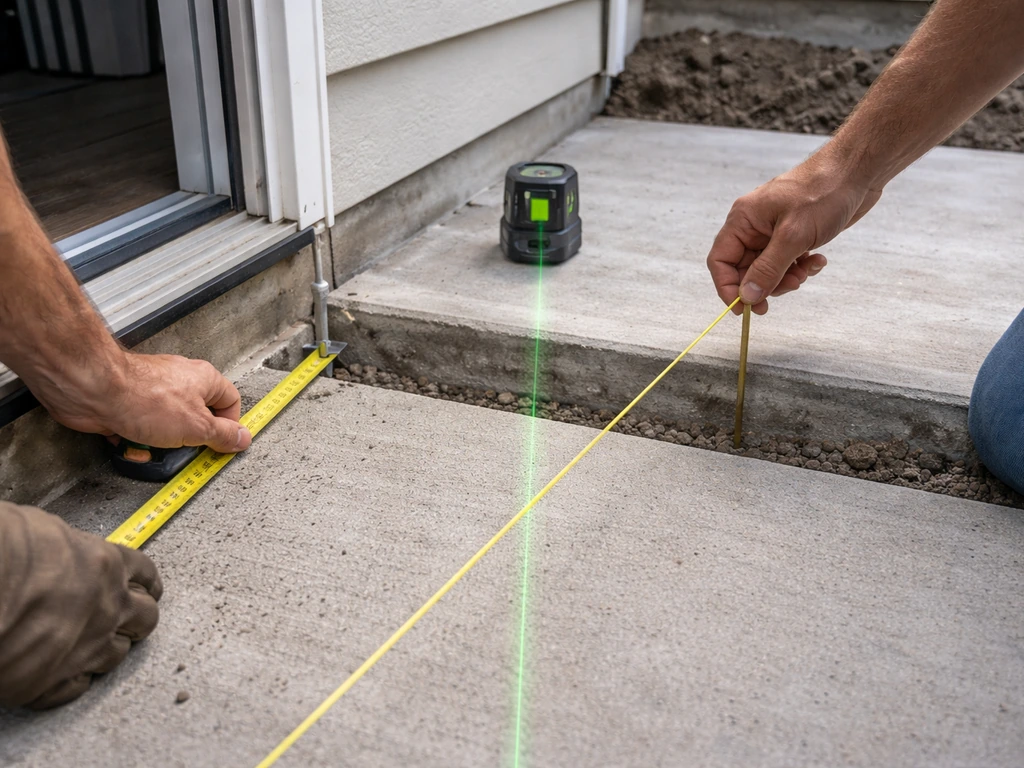
Set a string line or use a level and tape measure to find your finished elevation relative to the door threshold, house foundation, and surrounding grade. A patio that's too high traps water against the foundation; too low and you get puddles. The finished surface should slope away from the house at about 1/4 inch per foot (roughly 2%) to drain properly. Mark your target height on the house wall with chalk or a pencil line so you can reference it throughout the build.
Check what's under the existing slab (if applicable)
If you're pouring over an old slab, look for hollow spots by walking the surface and listening for a dull thud. Those areas have lost subbase contact and can flex under load, which breaks a bonded overlay. Tap around, mark the voids, and decide whether to grind off the high spots, fill the low ones, or address the whole slab before proceeding. An overlay poured over a structurally compromised slab will crack along the same lines as the original.
Layout and permits
Stake out the perimeter with batter boards and string lines. Check square by measuring diagonals: they should match. For a raised patio over grade, check whether your municipality requires a permit for structures over a certain height or area. Many areas don't require permits for at-grade concrete work but do for raised structures above 12 to 18 inches. A quick call to your local building department takes five minutes and could save you a stop-work order later.
Formwork, subbase, and drainage: the foundation of the whole job
This section is where raised patios go wrong most often. People rush the subbase, skip the drainage slope, or build forms that flex under the weight of wet concrete. Don't skip anything here.
Building the subbase for a new raised slab
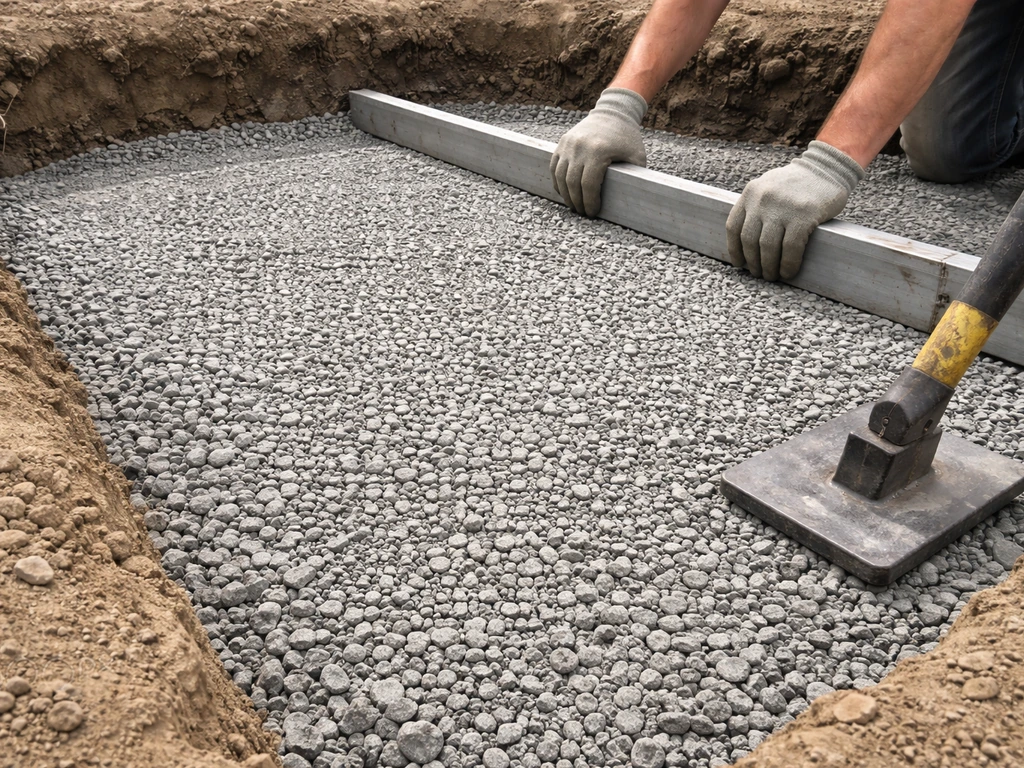
Excavate or build up to your target subbase elevation. For a raised patio, you're usually adding material rather than digging. Use compactable gravel (crushed stone or Class II base) in 2 to 3 inch lifts, compacting each lift with a plate compactor before adding the next. Your total gravel depth should be 4 to 6 inches under the slab. Slope the gravel base at 1/4 inch per foot away from the house so water that infiltrates doesn't pool under the slab and cause frost heave or erosion. If you're on expansive clay soil, go toward the 6-inch end of that range and consider a geotextile fabric between the native soil and the gravel to prevent migration.
Formwork that won't move
For a 4-inch slab, use 2x4 lumber for forms; for thicker slabs (5 or 6 inches), step up to 2x6. Drive stakes every 2 feet or less on the outside of the form boards and screw the boards to the stakes, not just toe-nailed. Wet concrete is heavy, about 150 pounds per cubic foot, and it will bow a form that isn't properly braced. Set your form boards at the exact finished height using your string line as a reference and check them with a level before you pour. Double-check the slope away from the house.
For curves or irregular shapes, use 1/4-inch plywood or flexible hardboard bent and staked into place. Coat the inside face of all forms with a light brush of vegetable oil or commercial form release agent so they pull off cleanly after the pour without chipping the concrete edge.
Drainage details that prevent long-term settling
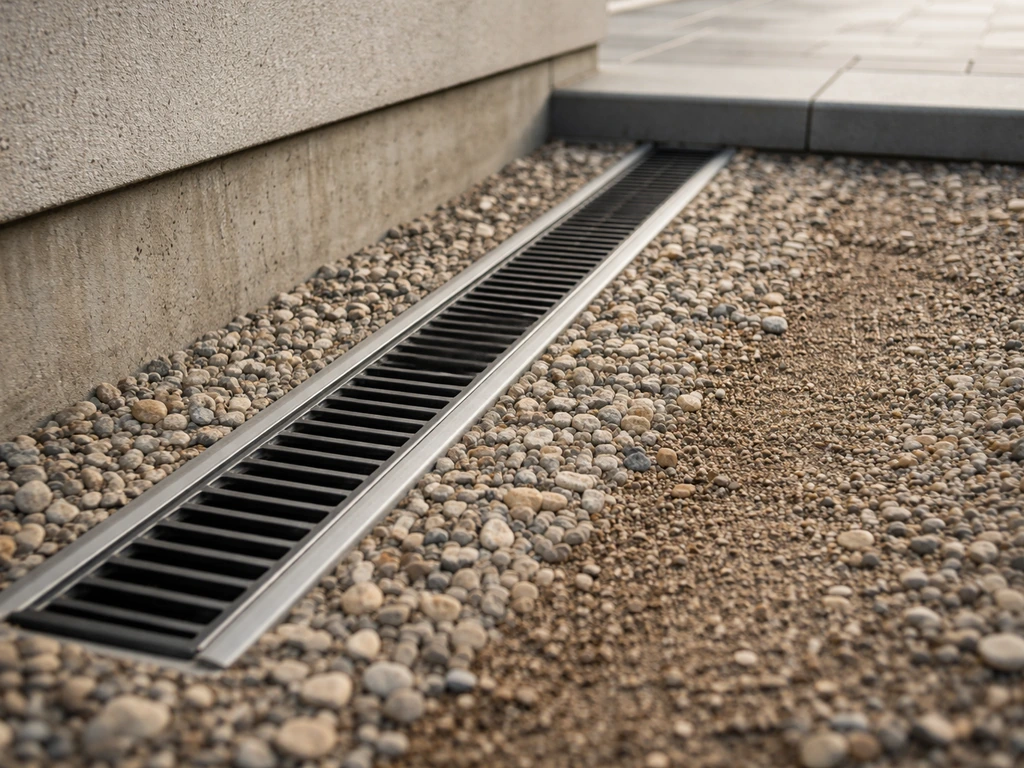
If your raised patio is significantly above grade and water has nowhere to go along the sides, add a French drain or channel drain along the lower edge before you pour. A channel drain set flush with the finished slab surface works especially well when the patio is essentially a platform. Route the drain pipe to daylight or a dry well at least 6 feet from the foundation. Ignored drainage is the single biggest reason raised slabs crack and shift over time.
Reinforcement and concrete mix choices
Do you actually need rebar?
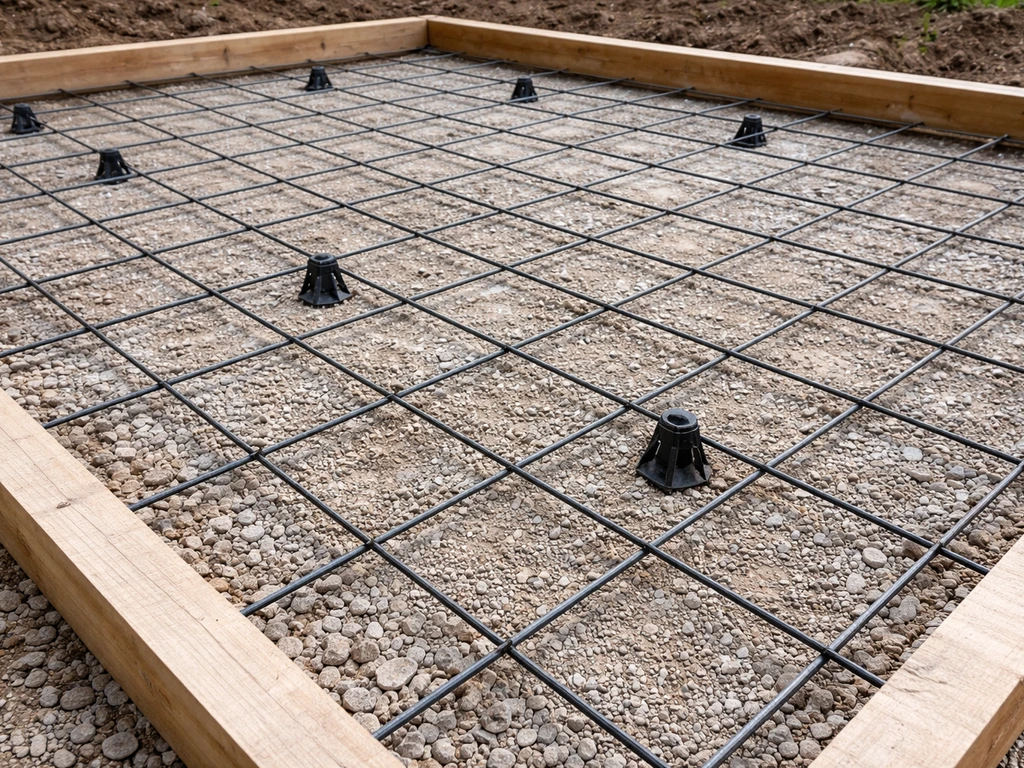
For a standard 4-inch residential patio slab on a well-compacted subbase with proper control joints, wire mesh or fiber reinforcement handles crack control adequately. Rebar (typically #3 or #4 bar on 18-inch centers) makes more sense when your slab is 5 inches or thicker, spans any void or soft spot, or ties into an adjacent structure.
If you do use rebar or wire mesh, placement depth matters a lot: the steel should sit in the middle to upper third of the slab, about 1. 5 to 2 inches from the top surface for a 4-inch slab. Steel left sitting on the ground (where it ends up when people just toss mesh on the subbase) provides almost no crack control and can rust through to the surface over time.
Use bar chairs or small chunks of brick to hold the mesh or rebar at the right height.
For a bonded overlay over an existing slab, fiber-reinforced concrete or micro-rebar (short discrete fibers mixed into the batch) works well because you can't easily chair up traditional mesh in a 2 to 4 inch layer without the steel ending up too close to the surface.
Choosing the right concrete mix
For most raised patios, a 4,000 psi mix is appropriate. If you're in a climate with hard winters, specify air-entrained concrete with 5 to 7% air content. Air entrainment puts microscopic bubbles (roughly 0.01 mm to 1 mm in size) into the paste that give water room to expand when it freezes, dramatically reducing surface scaling and spalling over time. This is not optional in freeze-thaw climates, it's the difference between a patio that looks good after 10 winters and one that starts flaking after year two.
| Situation | Recommended Mix | Reinforcement |
|---|---|---|
| New raised slab, mild climate | 4,000 psi standard | Wire mesh or fibers, properly chaired |
| New raised slab, freeze-thaw climate | 4,000 psi, 5–7% air-entrained | Wire mesh or #3 rebar on 18" centers |
| Bonded overlay 2–4" over existing slab | 4,000 psi, polymer-modified or fiber-reinforced | Fiber reinforcement or micro-rebar |
| Heavy use / vehicle loads | 4,500–5,000 psi | #4 rebar on 12–18" centers |
If you're doing a bonded overlay, use a polymer-modified topping mix (available bagged at most home centers) or ask your ready-mix supplier for a polymer-modified mix. The polymer improves adhesion to the existing slab and reduces shrinkage cracking in thinner sections.
Surface prep for bonded overlays (critical step)
If you're raising an existing slab with an overlay, surface preparation controls whether it bonds or delaminate. The existing slab surface needs to be clean, sound, and have a rough profile so the new concrete can mechanically interlock with it. Pressure wash the old slab and let it dry fully. Then grind or shot-blast the surface to open the paste and expose aggregate, a rented angle grinder with a cup wheel works for smaller areas. Remove all dust, oil, paint, sealers, and any loose material. After grinding, the surface should feel rough like coarse sandpaper.
Right before you pour, apply an epoxy bonding agent to the prepared surface using a stiff brush or roller, working it into the surface profile. Pour while the epoxy is still tacky (check the manufacturer's window, usually 30 to 60 minutes). If the epoxy skins over before you pour, you've lost the chemical bond and need to recoat. This step is non-negotiable for overlays that need to carry any real load.
Pouring, finishing, and curing the slab
The pour itself
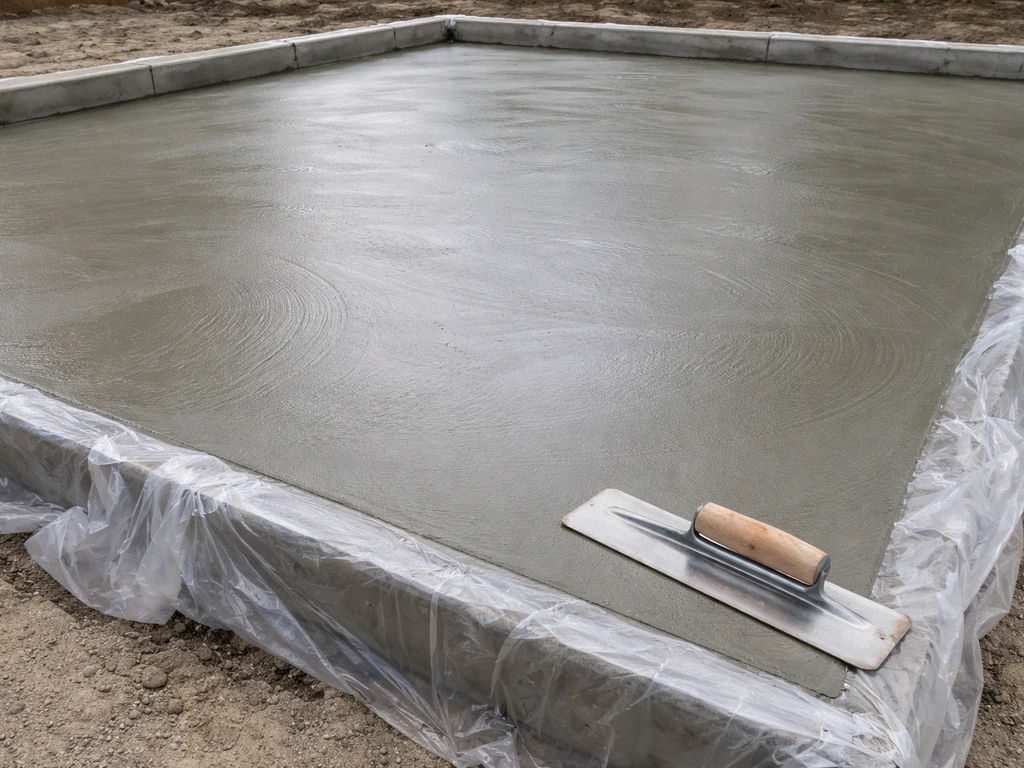
Order your ready-mix concrete (or batch from bags for small areas) and have everything staged before the truck arrives. You need screeding tools, a bull float, edging tools, a hand float, and a steel trowel. Start pouring at the far corner and work back toward the truck. Strike off the concrete flush with the top of your forms using a straight 2x4 screed board, moving it in a sawing motion. Follow immediately with a bull float to flatten high spots and push aggregate down.
Wait for the bleed water sheen to disappear from the surface before doing any trowel finishing. Finishing too early traps bleed water in the surface layer and creates a weak, dusty top that scales off. For a broom finish (best for outdoor patios because it's slip-resistant), drag a stiff broom across the surface after the initial bull float pass and before the concrete gets too stiff. For a smoother finish, use a steel trowel in overlapping circular passes once the surface can support your weight on a kneeling board without leaving more than a 1/4-inch impression.
Control joints: spacing and depth
Control joints give the concrete a predictable place to crack as it shrinks during curing. For a 4-inch slab, space them every 8 to 12 feet (roughly 2 to 3 times the slab thickness in feet). Cut them to a depth of at least 1 inch using a groover tool while the concrete is still workable, or saw-cut them within 4 to 12 hours after the pour using an early-entry saw to a depth of at least 1 inch (1/4 of the 4-inch slab thickness). If you wait too long to cut, the concrete may already be cracking on its own.
Curing for real strength
Curing is the step most DIYers cut short. Cure the slab for a minimum of 7 days when temperatures are consistently above 50°F. Keep the surface continuously moist by covering it with wet burlap or plastic sheeting, or apply a liquid curing compound right after finishing. If temperatures drop below 40°F at night, cover the slab with insulating blankets to prevent freezing. Concrete that dries out too fast in the first week loses significant strength and surface hardness permanently, no amount of sealing fixes a poorly cured slab.
Leveling, edging, and adding steps
Getting the finished surface truly level
Once forms are off (usually 24 to 48 hours after the pour), check the surface with a long straightedge or a 6-foot level. Minor humps or bird baths in a new slab can be addressed with a self-leveling concrete topping if they're less than about 1/2 inch in height variation. If your concrete patio is not level, the fix usually depends on whether the slab is slightly off or whether it has settled.
Larger deviations usually mean a form moved during the pour and may need grinding (for high spots) or a thin repair overlay. For more involved leveling situations, the topics of how to level a concrete patio and what to do when your concrete patio is not level go into much more detail.
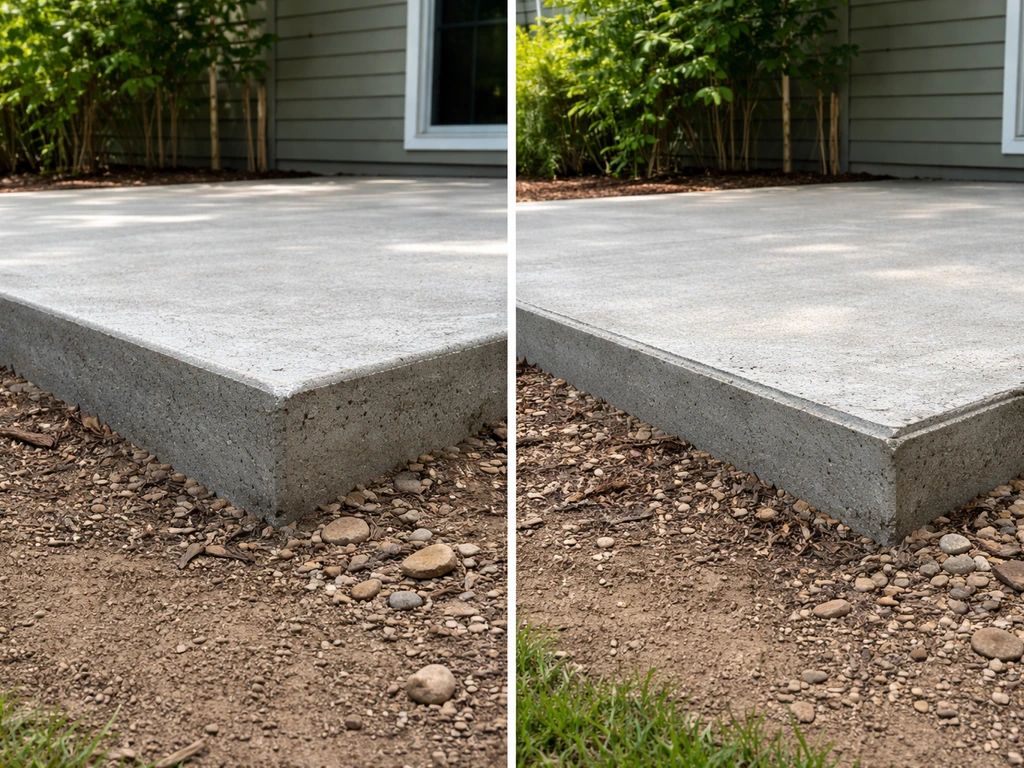
Edging and border treatment
Run an edging tool along all form edges while the concrete is still plastic to create a rounded, chip-resistant edge. A rounded edge (1/4 to 1/2 inch radius) is much less likely to chip or spall at the corner than a sharp 90-degree edge. If you want a decorative border, you can use a groover to cut a 1-inch-deep border line about 6 inches in from each edge, creating a visual frame that also functions as a control joint.
Integrating steps for a raised patio
If your raised patio is more than about 6 inches above grade, you need at least one step. Concrete steps should have a rise of 6 to 7.5 inches and a run (tread depth) of at least 11 inches. The simplest approach is to form and pour integral steps as part of the main pour using a step form on the leading edge. Build the step form out of 2x lumber, brace it well, and fill from the bottom step up, consolidating the concrete with a rod or vibrator to eliminate voids. Alternatively, prefab concrete step units can be mortared into place after the main slab cures, though integral steps are stronger and look cleaner.
Sealing, staining, and finishing touches
Wait at least 28 days after the pour before applying any sealer. Concrete reaches its design strength at 28 days, and sealing too early can trap moisture and cause the sealer to peel or cloud. While you're waiting, this is a good time to finalize your finish plan.
Choosing between a penetrating sealer and a film-forming sealer
Penetrating sealers (silane, siloxane, or silane-siloxane blends) soak into the concrete and form a chemical barrier against moisture and deicing chemicals without changing the surface appearance. Silane-based systems last roughly 7 to 10 years before reapplication; siloxane-based systems typically last 5 to 7 years. These are the best choice for freeze-thaw climates and surfaces where you want a natural look. Film-forming acrylic sealers sit on top of the surface, add a slight sheen, and can enhance color. They're easier to apply and typically ready for light foot traffic within about 12 hours, but they need reapplication every 2 to 3 years on exterior surfaces.
One practical combination that works well: apply a penetrating silane-siloxane sealer first, let it dry to the touch completely, then apply an acrylic top coat over it for added surface protection and appearance. The penetrating layer handles moisture intrusion while the acrylic adds an extra wear layer. Make sure the slab is fully dry before applying any sealer, moisture contact during application is the leading cause of sealer failures like whitening, peeling, and bubbling.
Staining for color and character
If you want color, acid staining or water-based concrete stain applied before sealing gives a natural, mottled look that reads more like stone than painted concrete. Acid stain reacts chemically with the concrete surface, so it's permanent and won't peel. Water-based stains offer more color options and are easier to work with but need a good topcoat sealer to protect them outdoors. Either way, the surface needs to be clean, free of any curing compound residue, and lightly acid-etched before staining to open the surface pores.
Practical next steps before and after the pour
Before you order concrete or mix a single bag, run through this checklist:
- Confirm finished elevation and drainage slope (1/4 inch per foot minimum away from the house).
- Verify subbase depth (4 to 6 inches compacted gravel) and that the base is sloped for drainage.
- Check that all forms are staked, level, and set to the correct finished height.
- Confirm reinforcement is chaired up to the correct depth, not resting on the subbase.
- Order air-entrained concrete (5 to 7% air content) if you're in a freeze-thaw climate.
- Have all finishing tools staged and ready before the truck arrives.
- For bonded overlays: confirm epoxy bonding agent is applied and still tacky at pour time.
- Plan control joint locations (every 8 to 12 feet for a 4-inch slab) and have your groover or saw ready.
After the pour, keep people and pets off the slab for at least 24 to 48 hours, maintain curing moisture for 7 full days, and don't remove forms until the concrete is firm enough that pushing on it doesn't leave a mark. The 28-day wait before sealing feels long, but it's the difference between a sealer that bonds properly and one that traps moisture and fails in the first season. A raised concrete patio done right is a 20-plus year investment, the extra few weeks of patience at the end are well worth it.
FAQ
How do I choose between a new elevated slab and a bonded overlay when trying to raise my patio?
If your existing slab has widespread soft spots, deep cracking, or poor adhesion, a bonded overlay will likely replicate the failure lines. As a rule of thumb, overlays make more sense for structurally sound slabs with only height or unevenness issues. If you have one isolated dip or minor humps, a leveling patch may be safer than adding 2 to 4 inches of new concrete.
Can I raise a patio without pouring concrete, for example with gravel only or pavers?
You can raise the perceived height with gravel or pavers, but you will not get the same slab behavior as a concrete patio. Pavers can heave if drainage is poor or if the base is not compacted in thin lifts, and gravel-only fills can settle over time. If your goal is to match door thresholds or prevent frost movement, a compacted base plus a concrete top is usually more reliable.
What happens if my raised patio slopes the wrong direction (or not enough)?
Water will infiltrate under the slab, increase freeze-thaw damage, and can push at the edges, causing cracking and rocking. To avoid this, verify the slope with a level during subbase placement, not just after the pour, because you cannot fix a wrong base slope without grinding or rebuilding.
How far from the foundation should I drain, and what if my yard is tight?
The article mentions routing to daylight or a dry well at least 6 feet from the foundation. If you cannot meet that distance, you still need a defined discharge path rather than letting water run along the foundation line. In tight spaces, consider a contractor-designed drainage route so the outlet does not undermine footing, especially if you have a basement or damp crawlspace.
Do I really need geotextile fabric under the gravel on expansive clay?
If you have expansive clay or frequent soil migration, geotextile helps reduce separation between native soil and the gravel base. This matters because mixing or pumping fines into the base can reduce bearing and increase settlement, leading to cracking. On stable, well-draining soil you may skip it, but it is a low-risk addition when clay or high-fines conditions are present.
What is the correct way to place reinforcement, and how can I tell if I got it wrong?
Reinforcement needs to be at the right depth, typically centered to upper-third for the slab thickness, not resting on the subbase. A quick check is to look for reinforcement sitting directly on aggregate, leaving it at the bottom layer. If it is on the ground, it will provide little crack control and can rust through, so use bar chairs or spacers and confirm depth before the pour.
Should I use wire mesh or rebar for a 4-inch slab?
For many standard 4-inch residential patios on a properly compacted subbase with good jointing, wire mesh or fiber reinforcement can be adequate. Choose rebar when the slab is thicker than 4 inches, spans a soft spot, ties into another structure, or the patio experiences heavier loads. Also consider that mesh left on the subbase is not equivalent to properly chaired reinforcement.
How can I tell if my existing slab has enough soundness for an overlay?
Beyond hollow-spot testing by tapping, watch for persistent dampness, widespread spalling, or cracks that have shifted. If you find areas that flex or you can identify delamination, a bonded overlay may debond and crack along the same lines. In those cases, leveling with lift techniques or removing and replacing is often more cost-effective long term.
What concrete strength and air content should I specify for freeze-thaw climates?
For most raised patios, the article recommends 4,000 psi, and it calls out air-entrained concrete with about 5 to 7% air for hard winter regions. If you do not specify air entrainment, you are more likely to see surface scaling or spalling. If you are ordering, confirm the mix on the ticket and discuss curing and placement timing with the ready-mix supplier.
Can I pour over the old slab if there is paint, sealers, or curing compound residue?
No, the bond will be unreliable if contaminates remain. The overlay needs a rough, clean, sound profile, with all dust and residues removed. If you cannot achieve the coarse sandpaper-like surface after grinding or shot-blasting, stop and rework the preparation rather than assuming epoxy alone will solve the adhesion problem.
How do I know the epoxy bonding agent is still in its usable window?
You should plan so you can pour while the epoxy is tacky, not after it skins over. If you are delayed, you may need to recoat rather than pouring over a set film. A practical approach is to time epoxying around pour crew workflow and start placing concrete immediately after coverage.
What’s the best finish for a raised patio that needs slip resistance?
A broom finish is commonly best for outdoor slabs because it creates texture without being overly slick when wet. Avoid doing the broom pass too early, since that can tear the surface when bleed water is still present. If you want a smoother look, wait until you can kneel on the slab without leaving more than a light impression, then finish with a steel trowel on overlapping passes.
Why are control joints critical, and where do people usually place them wrong?
Control joints give concrete a predictable place to crack as it shrinks. Common mistakes include spacing joints too far apart, cutting too late, or forgetting joints at changes in geometry like near corners or borders. If your patio has a frame border or inset panel, add joints in the same pattern so cracks do not wander into visible areas.
How long should I keep the slab covered during curing, and what if it rains?
The goal is continuous moisture for at least 7 days when temperatures stay above about 50°F. If it rains heavily, you still need to prevent drying swings, because wet weather followed by sun can create a drying front. Keep the slab covered with plastic or damp burlap so it does not dry out between showers.
When can I step onto the patio after pouring, and when is it safe for vehicles or heavy furniture?
The article says not to remove forms until the concrete is firm and to avoid people and pets for 24 to 48 hours. For furniture and light foot traffic, you can usually do it soon after, but avoid concentrating heavy loads early, before 28 days, because the surface can still be weaker and more prone to indentation.
Do I need to grind high spots immediately if I find a birdbath after curing?
Small variations under about 1/2 inch can often be corrected later with a self-leveling topping, as the article notes. If you have a larger high spot, self-leveling may be too thin and can debond or crack. In that case, grinding the high area first is usually more reliable than trying to “build up over” the entire slab.
Should I wait the full 28 days before sealing if the patio looks dry?
Yes, because “dry to the touch” does not equal fully cured. Sealing early can trap moisture, leading to whitening, peeling, or cloudy patches. If you need to protect it from weather, consider short-term covering, but do not apply the sealer until curing time requirements are met.
What sealer should I pick if I want a natural look but also protect from deicing salts?
A penetrating silane or siloxane (or silane-siloxane blend) is designed to block moisture intrusion without forming a surface film, which helps maintain a natural look. If you want extra appearance and wear protection, the article’s layered approach (penetrating first, acrylic top coat second) can balance both needs.
Can I acid stain or water-based stain right after finishing, or can I apply it over curing compound?
Do it only after the slab is fully cured and the surface is free of curing compound residue. If curing compounds are left behind, stains can come out blotchy and sealers can fail. Before staining, lightly etch or follow the prep steps needed to open pores so the stain can penetrate evenly.
What are the most common causes of sealer failure I should watch for after a raised patio is built?
Moisture contact during application is a major one, which leads to whitening or bubbling. Another frequent issue is sealing over a surface with dust, curing compound residue, or poor surface profile. If the patio was rained on before sealing, wait until it is fully dry and then verify the surface is clean and properly prepped.