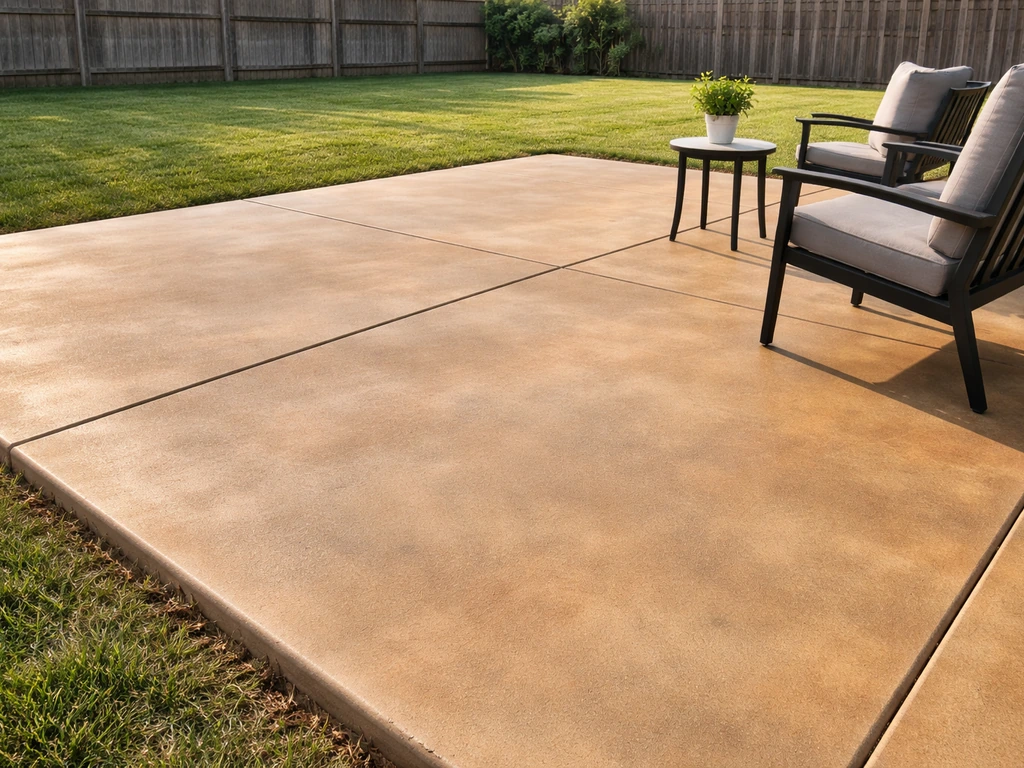
You can stain an existing cement patio yourself in a weekend if you pick the right stain type, do proper surface prep, and seal the color when you're done. The single biggest reason DIY stain jobs go wrong isn't the application, it's skipping prep or rushing through it. If you want a textured look on a concrete patio, focus on the same fundamentals of prep, even application, and proper sealing stain project. Get the surface clean and open, apply in thin coats, let it fully react or dry depending on your stain type, then seal it. That's the whole game.
How to Stain a Cement Patio Step-by-Step DIY Guide

Silas Morrison
11 May 2026
Acid stain vs water-based stain: which one is right for you?

The first decision is picking your stain system, and it matters a lot because the two main types work completely differently and deliver different looks.
Acid stains (sometimes called reactive or chemical stains) work by triggering a chemical reaction with minerals already present in the concrete. The result is a mottled, variegated, almost marbled look that's genuinely unique to your specific slab. If you're aiming for a marble look, acid staining is the method most people use to get that natural, variegated effect. No two slabs come out exactly the same.
The color depth and tone depend heavily on the concrete's age, mineral content, and history, which is part of the appeal but also means you can't fully predict the outcome. Acid staining requires a neutralization step after the reaction is complete, and the whole process takes longer: the reaction typically runs 2 to 24 hours depending on temperature and the specific product, and you have to rinse off the residue and let the slab dry before sealing.
Water-based stains (non-reactive, acrylic-based) penetrate near the surface and tint the concrete rather than chemically bonding with it. The color is more consistent and predictable, and the process is faster and more forgiving. Touch-dry time on a typical water-based acrylic concrete stain runs around 2.5 hours, with a recoat window of about 5 hours. You don't need a neutralization step before sealing, which saves time and simplifies the project considerably. If you want a rich, earthy mottled look, go acid. If you want even, predictable color with less hassle, go water-based.
| Feature | Acid (Reactive) Stain | Water-Based Stain |
|---|---|---|
| How it works | Chemical reaction with concrete minerals | Tints/penetrates near the surface |
| Final look | Mottled, variegated, unpredictable depth | More uniform, consistent color |
| Reaction/dry time | 2–24 hours to react | Touch dry ~2.5 hrs, recoat ~5 hrs |
| Neutralization required | Yes — alkaline scrub + rinse | No |
| Predictability | Lower — depends on your slab | Higher — closer to what you choose |
| Difficulty | Moderate to high | Moderate |
| Best for | Organic, artisan patios | Clean, solid, or multi-coat color jobs |
My honest recommendation for most homeowners doing their first stain project: start with water-based. You'll get more control over the color, the process is more forgiving, and you're not dealing with acid fumes and a neutralization step. If you love the idea of that natural stone-like mottled effect, acid stain is worth the extra work, but plan your weekend accordingly.
Surface prep: this is where you win or lose the job
I can't stress this enough, surface prep is everything. Stencil patterns can be applied after the surface is properly prepped and clean, then you stain or color within the stencil and finish by sealing for outdoor durability how to stencil concrete patio. Stain doesn't stick to a sealed, contaminated, or laitance-covered surface. If the concrete has been previously sealed or coated, you have to get that sealer off first or the stain won't penetrate at all. You'll just end up with blotchy, peeling color that looks worse than what you started with.
The goal of surface prep is to mechanically open up the concrete so the stain can actually get in. That means removing any existing sealer, stripping coatings, grinding down high spots, and creating a surface that's porous enough to accept color. For most residential patios, acid etching or mechanical grinding does the job. If you are wondering how to color an existing concrete patio, make sure you fully open the surface so the stain can actually penetrate acid etching or mechanical grinding. If you see shiny patches where water beads up, that's sealed or glazed concrete and it will resist stain completely.
Check for moisture before you do anything else
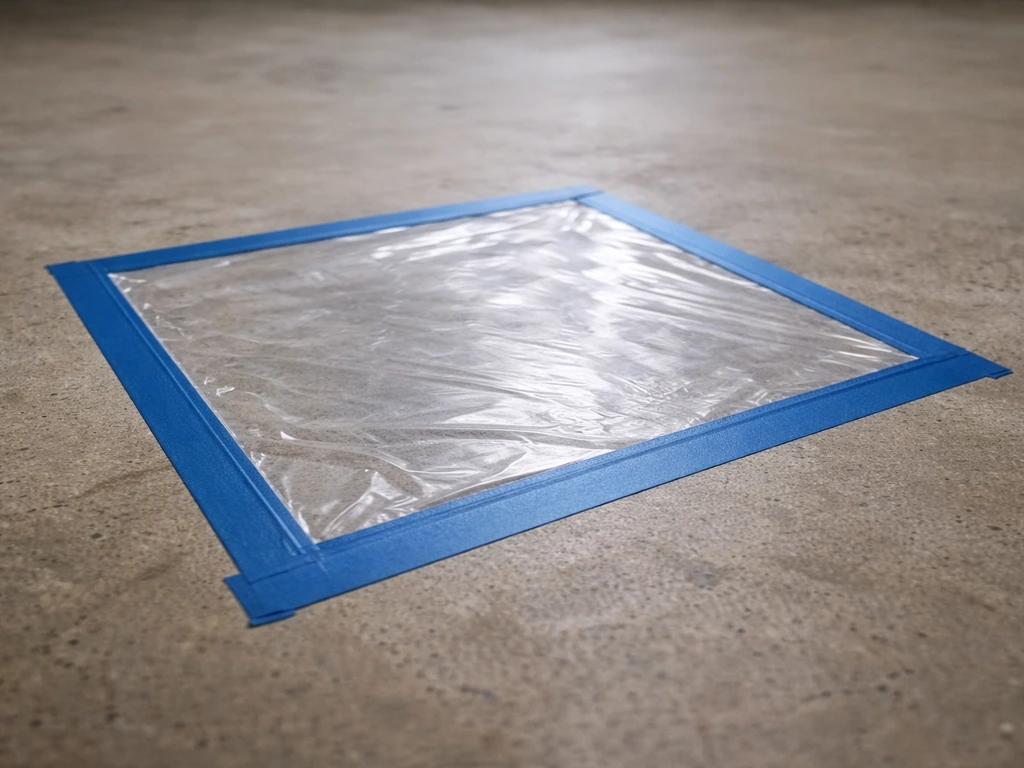
Before staining or sealing, do a plastic sheet test (ASTM D4263). Tape a 2-foot square of plastic sheeting flat against the concrete and leave it for 16 to 24 hours. If you see condensation or the concrete underneath looks darker and wet when you lift it, there's moisture coming up through the slab. Sealing or staining over a slab with active moisture can lead to bubbling, peeling, and trapped efflorescence down the road. Let the slab dry out and retest before proceeding.
Cleaning and repairing the patio before you stain
Work through this sequence before you open a single container of stain:
- Remove all furniture, planters, and anything sitting on the slab.
- Pressure wash the entire patio at a minimum of 2,500 PSI to strip loose debris, dirt, algae, and surface buildup.
- Check for efflorescence—those chalky white mineral deposits that leach up through the concrete. Efflorescence has to come off before you stain because it blocks penetration and causes uneven color. Use a sulfamic-acid-based cleaner (something like a concrete etch and cleaner product), apply it, let it sit about 30 minutes, then rinse thoroughly with clean water. The key is rinsing completely—any leftover residue causes its own problems.
- After efflorescence removal, neutralize the surface if you used an acid-based cleaner and allow it to dry at least 48 hours before staining.
- Strip any old sealer. If the concrete has been previously sealed and you can't confirm what type it was, assume it needs to come off. Use a chemical sealer stripper or grind it off mechanically.
- Fill cracks and spalls. Use a concrete crack filler or patching compound for anything wider than a hairline. Let repairs cure fully—follow the product's cure time instructions before staining over them. Keep in mind that patched areas may absorb stain differently than the original concrete and can show as lighter or darker spots.
- Do a final rinse and let the slab dry completely. For water-based stains, the concrete can be slightly damp but not wet. For acid stains, a slightly damp surface can actually help the reaction—check your specific product instructions.
Protecting everything around the patio
Concrete stain, especially acid stain, will permanently discolor anything it touches. Plants, grass, siding, adjacent walkways, and even your shoes are all at risk. Don't skip this step.
- Tape masking tape along any adjoining concrete surfaces, walkways, or flooring edges to get a clean boundary line.
- Cover adjacent siding and house trim with plastic sheeting or painter's tape, overlapping the tape and plastic so overspray can't creep through seams.
- Wet down plants and grass near the patio with plain water before you start applying any chemical stain. Apply the product, then immediately rinse surrounding vegetation again after.
- Lay plastic sheeting or canvas over any landscaping beds directly next to the slab.
- Keep a garden hose nearby while working with acid stain so you can rinse off any accidental splashes on skin, plants, or siding immediately.
- Don't apply stain in direct sunlight on a hot surface—stain can flash-dry before it properly penetrates, leading to uneven color. Plan to work in the early morning or on a cloudy day.
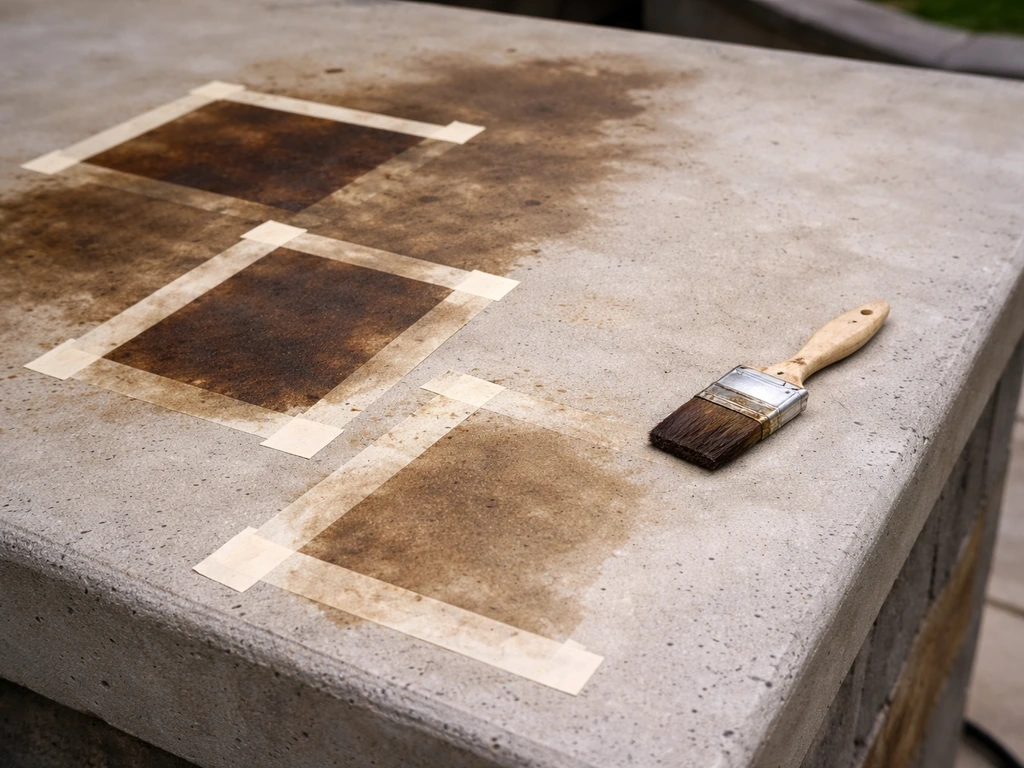
Do a test spot, every time
Always do a test spot on your specific slab before committing to the full application. Pick a low-visibility corner or area under where furniture will sit. Apply a small amount of stain, let it fully develop or dry, then assess the color. This matters especially with acid stain, where the reaction depends on your concrete's mineral content, what you see on the color chart is not necessarily what you'll get on your slab. The test spot tells you what you're actually working with before you've covered 300 square feet.
Applying the stain step by step
Gather your tools before you start: a pump garden sprayer or brush applicator, a paint roller (4-inch or 9-inch nap depending on coverage area), plastic squeeze bottles for detail work, rubber gloves, eye protection, and knee pads. Have clean water and neutralizing solution ready if you're using acid stain.
For water-based stain
- Stir (don't shake) the stain to mix pigment evenly.
- Apply the first coat with a pump sprayer or brush in thin, even passes. Work in sections and maintain a wet edge to avoid lap marks.
- Let the first coat go touch-dry—typically around 2.5 hours for most water-based acrylic products.
- Assess color depth. If it's lighter than you want, apply a second coat after the 5-hour recoat window. Multiple thin coats give you more control than one heavy coat.
- Let the final coat dry fully before walking on it or applying sealer.
For acid stain
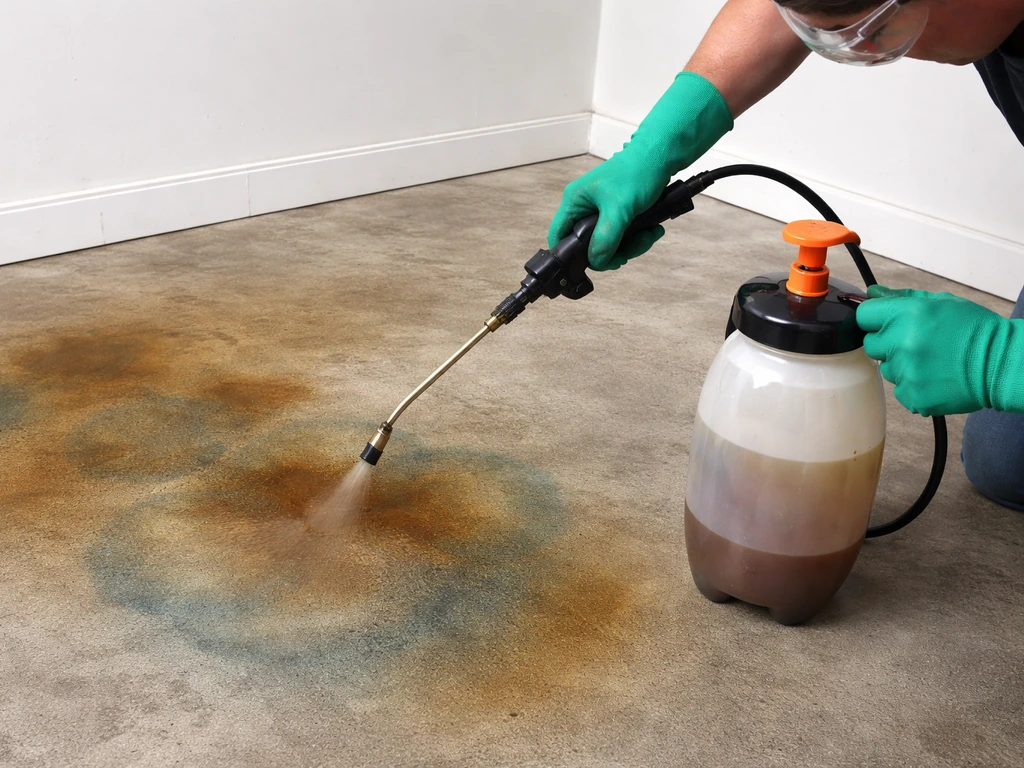
- Wear acid-resistant gloves, eye protection, and old clothing. Work in a ventilated area.
- Apply the acid stain evenly with a pump sprayer in a circular or overlapping motion. Avoid puddling—thin and even is the goal.
- Let the stain react for at least 2 to 8 hours, or up to 24 hours depending on temperature, conditions, and your product's instructions. The concrete will look bubbly and discolored while it reacts—that's normal.
- Once the desired color has developed, neutralize the concrete by scrubbing with an alkaline solution (baking soda and water works: roughly 1 cup baking soda per gallon of water, or use a commercial neutralizer). Scrub thoroughly with a stiff brush.
- Rinse completely with clean water and let it dry fully. The concrete may look chalky after drying—that's normal and not a problem you need to fix.
- Allow a full dry before sealing. Never seal before the neutralization residue is fully rinsed and the slab has dried.
Sealing and finishing for long-lasting color
Stain alone doesn't protect itself. The color will wear away over time from foot traffic and weather if you don't seal it. Sealing locks in the color and gives the surface wear resistance, and for an outdoor patio, picking the right sealer type matters.
For outdoor patios, penetrating sealers (silane, siloxane, or silicate-based) are generally the better long-term choice. They form a chemical barrier inside the concrete rather than a film on top, which means they won't peel if the surface is damaged, they're breathable (moisture can escape from below), and they offer excellent UV resistance. Penetrating silane or siloxane sealer product guidance describes “non film forming” behavior and recommends not applying over previously sealed concrete when incompatible coating systems are involved. Film-forming sealers like acrylics create a sheen on top and can enhance color depth visually, they're fine outdoors but can peel if the film is compromised and may need more frequent reapplication.
Here's how to seal correctly:
- Confirm the stained concrete is completely dry and neutralized (for acid stain). Don't rush this—sealing over moisture traps it and causes efflorescence and sealer failure.
- Apply sealer in thin, even coats. Two thin coats are better than one thick one. Thick coats can bubble, turn milky, or peel.
- Use a short-nap roller or pump sprayer depending on the sealer viscosity. Follow the manufacturer's application method.
- Allow full cure time before returning furniture or allowing heavy foot traffic—typically 24 to 72 hours depending on the product and weather conditions.
- Plan to reseal every 1 to 3 years for outdoor patios, depending on traffic and climate.
Troubleshooting common staining problems
Even when you do everything right, things can go sideways. Here's what I've seen happen most often and how to deal with each:
Blotchy or splotchy color
The most common cause is inconsistent surface absorption, meaning part of the slab was sealed, contaminated, or just denser than the rest. If the slab had a previous sealer you didn't fully remove, you'll see exactly this. The fix is to strip the problem areas thoroughly, re-etch, and reapply stain. If it's minor, a second coat of water-based stain can sometimes blend it out.
Stain won't take in spots
Spots that resist stain almost always have a contamination issue, oil, old sealer, paint, or curing compound. If you can see that water beads on those spots rather than absorbing, the surface isn't open. Mechanically grind or chemically strip those areas and re-prep before trying to reapply stain.
Color came out too light or weak
With water-based stain, the solution is simple: apply another coat. Build color up in layers until you get what you want, respecting the recoat window. With acid stain, if the color looks washed out after neutralizing and drying, you may have neutralized too early (before the reaction finished) or applied too thinly. You can try applying a second acid stain coat, but do your test spot first to see how the second coat interacts with what's already there.
Sealer peeling or bubbling
This is almost always a moisture problem or a residue problem. If you sealed before the neutralization rinse dried completely on an acid-stained slab, moisture and residue get trapped under the sealer and cause failure. Strip the sealer, let the slab dry fully (recheck with the plastic sheet test), and reseal. Apply thin coats, bubbling in film-forming sealers is often caused by applying too thick.
Efflorescence appearing after sealing
If you see white mineral deposits appearing after you've sealed, moisture is moving through the slab and carrying salts to the surface. This usually means either the efflorescence wasn't fully removed before staining, or the sealer went on before the slab was dry. The only real fix is to remove the sealer, treat and neutralize the efflorescence, let everything dry properly (at least 48 hours), and reseal.
Patchy results around repaired areas
Patched concrete almost always absorbs stain differently than the surrounding slab. Patches tend to come out lighter with acid stain and can look noticeably different. For water-based stain you have more control with extra coats. For acid stain, this is one of those honest limitations, you can minimize the contrast but you may not fully hide the repair. If this is a concern, consider a look that embraces variation, or look into techniques for making concrete look like stone, which can work with rather than against patchy results.
Staining your patio is genuinely satisfying to do yourself, and when you nail the prep and application, the results hold up for years. Take the surface prep seriously, respect dry times, do your test spot, and seal properly, and you'll end up with a patio that looks like a professional did it.
FAQ
Can I stain a cement patio if it was previously painted or sealed?
Yes, but only if you first remove any paint, curing compounds, or sealers and then create a porous, absorbent surface. If the old coating is still on the concrete, most stains will sit on top and look patchy or peel later. After stripping or grinding, do the plastic sheet test again to confirm the slab is not pulling moisture up through the surface.
What weather conditions should I avoid when staining and sealing a cement patio?
Plan on weather risk. Do the job when the forecast stays dry for at least 24 hours after you finish staining, and avoid strong sun or windy conditions that cause uneven drying. For water-based stains, rushing the recoat window can lead to muted color or streaks, so follow the product timing instead of the general “weekend” idea.
How do I protect my landscaping and house from stain drips and splashes?
Remove or protect it. Concrete stain can permanently tint grass, landscaping, siding, and nearby walkways, and it is also hard to clean from rough materials. Cover plants with plastic sheeting and keep a tight boundary line with tape and rosin paper, then handle spill cleanup immediately before the stain develops.
How can I tell if some areas of my patio won’t take stain evenly?
Do not assume everything is evenly absorbent. Run a simple water-spray check, if water beads or stays shiny, that area is still sealed, glazed, or contaminated and will resist staining. Those spots usually require mechanical grinding or chemical stripping before you apply stain again.
Where should I do a test spot, and how many test spots should I run?
A test spot is especially important on older slabs and on slabs with patches, because mineral content and density change how acid or acrylic stains develop. Pick the lowest-visibility area and test both color appearance and how the sealer looks over it, since the sealer can change the final tone.
Can I stain and seal immediately after the stain dries?
It depends on the stain type and the stage you are at. Acid stain needs a complete reaction and an appropriate neutralization and rinse routine, then full dry time before sealing. Water-based stain generally skips neutralization, but it still needs the full dry and recoat window, and applying sealer too soon can trap residue and cause failure.
Do I need a penetrating sealer or will any concrete sealer work?
Yes, but you must match the sealer system to the patio exposure. For best long-term performance outdoors, penetrating sealers (silane, siloxane, or silicate-based) are typically more forgiving if the surface gets scuffed, they are breathable, and they reduce peeling risk. Film-forming sealers can boost sheen and color depth but may need more frequent reapplication if the film is damaged.
What should I do if white haze shows up after sealing?
If you have efflorescence or white haze, do not seal over it. Strip and remove the mineral deposits first, then let the slab dry fully before resealing. A practical decision aid is this, if the white material appears or grows after sealing, it is almost always moisture movement, and sealing again without correcting the source usually repeats the problem.
Why does my stained patio look blotchy after sealing, and how do I fix it?
Most “color problems” come from prep and absorption, not from the stain itself. If the patio looks blotchy, streaky, or uneven, identify whether the surface is still contaminated or partially sealed, then re-prep only the affected areas. For minor unevenness with water-based stain you can sometimes blend with additional thin coats, but for contamination-caused spots you usually need to mechanically fix the surface first.
What if the plastic sheet test shows moisture coming through my slab?
If the concrete is actively wet underneath, do not proceed. The plastic sheet test helps you detect that condition. If you see condensation or darker wet-looking concrete, let the slab dry out and retest, then only seal once you are confident moisture is no longer migrating upward.
Can I make an acid-stained patio look perfectly uniform?
If you want a more uniform look, consider water-based for predictable color and layering control. For acid stain, variation is part of the result since it reacts with minerals in your exact slab, and you cannot fully force it to look identical across patches and repairs. If your goal is camouflage, plan color direction and accept natural variation rather than trying to eliminate it entirely.
How do I stencil a cement patio without bleed-through or uneven edges?
Yes, but keep the process clean and controlled. Stain can wick under stencil edges if the surface is not level and absorbent, so you need consistent prep and firm stencil adhesion. After removing the stencil, keep the surface dry and then seal once the stain has fully developed and dried.