You can absolutely install Trex composite steps so they land on a concrete or paver patio, and the job is very doable for a capable DIYer. The key is matching your anchoring method to your patio surface, doing honest prep work before a single board goes down, and following Trex's own stringer spacing and tread fastening specs so the steps stay tight for years. Skip any of those three things and you get wobble, gaps, or water problems that are a pain to fix after the fact.
TREX Steps on Concrete Patio: Install Guide for Today

Silas Morrison
12 Jun 2026
Choosing the Right Connection Method: Concrete vs. Paver Patio
The patio surface underneath your steps matters more than most people expect. If you are planning patio door concrete steps, choose the right footing and fastener approach based on whether your landing surface is poured concrete or pavers patio surface. Concrete and pavers behave differently under load, move differently with seasons, and accept fasteners differently. Getting this decision right upfront saves you from redoing the whole thing in two years.
Landing on a concrete patio
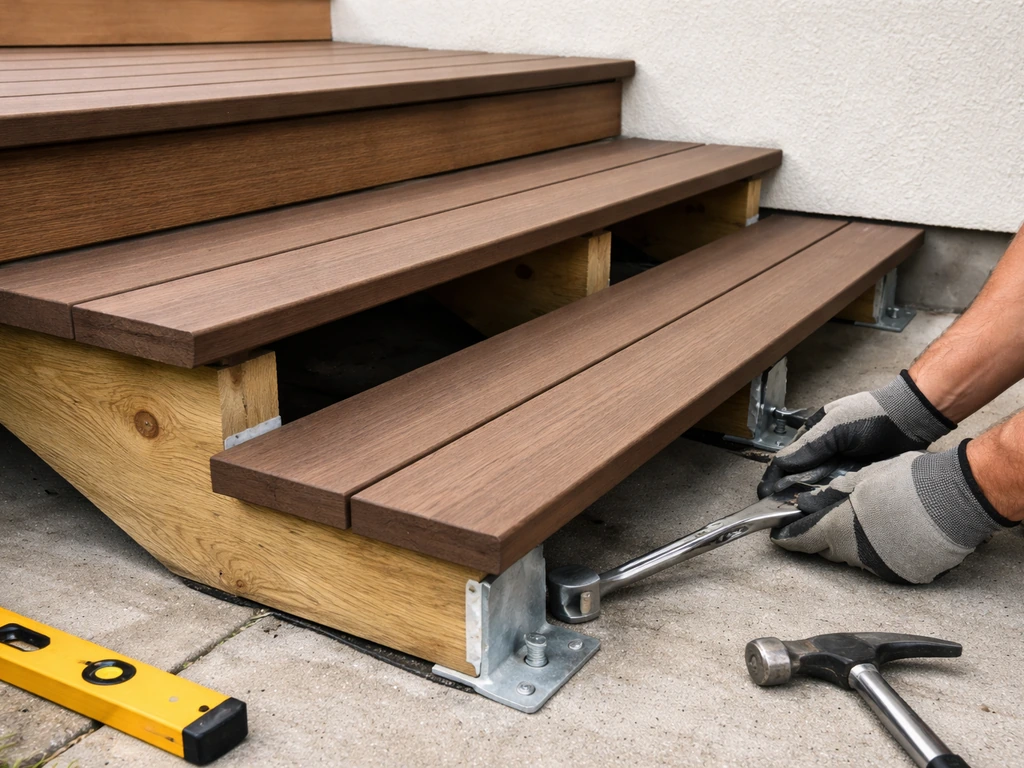
Concrete is the more straightforward landing surface. It's rigid, stable, and you can fasten directly into it with concrete anchors or tapcon screws. The bottom of your stair stringers can either rest on a pressure-treated kickplate that's anchored to the slab, or you can set a treated wood ledger flat against the slab's edge if the steps are descending from a deck above. The goal is keeping the stringer bottoms from sliding forward under foot traffic load. A simple 2x6 or 2x8 pressure-treated nailer bolted to the concrete with 3/8" tapcon anchors every 16 inches gives the stringers something solid to toe-nail or bracket into. If the steps are freestanding (not attached to a deck above), the concrete surface itself acts as the footing, and the stringer bases just need to be captured so they can't kick out.
Landing on a paver patio
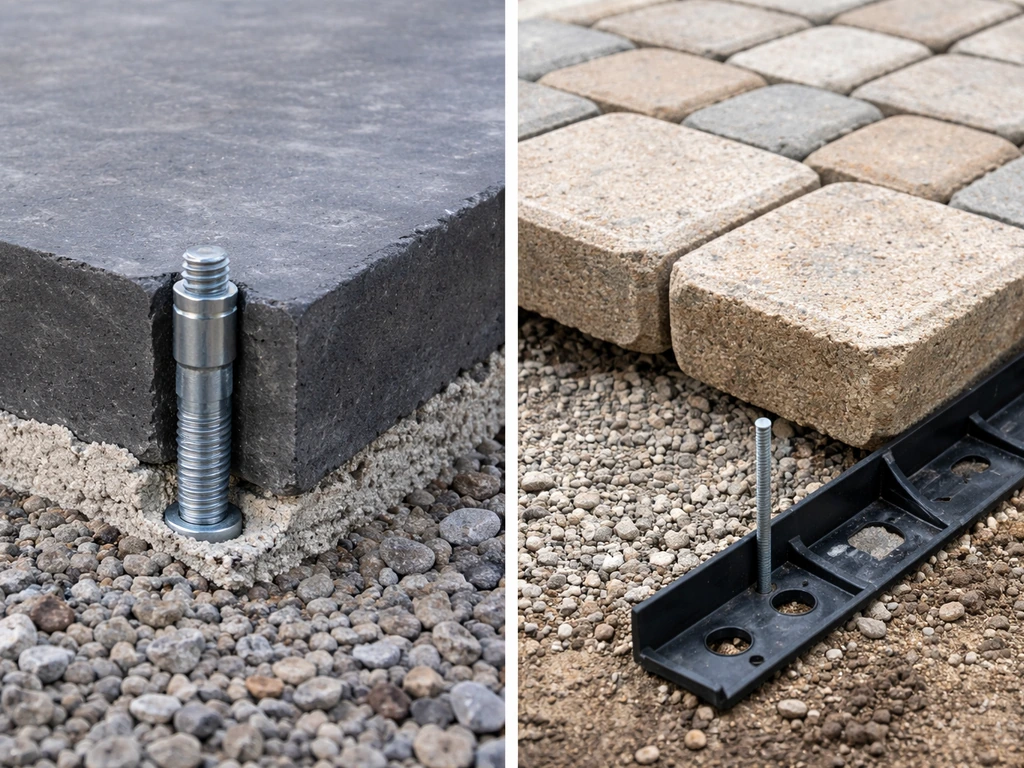
Pavers are trickier because they're not monolithic. Individual pavers can rock, settle, or shift under repeated point loads from stringer feet. You have two solid options here. First, you can excavate a small section of the paver base where the stringers land, pour a small concrete pad (even just a 12"x12" spot footing) flush with the surrounding pavers, and anchor into that. Second, if excavation isn't appealing, you can use heavy composite or galvanized post bases with wide bearing plates that spread the load across four or more pavers at once. Either way, do not just rest stringer feet on bare pavers without capturing them. Pavers will creep, and so will your steps.
| Feature | Concrete Patio | Paver Patio |
|---|---|---|
| Surface rigidity | High, monolithic | Moderate, individual units |
| Direct fastening | Yes, with tapcon anchors | No, need footing or base plate |
| Seasonal movement | Minimal | More likely, especially edges |
| Prep difficulty | Low to moderate | Moderate to high |
| Best anchoring method | Treated kickplate or ledger bolted to slab | Spot concrete footing or wide-bearing post base |
My recommendation: if you have pavers and any flexibility in the project, pour a small spot footing where each stringer lands. It takes an extra afternoon but it gives you the same solid foundation you'd have on a poured slab, and you won't be second-guessing it every time someone runs up the steps.
Prep Work: Leveling, Cleaning, and Checking the Substrate
This is the part people rush, and it's always the part that causes problems. Do not skip a thorough patio inspection before the steps go in. Here's what you're checking for and how to address each issue.
Check for level and slope
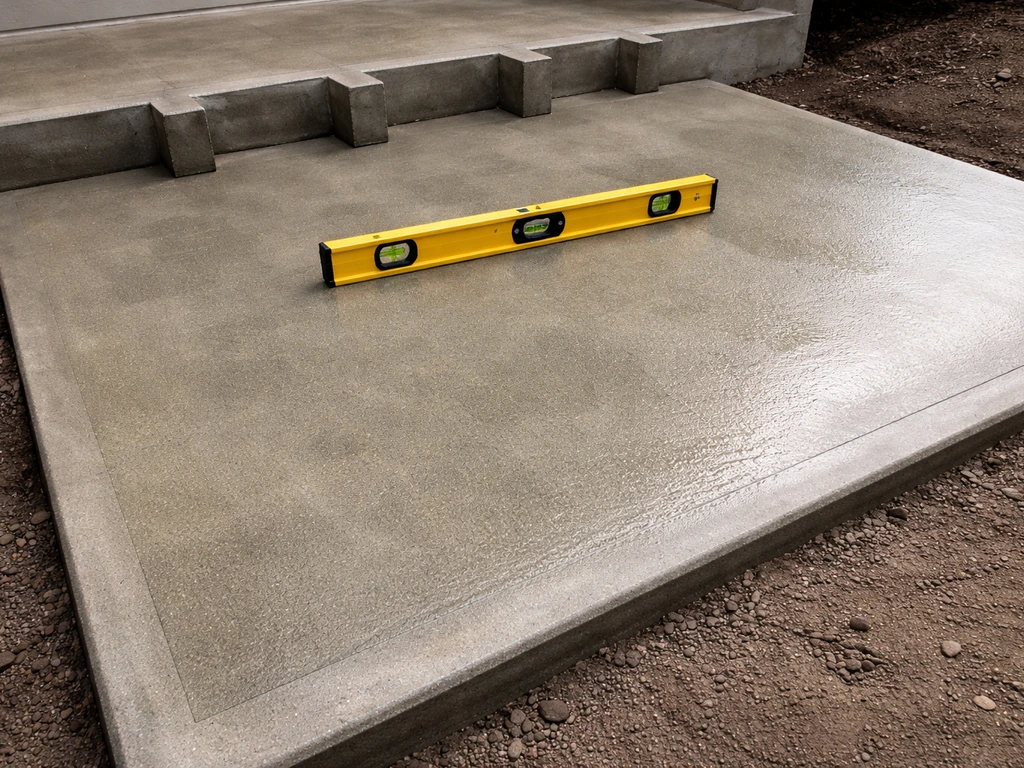
Concrete patios should drain away from the house, typically with about a 1/8" per foot slope. That slope is intentional and you need to account for it when your stringer bases land there. If the patio slopes toward the house or has a significant cross-slope, the stringer heights will be unequal and your steps will look crooked. Use a long level or a laser level to measure the actual surface at the landing zone. If there's a slope differential of more than 1/4" across the stringer base width, you'll need to shim the low side with composite shims or grout under a kickplate to get a truly level base before the stringers go on.
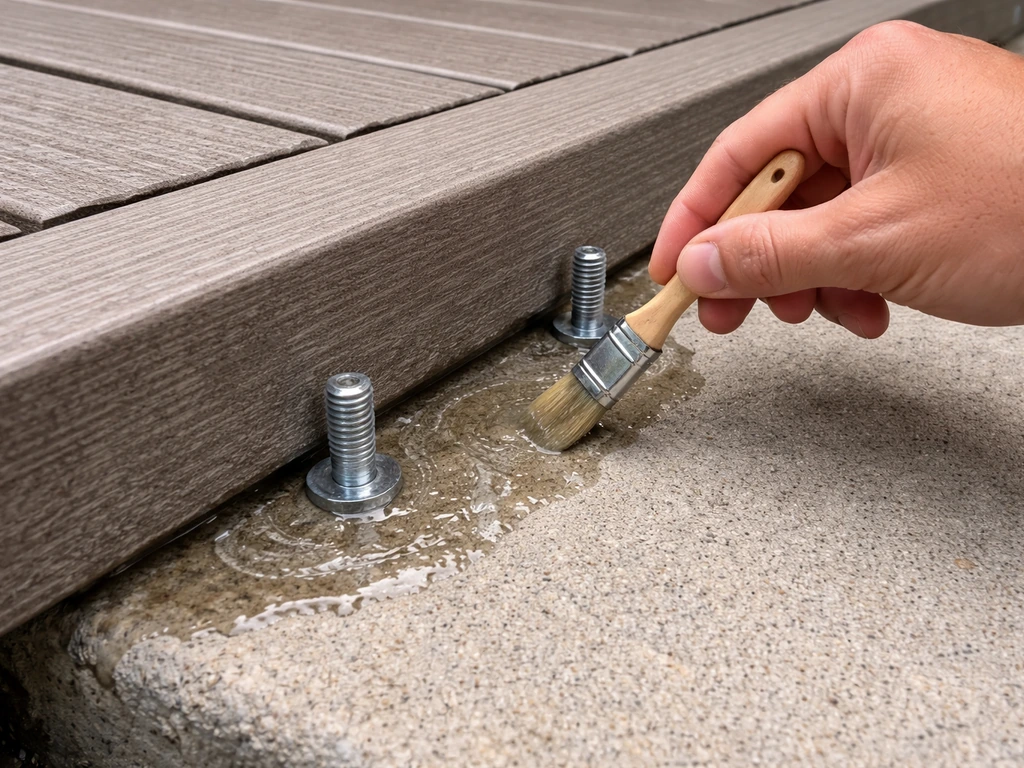
Clean the surface thoroughly
Concrete that's been sitting outside collects algae, efflorescence, grease, and debris, and none of that belongs between your anchoring hardware and the slab. Pressure wash the landing zone and let it dry completely, at least 24 hours in warm weather. If there's efflorescence (that chalky white mineral bloom), scrub it off with a diluted muriatic acid solution and rinse well. Clean concrete gives your anchors full bite and helps any adhesive or sealant you apply later actually bond.
Inspect for cracks and soft spots
Tap across the concrete with a hammer. A hollow sound means a delaminated or undermined section that can crack further under repeated load from stair traffic. Hairline surface cracks are usually cosmetic, but cracks wider than 1/4" or cracks that show vertical displacement (one side is higher than the other) need to be repaired before you anchor anything into them. Fill structural cracks with a polyurethane concrete caulk or an epoxy injection filler, let it cure fully, and then re-check the area for stability. For paver patios, walk the entire landing area and press each paver with your foot. Any rocking paver needs to come up, get re-bedded in fresh polymeric sand or concrete sand, and be tamped back into place before you proceed.
Attaching Trex Steps to the Patio Surface
Once your surface is solid and level, you're ready to anchor the stringers and build out the treads. With the right concrete patio process in mind, you can keep your landing level, your anchors seated correctly, and your steps from shifting over time. This is where Trex's own specs become your bible. The company is specific about stringer spacing and tread fastening, and those numbers exist for a reason.
Stringer spacing and count
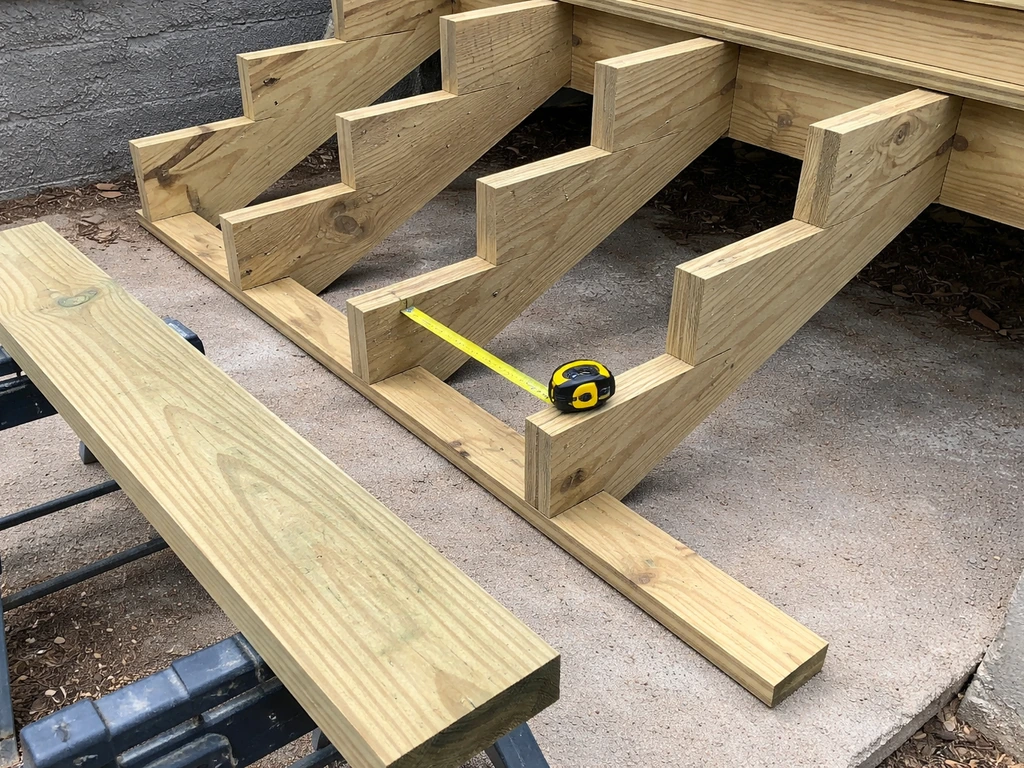
Trex requires a stringer every 9 inches minimum for Trex Enhance Decking used on stair treads. For most residential stair widths (36" to 48"), that means you'll be running three to five stringers, not just the two outside stringers that some builders default to. The stringer count is determined by stair width, so do the math for your specific configuration before you cut anything. Skimping on stringers is one of the most common reasons composite stair treads flex or crack at midspan over time.
Anchoring the stringer bases to concrete
Cut a pressure-treated 2x6 kickplate to span the full width of your stair opening and anchor it flat to the concrete with 3/8" diameter tapcon screws at least 2.5" long, placed every 16 inches. Pre-drill through the wood and into the concrete with a hammer drill and the correct masonry bit for your tapcon diameter. Set the kickplate in the landing position, mark the drill locations, pull the board, drill the holes, then reset and drive the tapcons. Once the kickplate is solid, toe-screw each stringer base into the kickplate using structural screws, or use metal stringer connector brackets for a cleaner result. The stringers should not be able to slide forward or sideways under load.
Anchoring to pavers (with spot footing)
If you went the spot footing route, set your j-bolts or anchor bolts into the wet concrete before it cures, positioned to match your post base or kickplate bolt pattern. Once cured (minimum 24 to 48 hours depending on mix and temperature), drop the pressure-treated kickplate or post bases onto the anchors, level everything, and torque down the nuts. Then attach stringers to the kickplate or bases exactly as you would on a poured slab. The pavers around the footing can be re-set snug against the concrete after everything is anchored.
Installing Trex stair treads
Trex requires tread boards to be fastened continuously across at least four stringers, which is another reason stringer count matters. Use Trex-approved hidden fasteners or face-screw with composite-compatible deck screws depending on your decking product line. Tread-to-tread gap should be 1/4" to 3/8", which handles expansion without looking sloppy. Critically, tread overhang beyond the front face of the riser board must not exceed 3/4". More overhang than that creates a trip hazard and stresses the tread edge. Use a spacer block to keep gaps consistent as you work your way up.
Common Problems and How to Fix Them
Even a well-planned stair installation can run into real-world snags. Here are the ones I see most often and what actually fixes them.
Wobble and lateral movement
If the completed stairs feel wobbly side to side, the stringers are not adequately captured at the base or the top. At the base, the kickplate anchors may be undersized or the tapcons may not have gotten full purchase in the concrete. Pull the steps back, re-drill with a hammer drill (not a regular drill), and use longer or larger tapcons. At the top, make sure the stringers are solidly fastened to the deck rim joist or house band with structural hangers or lag bolts, not just toe-screws. A diagonal metal strap across the back of the upper stringer assembly also eliminates racking in freestanding configurations.
Gaps between step and patio surface
A gap between the bottom riser and the patio surface is usually a slope mismatch or an unlevel kickplate. If it's less than 1/2" on one side, a composite trim board cut to fit and screwed to the bottom riser face can close the gap cleanly. If the gap is larger, you need to shim the kickplate or address the underlying slope issue. Leaving a large gap untreated looks unfinished and creates a place for water to pool and debris to collect under the step.
Drainage and water pooling
Water should move away from the base of the steps, not collect there. If your patio slopes toward the step landing zone, you may need to cut a small relief channel in the concrete at the base of the steps using an angle grinder with a diamond blade to redirect drainage laterally. On paver patios, re-grading the sand bed around the landing to create a slight outward slope (1/8" per foot) does the same thing. Never seal the gap between the step base and the patio surface completely. Water needs somewhere to escape.
Seasonal movement and expansion
Composite decking expands and contracts with temperature swings. Trex products can move up to 1/8" per 8-foot board length across temperature extremes. Make sure your fastener pattern allows for this movement rather than fighting it. Don't over-torque screws, use the recommended 1/4" to 3/8" tread gaps, and avoid caulking tread seams. Between the composite boards and the concrete, a small gap (1/4" or so) at the bottom riser is actually fine and expected.
Finishing Details: Trim, Railings, Sealing, and Long-Term Care
Trim and edge cleanup
Once treads are down, cap the stringer ends and any exposed framing with Trex fascia board or composite trim in a matching color. This protects the wood framing from moisture and UV and gives the whole assembly a finished look. Fascia goes on with exterior-grade finish nails or color-matched composite screws. At the base where the stringer meets the concrete, a thin bead of paintable exterior caulk (not silicone) along the kickplate-to-concrete joint keeps water from wicking under the treated wood over time.
Installing railings on the steps
If your stairs are more than 30 inches off grade at any point or local code requires it (check your municipality before assuming), you'll need railings. Trex Signature stair railing uses a foot block and post attachment system where the post base is fastened to the stringer or outer framing with specific hardware before railing components are assembled. Follow Trex's stair railing installation instructions for post mount placement because the post positions on stairs are different from flat deck railings. Getting the post angle and foot block orientation wrong is the most common railing installation mistake, and it's much easier to fix before the post is set than after.
Sealing and weatherproofing
Trex composite boards don't need to be sealed the way wood does, but the concrete patio underneath them does benefit from sealer, especially around the anchor points. Apply a penetrating concrete sealer around any tapcon or anchor locations to slow moisture intrusion and reduce freeze-thaw damage to the concrete at the fastener holes. Reapply every two to three years. For the composite treads themselves, an annual cleaning with a composite deck cleaner and a soft brush is all the maintenance they need.
Long-term durability checklist
After installation, set a reminder to run through this checklist every spring before heavy outdoor season begins.
- Check all tapcon or anchor bolt heads for corrosion or loosening and re-torque as needed
- Inspect the kickplate or base plate connection for any movement or moisture damage
- Look at tread gaps and confirm they haven't closed up due to debris buildup (clear them out with a putty knife)
- Check that tread overhang is still within 3/4" and no boards have shifted or cupped
- Inspect the bottom riser-to-patio gap for debris or standing water issues
- Re-apply concrete sealer around anchor points if the surface looks dry or powdery
- Confirm railing posts are still plumb and foot block fasteners are tight
- Look at fascia trim for any separation or fastener pull-through and re-secure as needed
The whole job from prep to finished railings typically runs a long weekend for a pair of motivated DIYers. The concrete work and anchor curing adds the most time, so plan the spot footings or slab anchors on day one and do the stair framing and tread installation on day two or three. If you're also thinking through how the steps integrate with the rest of a concrete patio build or connecting to a door threshold at the top, those elements affect your rise-and-run layout and are worth working out on paper before any concrete goes in. These concrete patio tips for leveling, anchoring, and drainage can help your Trex steps perform reliably for years. If your plan involves concrete steps and patio landing details, double-check the leveling, anchoring, and drainage so everything stays secure season after season concrete patio build.
FAQ
Can I install trex steps on a concrete patio that is not perfectly level?
Yes, but you should treat it like a drain and movement problem rather than a fastening problem. If your landing is a sloped slab, measure the height at every stringer base location and shim or grout only the low areas so each stringer sits true to the tread layout. If you try to “make the tread math work” without leveling the bases, you can end up with unequal riser heights that are hard to correct later.
Should I completely seal the gap between the trex steps frame and the concrete patio?
If there is any chance the base wood will see pooling water, use pressure-treated material and keep the bottom joint open to daylight, not sealed airtight. The article recommends a paintable exterior caulk at the kickplate-to-concrete seam, but avoid silicone that can trap moisture. Also verify your drainage slope away from the house, because a sealed joint can still be vulnerable if water is directed back toward the steps.
What is the biggest mistake when drilling holes for Tapcon anchors into concrete?
For a DIY anchor into concrete, a hammer drill matters for two reasons, bit control and drilling speed through the surface. If you use a regular drill, you can overheat the bit, wander off mark, or leave holes that do not give full concrete bite, which is a common cause of wobble. Pre-drill through the wood first, then drill to depth into the concrete with the masonry bit sized to your Tapcon diameter.
Do small cracks in a concrete patio under trex steps need to be repaired?
If your landing is poured concrete and you have hairline cracks, check whether the slab surface is still stable. Cosmetic cracks are usually fine, but cracks wider than about 1/4 inch or cracks that show vertical displacement should be repaired first so the anchors do not sit over a moving weak spot. After repair, re-check level at the base locations before installing the kickplate and stringers.
Can I skip the spot footing on a paver patio and just set stringer feet on the pavers?
It is usually a bad idea. Pavers can shift under repeated point loads from stringer feet, even if the pavers look solid today. The fixes are the ones described, either add a small poured spot footing where each stringer lands, or use wide bearing post bases that spread load across multiple pavers. Resting stringer feet directly on bare pavers is one of the fastest ways to get creeping steps and widening gaps.
How do I account for Trex expansion when fastening trex steps on concrete?
Yes, but focus on movement at the tread-to-frame interface rather than trying to “lock everything tight.” Trex boards expand and contract with temperature, so your fastening pattern and your tread gap matter more than the screw brand. Use the specified 1/4 to 3/8 inch tread gaps, avoid over-torquing, and do not caulk tread seams because that can restrict movement and lead to buckling.
If the bottom riser gap is off, what is the correct way to fix it after the stringers are installed?
If you have to adjust something after the framing is set, the safest correction is at the base using composite shims or grout under the kickplate, not by forcing treads into an incorrect geometry. When the bottom is out, you can get uneven risers or an unattractive crooked look. If you see a slope mismatch, pull back to the level base before committing to the treads and risers.
What happens if I use fewer stringers than recommended for Trex stair treads?
You generally should not plan on relying on filler to cover an unsupported edge. Where stringer count is increased, you create more load paths so treads do not flex or crack at midspan. If your stair width calls for three to five stringers, adding only two outside stringers is a common reason composite treads end up flexing over time.
Do I need railings for trex steps on a patio, and what installation mistake should I avoid?
If you need railings and the stair is more than 30 inches off grade at any point or local code requires it, install them using Trex’s post attachment system and the correct post placement on stairs. The top error is getting the post angle and orientation wrong relative to the stair slope. Fixing that is far easier before the post is set, because retrofits often involve replacing hardware holes.
What maintenance matters most for trex steps installed on a concrete patio?
A practical rule is to prevent freeze-thaw damage at the anchor holes and keep moisture from wicking into treated lumber. The article recommends using a penetrating concrete sealer around tapcon and anchor locations and reapplying every two to three years, plus an annual composite deck cleaner for the treads. If you live in a freeze-thaw climate, do not skip the fastener-hole sealing.