The most reliable way to attach a pergola to a concrete patio is to use steel post base brackets bolted into the slab with concrete screw anchors (like Simpson Strong-Tie Titen HD) or adhesive anchors, then set your posts into the brackets and secure them plumb. Done right, this connection handles wind uplift and lateral loads without cracking your slab or working loose over time. The process takes a hammer drill, a carbide-tipped bit, some layout work, and about half a day for a four-post pergola. Here is exactly how to do it.
How to Attach and Anchor a Pergola to a Concrete Patio

Silas Morrison
19 Jun 2026
First, size up your patio and pergola before buying anything
Before you touch a drill, spend 20 minutes understanding what you are working with. The two biggest variables are the condition of your slab and the weight and span of your pergola. A lightweight aluminum kit pergola puts much less demand on the anchors than a heavy timber structure with a solid roof. Know which one you have.
For the slab: check its thickness if you can. Most residential concrete patios are 3.5 to 4 inches thick. Anchors need a minimum embedment depth, and a thin slab limits your options. Also look at the slab edges. Edge distance matters because drilling too close to the edge (generally less than 6 inches) can cause the concrete to crack or spall. If your posts need to land right at the perimeter of the slab, you may need to adjust post placement or use a surface-mounted clamp-style bracket designed for edges.
Also check whether you are working with an existing slab or pouring new concrete. This guide focuses on attaching to an existing slab, which is the most common situation. If you are pouring new concrete, you would set anchor bolts wet before the pour, which is a cleaner method. For a new pour, hold off and do it right during the pour. For everything else, read on.
- Confirm slab thickness (probe a crack edge or check original build records if possible)
- Note the slab edge locations relative to planned post centers
- Check for visible cracks, hollow spots, or heaving that might affect anchor performance
- Identify any underground utilities, irrigation lines, or conduit that might run under the patio
- Note the pergola's post count, size (4x4, 6x6, etc.), and total roof weight or kit specifications
Pick the right hardware for anchoring into concrete
You have three main anchor types to choose from, and the right one depends on your load and slab condition. For most residential pergolas, concrete screw anchors with a rated post base bracket are the go-to. They are forgiving, removable if needed, and readily available at any hardware store.
| Anchor Type | Best For | Key Requirement | Removable? |
|---|---|---|---|
| Concrete screw anchors (e.g., Titen HD) | Most DIY pergola installs, lighter-to-medium loads | Correct pilot hole diameter and depth | Yes, with care |
| Wedge/expansion anchors | Heavier timber pergolas, high-wind areas | Clean, dry hole; exact diameter match | No |
| Adhesive/epoxy anchors (e.g., Hilti HIT-HY 200-R) | Maximum load, cracked or thin concrete, high-stress installs | Perfectly clean, dry hole; cure time required | No |
For the post base bracket itself, Simpson Strong-Tie's ABU Adjustable Post Base is one of the most popular options for concrete attachment. It allows some adjustment after installation, which saves you if your hole lands slightly off. The Outdoor Accents product line from Simpson Strong-Tie includes post bases that ship with the correct concrete screw anchors and list load capacity ratings right on the product page, so you can match the bracket to your pergola's specs before buying. The Outdoor Accents Sage System pergola FAQ also notes that post bases are designed to attach to concrete using the included concrete screw anchors, and that load capacity is provided on each individual connector or post-base product page post bases that ship with the correct concrete screw anchors and list load capacity ratings right on the product page.
If you are using adhesive anchors like the Hilti HIT-HY 200-R, pay close attention to the hole-cleaning requirement. Hilti specifically pairs this system with hollow carbide drill bits and a Hilti vacuum cleaner for the self-cleaning step. In water-saturated concrete, you need to set the anchor immediately after cleaning the hole. Skipping hole prep is the number-one reason adhesive anchors fail, so do not cut corners there.
For most homeowners, my honest recommendation is to use a quality post base bracket with Titen HD concrete screws. It is the most forgiving system, does not require cure time, and gives you strong, rated connections for typical pergola loads. Save adhesive anchors for situations where you need maximum holding power in a compromised slab. If you are trying to anchor posts into a concrete patio, choose anchors that match your slab thickness and the load your pergola will put on them.
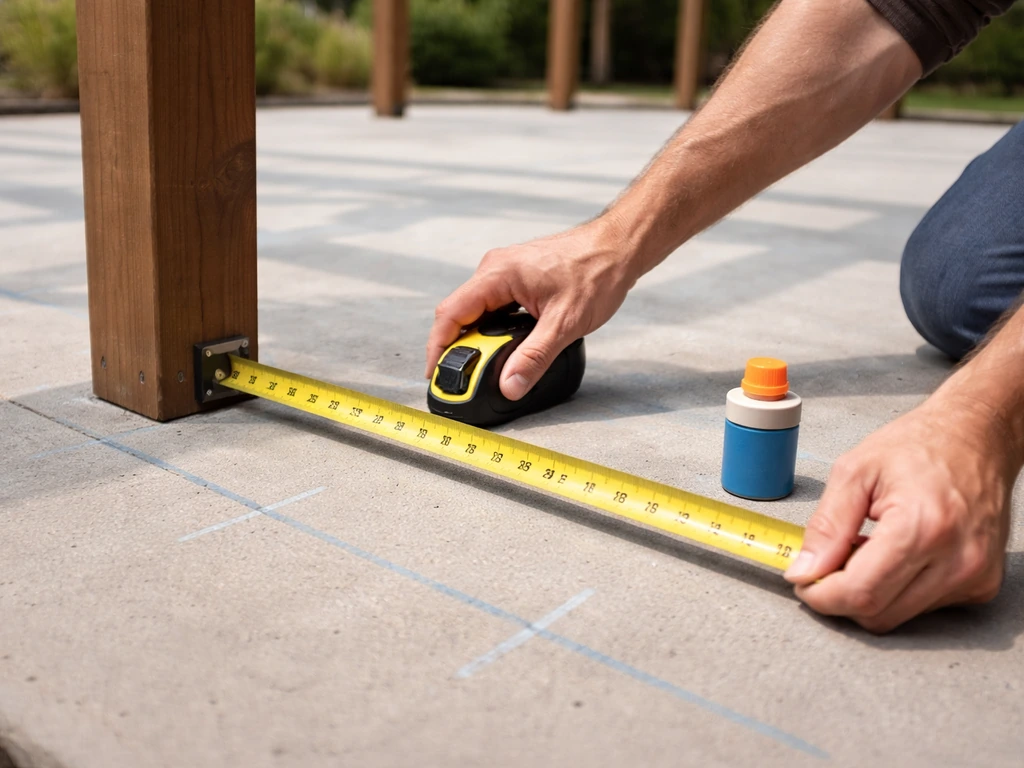
Lay out your post locations accurately before drilling anything
Layout is where most DIY pergola installs go sideways. Drilling in the wrong spot means a bad hole you cannot undo. Take the time to do this carefully and you will save yourself a headache later.
- Start from your house wall or the fixed reference point of your pergola design and measure out each post center location using a tape measure.
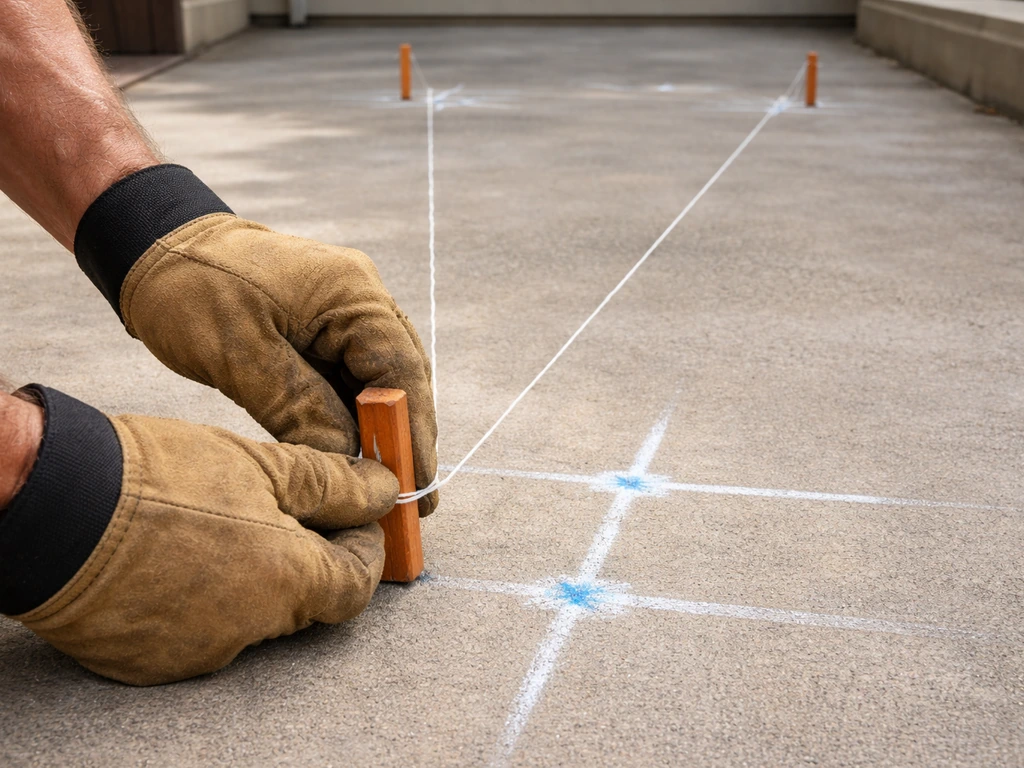
- Use the 3-4-5 triangle method to confirm your corners are square: measure 3 feet along one side, 4 feet along the adjacent side, and the diagonal between those two points should be exactly 5 feet.
- Mark each post center with a pencil or chalk mark on the concrete surface.
- Double-check that each mark is at least 6 inches from the nearest slab edge to avoid spalling when you drill.
- Set a long level or string line across post locations to confirm everything is on the same plane. Patios often have a slight slope for drainage, so factor that into your bracket choice (the ABU adjustable base handles minor grade differences well).
- Verify your overall dimensions match the pergola's beam spans and that the layout clears any doors, windows, or overhead obstructions.
Once all four (or more) marks are confirmed and square, place your post base bracket over each mark and trace or mark the anchor bolt hole locations through the bracket onto the concrete. This gives you your actual drill points, which account for the bracket's hole pattern rather than just the center mark alone.
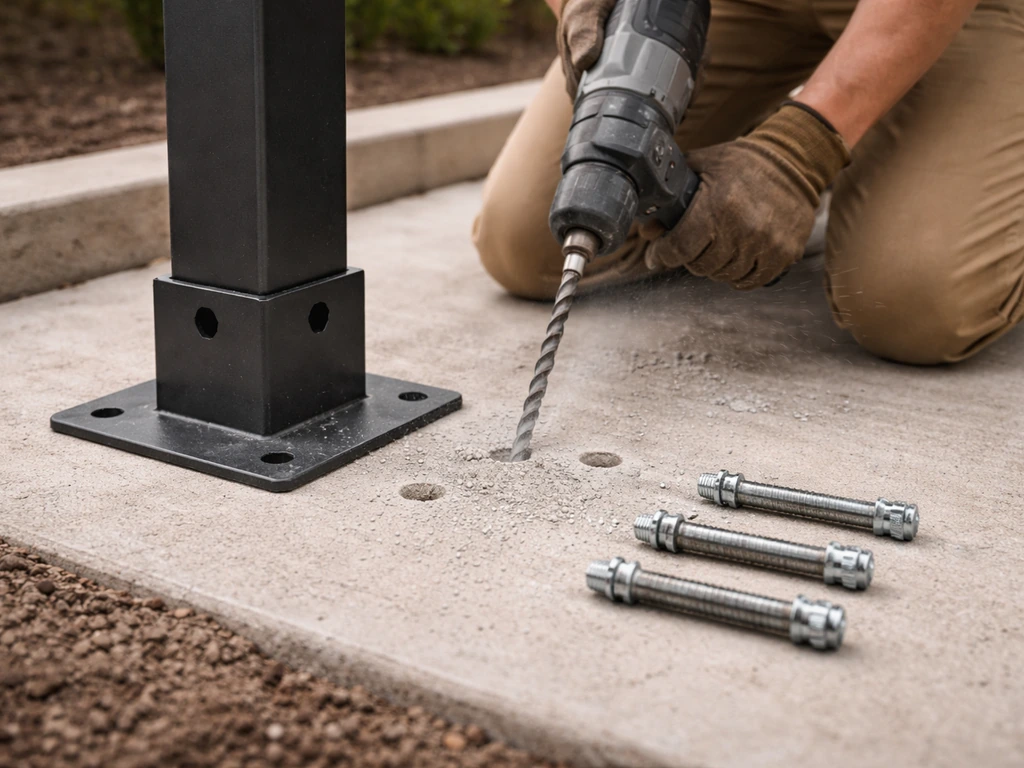
Drill the holes correctly, this step makes or breaks the whole install
Before you drill anything, scan under and through the slab. Use a rebar locator or concrete scanner (rental tool or app-compatible sensor) to check for rebar, post-tension cables, or conduit runs. Hitting rebar with a hammer drill is a bad day. Cutting a post-tension cable is a catastrophic and expensive mistake. If you are unsure, rent the scanner, it takes 10 minutes and costs less than the repair.
Once you are clear to drill, here is the exact process:
- Use a hammer drill, not a standard drill. A regular drill cannot produce the percussive action needed to penetrate concrete efficiently without overheating and damaging the bit.
- Select a carbide-tipped masonry bit sized to match your anchor's required pilot hole diameter. Check the anchor packaging — Titen HD screws and most post base anchors list the exact bit size required.
- Set your drill depth stop (or mark the bit with tape) to drill roughly 1/4 inch to 1/2 inch deeper than the anchor's embedment length. This extra depth gives the anchor tip clearance and ensures the threads fully engage in solid concrete.
- Drill straight down, keeping the bit perpendicular to the slab. Angled holes cause anchor misalignment and reduce holding strength.
- Clear the hole of concrete dust using a hand pump blow-out bulb or compressed air. Blow out, then brush, then blow out again — at least two cycles. Dust is bond-killer for adhesive anchors and reduces friction fit for screw anchors.
If you nick a piece of rebar during drilling and the hole is close enough to use, stop and consult your anchor manufacturer's guidance on minimum edge distance from rebar. In most cases you can proceed, but you may need to reduce the torque spec or shift slightly. If you hit the rebar dead center, plug the hole with hydraulic cement and relocate the mark by an inch or two.
Set the base plates and attach the pergola posts
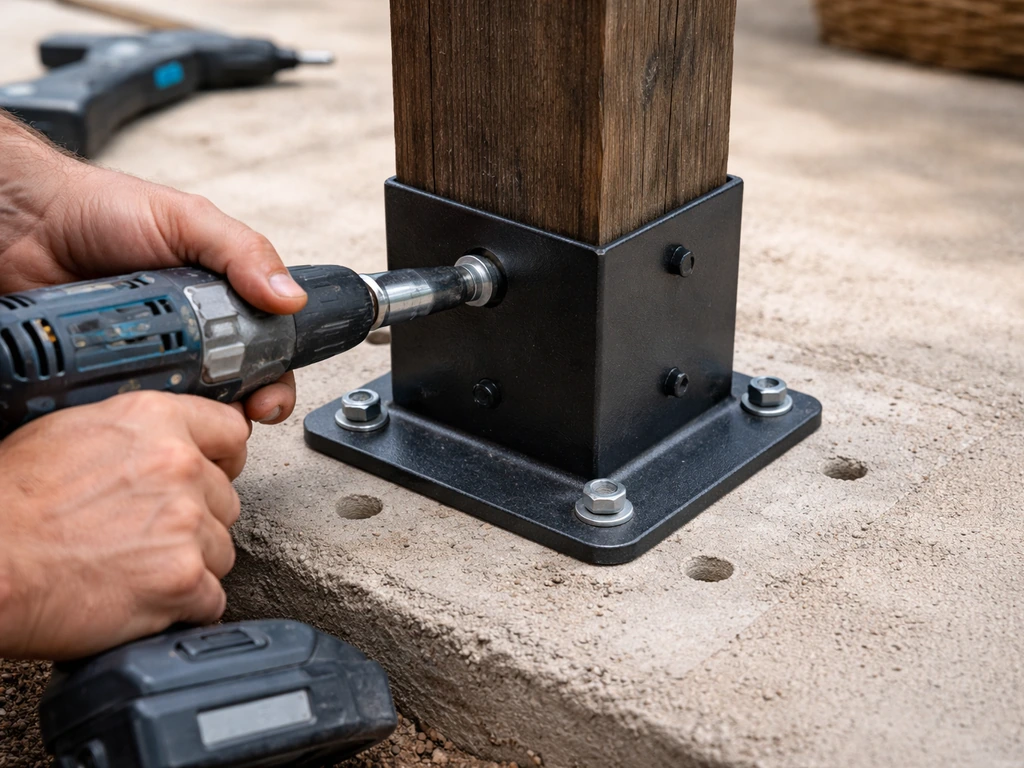
With your holes drilled and cleaned, you are ready to install the brackets and posts. Work one bracket at a time so nothing shifts while you are setting up.
- Position the post base bracket over the drilled holes, aligning the bracket's anchor holes with your pilot holes.
- Insert the concrete screw anchors through the bracket and into the pilot holes by hand first to confirm alignment.
- Drive the anchors with an impact driver or torque wrench set to the manufacturer's spec. Do not overtorque — excess torque can cause the concrete around a shallow hole to crack or the anchor to strip. Most Titen HD screws spec around 40-60 ft-lbs depending on size.
- For adhesive anchors: inject the epoxy into the hole from the bottom up (use the extension nozzle), then slowly insert the threaded rod while rotating it to work out air bubbles. Wait the full cure time listed on the packaging before applying any load — typically 1 to 4 hours depending on temperature.
- Once the bracket is secured, slide your post into the post cup. For 4x4 or 6x6 posts, the post should drop into the bracket with a snug fit.
- Drive the through-bolts or structural screws through the bracket's post holes into the timber post sides per the bracket instructions.
- Repeat for all post locations before you start assembling beams overhead.
One thing worth mentioning: if your patio has a noticeable slope (which most do, for drainage), your post bases need to compensate for it. Adjustable standoff bases like the Simpson ABU are ideal here because they let you set the post plumb even when the bracket plate sits on a slightly tilted surface. If you use a fixed flat base on a sloped slab, shim under the bracket with stainless steel shim stock before setting the anchors to get a level seat.
Check alignment, plumb, and make sure the whole thing is actually stable
Once all four posts are in their brackets, check plumb on both faces of each post with a level before you install any beams. Posts that go in slightly racked are almost impossible to correct once the structure is assembled. A 4-foot level works fine, but a longer one catches subtle lean better.
Brace each post temporarily with 2x4 diagonal braces screwed into the post and staked into the ground (or taped to the slab surface if you cannot stake) while you build the rest of the structure. This keeps things from drifting as you add weight from above.
After the beams and rafters are in place, do a load and sway check. Push firmly against the top of each post column in both directions. There should be minimal flex. Any noticeable rocking means either the bracket anchors did not seat fully, the post is not fully captured in the bracket, or the connection hardware is under-torqued. Address it before adding any roofing material, shade cloth, or plants that add weight and wind resistance. If you want more guidance on attaching a railing, follow the same bracket and anchor principles, but choose hardware rated for the expected lateral loads.
For wind: a standard open-lattice pergola in most residential areas manages fine with properly set post base brackets. But if you are in a high-wind zone (coastal, elevated, or prone to storms), check your local building code. Many jurisdictions require a permit and engineered anchor specs for permanent structures. The added lateral bracing of knee braces or diagonal blocking at the beam-post connection significantly improves wind resistance and is worth including regardless of code requirements.
Mistakes people make and how to fix them
Loose anchors after installation
If an anchor feels loose immediately after setting, the pilot hole is probably too large or was drilled with a worn bit that wandered and oversized the bore. For screw anchors, the only real fix is to move to the next larger anchor size if the bracket's hole pattern allows it, or relocate the bracket slightly and redrill. Do not try to fill and reset in the same hole, it rarely holds.
Slab cracking around the hole
Small surface cracks radiating from the hole are usually caused by over-torquing expansion anchors or drilling too close to the slab edge. Surface cracks that do not go through the slab are mostly cosmetic. Through-cracks that travel to the edge are a real problem and mean the anchor has lost its concrete mass to bear against. In that case you may need to cut out a small section and patch with a high-strength concrete repair mortar, then redrill. Avoid this by respecting edge distances and not cranking expansion anchors past their torque specs.
Posts out of square or misaligned
If your post centers are set but the spacing is off by an inch or two, you have a few options before giving up. An adjustable post base like the Simpson ABU has some lateral adjustment built in, sometimes enough to correct a minor layout error. If the discrepancy is larger, you may need to plug and redrill. This is why layout verification before drilling is the most important step in the whole process.
Post bracket pulling away from the slab over time
This usually means inadequate embedment depth or anchors set in soft, degraded concrete. If your slab surface is visibly spalled, chalky, or the concrete sounds hollow when you tap it, the top layer may not provide solid anchor purchase. In that case, you need to either core through to the solid concrete below and use longer anchors, or pour a small concrete pad on top of the existing slab in the post locations using a bonding agent.
A note on related attachments to concrete
If you are planning to add a railing around your pergola or patio edge, the process for attaching railing posts to concrete follows a very similar anchor-and-bracket approach with a few extra code requirements around post spacing and rail height. The same logic applies if you are anchoring other patio structures or furniture to the slab. Use non-slip rug grippers or an outdoor rug pad rated for concrete to help prevent sliding, then secure the rug edges with anchors designed for hard surfaces other patio structures or furniture. The core skills, drilling with the right bit, cleaning the hole, using a rated bracket, and checking your edge distances, carry over directly across all of those projects.
Similarly, if your pergola design involves attaching a ledger board or wood member directly to the slab surface rather than post-and-bracket framing, the fastening method shares the same fundamentals: hammer drill, carbide bit, clean hole, rated concrete fastener. The same anchor fundamentals apply when you are anchoring patio furniture to concrete, including choosing the right fasteners and drilling and cleaning the holes properly. The bracket-to-post connection is where pergola attachment gets pergola-specific.
Your next steps at a glance
- Measure your slab thickness and confirm post locations meet the 6-inch minimum edge distance rule.
- Choose your post base bracket (Simpson ABU adjustable is a solid default) and match it to the correct anchor type for your load.
- Lay out and verify all post centers with a square and level before making a single hole.
- Scan for rebar and utilities, then drill with a hammer drill and correctly sized carbide bit to the required depth plus 1/4 to 1/2 inch extra.
- Clean every hole thoroughly, set the brackets, drive anchors to spec, and install posts plumb.
- Brace posts temporarily, assemble the structure, then do a load and sway check before finishing.
- Check local permit requirements if the pergola is a permanent structure — many municipalities require one.
FAQ
Can I attach a pergola to a concrete patio using wedge anchors or sleeve anchors instead of post base brackets and concrete screw anchors?
You can, but only if they are part of a tested system that captures the post correctly. Pergolas need both uplift resistance and lateral stiffness. Sleeve and some expansion anchors often require stricter torque control and correct hole size, and they can be unreliable in thin, cracked, or weak concrete, so matching the anchor type to your bracket and slab thickness matters more than the brand name.
How do I know what slab thickness and embedment depth I should plan for?
Start by measuring exposed slab edges or any cutouts around existing footings, then confirm thickness at each post location. Use the anchor manufacturer’s minimum embedment requirement as the controlling spec. If your embedment requirement leaves too little concrete below the drilled hole, the safest fix is longer anchors or a small concrete pad, not “hoping the top layer holds.”
What should I do if the concrete is very old, crumbling at the surface, or sounds hollow?
Don’t anchor into the degraded surface layer. If the slab looks spalled, chalky, or sounds hollow when tapped, you generally need to core to sound concrete and use longer anchors, or build up a properly bonded pad at the post locations. Anchoring into loose surface concrete is a common cause of anchors loosening after a wind event.
Can I reuse the same holes and anchors if I make a layout mistake?
Usually no. For screw anchors and post base bracket systems, the durable approach is relocating the bracket and drilling new holes. Filling and resetting in the same hole often fails because the anchor can’t regain the original concrete mass and confinement. Only consider a repair-and-reanchor plan if the anchor manufacturer specifically approves that scenario.
What if I hit minor rebar when drilling, can I still proceed?
If you only nick rebar and the hole is close enough to meet the manufacturer’s rebar edge distance guidance, you may proceed with adjustments. If you hit dead center or the guidance cannot be met, plug with hydraulic cement and relocate. Continuing without confirming rebar clearance risks weakening the concrete around the anchor.
How tight should I torque the screws or anchors, and how do I avoid cracking the slab?
Use a torque wrench if the fastener instructions provide a torque range, and stop at the specified value. Over-torquing is a frequent reason for radiating surface cracks near the hole. If you see cracks spreading while tightening, stop and reassess hole placement and anchor type before proceeding to the next post.
Do I need to drill a hole-cleaning step for concrete screw anchors too, or is that only for adhesive anchors?
Hole cleaning is most critical for adhesive anchors, but removing dust still helps with screw anchors for consistent bite and holding. At minimum, vacuum or blow out the hole after drilling and before installing the anchor, then check that the anchor seats fully against the bracket as required. If the hole is dusty, the anchor may not develop its rated capacity.
Should I use stainless shims on a sloped patio, and what’s the risk if the posts are not perfectly plumb?
Stainless shims are a good choice because they resist rust staining and deterioration under outdoor moisture cycles. If posts are slightly racked, it usually gets worse once beams and rafters are tightened, and you may not be able to correct it afterward. Level plumb before you install any overhead members is the simplest way to avoid misalignment and overstressing connections.
How much movement is acceptable during the sway check, and when should I stop and fix the connection?
You want minimal flex, meaning the posts should feel firm with no visible rocking at the base when pushed in both directions. If the structure moves noticeably, treat it as a connection issue, under-torqued hardware, or bracket not seated correctly, and fix it before adding roof material or adding plants that increase wind resistance and sail area.
Is it safe to install a pergola on a patio slab without any diagonal bracing or knee braces?
Often it can work for light, open-lattice designs in moderate wind areas, but it is not the universal rule. If your location is high-wind or your pergola has a solid roof, more bracing is usually required to reduce lateral sway and uplift loads. Check local code and consider diagonal blocking at beam-to-post connections for added safety.
What should I do if my anchor feels loose right after installation?
A loose feel usually indicates an oversized hole, worn drill bit, or drilling too far from the intended location. For screw anchors, the practical fix is moving to the next larger anchor size if the bracket hole pattern allows it, or relocating the bracket and redrilling. Filling and resetting into the same hole is typically not reliable.