
You can build a covered patio on an existing concrete slab, and for most homeowners this is one of the most rewarding weekend-to-weekend projects you can tackle. The slab you already have does most of the foundation work for you. What you're really building is a post-and-beam roof structure anchored into that concrete, connected either to your house (attached) or standing on its own (freestanding). Done right, it adds usable outdoor living space, protects your furniture and family from sun and rain, and can increase your home's value. This guide walks you through every stage: assessing your slab, pulling permits, choosing a design, anchoring posts into concrete, framing, roofing, and finishing details. For a detailed step-by-step walkthrough on how to build a patio cover on concrete, see our full how-to guide. I'll also be straight with you about where the line is between a confident DIY job and one that needs a structural engineer or licensed contractor.
How to Build a Covered Patio on Concrete Slab, Step-by-Step Guide

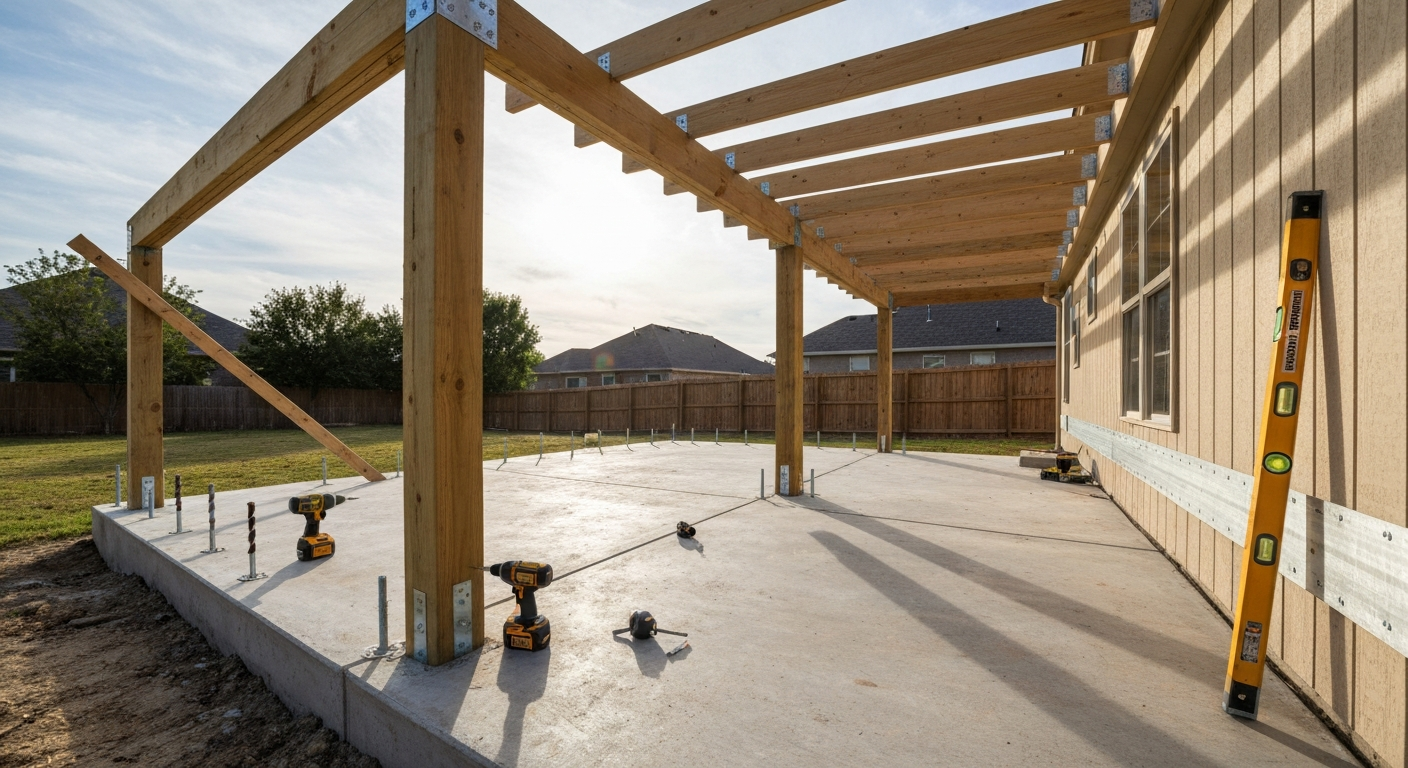
What this guide covers and why safety comes first
This isn't a decorative project. A covered patio is a structural addition to your property, and it has to handle wind uplift, rain, and in some climates, significant snow loads. Structural failures on patio covers are rare when they're built correctly, but they are catastrophic when they go wrong. I've seen photos of covers that pulled ledgers right off house walls and covers that collapsed because post bases were attached with the wrong anchors. So before we talk about lumber or roofing, we talk about doing this safely and to code. Throughout this guide I'll flag the steps where you should slow down, double-check your work, or get a professional set of eyes on the plan. The goal is a structure you're genuinely proud of, not one you're worried about every time a storm rolls through.
Quick project overview: attached vs. freestanding and common roof types
Before anything else, you need to decide on the basic format of your cover. Every decision that follows, from permits to lumber sizes to anchoring method, flows out of this one choice.
Attached vs. freestanding
An attached cover connects directly to your house, usually through a ledger board bolted to the rim joist or wall framing. This is the most common choice because it uses the house as one of the support points, which means fewer posts and a cleaner look. The tradeoff is that you're now connecting a roof to your house, which creates waterproofing obligations (flashing) and almost always triggers a building permit. A freestanding cover stands entirely on its own posts. It's a bit more work structurally because all four (or more) sides need posts, but it's independent of your house, easier to waterproof, and in many jurisdictions falls below the permit threshold if it's open lattice and under a certain square footage. I'll explain those thresholds in the permits section.
Common cover types
| Cover Type | Description | Best For | Permit Likelihood |
|---|---|---|---|
| Solid roof (shingles or metal) | Full weather protection, matches house roof | Rainy climates, year-round use | Almost always required |
| Polycarbonate panels | Translucent, lets light in while blocking rain | Sunbelt climates, garden-adjacent patios | Usually required |
| Pergola (open lattice) | Shade only, no rain protection | Mild climates, aesthetics | Often exempt under sq ft threshold |
| Gazebo | Freestanding, often octagonal, self-contained roof | Focal point, smaller patios | Varies by size and jurisdiction |
| Retractable awning | Fabric cover, motorized or manual | Renters, minimal construction | Rarely required |
If you're interested in the open pergola or gazebo routes specifically, those deserve their own deep dives because the framing geometry and anchoring details differ from a solid-roof attached cover. This guide focuses primarily on the attached or freestanding solid-roof cover since that's the most involved and most common project, but the slab assessment, permitting, and anchoring sections apply to all types. For pergolas and gazebos on a concrete slab, the anchoring principles covered here are directly relevant.
Is your existing concrete slab actually suitable?
This is the question most homeowners skip, and it's the one that can derail the whole project. Not every concrete slab is ready to support a patio cover structure. The good news is that most residential patios poured in the last 30 to 40 years to a reasonable standard will pass. But you need to confirm that before you buy a single 2x6. There are three scenarios: your slab is solid and ready to go, your slab needs some repairs before you build, or your slab has problems serious enough that you need to address the concrete first. The assessment in the next section tells you which scenario you're in.
One specific code threshold worth knowing right now: the IRC (Section R506) sets the minimum residential slab-on-grade thickness at 3.5 inches (89mm). IRC R506 (Concrete Floors on Ground) sets the minimum slab‑on‑grade thickness at 3½ inches (89 mm) and specifies base, vapor retarder, and reinforcement requirements that many jurisdictions use when accepting a slab for post bearing Section R506 — Concrete Floors (on ground) / minimum 3½" slab — International Residential Code (IRC). Several municipalities, San Diego being a well-documented example, use this as the benchmark when allowing posts to bear directly on a slab, and some limit post loads to 750 pounds or less in that scenario. If your slab is thinner than 3.5 inches, or if your post loads are expected to be heavy, you may need isolated footings drilled or poured through the slab. That's more work, but it's not a project killer.
Assessing the slab: what to check before you design anything
Grab a notepad and spend 20 minutes doing a proper inspection of your slab. You're looking at five things: thickness, flatness, cracks, drainage, and surface condition.
Thickness
If you don't have construction records, you can core drill a small test hole (or look for an exposed edge at a step or expansion joint) to measure. The 3.5-inch minimum is the floor. Most residential patios poured to code are 3.5 to 4 inches. If you find 3 inches or less, plan for through-slab footings at your post locations rather than surface-mounted post bases.
Flatness
Lay a 6-foot level across the slab in multiple directions. Minor settlement of a quarter inch over 6 feet is common and manageable. Post bases can be shimmed, and trim cuts adjust for minor slope. What you're looking for is severe heaving or differential settlement of an inch or more, which can indicate active soil movement underneath. If you find that, get a concrete contractor to assess the subgrade before you build on top of it.
Cracks
Hairline cracks less than 1/16 inch wide and not growing are normal shrinkage cracks. They don't affect structural capacity for light post loads. Wider cracks, cracks with vertical displacement (one side higher than the other), or cracks that run through your intended post anchor locations are a different matter. Active cracks or those with displacement should be investigated further. For anchor placement, ACI guidance and anchor manufacturer instructions (Hilti, Simpson) explicitly note that adhesive anchor capacity is reduced in cracked concrete, so choose mechanical expansion anchors or adjust your anchor location away from cracks when possible.
Drainage
Your patio slab should slope away from the house at roughly 1/8 to 1/4 inch per foot. Once you put a roof over it, you're concentrating roof runoff onto the slab and redirecting it. Make sure the slope still carries water away from the foundation. If ponding is already a problem on your bare slab, adding a roof without addressing drainage will make it worse.
Surface condition
Spalling, scaling, or soft friable concrete at the surface matters most at your anchor locations. If the top 1/4 to 1/2 inch is crumbling or delaminating, a wedge anchor drilled into that zone won't have reliable holding strength. Repair spalled areas with a concrete patching compound before drilling. If you're planning to refinish the slab surface (stain, overlay, sealer) after the cover is up, now is the time to note what prep work that will require. If you plan to add a fire pit on the slab, see our guide on how to build a fire pit on a concrete patio for safe placement, heat-protection, and anchoring considerations.
Permits, local codes, and structural load requirements
I'm going to be direct here: most attached patio covers require a building permit, and skipping it is not worth the risk. Unpermitted structures can block home sales, trigger fines, and leave you liable if the structure fails and injures someone. The permit process also forces you to think through your design properly, which is genuinely useful.
What municipalities typically require
Based on published guidance from building departments including Los Angeles LADBS and the City of Rocklin, a typical patio cover permit submittal includes a site or plot plan showing property lines and setbacks, a floor and roof framing plan, elevations, and details for ledger or post anchorage and flashing. The Los Angeles Department of Building and Safety's Information Bulletin (Attached Patio Cover) lists site/plot plans, floor and roof framing plans, elevations, and ledger/post anchorage and flashing details as typical permit submittal items Information Bulletin (Attached Patio Cover) — Los Angeles Department of Building and Safety (LADBS). Some cities provide standard patio cover detail sheets you can use instead of custom structural drawings, which saves you money. Many cities also set a permit-exempt threshold for freestanding open lattice structures under a certain square footage. Check your specific municipality before assuming you're exempt.
Load requirements: what your structure needs to handle
The International Residential Code (IRC Section R301) requires that all structures safely support dead loads (the weight of the structure itself), live loads (people, equipment), roof live loads or ground snow loads (whichever is greater), and wind loads, with a complete load path from roof to foundation. For your patio cover, this means your rafters, beams, posts, and anchors all need to be sized to handle these forces in combination. The IRC and American Wood Council (AWC) span tables give prescriptive rafter and beam sizes for common lumber species, spacings, and load assumptions. Use these tables to size your members without custom engineering, as long as your spans and loads fall within their range. If your design involves long spans, heavy snow loads, or unusual geometry, the code requires stamped calculations from a licensed engineer. Most standard residential patio covers in moderate climates fit comfortably within the prescriptive tables.
Wind uplift is the load most DIYers underestimate. In high-wind areas, the force trying to lift your roof off its posts can exceed the downward gravity loads. This is why post base selection, anchor embedment depth, and connection hardware all matter. Use local basic wind speed values from the ASCE 7 hazard tool or your local code tables when selecting post base hardware and verifying anchor capacity.
A note on rafter tail attachments
Some homeowners want to attach their patio cover ledger to existing rafter tails projecting from the house eave. Several California municipalities explicitly prohibit this unless a licensed engineer provides structural calculations justifying the attachment. Rafter tails are not designed to carry the combined loads of a new roof structure. Attach your ledger to the house rim joist, band joist, or wall framing instead, and verify the connection point with a structural engineer if you have any doubt.
Design decisions: size, pitch, attachment, and look
With your slab assessed and permit requirements understood, you can design the cover itself. These are the decisions that determine how much you'll spend, how long it will take, and whether you'll be happy with it in five years.
Size and setbacks
Your patio cover cannot extend past your setback lines, even if your concrete slab does. Check your property's setback requirements before finalizing dimensions. In most residential zones, side and rear setbacks for accessory structures range from 3 to 5 feet, but this varies widely. Measure your available footprint after subtracting setbacks, then design within that envelope.
Roof pitch
A minimum 3:12 pitch (3 inches of rise per 12 inches of run) is the typical minimum for asphalt shingles. Metal roofing can go as low as 1:12 or even lower with the right panel profile and sealant. Polycarbonate panels generally need at least 2:12 for drainage. Low pitch covers that shed poorly become ponds and rot quickly. I'd recommend 4:12 as a solid general target for a solid-roof cover: it sheds water well, is easy to frame, and doesn't create an awkward visual height at the low end.
Attachment location on the house
For an attached cover, your ledger needs to land on solid structural material: the rim joist, a double top plate, or the wall framing. Avoid attaching through stucco or EIFS cladding without proper flashing and backing verification. The ledger height determines your roof pitch and your finished ceiling height at the house wall. A common target is 8 to 9 feet of clearance at the low (outer) end of the roof, which means your ledger height depends on your span and chosen pitch.
Aesthetics and matching the house
The best-looking patio covers pick up details from the house: matching fascia profile, same roofing material, similar column style. This isn't just cosmetic, it often helps with permit approvals in design-review jurisdictions. If your house has 5-inch exposure cedar siding and a 6:12 gabled roof, a flat-roofed cover with smooth white columns is going to look like an afterthought. Spend some time with a sketch or a free design tool before committing.
Materials overview
Here's what you'll be buying and why each category matters.
Lumber
For exterior structural use, choose pressure-treated lumber (PT) for any members in contact with concrete or within 6 inches of grade. Use #2 or better Douglas Fir, Southern Yellow Pine, or Hem-Fir for rafters and beams. PT lumber rated for ground contact (UC4B or UC4A) is required for posts. If you want a finished look, wrap or sleeve PT posts in cedar or PVC trim after framing. Always size your rafters and beams using the AWC span tables or your local prescriptive tables, not guesswork.
Fasteners and connectors
All exterior hardware must be corrosion-protected. Simpson Strong-Tie and similar manufacturers make post bases, joist hangers, rafter ties, and hurricane ties rated for exterior and PT-lumber contact. Use hot-dipped galvanized (HDG) or stainless steel fasteners. Standard zinc-plated screws will rust within a few seasons in outdoor conditions. Use structural screws or through-bolts (not toe-nails alone) for primary connections.
Post bases and concrete anchors
This is where the patio cover connects to your existing slab, and it's the most critical material selection in the project. You have three main options: mechanical expansion anchors (wedge anchors), screw anchors, and adhesive anchors (epoxy and threaded rod in a core-drilled hole). Each has a specific use case.
| Anchor Type | Best For | Notes |
|---|---|---|
| Mechanical wedge anchor | Standard post base installation in sound concrete away from edges | Install per manufacturer torque specs; keep minimum edge distance (usually 1.75x anchor diameter) |
| Concrete screw anchor (e.g., Tapcon heavy) | Light-duty post bases, non-critical attachments | Lower capacity than wedge anchors; not for primary structural posts |
| Adhesive/epoxy anchor (e.g., Hilti HIT-HY 200) | Higher tensile loads, cracked concrete, close edge distances | Core drill, clean hole per manufacturer, inject adhesive, insert rod, wait full cure time before loading |
| Through-bolt to embedded plate | New slabs or slabs with existing embedded hardware | Highest capacity; requires access to underside or pre-installed insert |
Adhesive anchors like the Hilti HIT-HY 200 are particularly useful where you're working near a slab edge or in concrete with existing cracks, because the epoxy distributes load more broadly than a wedge anchor. Always follow the manufacturer's ICC-ES-listed installation procedure exactly: use the listed bit diameter, brush and blow the hole clean, inject from the bottom up to avoid air voids, insert the rod with a turning motion, and do not apply any load until the full cure time has elapsed. Cure time varies by temperature, from as short as 4 hours at 70°F to 24 hours or more in cold weather.
Simpson Strong-Tie's post base catalog and Hilti's anchor selection tools both provide load tables that help you match the anchor to the post base and load conditions. Use these, not generic rules of thumb. Anchor capacity depends heavily on concrete compressive strength, effective embedment depth, edge distance, and spacing, and published ultimate values need to be reduced to allowable design values using the manufacturer's safety factors.
Ledger board and flashing
For an attached cover, the ledger is a horizontal PT lumber member (typically 2x8 or 2x10 matching your rafter depth) through-bolted to the house framing. Proper flashing is non-negotiable. Water that gets behind a ledger will rot the house rim joist within a few seasons. Use self-adhering waterproof membrane (like Grace Vycor or equivalent) behind the ledger, step flashing at the top, and counter-flashing if attaching below a cladding line. Your building inspector will look at this detail closely.
Roofing materials
Match your roofing to your pitch. Asphalt shingles (minimum 3:12), metal panels (1:12 or greater), polycarbonate corrugated or standing seam panels (2:12 or greater). For a patio cover that blends with the house, asphalt shingles are the easiest aesthetic match. Metal is lighter, more durable, and better for low pitches. Solid polycarbonate lets light through but traps heat in summer unless you choose a solar-control tinted panel.
Finishing materials
Plan for fascia boards, soffit material (if you're boxing in the underside), gutters and downspouts, and any ceiling finish you want (tongue-and-groove cedar is popular). Lighting rough-in, if you want it, happens during framing before the ceiling goes up. Exterior-rated recessed lights or string-light blocking are the two most common choices.
Tools checklist and cost planning
Tools you'll need
- Rotary hammer drill with SDS bits (sized for your anchor diameter, typically 1/2 inch or 5/8 inch)
- Standard cordless drill and impact driver
- Circular saw and miter saw
- Chalk line and speed square
- 4-foot and 6-foot levels
- Post level (two-way bubble level that clamps to a post)
- Tape measure and framing square
- Wrench set and socket set for anchor bolts
- Caulk gun (for adhesive anchor injection cartridges)
- Safety glasses, hearing protection, and dust mask (concrete drilling produces silica dust, use an N95 or better)
- Ladder and/or scaffolding rated for your working height
- Reciprocating saw for trimming rafters in place
- Pry bar and hammer
The rotary hammer drill is the one tool most homeowners don't own and most need to rent. A standard drill will not reliably drill into concrete for structural anchors. Rent a good-quality SDS rotary hammer from your local tool rental store for a day or a weekend. It makes the anchor installation dramatically faster and produces cleaner holes. For a step-by-step visual walkthrough, look up how to build a concrete patio YouTube videos, many builders post clear tutorials you can follow alongside this guide.
Cost planning framework
Patio cover costs vary enormously by size, material choice, and region, but a realistic framework helps you budget before you price anything out. For a 12x16 foot attached cover with a solid roof, here's how the budget typically breaks down.
| Cost Category | Typical DIY Range | Notes |
|---|---|---|
| Permit fee | $150–$600 | Varies widely by jurisdiction and project value |
| Lumber (framing) | $800–$1,800 | Depends on span, species, and PT requirements |
| Hardware and connectors | $200–$500 | Post bases, joist hangers, structural screws, anchors |
| Roofing materials | $300–$1,200 | Shingles and underlayment on low end; metal panels on high end |
| Ledger and flashing | $100–$300 | PT lumber, waterproof membrane, step flashing, counter-flashing |
| Posts and post bases | $150–$400 | Pressure-treated 6x6 posts and Simpson-style bases |
| Fascia, soffit, and trim | $200–$600 | Cedar or PVC trim, soffit material |
| Gutters and downspouts | $100–$400 | DIY aluminum sectional gutters |
| Finishing (ceiling, lighting) | $200–$800 | T&G cedar ceiling and exterior lighting fixtures |
| Tool rental | $50–$150 | Rotary hammer drill, scaffolding if needed |
| Total DIY materials estimate | $2,300–$6,750 | Labor savings vs. contractor: $4,000–$12,000+ |
The single biggest cost variable is roofing material choice. Going from standard asphalt shingles to standing seam metal can add $800 to $1,500 to a 200 square foot roof. The second biggest is finishing: a basic open-rafter ceiling costs almost nothing, while a full tongue-and-groove cedar soffit with recessed lighting can add $1,000 or more. Decide on your finish level before you budget, not after.
When to hire a pro (or at least consult one)
Most homeowners with basic carpentry skills can build a standard attached patio cover. But there are specific situations where you need professional help. If your slab is thinner than 3.5 inches and you're unsure whether it can carry post loads, get a structural engineer to review it. If your design involves spans over 14 feet, heavy snow loads, or a high-wind zone, the IRC requires stamped engineering calculations, and you should get them. If you're attaching to a house with stucco, EIFS, or a complex roof intersection, have a waterproofing or roofing contractor do the ledger flashing. Electrical rough-in inside the cover structure needs to be done by a licensed electrician in most jurisdictions. And if the permit process in your area requires full plan review and the building department wants details you're not sure about, a few hundred dollars for a consultation with a local structural engineer is money well spent.
FAQ
Do I need a permit to build a covered patio on an existing concrete slab?
Most jurisdictions require a building permit for attached patio covers and often for freestanding covers above certain sizes. Permit submittals typically include a site/plot plan (setbacks), roof/framing plans, elevations, and details for ledger or post anchorage and flashing. Check your local building department checklist — some small, open or freestanding structures may be exempt under local square‑foot limits.
How do I know if the existing slab can support posts or an attached ledger?
Begin with a visual inspection for thickness, cracks, spalling and evidence of settling. Verify slab thickness and reinforcement (R506 requires a minimum 3½" slab on grade). Many jurisdictions allow limited column loads on thin slabs only (examples: ≤750 lb on 3½" slab). If loads or slab condition are uncertain, have a structural engineer or local building inspector evaluate the slab and confirm whether footings or core‑drilled anchored connections are required.
Should I build an attached or freestanding cover? Pros and cons?
Attached cover: saves space, can tie into house roof for a more finished look, may be less expensive. However, it requires proper ledger flashing and strong attachment to the house (inspectors commonly prohibit fastening to rafter tails without engineered calculations) and may need more stringent permits. Freestanding cover: simpler connections to the slab (post bases), fewer concerns about house waterproofing, and often easier to meet code for lateral/load path. It generally requires slightly more material and footprint but can avoid risky ledger details.
What are the common methods to anchor posts to hardened concrete?
Three standard methods: 1) Engineered post bases (Simpson‑style) secured with post‑installed anchors (wedge anchors, sleeve anchors) per manufacturer instructions; 2) Core‑drill + adhesive (chemical) anchors with threaded rod where higher tensile capacity or cracked concrete conditions exist — follow adhesive manufacturer cleaning and cure procedures; 3) Through‑bolting to embedded hardware or new cast‑in anchors (best during pour). Use ICC‑ES/ACI guidance and manufacturer capacity tables to select anchor type, embedment depth and spacing.
How do I size posts, beams and rafters without custom engineering?
Use the American Wood Council (AWC) span tables or AWC span calculator. These prescriptive tables account for common lumber species/grades, spacings and typical loads and give allowable spans for joists, rafters and beams. If your geometry, snow loads, spans or member sizes exceed the prescriptive table limits, you must use engineered (stamped) calculations by a licensed engineer.
What loads must I account for when designing a patio roof?
Design must account for dead load plus roof live/snow load (use the greater), wind loads (including uplift, per IRC/ASCE 7), and seismic/LRFD where applicable. The IRC requires a complete load path to the foundation. Use local wind speeds, exposure categories and ground‑snow values when checking uplift and lateral forces.