Yes, you can absolutely build a pergola on an existing concrete patio, and it's one of the more satisfying DIY upgrades you can do for your outdoor space. The key is getting the post anchors right. Everything else, the beams, the rafters, any roofing you add, is just carpentry. But if your posts aren't solidly fastened to that concrete slab, the whole structure becomes a liability. This guide walks you through the full process from planning and prep all the way to finishing and maintenance, so you end up with something that's safe, level, and built to last.
How to Build a Pergola on a Concrete Patio

Silas Morrison
5 Jul 2026
Can you mount a pergola to a concrete patio (and what makes it tricky)
Mounting a pergola to concrete is completely doable, but it's different from anchoring into soil or a wood deck. You can't just drive stakes or lag into a joist. You're fastening into a rigid, brittle material that can crack, spall, or crumble around an anchor if the installation geometry is wrong. The two main risks are drilling too close to the slab edge (which causes the concrete to break out around the anchor) and failing to clean the hole properly before setting an adhesive anchor (which leads to poor bond strength and eventual failure). Both of these are easy to avoid once you know they exist.
The other tricky part is that concrete patios vary a lot. Some are 3.5 inches thick, some are 5 or 6 inches. Some have rebar, some don't. Some are perfectly level, others have settled or cracked over the years. All of that affects which anchoring method you use and how you prep the surface. The good news is that with the right hardware and a few careful measurements, you can get a rock-solid connection without hiring a structural engineer for a standard residential pergola.
One more thing worth mentioning: a covered pergola (one with actual roof panels) introduces wind load considerations that an open-frame pergola doesn't. If you're in a high-wind region or adding a solid roof, your local building department may require a permit and may want to see that your anchor design meets wind resistance requirements tied to ASCE 7 wind speed maps. That's not meant to scare you off, it's just worth knowing before you start drilling.
Planning: measurements, layout, permits, and open vs. covered design
Before you buy a single board, spend 30 minutes with a tape measure and a sketch pad. Your planning decisions here will save you hours of frustration later.
Size and layout basics
A standard freestanding pergola uses four posts. Measure the usable area of your patio and decide how much of it you want shaded. Common sizes run from 10x10 feet up to 16x20 feet for a DIY build. Leave at least 18 to 24 inches of clearance from any slab edge to your post centers. This is important for two reasons: it keeps you in the safe zone for anchor edge distance (more on that in the tools section), and it keeps the structure from looking like it's tipping off the edge of your patio.
If you're building an attached pergola, one side fastens to the house ledger and the other two posts sit on the concrete. The ledger attachment to your house is a separate structural concern, but the concrete side follows the same anchoring logic as a freestanding build.
Permits: when you need one and when you probably don't
Most municipalities require a permit for any structure over 200 square feet, any attached structure, or any covered structure with a solid roof. An open-frame pergola under 200 square feet on a freestanding patio often falls below the permit threshold, but don't assume that's true where you live. Call your local building department or check their website before you start. If you're adding roof panels that create a full overhead cover, treat it like a patio cover from a permitting standpoint, because that's essentially what it becomes.
Open vs. covered: which design fits your needs
An open pergola (just posts, beams, and rafters with gaps between them) is simpler, cheaper, lighter, and usually permit-free. It gives you shade without full coverage and puts less structural demand on your anchors. A covered pergola with polycarbonate or metal roofing gives you rain protection, but it adds weight, wind load, and drainage responsibilities. If rain protection is the goal and you want the full covered look, the building process for a patio cover on a concrete slab follows a similar anchoring approach but with more attention to roofing details. This same approach is what you follow when you’re figuring out how to build a patio cover on concrete, not just a pergola.
Tools, materials, and anchor options for concrete mounting
Tools you'll need
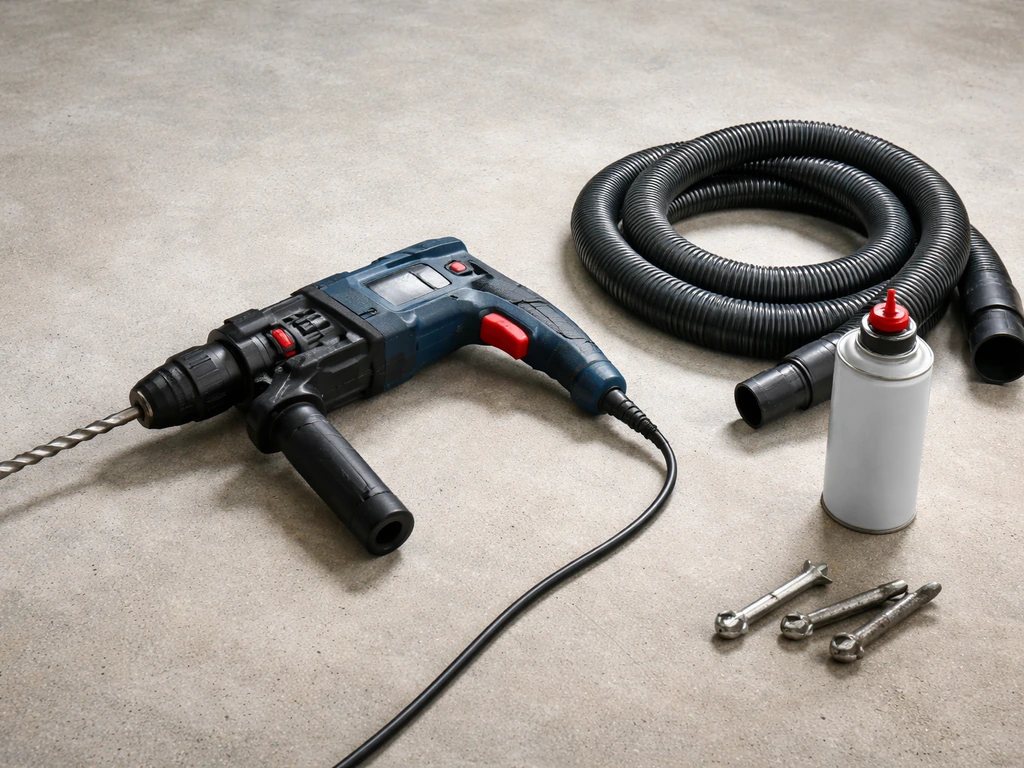
- Rotary hammer drill (not just a standard drill) with SDS-plus carbide bits sized to your anchors
- Vacuum or dust extraction attachment and a can of oil-free compressed air for hole cleaning
- Wire brush sized to the anchor hole diameter
- 4-foot level and a long laser level or string line
- Tape measure (at least 25 feet) and chalk line
- Speed square and framing square
- Circular saw or miter saw for lumber cuts
- Socket wrench or impact driver for tightening anchor hardware
- Post hole template or a simple piece of plywood for consistent post base drilling layout
- Safety glasses, hearing protection, and dust mask rated for concrete dust
Materials list
- Pressure-treated 6x6 posts (or 4x4 for lighter designs) rated for ground contact
- Pressure-treated or cedar/redwood beams and rafters (size depends on span)
- Post base connectors with standoff/air gap design (Simpson Strong-Tie ABA or similar)
- Concrete anchors (sleeve anchors, wedge anchors, or adhesive anchors, see below)
- Hot-dipped galvanized or stainless steel hardware (bolts, joist hangers, post caps)
- Flashing barrier tape for wood-to-metal contact points
- Exterior wood sealer or stain
- Optional: polycarbonate roof panels, metal roofing, flashing, and gutter hardware
Choosing your concrete anchor type
This is the decision that matters most for a long-lasting installation. Here are the three anchor types most commonly used for pergola post bases on concrete patios:
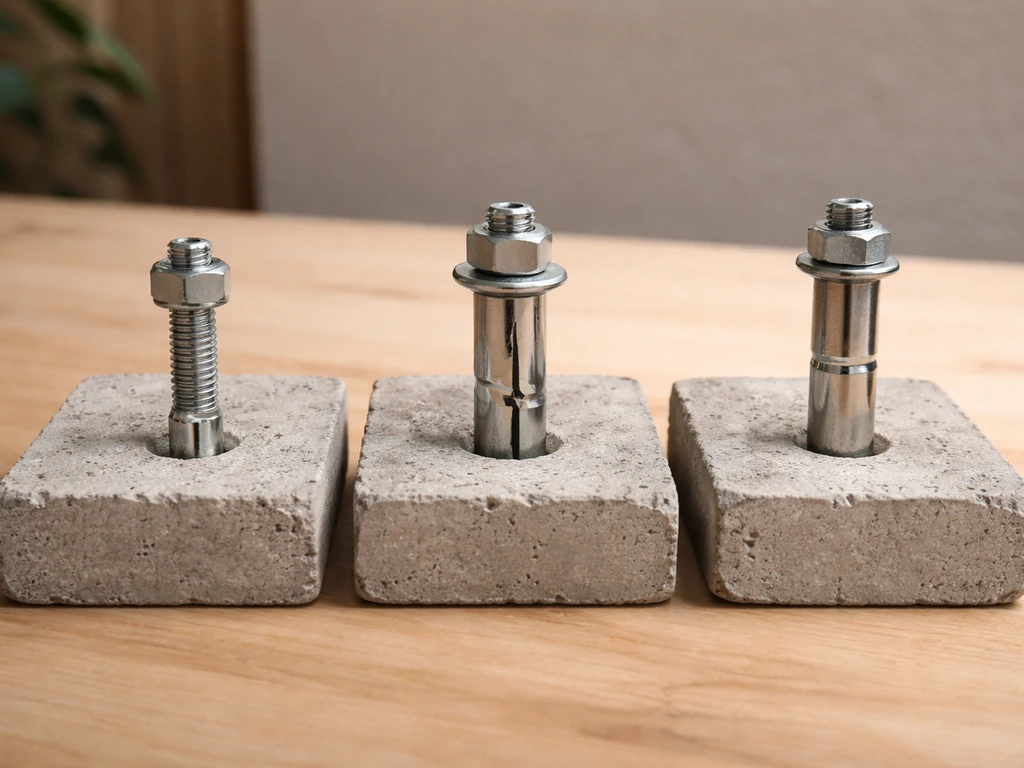
| Anchor Type | How It Works | Best For | Watch Out For |
|---|---|---|---|
| Wedge anchor | Expansion clip grabs concrete as you torque the nut | Solid, uncracked concrete 4" or thicker | Over-drilling hole diameter makes it too loose to grip properly; must be exact |
| Sleeve anchor | Sleeve expands around a bolt as it's tightened | Medium-duty loads, 3.5"+ thick slabs | Minimum embedment must be met; drill hole 1/2" deeper than anchor length to allow debris clearance |
| Adhesive anchor (epoxy) | Threaded rod set in epoxy fills the hole for a chemical bond | Thinner slabs, cracked concrete, high-load situations | Hole cleaning is critical; inadequate vacuuming and blowing leads to poor bond and failure risk |
For most residential pergolas on a standard 4-inch patio slab, sleeve anchors or wedge anchors with 3/8-inch or 1/2-inch diameter hardware get the job done. If your slab is thinner, cracked, or you're in a high-wind area, go with a quality adhesive anchor system. Whatever you choose, follow the manufacturer's embedment depth, edge distance, and spacing specs. These aren't suggestions, they're what allows the anchor to actually achieve its rated load capacity per ACI 318 anchor design provisions.
Prep the concrete patio before you drill anything
I've seen people skip this step entirely and regret it later. A few minutes of assessment and prep work now prevents anchor failures and corrosion problems down the road. You can use the same concrete-anchoring principles when planning how to build a fire pit on a concrete patio.
Inspect the slab condition
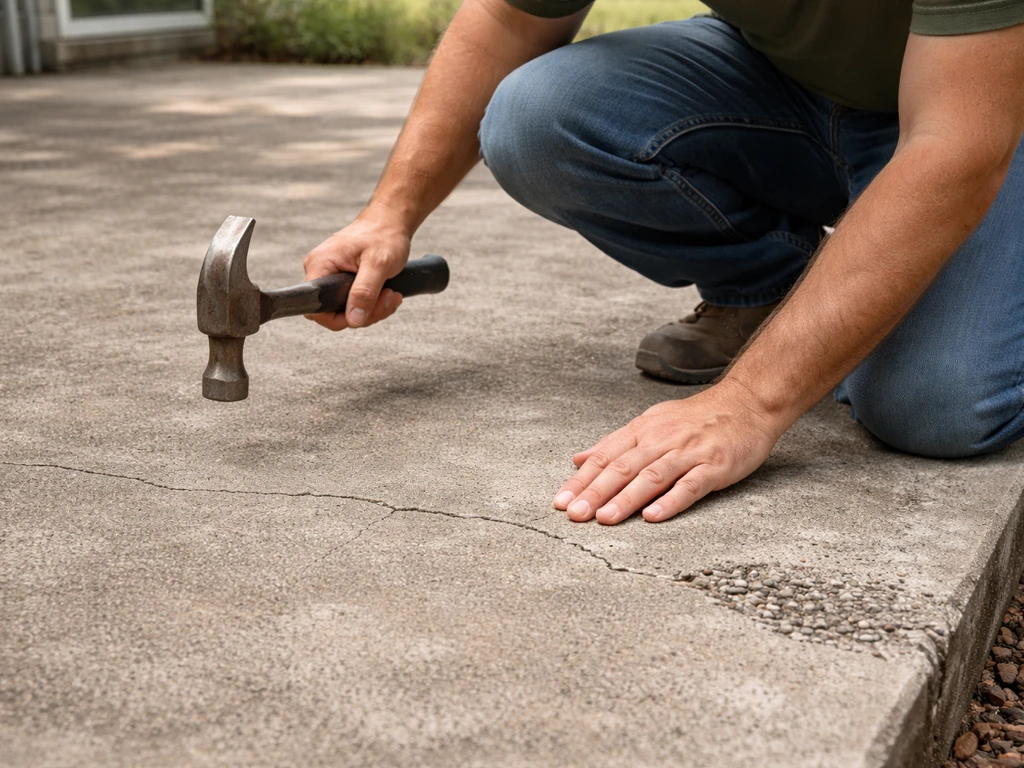
Walk the entire patio and look for cracks, spalling (surface flaking), soft spots, or areas that sound hollow when you tap them with a hammer. Hairline cracks that don't move are usually fine to drill through, but avoid placing an anchor within 2 to 3 inches of any crack. Larger or active cracks that widen and narrow seasonally are a problem near anchor points. If you spot powdery white deposits (efflorescence) on the surface, that tells you moisture is migrating through the slab, which matters for corrosion protection at your anchor points.
If you have cracks wider than about 1/8 inch near your planned post locations, repair them with epoxy injection before drilling. The key is that the crack and surrounding concrete must be dry for epoxy to bond properly. ACI 503.7 discusses crack repair and epoxy-related concepts, noting that epoxy/sealer performance depends on appropriate concrete surface and condition The key is that the crack and surrounding concrete must be dry for epoxy to bond properly.. For cracks that go completely through the slab with no way to seal the backside, standard epoxy injection may not be the right fix and you'd want to either relocate your post position or consult a concrete contractor.
Check for level
Lay a long level or use a water level across your planned post locations. A concrete patio that slopes for drainage (typically 1/8 inch per foot away from the house) is normal and fine. But if one corner is more than an inch lower than another over a 12-foot span, you'll need to account for that when cutting post heights. You're not trying to level the slab, you're just documenting what you're working with so your posts end up at consistent heights.
Clean the surface
Sweep and pressure wash the areas where your post bases will sit. Loose dirt, oil stains, and algae on the surface won't affect anchor performance much, but they can interfere with how the post base sits flat and how well you can read your layout marks. A clean slab is also easier to mark with chalk line and pencil.
Step-by-step build: set post locations, drill, anchor, then build up
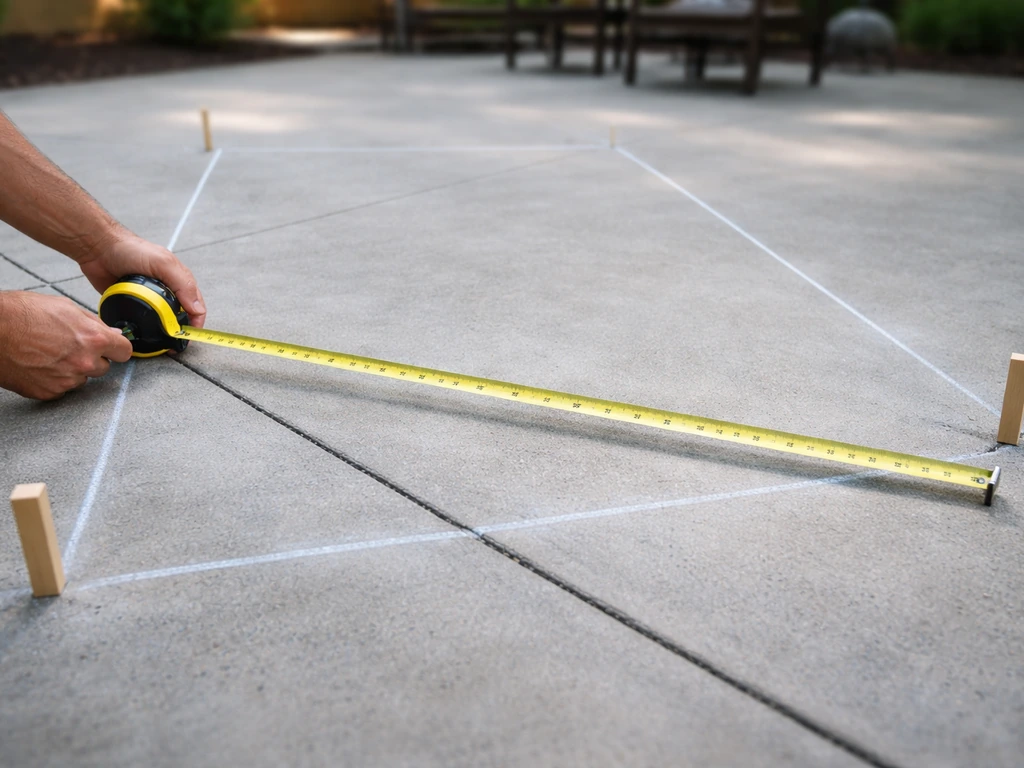
Step 1: Lay out your post locations
Start from a reference point, usually an outer corner of the patio or the house wall. Measure and mark the center of each post base location. For a four-post pergola, you'll have four marks. Once they're marked, verify the layout is square using the 3-4-5 method: measure 3 feet along one side, 4 feet along the adjacent side, and the diagonal between those two points should be exactly 5 feet if the corner is a true right angle. For larger pergolas, scale it up (6-8-10 or 9-12-15) for more accuracy. A second check is measuring both diagonals of the full layout rectangle: if the diagonal from post 1 to post 3 equals the diagonal from post 2 to post 4, you're square.
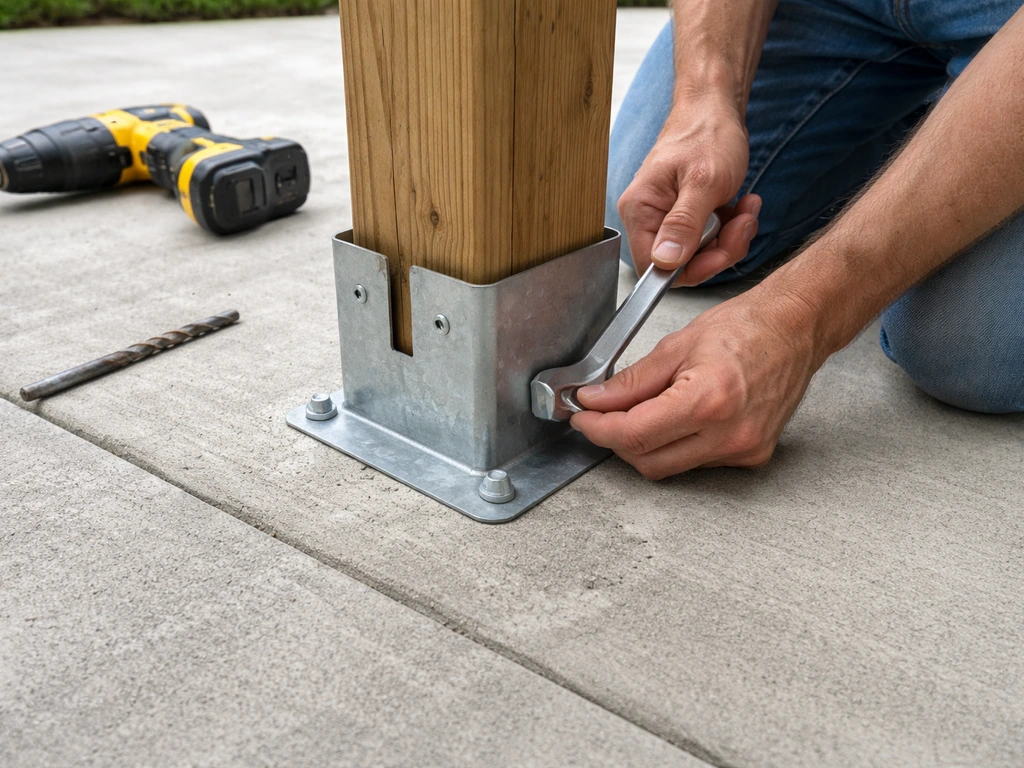
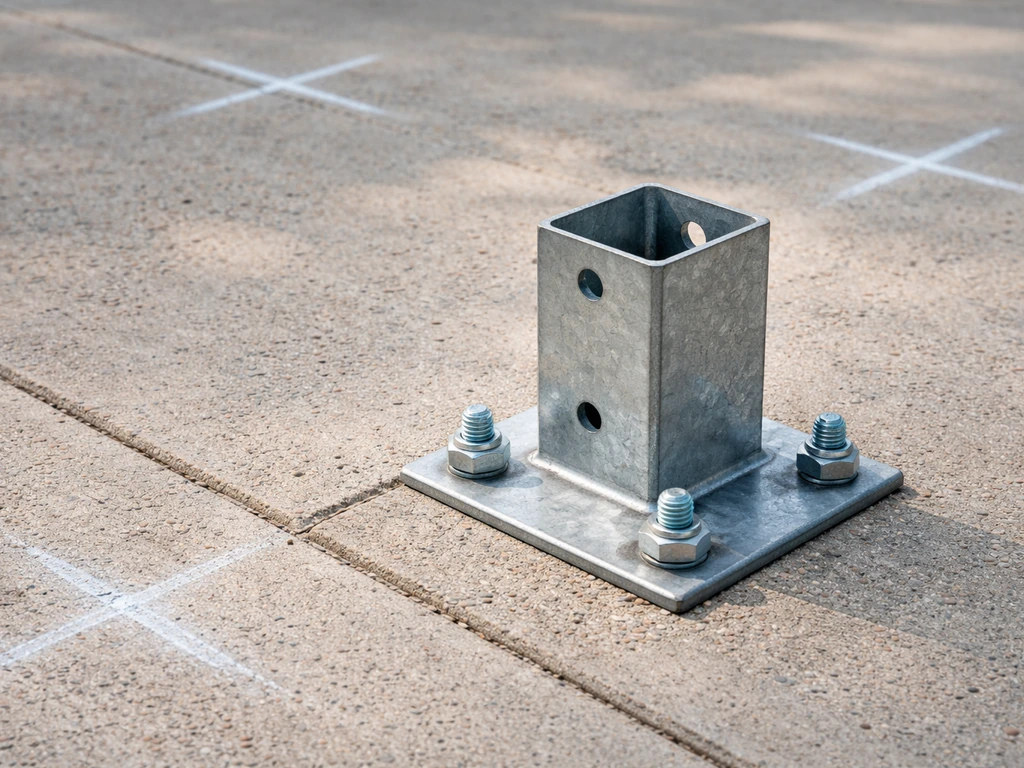
Step 2: Drill and install the post base anchors
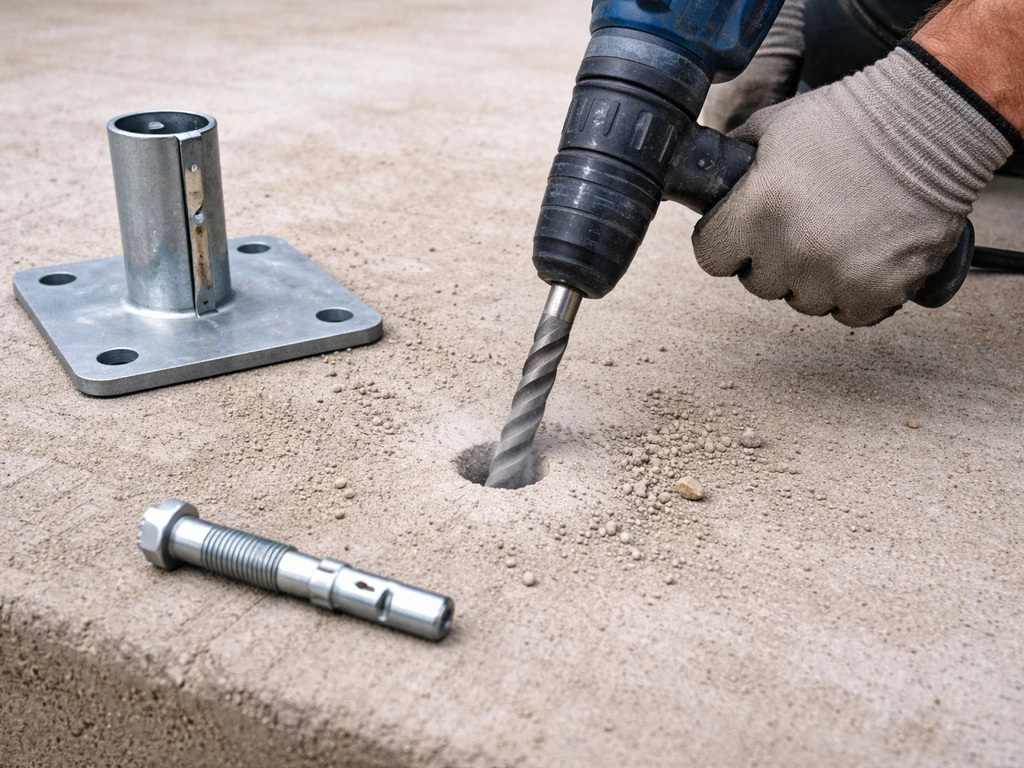
Position each post base on its center mark and use it as a template to mark the anchor hole locations. Remove the base and drill your holes with the rotary hammer drill. Drill about 1/2 inch deeper than the anchor will penetrate to give dust and debris somewhere to go. Drilling depth should account for the anchor embedment plus room for dust and debris, which is why anchor-hole depth guidance is included alongside hole diameters on Eugene Fasteners' concrete anchor drill-bit chart blank" rel="noopener noreferrer">Drill about 1/2 inch deeper than the anchor will penetrate to give dust and debris somewhere to go. After drilling, clean every hole thoroughly: vacuum out the dust with a dust extraction attachment, then blow with oil-free compressed air for at least four seconds, then brush the inside of the hole with a wire brush, then vacuum and blow again. If a wedge anchor feels too loose in the pilot hole, some DIYers report the fix is to adjust drilling technique, like avoiding hammer-drill mode, and getting proper resistance so the wedge and collar grab correctly. This cleaning sequence is non-negotiable for adhesive anchors and still good practice for mechanical anchors.
Set your anchors per the manufacturer's specs. For wedge and sleeve anchors, drop them into the hole, set the post base over the threaded ends, and torque to the specified value with a socket wrench. Don't over-torque: you're tightening against concrete, not metal. For adhesive anchors, inject the epoxy into the clean hole (working from the bottom up to avoid air pockets), set the threaded rod, and let it cure to full strength before loading anything. Curing time varies by product and temperature, so check the data sheet.
Step 3: Set the posts
Use a post base with a built-in standoff, a design that holds the bottom of the wood post slightly above the concrete surface. That small air gap is important: direct wood-to-concrete contact traps moisture and accelerates rot at the base of the post. Label your posts before you set them (A, B, C, D is fine) and if your slab isn't perfectly level, cut each post to compensate so the tops all land at the same height. Set each post in its base, plumb it with a level on two adjacent faces, and brace it temporarily with 2x4 kickers staked to the ground. Don't attach the beams until all four posts are plumbed and braced.
Step 4: Install the beams
Beams run the length of the pergola (usually the longer dimension) and sit on top of the posts or are bolted through them depending on your design. Use post cap hardware to connect beams to posts rather than just toenailing. Two 2x8s or 2x10s sandwiched around a post with through-bolts is a common and strong approach. Check for level across both beams before finalizing any fasteners.
Step 5: Install the rafters
Rafters span across the two beams, typically spaced 16 to 24 inches on center. Use joist hanger hardware or notch the rafters over the beams. For a decorative open pergola, the rafter tails that extend past the beams are often cut at an angle for aesthetics. Once all rafters are in, add any decorative purlins (smaller boards running perpendicular to the rafters on top) if your design includes them. At this point, your open pergola is essentially done. If you're adding a cover, keep reading.
Adding a covered top: roof panel options, drainage, and weatherproofing
A covered pergola is a big upgrade in usability, but it introduces a few things you have to get right: slope for drainage, panel fastening, and edge weatherproofing. This is where the project starts to feel more like building a patio cover than a simple pergola, and if you're going all-in on a fully covered structure, it's worth looking at the process for a covered patio on a concrete slab as a reference point.
Roof panel options
| Panel Type | Light Transmission | Weight | Best For | Key Consideration |
|---|---|---|---|---|
| Twin-wall polycarbonate | Diffused light, some shade | Light | Rain protection with natural light | Needs 4%+ slope (about 1" per 24" of length) for drainage; expands/contracts with temperature |
| Corrugated polycarbonate | High transparency | Very light | Budget-friendly rain cover | Corrugations must run downslope for drainage |
| Metal roofing panels | Opaque | Moderate | Full weather protection, long lifespan | Requires slope, drip edge, and gutter planning; may require permit |
| Shade sail fabric | Variable (20–90% shade) | Very light | UV protection without rain coverage | Not waterproof; tension anchors must be solid |
Whatever panel you choose, the rafters beneath them need to slope at least 4 percent (roughly 1 inch of drop per 24 inches of run) so water doesn't pool. If you built your pergola level, you can create slope by shimming the low end of the rafters up slightly, or by building the post on one side slightly taller from the start. Polycarbonate panels in particular are sensitive to standing water and freeze-thaw cycles, so unobstructed drainage really matters in colder climates.
Fastening and sealing panels
Use pre-drilled or gasketed fasteners designed for the specific panel type. For polycarbonate, use screws with neoprene washers that seal the hole without cracking the panel. Seal the upper (upslope) ends of polycarbonate panels with solid aluminum tape to keep bugs and moisture out of the flutes, and leave the lower ends open with a breather tape to allow condensation to escape. At the high side where the roof meets a wall, install flashing that directs water away from the wall and onto the panel surface.
Gutters and runoff
If your covered pergola sits adjacent to the house or over a patio where runoff would dump onto foot-traffic areas, add a gutter on the low side. Gutter sizing for a pergola doesn't need to be over-engineered, but the downspout needs to route water away from the slab edge and the post base anchors. Water pooling around anchor points accelerates corrosion, and in freeze-thaw climates, repeated freezing around the slab edge and anchor area degrades the concrete over time.
Finishing and maintenance: sealing, corrosion protection, and seasonal care
Protect the wood
Pressure-treated lumber is resistant to rot and insects but it's not immune to weathering, checking (surface cracking), and gray discoloration. Seal or stain all exposed wood surfaces within a few weeks of completing the build, once the wood has dried out from the kiln treatment. Use a penetrating exterior wood sealer or a solid-body stain with UV inhibitors. Pay special attention to end grain, the cut ends of posts, beams, and rafters, because end grain absorbs moisture far more aggressively than face grain.
Protect the metal connections
Modern pressure-treated lumber uses copper-based preservatives that are more corrosive to metal than older formulations. Use only hot-dipped galvanized or stainless steel hardware throughout the build. At every point where a metal post base or connector makes direct contact with treated wood, consider adding a layer of flashing barrier tape between the two materials. This isolates the metal from the wet treated wood and significantly slows the corrosion process. Simpson Strong-Tie specifically flags this risk in their connector guidance for pressure-treated applications.
Inspect and re-torque anchors after the first season
After your first full year through heat, rain, and cold, go around to each post base and check that the anchor bolts are still snug. Thermal expansion and contraction can loosen mechanical anchors slightly over time, especially in climates with large temperature swings. A quick check with a socket wrench takes ten minutes and tells you a lot about how your installation is holding up. If you're in a freeze-thaw climate, also look at the concrete around each anchor point for any new cracking or spalling that could indicate moisture infiltration.
Annual maintenance checklist
- Re-seal or re-stain wood every 2 to 3 years (sooner if you see graying or surface checking)
- Check anchor bolt torque and look for concrete cracking or spalling around anchor points
- Inspect metal connectors and hardware for rust, especially at wood-to-metal contact points
- Clear debris from roof panel drainage channels and gutters every spring and fall
- Check polycarbonate panels for UV yellowing or cracking (typical lifespan is 10 to 15 years)
- Look for any post base movement or rocking, which would indicate anchor loosening
- In freeze-thaw climates, check for frost heave effects near slab edges after winter
When to call in a pro
This whole project is well within DIY territory if you're comfortable with basic carpentry and using a rotary hammer drill. The one area where I'd seriously consider bringing in help is if your slab is thinner than 3.5 inches, has significant structural cracking, or if you're in a high-wind zone and want a covered roof. In those situations, a structural engineer can spec your anchor design and give you something stamped for the permit office, which is worth the few hundred dollars it typically costs. For a standard open pergola on a solid 4-inch-plus slab, though, you've got everything you need right here.
FAQ
Can I build a pergola on concrete if my slab is less than 3.5 inches thick?
It’s possible, but you may need a different anchor system and often more conservative placement. If you cannot meet the manufacturer’s embedment and edge-distance requirements for your chosen anchors, the safest move is to relocate the post positions or redesign the base so you still achieve rated load capacity.
What if my concrete patio has rebar or post-installed patches where the anchors would go?
Rebar and patches can change how the drill path behaves and how anchors seat. If a hole will intersect steel, ask the hardware manufacturer whether their anchor is rated for that situation, otherwise shift the post location to keep anchors in plain, solid concrete.
How far from slab edges do post anchors really need to be?
Beyond the layout clearance you plan for, you must also follow the anchor’s specific edge-distance spec (which is often different for wedge anchors versus sleeve or adhesive anchors). If you cannot meet both the layout aesthetic clearance and the anchor edge-distance requirements, adjust the pergola footprint.
Is adhesive anchoring still a good idea in cold or wet weather?
Adhesive anchors depend on proper hole cleaning and acceptable cure conditions. In cold temperatures, epoxy curing slows and may not reach full strength on schedule, so check the product data sheet for minimum installation and cure temperatures, and avoid drilling right after heavy moisture or freeze conditions.
What’s the biggest mistake people make with drilling and cleaning anchor holes?
Not getting the hole dust-free. Even small residual concrete dust can drastically reduce bond strength for adhesive systems. Use the complete vacuum, blow, wire-brush, vacuum, and blow sequence, and keep your compressed air oil-free.
Can I drill into a crack if it’s hairline and stable?
You should generally avoid placing anchors within about 2 to 3 inches of cracks, even if they look stable. If the geometry forces a choice, relocate if possible, because hairline cracking can still indicate micro-movement or moisture pathways that reduce reliability around the anchor.
How do I decide between sleeve or wedge anchors versus an adhesive anchor?
Choose mechanical anchors when you want predictable installation and your slab thickness and conditions meet embedment and edge-distance requirements. Choose adhesive anchors when the slab is thinner, cracked, or conditions make mechanical embedment less reliable, but only if you can meet cure-condition requirements and achieve the specified hole prep.
Do I need to seal around the post base after anchoring?
Usually you should not rely on sealant as a structural fix. If your design requires moisture management, use a flashing barrier between treated wood and metal and keep the built-in post standoff to prevent direct wood-to-concrete contact. If you seal, do it in a way that does not trap water in the anchor pocket.
Should I level the slab or shim the pergola frame?
You generally should document the slab slope and shim the pergola frame to make the top members land consistently, rather than trying to level the concrete. Shimming rafters or the low side while keeping drainage slope right for a covered roof is typically the safer approach.
What size spacing should I use for rafters and how do I avoid sagging?
Use the rafter spacing your design materials and spans can support, commonly 16 to 24 inches on center for typical residential builds. To prevent sagging, ensure the rafters are properly seated on the beams (with hangers or notches) and that beam level is verified before final fasteners.
How should I handle drainage when the pergola is covered with panels?
Plan for roof slope, at least about a 4 percent drop across the panel run, so water does not pool. Also ensure the gutter and downspout route water away from the slab edge and post bases, because repeated pooling accelerates corrosion and freeze-thaw deterioration.
Do polycarbonate panels need special installation details to last longer?
Yes. Use screws with neoprene washers, tape the upslope panel ends to prevent debris and moisture intrusion, and keep lower ends vented with breather tape to allow condensation to escape. Over-tightening can crack polycarbonate, so stop at the recommended torque or snug-to-spec guidance.
Is pressure-treated wood acceptable for pergolas, and what about metal corrosion?
Pressure-treated lumber resists rot, but it can accelerate corrosion of some metals. Use only hot-dipped galvanized or stainless hardware, and consider adding a flashing barrier tape where metal connectors contact treated wood to isolate them from wet chemical residue.
How soon can I load the pergola after installing adhesive anchors?
Do not load until the epoxy has cured to full strength per the specific manufacturer instructions. If you rush and assemble the frame immediately, you can compromise the bond before it reaches rated capacity, especially in cooler weather.
How do I maintain anchor and hardware after the first season?
Re-check anchor snugness on mechanical anchors after the first year, and inspect around each post base for new cracking or spalling that suggests moisture infiltration. If you notice loosening or surface deterioration, correct it promptly before adding tightening or loading changes that could stress weakened concrete.
When should I stop DIY and bring in help for this project?
Consider professional input if your slab is thinner than about 3.5 inches, has significant structural cracking, you’re in a high-wind area, or you want a solid covered roof that increases wind and permitting complexity. A stamped anchor design can prevent expensive rework and satisfy permit review requirements.