To demo a concrete patio, you break it into manageable chunks using a rotary hammer or rented electric jackhammer, pry the pieces up, and haul them away. That's the core of it. But doing it safely and efficiently, without cracking your house foundation, breathing in silica dust, or leaving a lumpy subbase behind, takes a bit more planning than just swinging a sledgehammer. Here's exactly how to do it right, from first assessment through site prep for whatever comes next.
How to Demo a Concrete Patio: Step-by-Step DIY Guide

Silas Morrison
4 Jun 2026
If you are wondering how hard it is to remove a concrete patio, the difficulty mainly depends on slab thickness, reinforcement, and how close it is to the house how hard is it to remove concrete patio. If you need to tackle the removal part next, follow the step-by-step guidance for how to remove a cement patio safely how to remove cement patio.
Before you start: assess the patio, make a plan, and protect the area
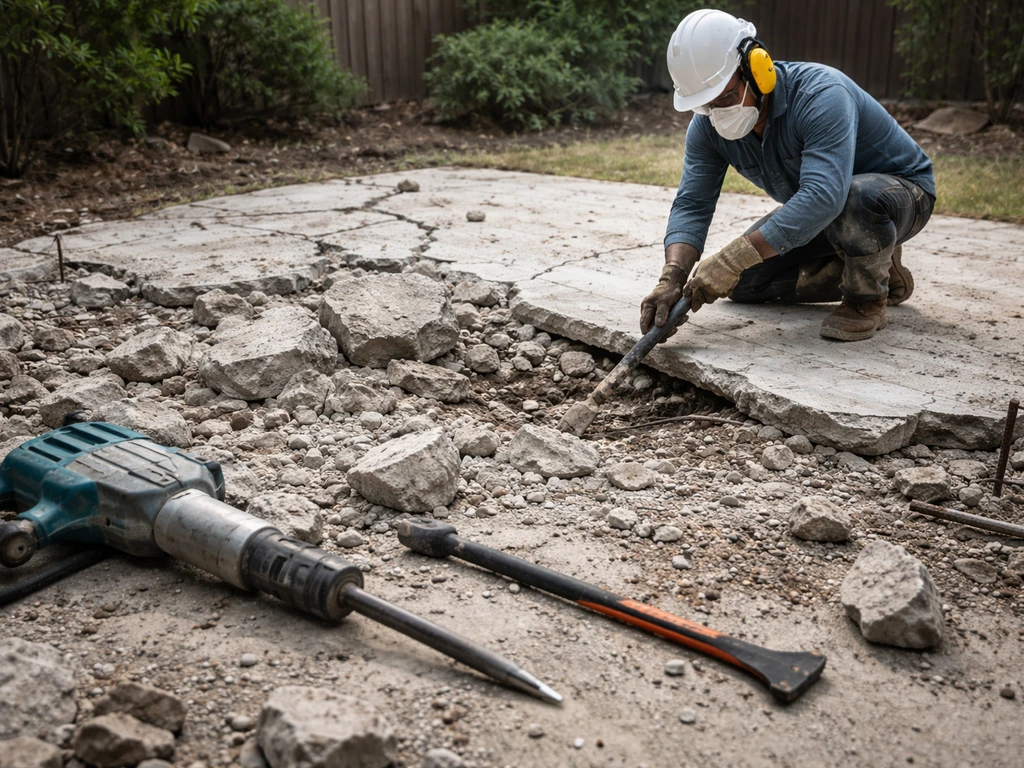
Spend 30 minutes walking the patio before you touch a single tool. What you find will shape your whole approach. Look for cracks: hairline cracks are normal, but wide or heaved cracks tell you the slab has already partially broken into sections, which can actually make your job easier. Check the edges.
If the patio runs right up to the house, look for a control joint or expansion joint separating it from the foundation. If there's no joint and the concrete is poured against the house slab or footing, you'll need to cut that edge before demolishing, not after. A patio attached to the house without a proper joint is one of the most common complications in patio removal, and rushing through it can crack your foundation or damage a door threshold.
Try to figure out the slab's thickness. Probe an exposed edge, check a crack, or look at where the patio meets a step. Most residential patios are 3.5 to 4 inches thick, but some are 6 inches or more, especially if they were built over an old slab or designed for vehicle weight. Thicker slabs take more time and may require a heavier tool. While you're at it, check for rebar or wire mesh. Probe any exposed edge with a screwdriver or flashlight. Reinforced concrete breaks differently than plain concrete, and you'll need bolt cutters or an angle grinder on hand to cut the metal as you go.
Before any digging or demo work, call 811, the national call-before-you-dig line, at least a few days in advance. Even if you're not planning to dig deep, jackhammering a slab can disturb shallow utilities underneath. Once utilities are marked, respect the tolerance zone: stay at least 24 inches from any marked utility line when breaking or prying. If you hit a line, stop immediately, call 911 if there's a gas or electrical emergency, and report the damage through 811.
Protect everything nearby. Move patio furniture, grills, and planters well out of range. Lay plywood or thick tarps over any garden beds bordering the patio to protect plants from flying chunks and foot traffic. Cover window wells and any exterior vents or AC units near the work zone. If your patio is close to a fence or retaining wall, plan your break pattern so chunks fall away from those structures.
Tools, materials, and PPE you'll actually need
Getting the right gear together before you start saves you multiple trips and a lot of frustration. Here's a practical breakdown of what you need, not an exhaustive shopping list but the stuff that actually matters.
Breaking tools
- Rotary hammer with chisel bit: ideal for small patios (under 100 sq ft) or detailed work near the house edge. Most rental centers have them.
- Electric or pneumatic jackhammer (also called a demolition hammer): the right tool for medium to large patios. A 35 to 70 lb electric jackhammer handles most residential work without needing a compressor.
- Sledgehammer (8 to 12 lb): useful for finishing off chunks the jackhammer started, but not efficient as your primary tool for anything over a small patch.
- Circular saw with diamond blade or cut-off saw: for scoring control cuts and separating the slab edge from the house before demo begins.
Pry and removal tools
- Pry bar or demolition bar (24 to 36 inch): essential for popping broken slabs off the ground
- Bolt cutters or angle grinder with metal cutting disc: for cutting rebar or wire mesh as it's exposed
- Wheelbarrow: for moving chunks to a disposal pile or dumpster; two if you have a helper
- Flat-head shovel: for scooping gravel base and debris
- Garden hose or pump sprayer: for dust suppression during cutting and breaking
PPE and safety gear
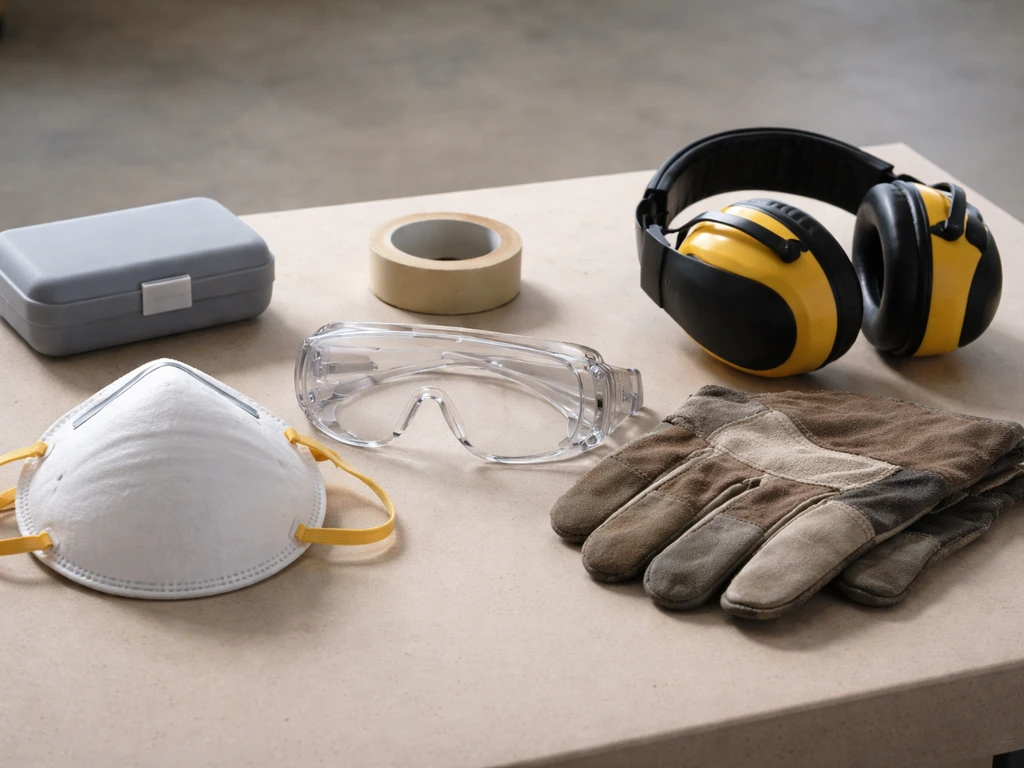
Concrete dust contains respirable crystalline silica, which is a serious lung hazard with cumulative effects. Don't skip the respirator. You need at minimum an N95 disposable respirator for lower-intensity work, but for jackhammering or sawing, step up to a P100 half-face respirator. Pair it with water suppression at the point of impact: a hose running near the jackhammer tip or a pump sprayer to wet the surface before and during cutting.
NIOSH research specifically identifies water-spray attachments at the jackhammer tip as an effective engineering control for silica dust. Beyond that, you need safety glasses or goggles (not just glasses, because chips fly sideways), hearing protection rated for at least 25 dB NRR since jackhammers routinely hit 100 dB, steel-toed boots, heavy work gloves, and long pants and sleeves.
How to demo a concrete patio step-by-step
The overall process is the same whether you're pulling up 50 square feet or 500. You isolate the slab from the house, break it into chunks, pry up the pieces, and move them out. What changes is the scale of your tools and how many passes it takes. To understand the full workflow and key safety steps, see our guide on how to demolish concrete patio.
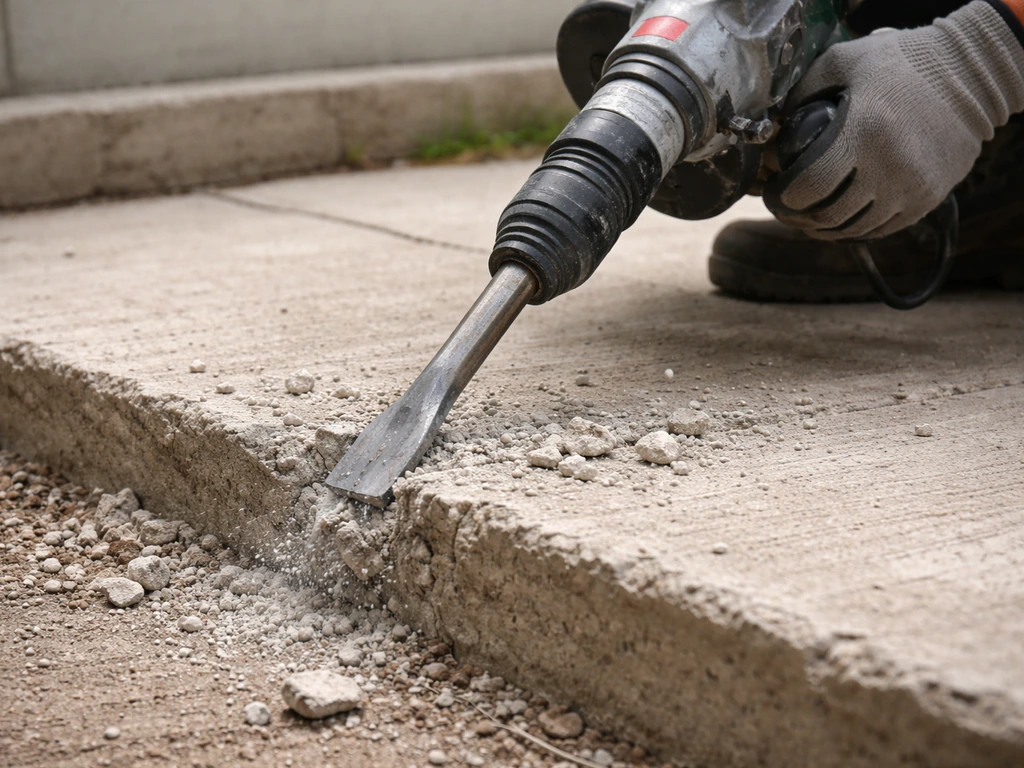
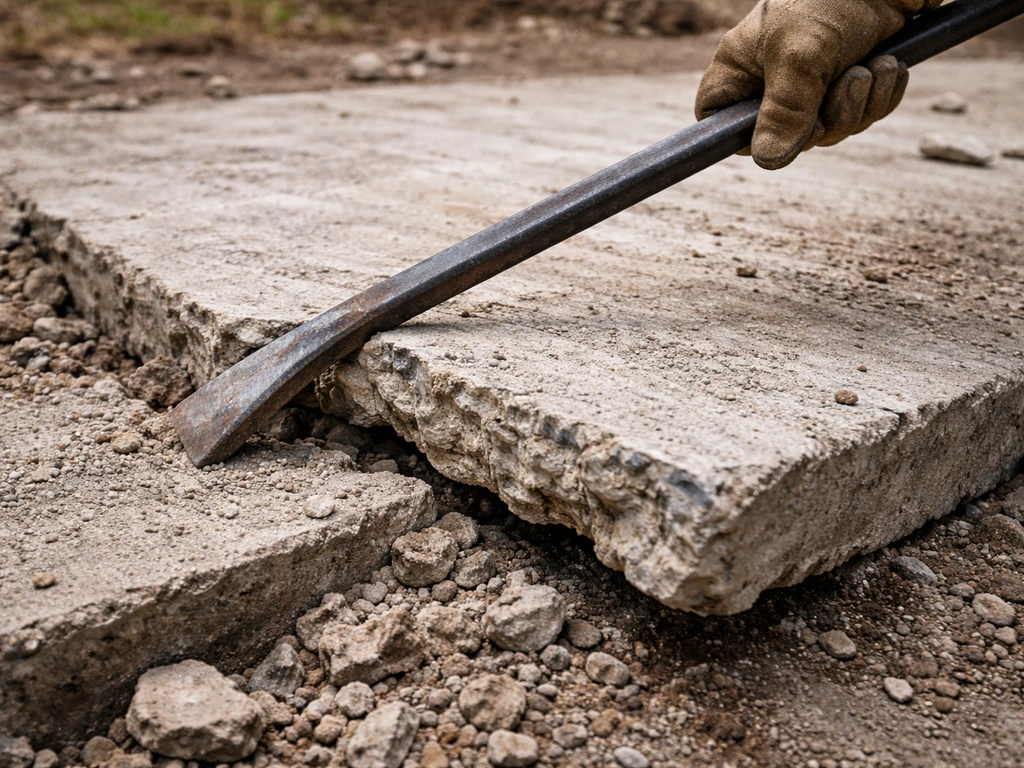
Step 1: Cut the edge where the patio meets the house
If the patio is attached to the house, this is your first cut, full stop. If you find the slab is truly bonded to the house, the key is to cut the edge at the house line before you start breaking so the stress does not transfer into the foundation cut the edge where the patio meets the house.
Use a circular saw with a diamond blade or a cut-off saw to score a clean line along the house edge, cutting all the way through the slab thickness. Wet the blade continuously with water from a hose or spray bottle while cutting to suppress silica dust. This severs the patio from the foundation so that when you start breaking, the stress doesn't transfer into the house. If there's already a visible expansion joint, inspect it first.
If you need more details for the edge cut before removal, see the full guide on how to remove concrete patio expansion joint. If it's intact and the slab is clearly separate, you may be able to skip the cut, but when in doubt, make it.
Step 2: Mark your break lines
Use chalk or a chalk line to divide the patio into sections of roughly 2 to 3 square feet each. Smaller sections are easier to pry up and lift, especially since a 4-inch slab of concrete weighs about 50 lbs per square foot. A 2x3 foot chunk is manageable for one person. Don't try to work in random patterns; grid it out so you're always working from a broken edge inward, giving yourself room to pry.
Step 3: Break the concrete
Start at an outer edge or existing crack, not in the middle of a section. Position the jackhammer or rotary hammer chisel at roughly a 30-degree angle and work along your chalk lines. Let the tool do the work; don't force it straight down. Once you see a section crack through, move the tip slightly and open the break.
Keep water running near the impact point throughout. OSHA notes that concrete and other silica-containing materials can generate respirable crystalline silica dust, and recommends [minimizing airborne dust during tasks like jackhammering](https://www. osha. gov/sites/default/files/publications/OSHA_FS-3629.
pdf) using engineering control approaches such as water, shrouds, and vacuums where applicable. For small patios under about 80 square feet, a rotary hammer with a wide chisel bit gets the job done in a few hours. For larger patios, rent a 35 to 50 lb electric demolition hammer and you'll move much faster.
Step 4: Pry and lift the chunks
Once a section cracks through, slide your pry bar into the crack and lever the piece up. Work around the section from multiple angles if it's stubborn. If you hit rebar or wire mesh holding two pieces together, cut it with bolt cutters before trying to force the chunk free. Forcing unreinforced pieces apart is fine; yanking on rebar-connected concrete just damages your tools and your back.
Step 5: Load and move the debris
Load chunks into a wheelbarrow as you go rather than stacking them on the patio surface. A piled-up work zone is a trip-and-fall hazard and makes it harder to keep working efficiently. Set up a clear path from the patio to the debris pile or dumpster and keep it free of debris. If you're hauling chunks by hand, keep pieces under 50 lbs. Bigger chunks can be broken down further with a sledgehammer before loading.
Breaking methods based on thickness and reinforcement
Not all slabs demo the same way. Thickness and whether there's steel inside are the two biggest variables, and they determine which approach to take.
| Slab Type | Best Breaking Tool | Key Considerations |
|---|---|---|
| 3 to 4 inch plain concrete | Rotary hammer or 35 lb demo hammer | Breaks quickly; pieces come up easily with a pry bar |
| 3 to 4 inch with wire mesh | 35 lb demo hammer plus bolt cutters | Mesh holds sections together; cut it frequently as you work |
| 5 to 6 inch plain concrete | 50 to 70 lb demo hammer | Takes more passes; consider scoring deep cut lines first |
| 5 to 6 inch with rebar | 50 to 70 lb demo hammer plus angle grinder | Rebar may need to be cut in multiple spots per section; chunks are very heavy |
| Stacked slabs (poured over old slab) | 50 to 70 lb demo hammer | May require renting a larger tool; expect two layers of base material |
For thick reinforced slabs, scoring along your break lines with a cut-off saw before jackhammering makes the breaking phase significantly faster. It gives the impact tool a defined weak point to work from. Keep water flowing on the blade during cuts. If you're dealing with a double slab (a newer pour over an old one), budget roughly twice the time and debris volume.
Handling the base, disposal, and cleanup

Dealing with the base layer
Once the concrete is out, you'll have a layer of compacted gravel or sand base underneath, usually 4 to 6 inches deep. If you're rebuilding with a new concrete slab, don't automatically remove this base. Inspect it. If it's firm, uniform, and well-graded, it may be usable as-is or with minor adjustment. If it's muddy, contaminated, or inconsistent, dig it out and start fresh. If you're switching to pavers instead of poured concrete, you'll likely need to adjust the base depth to account for the paver thickness.
One thing to watch for: if you notice any unusual materials under the slab, dark staining, strange odors, or what looks like buried debris, stop and contact your state environmental agency before proceeding. It's rare, but older patios sometimes cover buried materials that need special handling.
Disposing of concrete rubble
Concrete is heavy, and disposal options matter. You have a few realistic choices. Renting a dumpster is the most straightforward: a standard 10-yard dumpster handles the rubble from roughly 400 to 500 square feet of 4-inch concrete. Many concrete recycling facilities accept clean concrete chunks for free or a small fee, since it gets crushed into aggregate. Call ahead to confirm they take it and that it's free of rebar if they require clean material. Some municipalities allow concrete in C&D (construction and demolition) debris recycling programs. Don't try to put concrete chunks in your regular trash or recycling bins; most haulers won't take it.
Final site cleanup
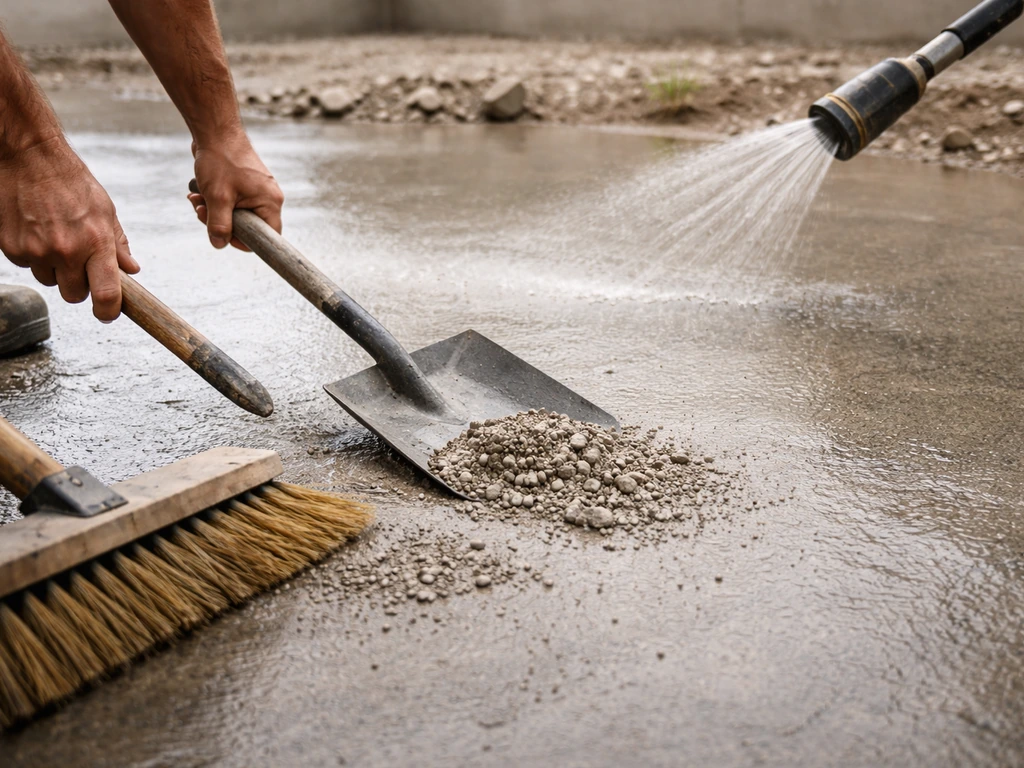
After the big chunks are gone, use a flat shovel and stiff broom to clear fine debris and concrete dust from the base layer. Wet the area down to knock down airborne dust before sweeping. Inspect the exposed base for any remaining concrete fragments, old form boards, or wire mesh that didn't come up with the slab. Pick them out by hand or with a rake. A clean, debris-free base is what you need before any grading or compaction work.
After demo: prep the site for your new patio
Demo day is satisfying, but what you do the day after determines whether your new patio lasts 5 years or 25. Don't just pour concrete on whatever's left. Take the time to prep the subbase properly.
Grade and level the subbase
Check the grade by stretching a string line across the area at the finished surface height and measuring down to the existing base. You want a consistent slope of about 1/8 inch per foot away from the house for drainage. If the base has high spots, rake them down. If there are low spots or soft areas where the base material was removed or disturbed, fill them with compactable gravel (typically 3/4-inch crushed stone or class II base rock) and compact in layers no more than 3 to 4 inches thick at a time.
Compact the subbase
Compaction is not optional. A loosely graded base will settle unevenly under a concrete slab and cause cracking within a year or two. Rent a plate compactor for this step. Most pavement engineering standards target blank" rel="noopener noreferrer">95% of standard proctor density for the top 6 to 12 inches of subbase, which in practical terms means running the plate compactor over the area at least 3 to 4 passes in overlapping rows, then checking that the surface doesn't visibly deflect when you walk on it. Add a final pass with the compactor after any spot-filling.
Check your depth
Measure the depth from your string line to the compacted base surface. For a 4-inch concrete slab, you need exactly 4 inches of clearance (plus whatever the forms add). For pavers, account for the paver thickness plus a 1-inch sand setting bed. Get this depth right now so you're not shimming forms or re-grading after they're set.
Set your forms and you're ready to pour
With a graded, compacted base at the right depth, you're ready to set forms for a new concrete slab or lay your paver base. Use 2x4 or 2x6 lumber for forms depending on your slab thickness, staked every 2 to 3 feet along the outside edge. Double-check that forms are level side-to-side and pitched correctly away from the house before any concrete is ordered. Getting the site right at this stage means the pour or installation goes smoothly and the finished patio performs the way you want it to.
The whole demo-to-prep process for an average 200-square-foot patio is realistically a weekend project for two people with rented equipment. Day one is breaking and hauling; day two is cleanup, grading, and compaction. Give yourself that full timeline rather than trying to rush into a pour the same day as demo. The base needs to be settled and checked before concrete goes down.
FAQ
Can I demo a concrete patio without cutting it at the house edge if it looks separated?
Yes, but only if you can confirm there is a true expansion joint or a visible gap, and the slab edge does not rock or remain mechanically tied to the foundation. If you can’t verify the separation, score and cut at the house line before jackhammering to prevent stress transfer, even if the joint appears intact.
What should I do if I hit suspected rebar or wire mesh unexpectedly?
Stop forcing the chunk. Cut the reinforcement where it is actively holding pieces together, then restart on the chalk line. Using force instead of cutting usually bends your pry bar or causes the concrete to shatter unpredictably.
How do I tell if the patio slab is reinforced or thicker than I assumed before demo?
Probe multiple points: look for a crack edge you can reach, check where a step meets the patio, and examine any exposed section at the perimeter. Reinforcement often shows up as visible dark metal at cracks, while thickness is suggested by how far the chisel sinks before concrete breaks cleanly.
Is an N95 enough for jackhammering concrete?
Usually no. For jackhammering or cutting, switch to a P100 half-face respirator or an equivalent higher-filtration option. Pair it with water suppression at the impact or cutting point, because filtration alone does not eliminate silica exposure.
What water-suppression method works best when I’m breaking concrete with a rotary hammer?
Use a hose or pump sprayer so water reaches the contact point continuously, not just the surrounding surface. If water makes the area muddy and you lose footing, reduce flow slightly while keeping the tip wet, and plan to clean and re-check base condition afterward.
How do I avoid damaging utilities when I’m only breaking shallow?
Treat jackhammering as a disturbance risk even at shallow depths. After calling 811 and respecting the marked tolerance zone, maintain extra margin. If you see soil excavation marks, discoloration, or utility markers that look different from the rest of the site, pause and re-check before continuing.
What’s the safest way to decide the order of my break pattern?
Work from an outer edge or an existing crack inward, using a grid of small sections. Avoid starting in the middle, because it can lock chunks together and make later prying require much more force.
How big should each concrete chunk be for loading and hauling?
Aim for 2 to 3 square foot sections so you can pry and lift them without exceeding about 50 lb per piece. If a chunk is heavier, break it down further with a sledgehammer before loading to reduce back injury risk and trip hazards.
What if the base under the patio is muddy or inconsistent after demo?
Don’t try to “patch” over soft areas with just a thin top layer. Remove contaminated or inconsistent base material, replace with compactable gravel or base rock in lifts, then compact each lift thoroughly and verify the surface is firm and uniform.
When reusing gravel/sand base, what’s the practical test to know it’s usable?
Verify it is firm when stepped on, consistent in depth across the area, and well-graded (not mostly fine mud or loose, drifting sand). If it yields underfoot or shows soft spots after wetting, plan to remove and rebuild the base rather than risking future settlement.
Do I always need a plate compactor, or can I compact by hand?
For a patio intended to last, use a plate compactor. Hand tamping usually does not reach the required density, and the slab can settle unevenly, leading to early cracking.
How can I check that my base meets the right slope before forms or pavers?
Use a string line at the finished height and measure down to the compacted base at multiple points. Target roughly 1/8 inch per foot away from the house, then rake or remove high spots before any form setup.
What should I do if I find unusual staining, odors, or buried debris under the slab?
Stop work and contact your state environmental agency. Don’t assume it is just old dirt, because buried materials can require special handling and may affect how you dispose of concrete and base material.
How should I plan disposal if my concrete includes rebar?
Call recycling facilities ahead of time and ask their rules for “clean concrete” versus mixed loads. Many facilities accept concrete for recycling only if reinforcement is removed or the load meets specific contamination limits, so you may need to cut and separate rebar before hauling.
Can I pour new concrete immediately the same day I remove the old patio?
Plan at least a separate day for grading and compaction, and do not pour until the base is settled and verified. Concrete placed over an incompletely compacted or disturbed base often cracks within a year or two due to ongoing settlement.