
You can fix a cracked, uneven concrete patio yourself in most cases, but only if you match the repair method to what's actually wrong. Hairline cracks get a surface sealant or epoxy. Cracks wider than 1/8 inch need routing, backer rod, and a flexible polymer sealant or repair mortar. Sunken or tilted slabs need grinding, foam lifting, or mudjacking. And if the slab is shattered, undermined, or has heaved more than an inch, full replacement is usually the smarter call. This guide walks you through every step: diagnosing the damage, picking the right method, gathering materials, and completing the repair safely. If your question is 'my concrete patio is cracked', use this guide's diagnosis and repair sections to find the right fix for the damage and severity you see. For a step-by-step guide to fix cracked concrete patio, follow our detailed repair guide.
How to Fix Cracked Uneven Concrete Patio: Step-by-Step Repairs, Leveling

Who this guide is for (and who should call a pro)
This guide is written for DIY homeowners who are comfortable working with basic tools, willing to read product data sheets, and ready to spend a weekend (or two) doing the job right. If you can run a shop vac, mix mortar, and follow safety directions, you can handle most patio crack and leveling repairs. I've done several of these projects myself, including a badly settled slab at the back of my house that had a 3/4-inch trip hazard at a control joint. Fixed it with foam lifting and a polymer mortar patch. Took a Saturday.
That said, there are situations where you genuinely need a professional. If your slab has structural cracks running through it with vertical offset greater than 1/2 inch, if you see signs of severe subgrade failure (sinkholes, large voids under the slab, active erosion), if the concrete is reinforced and rebar is corroding and pushing the surface up, or if drainage is routing water under a foundation, stop and get an engineer or licensed contractor involved. No DIY repair saves money if the underlying problem keeps getting worse.
How to choose the right fix
The biggest mistake homeowners make is picking a product before they understand the problem. I've seen people spend $80 on a bag of concrete patch and slap it over an actively settling slab, and watch it pop off six months later. The repair method has to match the crack type, the severity, whether the crack is still moving, and what caused it in the first place. Use the decision flow and comparison table below before you buy anything. For step-by-step resurfacing instructions and product recommendations, see how to resurface cracked concrete patio. For step-by-step repair options and cosmetic ideas, see our guide on how to make a cracked concrete patio look better.
Decision flow: matching problem to solution
- Is the crack hairline (under 0.02 inches / 0.5 mm) and stable? Use a surface-applied polyurethane or silicone crack sealant, or monitor and seal.
- Is the crack between 0.02 and 1/8 inch (0.5–3 mm) and stable? Use low-viscosity epoxy injection or a flexible crack filler.
- Is the crack between 1/8 and 1/2 inch (3–12 mm)? Route it, insert backer rod, and fill with a flexible polymer sealant or polymer-modified repair mortar.
- Is the crack wider than 1/2 inch, or is there vertical faulting (one slab panel higher than the other)? You need slab lifting, grinding, full-depth repair, or possibly replacement.
- Is the surface generally sound but rough, pitted, or cosmetically bad across a wide area? A concrete resurfacer or self-leveling overlay is your best option.
- Is there active movement, seasonal shifting, or ongoing root/drainage pressure? Fix the cause before repairing the surface, or use a flexible joint sealant that can move with the crack.
- Is the slab broken into multiple pieces, severely spalled, or undermined over more than 30–40% of its area? Get quotes for replacement — it will cost less in the long run.
| Problem | Best DIY Method | Difficulty | Typical DIY Cost | Durability |
|---|---|---|---|---|
| Hairline cracks (<0.5 mm) | Surface sealant or monitor | Easy | $10–$30 | 3–7 years with maintenance |
| Fine cracks (0.5–3 mm, stable) | Epoxy injection | Moderate | $30–$80 | 10+ years if crack is stable |
| Medium cracks (3–12 mm) | Route + backer rod + polymer sealant/mortar | Moderate | $50–$150 | 5–10 years |
| Wide or offset cracks (>12 mm) | Full-depth repair or slab lifting | Hard | $150–$500+ | Varies by cause |
| Uneven/sunken slab (trip hazard) | Foam lifting or mudjacking | Hard (pro typical) | $300–$800 hired out | 5–15 years |
| Widespread surface damage | Resurfacer or self-leveling overlay | Moderate | $100–$300 | 5–10 years |
| Severe breakup or undermining | Full replacement | Pro required | $1,500–$5,000+ | 25–40 years |
Diagnosing your patio: what kind of damage are you dealing with?
Before you touch anything, spend 20 minutes looking carefully at the patio. Crack type, orientation, pattern, and timing all tell you something specific about cause, and that determines the fix. I always take photos before I start any repair so I have a baseline and don't forget what I saw.
Crack types and what they mean
Plastic shrinkage cracks appear within hours of the concrete being placed, usually before it fully sets. They're irregular, often wider at the surface and narrow with depth, and tend to run in a loose diagonal or random pattern. If you're seeing these on an old patio, they've long since stabilized and can be treated as cosmetic or sealed. Drying shrinkage cracks (also called map cracking or crazing) show up days to weeks after pour, forming a random interconnected web across the surface. They're usually shallow and cosmetic. These are extremely common in residential patios and don't indicate structural failure.
Settlement cracks are a different story. These happen when the soil or subgrade beneath the slab moves, compresses, or washes away, allowing one section to sink or tilt. You'll usually see a distinct offset, one side of the crack higher than the other, and the crack often runs parallel or diagonal to a panel edge. If you see this pattern, subgrade investigation comes before any surface repair. Tree roots, poor drainage, and inadequate compaction at installation are the most common culprits.
Thermal cracks appear from repeated freeze-thaw cycles and typically run perpendicular to the longest slab dimension or across corners. Corrosion-induced cracking (rare in residential patios without embedded rebar near the surface) tends to show rust staining, popping, or spalling along a linear path. If you see rust stains and flaking, probe the area, you may have a rebar issue that needs structural attention, not just a patch.
Severity levels at a glance
| Severity | Crack Width | Offset / Faulting | Recommended Action |
|---|---|---|---|
| Monitor only | < 0.5 mm (hairline) | None | Seal if exposed to water; recheck in 6 months |
| Minor repair | 0.5–3 mm | None | Epoxy injection or flexible filler |
| Moderate repair | 3–12 mm | None or < 1/4 in | Route, backer rod, polymer sealant or mortar |
| Significant repair | > 12 mm or any offset | 1/4–1/2 in | Full-depth patch, lifting, or grinding |
| Pro/replace | Any width | > 1/2 in, or active movement | Structural repair, mudjacking, or replacement |
Other warning signs to check
- Water pooling on or near the slab after rain (drainage problem or slab slope issue)
- Soft, spongy feel when walking near a crack (void underneath — a classic sign for foam lifting)
- Cracks that run toward a house foundation or retaining wall (potential structural concern)
- Visible tree roots at or near the surface around a crack (root heave — root management needed before repair)
- Cracks that have grown since you last noticed them (active movement — find the cause before patching)
- Efflorescence (white mineral deposits) along crack edges (water is moving through the slab consistently)
Measuring and documenting the damage
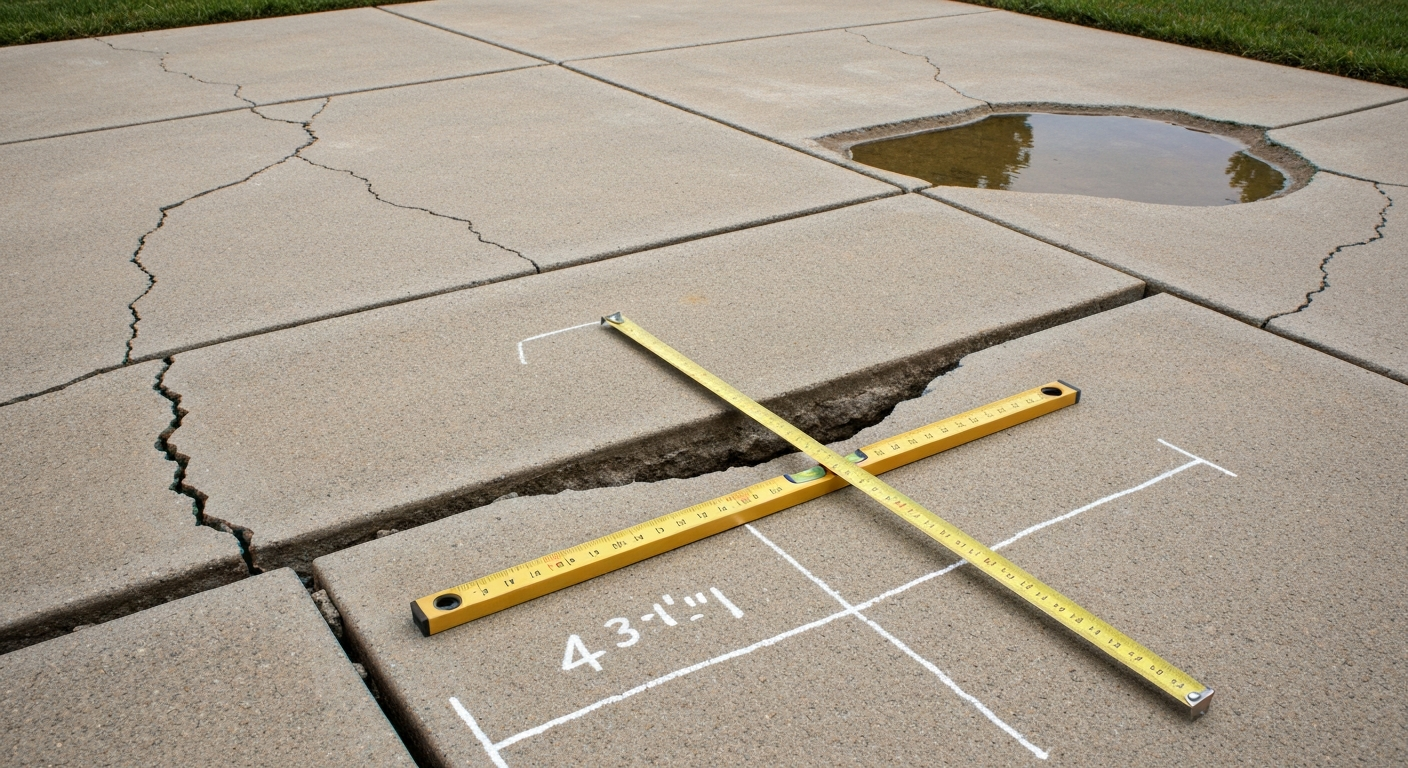
Don't skip this step. I learned early on that taking 10 minutes to document a patio before repair saves a lot of guesswork later, especially if you're trying to figure out whether a crack is still moving. Grab a steel ruler or crack gauge, a piece of chalk, a notepad, and your phone camera.
Walk the entire slab and mark every crack with chalk. Note the length, approximate width at multiple points, and any vertical offset. To measure offset, lay a straight edge across the crack perpendicular to it and use a tape measure or feeler gauge to find the height difference between panels. Even a 1/4-inch offset is a trip hazard that needs addressing. For crack width, a simple crack comparator card (available at hardware stores for under $10) gives you a fast, accurate reading.
To track movement over time, mark the ends of active-looking cracks with a date and a small paint dot, then photograph them. Check again in 4–6 weeks. If the crack has extended or widened, it's still active and you should address the root cause (drainage, tree roots, frost heave) before doing surface repairs. Patching an active crack without fixing the cause is like painting over mold, it looks fine for a season, then the problem resurfaces.
Also note the slope of the slab. Use a 4-foot level and a tape measure to find the low and high points. A patio should ideally slope 1/8 to 1/4 inch per foot away from the house. If it's sloping toward the foundation or pooling water, that's a drainage fix, not just a crack fix, and your repair plan needs to account for it.
Tools and materials you'll need
Your toolkit depends on which repairs you're doing, but the items below cover most combinations of crack repair, patch work, and surface resurfacing. I've organized them by category so you can shop in one trip.
Diagnostic and measuring tools
- Crack comparator card or feeler gauge set
- 4-foot level and tape measure
- Chalk and paint marker for crack mapping
- Phone camera or measuring tape for documentation
Surface prep tools
- Angle grinder with a diamond cup wheel (for removing loose concrete and grinding high spots)
- Cold chisel and 3-lb hammer (for removing spalled sections)
- Wire brush (hand or drill-mounted)
- HEPA vacuum — not a standard shop vac, since concrete dust contains respirable silica
- Pressure washer or stiff-bristle scrub brush
- Concrete crack router or circular saw with diamond blade (for routing wider cracks)
Repair materials
- Low-viscosity epoxy injection system (e.g., Sikadur-752 or equivalent) for cracks 0.5–5 mm — mix ratio typically 2:1 by volume, pot life approximately 60 minutes at 68°F/20°C
- Flexible polyurethane or silicone crack sealant for hairline and surface cracks
- Closed-cell polyethylene backer rod — buy in the diameter 25–30% larger than your routed crack width
- Polymer-modified cementitious repair mortar (e.g., Sika MonoTop series, MasterEmaco, or QUIKRETE FastSet Repair Mortar) — compressive strengths often exceed 3,500 psi at 24 hours for rapid-set types
- Concrete bonding adhesive or bonding slurry (required by most mortar PDSs before patching)
- Concrete resurfacer (for full-surface applications)
- Self-leveling overlay compound (for larger area leveling up to about 1 inch deep)
- Polyurethane lifting foam kit or mudjacking slurry (for settled slabs — foam kits are DIY-available; mudjacking is typically contractor work)
Finishing and sealing materials
- Penetrating silane/siloxane sealer or acrylic sealer appropriate for exterior concrete
- Concrete stain (optional, for cosmetic unification after repairs)
- Control joint sealant (polyurethane, self-leveling) for re-sealing existing control joints
Safety gear (non-negotiable)
- N95 or P100 respirator — concrete dust causes silicosis with repeated exposure
- Safety glasses or goggles
- Chemical-resistant gloves (nitrile or neoprene) when handling epoxy or sealants
- Knee pads for extended crack work
- Hearing protection when using grinder or router
- Work boots with toe protection
Prep and site safety before you start
Proper preparation is what separates repairs that last from repairs that peel off in a year. Every repair material, epoxy, mortar, sealant, resurfacer, depends on bonding to clean, sound, dry concrete. If you skip prep, you waste your materials and your weekend.
- Clear the patio completely: remove furniture, planters, rugs, and anything stored on the surface.
- Pressure wash the entire slab at 2,500–3,000 psi to remove dirt, algae, oil, and any existing sealers that are peeling. For oil stains, use a concrete degreaser and scrub with a stiff brush before rinsing.
- Let the slab dry completely. Most repair mortars and epoxies require a Saturated Surface Dry (SSD) or fully dry substrate. In humid conditions, allow at least 24–48 hours after washing. Some epoxies can be used on damp (not wet) surfaces — check the product data sheet.
- Remove all loose and delaminated concrete. Use a cold chisel and hammer to tap around cracks and spalled areas — a hollow sound means the concrete is no longer bonded. Remove everything that's loose. Trying to bond over delaminated concrete is pointless.
- Use a diamond cup wheel or angle grinder to grind back to sound material and to bevel the edges of repair areas so they aren't feathered. Most repair mortars need a minimum patch depth of at least 1/4 inch to adhere properly.
- Vacuum thoroughly with a HEPA vacuum. Compressed air alone is not enough — it just blows dust around and into your lungs. Vacuum after every grinding or routing step.
- Protect adjacent surfaces: tape plastic sheeting over the house siding, outdoor furniture stored nearby, and any plants you care about when working with epoxy or mudjacking foam.
- Check weather: most repair materials need temperatures between 40°F and 90°F (4–32°C), no rain for at least 24 hours after application, and no direct hot sun during cure (which can cause rapid moisture loss in mortars).
Repairing hairline and fine cracks (under 3 mm)
Hairline cracks, anything under about 0.02 inches (0.5 mm), are usually cosmetic and can be sealed with a surface-applied flexible sealant or simply monitored. Fine cracks between 0.5 mm and 3 mm (roughly 1/8 inch) are good candidates for epoxy injection when they're structurally significant and stable. Here's how to approach both.
Surface sealing hairline cracks: step-by-step
This method is the right call for shallow cosmetic cracks, map cracking from drying shrinkage, and early plastic shrinkage cracks that have long since stabilized. It won't restore structural capacity, but it will prevent water infiltration and freeze-thaw damage from making the crack bigger over time.
- Clean the crack channel with a wire brush and vacuum out all dust and debris.
- If the crack is slightly wider at the top, use a cold chisel or grinder to open it just enough to accept the sealant tip — you want the sealant to actually enter the crack, not just bridge it.
- Apply a flexible polyurethane or silicone concrete crack sealant directly into the crack using a caulk gun. Work steadily and keep the nozzle inside the crack rather than dragging it across the surface.
- Tool the sealant slightly below flush with a putty knife or gloved finger to create a slight concave profile. This handles minor movement without the sealant tearing away at the edges.
- Allow the full manufacturer cure time before foot traffic — typically 24 hours for polyurethane, 12–24 hours for silicone depending on temperature.
- Once cured, apply a penetrating concrete sealer over the entire slab to protect the surface and slow future cracking from moisture cycling.
Cost for this method runs $10–$30 for a 10-ounce sealant tube plus $15–$40 for sealer. It takes 1–2 hours of actual work. Longevity is typically 3–7 years before resealing is needed, which is similar to normal control joint maintenance.
Epoxy injection for fine cracks (0.5–5 mm): step-by-step
Epoxy injection is the right method when you want to restore structural continuity across a stable crack, think a crack that's gone all the way through the slab but isn't moving. Low-viscosity epoxies like Sikadur-752 (mix ratio 2:1 by volume, pot life approximately 60 minutes at 68°F) penetrate cracks as small as a few tenths of a millimeter and cure to tensile strengths that exceed the surrounding concrete. The key limitation: this only works on dormant, non-moving cracks. blank" rel="noopener noreferrer">ACI 224R-01 (crack control and repair selection) notes that epoxy injection restores bond in dormant cracks but is not appropriate for actively moving cracks or joints intended to accommodate movement; flexible polyurethane injection or routing plus flexible sealants are recommended for active/wet cracks. If the crack is still shifting seasonally, use a flexible sealant instead.
- Clean the crack with a HEPA vacuum and wire brush. Remove all dust, standing water, and loose particles. Some epoxies tolerate a damp surface but none tolerate a wet one — if water is seeping through, address drainage first.
- Mix a small batch of surface paste (epoxy putty or thickened epoxy from your kit) and apply it in thin beads across the crack surface, every 6–8 inches, leaving the center of the crack open. This is where your injection ports will go.
- Install injection ports at 6–8 inch spacing along the crack. Most DIY epoxy kits use plastic surface-mount ports that are bonded over pre-cleaned openings in the crack. Push them in, cap them, and let the surface paste bond firmly (check PDS for tack-off time, usually 30–60 minutes at room temperature).
- Seal the exposed crack surface between ports with the same epoxy paste, tooling it flat. Let it fully cure before injecting — this is important because the surface seal is what holds injection pressure.
- Mix only as much injectable epoxy as you can use within the pot life (approximately 60 minutes at 68°F; shorter in warm weather). Start injecting at the lowest port on the crack (or one end for horizontal cracks) and inject until you see epoxy appear at the next port.
- Cap the first port, move to the second, and continue working up or along the crack until all ports are full. Use hand pressure or a pressure pot per the product instructions — avoid over-pressuring, which can blow out the surface seal.
- Once epoxy has cured per the manufacturer's timeline (initial cure often 24 hours, full structural strength typically at 7–14 days), knock off the surface-mount ports with a hammer and grind the surface smooth.
- Inspect with a chain or hammer tap to verify the crack sounds solid, not hollow.
Epoxy injection kits for DIY run $30–$80 for a typical patio crack. The job takes a half day including cure waits. Done correctly on a stable crack, the repair is permanent, the cured epoxy is often stronger than the surrounding concrete. The downside is it requires patience, correct mixing, and temperature awareness. Below 40°F, cure slows dramatically and the epoxy may not penetrate fully. Above 90°F, pot life shrinks to under 30 minutes and you risk injecting partially gelled material.
When to use which: epoxy vs surface sealant
| Factor | Surface Sealant | Epoxy Injection |
|---|---|---|
| Crack width | Hairline to 3 mm | 0.5–5 mm |
| Crack status | Stable or slow-moving | Stable / dormant only |
| Goal | Waterproofing, cosmetic | Structural restoration + waterproofing |
| Skill level | Easy | Moderate |
| Cost | $10–$30 | $30–$80 |
| Durability | 3–7 years (reseal needed) | 10+ years if crack is truly dormant |
| Best for | Map cracking, surface crazing, cosmetic fine cracks | Through-cracks in sound slabs without movement |
Repairing wider and deep cracks (3–12 mm and beyond)
Once a crack reaches about 1/8 inch wide, direct-fill options stop working well. ACI 224R-01: Control of Cracking in Concrete Structures (Table 4.1 reference) provides recommended crack width limits for reinforced concrete and is the code reference for assessing when crack widths may indicate serviceability or durability concerns. The crack is too wide for epoxy injection to be economical, and surface sealants alone won't hold if there's any movement at all. The industry-standard approach is to route the crack to a uniform geometry, insert a backer rod, and fill with a flexible polymer sealant or a polymer-modified repair mortar depending on whether the crack is still moving.
Route, backer rod, and flexible sealant: step-by-step
This method is the right call for cracks between 3 mm and about 12 mm (1/8 to 1/2 inch) that have some seasonal movement, are in a control joint that has failed, or where you want a flexible repair that can accommodate future minor movement. The goal of routing is to create a uniform rectangular or slightly tapered channel so the sealant bead has the correct geometry, specifically, a width-to-depth ratio of 2:1. Federal specs and DOT guidance consistently specify this geometry because it optimizes the sealant's movement capacity without cohesive or adhesive failure.
- Mark the crack path with chalk and plan your routing line. For a standard concrete crack router or angle grinder with a diamond blade, you want to cut the crack at least 1/8 inch wider than the existing crack width and to a depth that gives you a 2:1 width-to-depth sealant geometry. For example, if you're targeting a 1/2-inch wide channel, route to approximately 1/4-inch depth minimum for sealant fill.
- Rout or saw the crack to the planned width and depth. Move steadily along the crack line. Don't rush — uneven routing creates thin spots in the sealant bead.
- Vacuum the routed channel thoroughly with a HEPA vacuum. Blow out any remaining dust with compressed air, then vacuum again. Dust is the enemy of sealant adhesion.
- Select closed-cell polyethylene backer rod approximately 25–30% larger in diameter than your routed channel width. For a 1/2-inch wide channel, use 5/8-inch backer rod. Press it into the channel so its top sits at the correct depth to leave room for your sealant bead at the 2:1 ratio (sealant depth equals approximately half the width). Closed-cell rod is required — it won't absorb water and it prevents three-sided adhesion, which would restrict the sealant's movement.
- If your sealant manufacturer requires a primer (check the product data sheet — many polyurethane sealants do on concrete), apply it per instructions and allow it to flash off.
- Gun the flexible polyurethane or silicone sealant into the channel in a single steady pass, slightly overfilling. Immediately tool it to a concave (slightly recessed) profile using a wet gloved finger or a plastic tool. The concave profile helps handle minor compression without the sealant crowning and peeling.
- Protect the repair from rain and foot traffic for the manufacturer's specified cure time — typically 24–72 hours for polyurethane, shorter for silicone. Don't cover it with plastic; it needs to breathe.
- Once cured, feather any raised edges with a diamond cup wheel if needed and apply sealer over the surrounding slab.
Material cost for this method runs $50–$100 for a typical 10–15 linear feet of cracking (router blade, backer rod, sealant). Time investment is about 3–4 hours including prep and cure staging. Expect 5–10 years of performance, though joint sealants in climates with hard freeze-thaw cycles may need touching up at 5–7 years.
Polymer-modified repair mortar for wide or deep cracks: step-by-step
When a crack is wide and deep, has some spalling at the edges, or needs to be filled flush and finished for resurfacing or tile overlay, a polymer-modified cementitious repair mortar is your material. For options on covering cracked concrete, thin overlays, pavers, or resurfacer, see our guide on how to cover cracked cement patio. Products like Sika MonoTop, MasterEmaco, and QUIKRETE FastSet Repair Mortar are formulated for high early strength (some exceed 3,500 psi compressive strength at 24 hours) and low shrinkage, making them dramatically more reliable than plain concrete mix or DIY mortar. The polymer modification gives them better bond to existing concrete and flexibility than standard cement.
- Rout or chisel the crack to remove all loose material and create clean, square or slightly undercut edges. Never feather-taper the edges of a mortar patch — the thin edges will pop off. Minimum repair depth is usually 1/4 inch, and some products specify 3/8 to 1/2 inch minimum. Check your product's PDS.
- Clean thoroughly with a HEPA vacuum and remove all dust. The substrate must be clean and either saturated surface dry (SSD) or dry — check your specific product's requirement.
- Apply a bonding slurry or bonding agent per the manufacturer's instructions. This step is mandatory for most polymer mortars and is frequently skipped by DIYers, which is why patches fail. Mix a small batch of the repair mortar with extra water (or use a separate bonding agent) and scrub it into the prepared concrete surface immediately before placing the mortar.
- Mix the repair mortar per the product's specified water ratio — adding extra water weakens the product significantly. Use a drill with a mixing paddle for thorough, lump-free mixing. Mix only what you can use in the product's working time (rapid-set products can have working times as short as 10–15 minutes).
- Compact and pack the mortar firmly into the crack or repair area, working in layers if the depth exceeds the product's maximum single-lift thickness (usually around 1 inch). Use a margin trowel or gloved hand to push out air voids.
- Strike off flush with the surrounding surface using a straightedge or trowel. For areas that will be resurfaced, you can leave the patch slightly low; for finished areas, strike it flush and finish to match the surrounding texture.
- Cure per manufacturer instructions — most polymer mortars need to stay moist and protected from direct sun for at least 24 hours. Plastic sheeting or damp burlap works well.
- After full cure (minimum 24 hours for foot traffic on most rapid-set products; 7 days for full structural strength), apply bonding agent and proceed with any overlay or sealer.
Material cost for polymer mortar patches runs $20–$60 for a 50-lb bag, which covers multiple repair areas. A typical crack repair takes 2–4 hours including prep. The resulting patch is essentially permanent if properly bonded, polymer-modified mortars in the R3/R4 class (per EN 1504 classification used in many manufacturer specs) are designed for structural and cosmetic repair of reinforced and unreinforced concrete. The main failure modes are skipping the bonding agent, working in freezing temperatures, or adding too much water to the mix.
Routing + sealant vs polymer mortar: which do you use?
| Factor | Route + Backer Rod + Sealant | Polymer-Modified Repair Mortar |
|---|---|---|
| Best for | Cracks with seasonal movement, control joints, wet climates | Stable cracks needing rigid, flush fill; base for overlay |
| Movement tolerance | High (flexible sealant moves with crack) | Low (rigid; will re-crack if movement continues) |
| Finish | Slightly recessed sealant bead | Flush, can be textured to match |
| Minimum crack width | ~3 mm (needs routing) | ~6 mm or routed to minimum 1/4 in depth |
| Skill required | Moderate | Moderate |
| Cost per repair | $50–$100 | $20–$60 (material only) |
| Durability | 5–10 years with movement | Essentially permanent if crack is stable |
FAQ
How do I diagnose the type and severity of cracks in my concrete patio?
Use visual and simple measurement diagnostics: note timing (did cracks appear within hours/days or after months/years), pattern (random map, straight, stepped, or isolated), orientation (along joints, across slab, or at edges), width (measure with a ruler or crack gauge), and presence of vertical offset/faulting. Early-age irregular surface cracks usually indicate plastic shrinkage; later random webbing is drying shrinkage; straight cracks with offset near footings or trees suggest settlement/subsidence or root action; corrosion or load cracks may be wider and show spalling. Compare measured widths to guidance (hairline <0.02 in/0.5 mm; small up to ~1/8 in/3 mm; medium 1/8–1/2 in/3–12 mm; large >1/2 in/12 mm). If cracks are widening, show significant slab tilt/settlement, undermine structural elements, or you suspect undermining/voids, proceed cautiously and consider professional evaluation.
What tools and materials should a DIY homeowner have before starting repairs?
Basic toolkit: safety gear (glasses, gloves, dust mask/respirator, hearing protection), tape measure, straightedge/level, chalk line, crack gauge or calipers, hammer and cold chisel, rotary grinder or concrete saw with diamond blade (for routing or truing), wire brush, HEPA-capable shop vacuum or compressed air, mixing bucket, margin trowel and pointing tools, caulk gun. Materials: closed-cell backer rod, polyurethane or silicone concrete sealant (flexible), low-viscosity epoxy injection kit (for structural cracks within manufacturer limits), polymer-modified repair mortar for wide/deep repairs, concrete resurfacer or self-leveling overlay for full-surface fixes, bonding primer/slurry per manufacturer specs, sealers/stains, sand for blending, and curing compound or plastic sheeting. Review product Technical Data Sheets for pot life, temperature limits, and mixing ratios before starting.
What is the correct decision rule for choosing between routing+sealant, epoxy injection, polymer mortar, slab lifting, resurfacing, or replacement?
Follow a tiered decision matrix: hairline (<0.02 in/0.5 mm) — monitor or surface seal; small cracks up to ~1/8 in (≈3 mm) with no active movement — epoxy injection or low-viscosity resin if structural continuity is desired; cracks 1/8–1/2 in (≈3–12 mm) or non-structural movement — route to form a proper joint, install backer rod and flexible sealant or use polymer repair mortar for shallow wider gaps; cracks >1/2 in (≈12 mm), significant vertical offset, active movement, underlying voids/settlement, or multiple adjacent failing slabs — consider slab-lifting (mudjacking or polyurethane foam) for leveling or localized full-depth replacement if slab is badly deteriorated. Use resurfacing (concrete resurfacers, microtoppings, or self-leveling overlays) when surface wear, small cracks, or aesthetic issues dominate and the slab is generally sound. Hire a professional when there is structural concern, active movement, extensive undermining, questionable drainage affecting subgrade, or when repair method requires specialized equipment (pressure injection, slab jacking) or permits.
How do I repair hairline and small cracks (surface sealing) step-by-step?
1) Clean crack with wire brush, blow out dust, and vacuum. 2) For hairline cracks, apply a concrete-compatible surface sealer or penetrating silane/siloxane per product directions; for slightly larger small cracks (up to ~1/8 in), route slightly to open the crack if required by sealant PDS, then clean. 3) Insert primer if manufacturer requires. 4) Tool in a low-viscosity flexible sealant (polyurethane or silicone) to the recommended width:depth geometry (approx. 2:1). 5) Tool for a concave profile and allow full cure before traffic. Monitor for re-opening for several months.
When and how should I perform epoxy injection for cracks?
Use epoxy injection when cracks are narrow (typically up to ~3/16–1/8 in depending on product), not actively moving, and you need to restore tensile/load transfer. Typical steps: clean and prepare crack surface, apply surface-bond paste across the crack, install injection ports spaced per product instructions, seal the crack between ports, inject low-viscosity epoxy from the lowest port upward until epoxy exudes at the next port, continue staged injection until ports show full penetration, allow full cure per PDS, remove ports and ground smooth. Follow product mixing ratios, pot life, temperature, and safety guidance. Do not use rigid epoxy for joints intended to move or for active/wet cracks; use flexible repair methods instead.
What is the correct routing + backer-rod + sealant workflow for wider cracks and control joints?
1) Route with a grinder or rotary bit to the manufacturer/specified width and depth (target a 2:1 width:depth sealant geometry). 2) Clean routed cavity thoroughly (vacuum and compressed air). 3) Select closed-cell backer rod about 25–30% larger than the routed width and compress to depth so sealant depth meets the 2:1 ratio. 4) Apply primer if required by sealant PDS. 5) Gun in flexible polyurethane/silicone sealant to fill to profile, tool to a concave finish, and protect from moisture and traffic until cured. This sequence prevents three-sided adhesion, accommodates movement, and follows industry/DOT sealing practice.