Most cracked concrete patios can be repaired as a DIY project in a weekend, but the right fix depends entirely on what kind of crack you're dealing with. Hairline shrinkage cracks just need a good sealer. Cracks wider than 1/4 inch, cracks that are uneven on both sides (one side is higher than the other), or cracks with water pushing through them need more serious attention, and in some cases the honest answer is that replacement will save you more money long-term than patching a slab that's already failing.
What to Do With a Cracked Concrete Patio: Fixes, Safety, or Replace

Silas Morrison
15 Jun 2026
First, figure out what you're actually dealing with
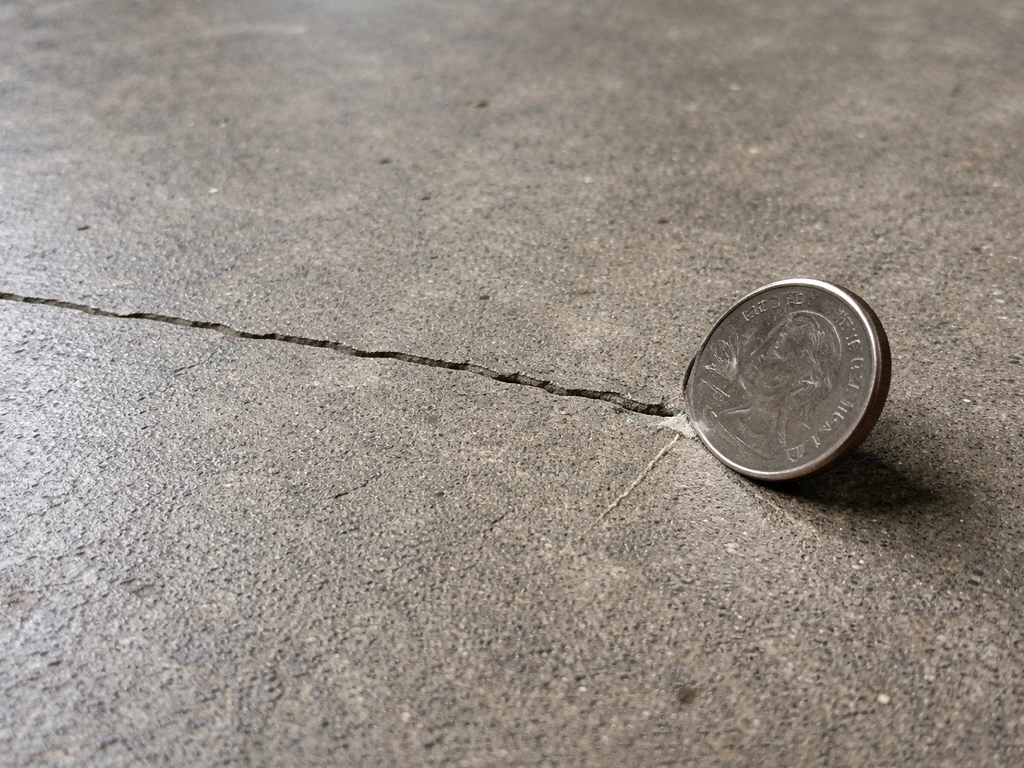
Before you buy a single bag of patch mix, spend 10 minutes doing a real assessment. Grab a coin or a key and scratch across the concrete surface near the crack. If the surface crumbles or flakes away easily, you've got spalling on top of the cracking, which changes your repair approach. Then measure the crack width at its widest point. A credit card is about 1/32 inch thick, and a standard pencil is just under 1/4 inch. Use those as your field gauges.
- Hairline cracks (under 1/8 inch wide): Almost always cosmetic, caused by normal concrete shrinkage as it cured. Very common and easy to seal.
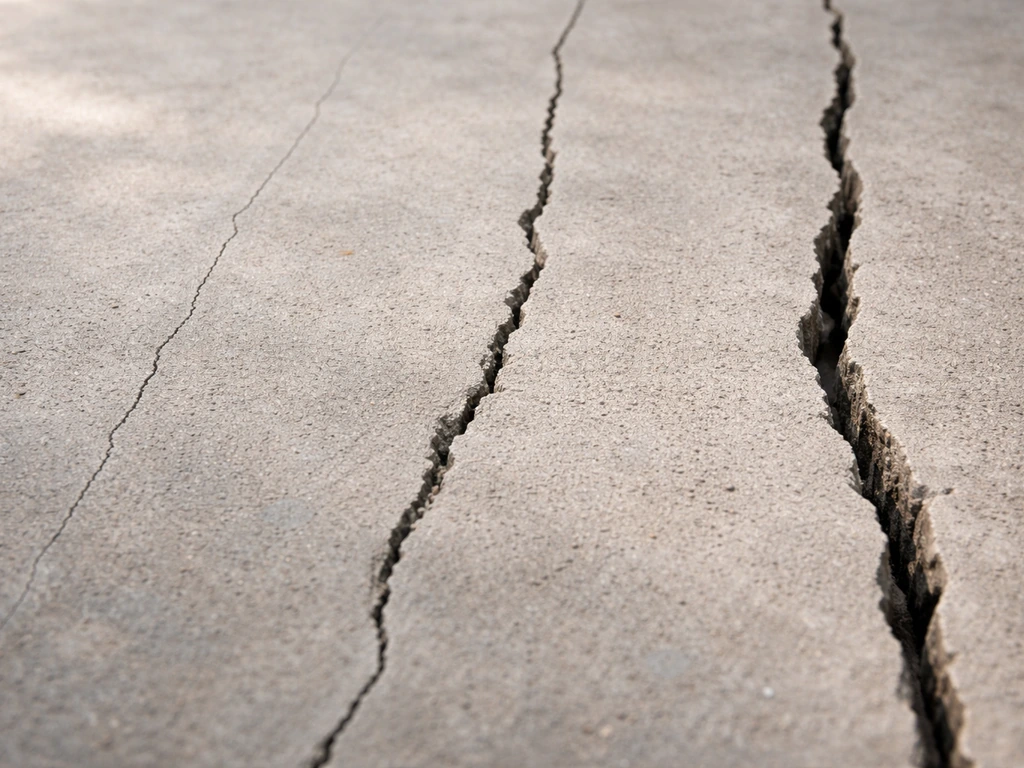
- Medium cracks (1/8 to 1/2 inch wide): Could be shrinkage, settlement, or freeze-thaw cycling. Check whether both sides of the crack are at the same height.
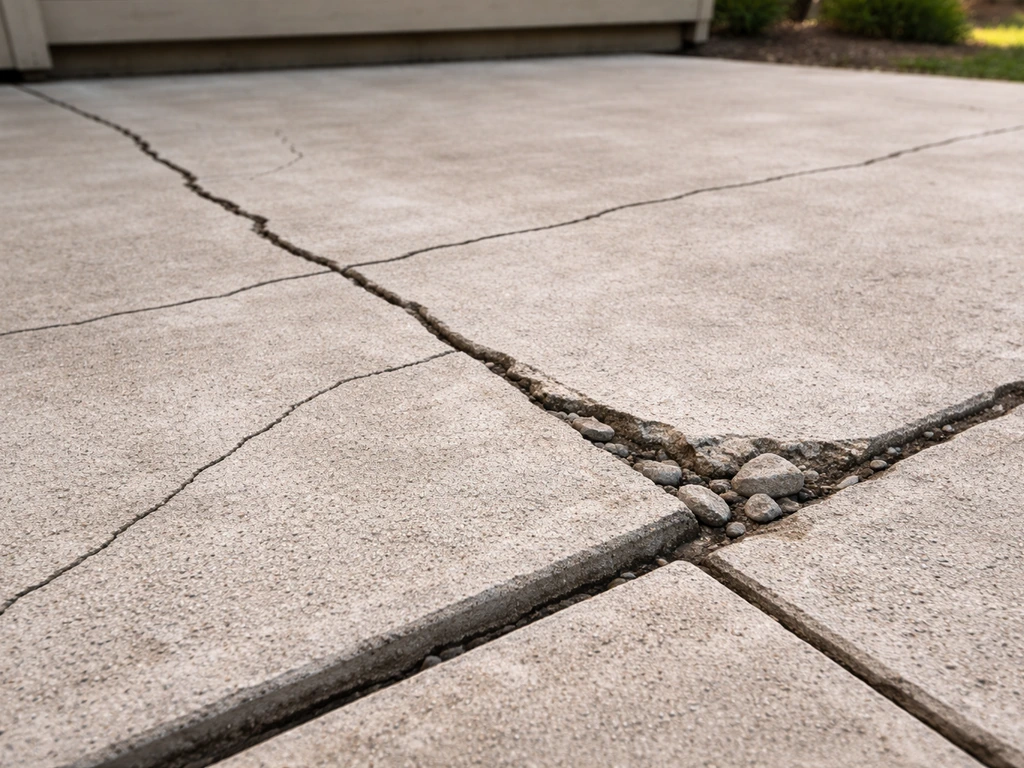
- Wide cracks (over 1/2 inch) or cracks with vertical displacement: One side of the crack is higher than the other, which means the slab has shifted. This is a structural signal.
- Spiderweb or map cracking across the whole surface: Usually alkali-silica reaction or long-term surface wear. Often a candidate for resurfacing rather than individual crack repair.
- Cracks with moisture or efflorescence (white chalky deposits): Water is moving through. This needs to be stopped before you do any cosmetic work.
Also look at the patio's age and overall condition. An old concrete patio that's been down for 30-plus years with scattered cracks and surface wear is a different problem from a five-year-old slab with one fresh crack. For older slabs, you're often dealing with a combination of issues: settled sections, surface spalling, multiple cracks, and possibly a slab that's already heaved or dropped unevenly. It's worth stepping back and looking at the whole picture before deciding your repair path.
Immediate steps before any repair
If there's a tripping hazard, handle it today. A displacement of even 1/2 inch at a crack edge is enough to catch a toe, especially for older family members or kids. If one side of the crack is raised, mark it with a bright spray paint stripe or block off that section until you can address it. Don't ignore it just because you're not ready to repair yet.
The second immediate concern is water. If you have a crack that's letting water into or under the slab, get a temporary hydraulic cement or polyurethane foam sealant into that crack to stop infiltration while you plan the full repair. Water under a slab accelerates settlement, erodes the base material, and in freeze-prone climates will blow the crack wider every winter. A $10 tube of temporary crack filler from any hardware store buys you time without making the permanent repair harder.
Clean the crack area before anything else. Blow out debris with compressed air or a shop vac, and remove any weeds or plant material growing in the crack. Plants will work their roots in and force the crack wider over time. For best results, the crack faces need to be clean and dry before any sealant, epoxy, or patch material goes in. This isn't optional. Every product on the shelf will fail faster if you skip this step.
Which repair method matches your crack
Concrete crack repair isn't one-size-fits-all. The material you use matters a lot, and using the wrong one is probably the most common DIY mistake I see. Here's how to match the fix to the problem.
Hairline cracks: penetrating sealer or crack filler
For cracks under 1/8 inch that are just cosmetic, a good penetrating concrete sealer is usually all you need. It locks out moisture, which is what causes those cracks to gradually worsen over time. If the crack bothers you visually, use a liquid crack filler (the kind that flows into the crack by gravity) before sealing. Don't try to force a caulk into a hairline crack. It won't bond well and will just peel out.
Medium cracks: polyurethane or self-leveling caulk
Cracks in the 1/8 to 1/2 inch range that show no displacement are great candidates for a self-leveling polyurethane concrete caulk. This type of caulk stays slightly flexible after curing, which matters because your patio slab will expand and contract seasonally. A rigid filler like hydraulic cement or standard concrete patch in a moving crack will just pop back out in a year or two. Look for a product labeled specifically for concrete joints or cracks, apply it in dry conditions, and tool it slightly below flush so you can feather a skim of concrete patch over it if you want a cleaner look.
Wide or structural cracks: epoxy injection or concrete patching
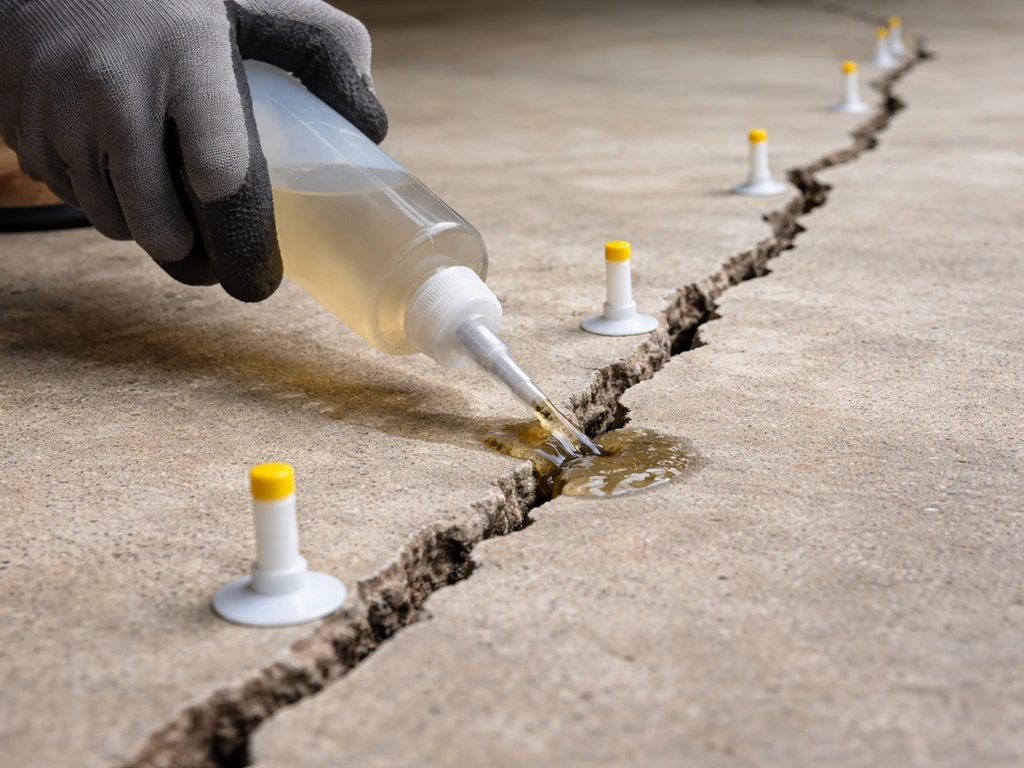
Cracks over 1/2 inch wide, or any crack where you want to restore actual structural bonding across the two slab sections, call for a different approach. Low-viscosity epoxy injection is the professional-grade solution here. The epoxy is injected under pressure, fills the crack from inside out, and actually bonds the two concrete faces back together. It's the same approach used in bridge and highway repair, where the goal is to restore structural integrity and prevent water and chloride infiltration. There are DIY-friendly epoxy injection kits that don't require a pressure pump. They use surface-mounted ports and gravity or a simple dispensing gun to work the epoxy into the crack.
One important note on epoxy: don't apply it when temperatures are below 40°F (4°C). The FHWA also cautions that epoxies should not be placed when air or pavement temperatures are below 40°F (4°C) for Portland cement concrete pavement applications [don't apply it when temperatures are below 40°F (4°C)](https://www. fhwa. dot.
gov/pavement/concrete/repair09. cfm). The chemistry doesn't work properly in cold conditions, and you'll end up with a bond that looks fine but fails early. Wait for a warm, dry day.
For cracks that are wide but not deep, a polymer-modified concrete patching compound (the kind that comes premixed or that you mix with water and an acrylic bonding agent) is a simpler choice. Use a concrete bonding adhesive on the crack faces first, let it get tacky, then pack in the patch material and feather the edges.
Displaced cracks (one side is higher): foam lifting or grinding
If the crack has vertical displacement, patching the crack itself only solves half the problem. If you have a cracked, uneven concrete patio, you’ll want to address both the crack itself and the slab movement so the problem does not keep coming back patching the crack itself only solves half the problem. . You've got a section that has settled or heaved.
For settled sections, polyurethane foam lifting (sometimes called mudjacking with foam) is worth a call to a local contractor. It's minimally invasive and relatively affordable compared to slab replacement. If the displacement is minor (under 1/2 inch), a concrete grinder or angle grinder with a diamond cup wheel can knock down the high edge to eliminate the tripping hazard, and then you patch the crack normally. This is faster and cheaper than you'd expect.
Repair vs. replace: making the honest call
This is the question most people avoid, but it's worth being straight with yourself early. Patching buys time. Sometimes that's all you need. Other times, you're just spending money to delay the inevitable.
| Situation | Repair makes sense | Replacement makes more sense |
|---|---|---|
| Crack width | Under 1/2 inch, no displacement | Over 1 inch, multiple wide cracks throughout |
| Slab movement | Stable, no ongoing shifting | Active settlement, cracks keep returning |
| Surface condition | Minor spalling, mostly intact | Widespread spalling, crumbling edges, delamination |
| Age | Under 20 years old, decent base | 30+ years, original base likely degraded |
| Number of cracks | 1-3 isolated cracks | Cracked in many places, including across the slab |
| Water issues | Isolated, manageable | Chronic water intrusion from below, soil erosion underneath |
A rough rule of thumb: if repair costs are going to exceed about 30 to 40 percent of what a new slab would cost, or if you're going to be redoing the repairs in two or three years anyway, replacement is the smarter financial move. Get at least one quote from a concrete contractor to know your baseline before committing to an extensive repair project. For an old patio where the slab is fundamentally sound but cosmetically rough, resurfacing (covered below) is often a better path than crack-by-crack repair.
If you do go the replacement route, this is also the time to plan any layout changes, drainage improvements, or upgrades like a thicker slab or wire mesh reinforcement that will make the new patio last longer. Don't just pour the same slab in the same spot without addressing what caused the failure in the first place.
Fixing spalling, unevenness, and all the other old-patio problems
Cracks are often just one item on the list when you're dealing with an old concrete patio. Spalling (where the surface flakes away in chunks or layers), uneven sections, and pitting are all common companions. Here's how to tackle each.
Spalling and surface deterioration
Light spalling (less than 1/4 inch deep) can be addressed with a skim coat of polymer-modified concrete resurfacer. Clean the surface thoroughly, wet it slightly, apply a concrete bonding adhesive, and then trowel or squeegee on the resurfacer at the manufacturer's specified thickness, usually 1/8 to 1/4 inch. This restores a clean, smooth surface and gives you a fresh canvas to seal or stain.
For deeper spalling, you need to chip out all the loose concrete until you hit sound material, then fill with a patching compound that matches your slab depth. The FHWA's guidance on partial-depth repairs makes it clear: you need to [remove all unsound concrete before you patch](https://www. fhwa. dot.
gov/Pavement/concrete/repair04. cfm). Leaving soft or delaminated concrete under your patch is the most common reason patches fail early.
Uneven sections and low spots
Low spots that collect water are a drainage problem and will accelerate future damage. Self-leveling concrete overlay is your friend here. It flows into low areas and levels itself out, and most products can go on at up to 1 inch thick in a single pour. For larger uneven sections caused by settlement, foam lifting is worth considering before you pour any surface overlays, because a lifted section that's still settling will crack your new overlay just as fast as it cracked the original slab.
Making it look right: sealing, staining, and refinishing after repairs
Once the structural and functional repairs are done, you've got a real opportunity to make the patio look significantly better than it did before. Patched concrete almost never blends seamlessly with old concrete, so trying to match the gray is usually a losing battle. Instead, commit to a full surface treatment that covers everything uniformly.
Sealing
A penetrating silane-siloxane sealer is the minimum you should apply after any repair work. It soaks into the concrete and repels water from below the surface, which protects your repairs and slows future cracking. For a patio that gets direct weather exposure, reapply every two to three years. Acrylic sealers (the film-forming kind) are a step up in appearance since they add a slight sheen, but they require periodic stripping and reapplication as they wear. For a natural look with maximum protection, the penetrating sealer is usually the right call for most homeowners.
Staining
Concrete stain is one of the best ways to disguise patchwork and give an old, repaired patio a cohesive look. Acid stains create a variegated, natural stone appearance that actually helps hide surface irregularities rather than highlight them. Water-based stains give you more color control and are easier for DIYers to work with. Apply stain before the final sealer coat, and plan for the stain to look somewhat different on patched areas than on original concrete. It's just the nature of different concrete ages and mixes absorbing color differently, and the acid stain's natural variation usually makes this look intentional rather than patchy.
Resurfacing as the full solution
If the patio has widespread cosmetic problems, cracks in multiple places, and light spalling, a full concrete resurfacing is often the most cost-effective path to a like-new appearance. If you want the cracked concrete patio to look better right away, resurfacing is often the most effective cosmetic fix when the damage is widespread cracked concrete patio look better.
A resurfaced patio gives you a clean, uniform surface, as long as you repair the underlying cracks first full concrete resurfacing. You repair the structural cracks first, then apply a 1/8 to 1/4 inch layer of concrete resurfacer over the entire slab. The result looks like fresh concrete and gives you a clean surface to seal or stain. This approach effectively eliminates the patchwork problem entirely.
It's also significantly cheaper than full replacement when the underlying slab is structurally sound. Resurfacing an average patio yourself typically costs $150 to $400 in materials, versus $2,000 to $5,000 or more for a new poured slab.
Keeping new cracks from showing up
The best repair is one you don't have to redo in three years. A few consistent habits will significantly extend the life of your repaired or resurfaced patio.
- Seal every two to three years, no exceptions. Water is the primary driver of concrete deterioration. A maintained sealer keeps it out.
- Keep the area around the patio graded away from the slab. Water pooling at the edge and migrating under the slab erodes the base and causes settlement.
- Trim back any tree roots near the patio now. Roots are patient and will heave concrete over years if they're not managed.
- Avoid using rock salt or chloride-based ice melts directly on the patio in winter. They accelerate surface spalling significantly. Use sand or a calcium magnesium acetate product instead.
- Inspect the patio every spring after the last hard freeze. Catch new cracks early when they're still hairline and easy to seal.
- If your patio has control joints (those intentional grooves cut into the surface), keep them clean and recaulk them every few years. Control joints are designed to be the weak points where the slab cracks on purpose, in a managed location. Keeping them sealed prevents water infiltration at those intentional breaks.
- Don't park vehicles or bring in heavy equipment onto a residential patio slab. Most residential patio slabs are 3 to 4 inches thick and not designed for vehicle loads.
The reality is that concrete will crack. It's not a question of if, it's when. But a patio that's been properly repaired, sealed, and maintained can easily go another 15 to 20 years before you're having this conversation again. Take the time to do the repair correctly, finish it properly, and then actually follow through on the sealing and inspection routine. It's a few hours every couple of years in exchange for a patio that holds up and looks good.
FAQ
Can I just seal over a cracked concrete patio instead of repairing it?
Yes, but only after you handle the cause of movement. If the slab has vertical displacement or it keeps settling, sealing over cracks can trap moisture and make the next freeze-thaw cycle worse. After repairs, apply a penetrating sealer (not film-forming paint) only once the patched/epoxy area has fully cured and is completely dry, typically after several warm, dry days.
What if the crack seems stable, but the surface feels loose or rough near it?
Do a quick “soundness” check at the edges of the crack. Tap along the crack line with a hammer handle, if you hear hollow sounds or the surface flakes, treat it as spalling/delamination and remove unsound concrete before any patch or overlay. Sealing or filling cracks alone will not fix loose top layers.
How do I know when DIY repair is not enough?
Stop and reassess if water is actively running into or under the slab, if the crack keeps widening each season, or if you see rust staining or dark damp areas along the crack. Those are signs the underlying base and drainage are still failing, and you may need a contractor to evaluate base voids, settlement, or slab tilt rather than continuing with DIY patching.
Is epoxy injection enough if the crack keeps reappearing?
If the crack is wider than about 1/2 inch, or you need structural bonding across two slab sections, epoxy injection is usually the right path. But if the crack has displacement and the slab is moving as a unit, injecting epoxy alone may not stop future separation. In that case, address settlement with leveling or lifting first, then repair the crack.
Can I use temporary crack filler and come back later for a permanent repair?
Yes for many jobs, but use it correctly. Apply the temporary filler to stop infiltration while you plan the permanent repair, then fully remove or follow the product directions for any surface residue before patching or sealing permanently. Never rely on hydraulic cement as a “forever” fix for an active leak if water is still finding a path under the slab.
Will resurfacing cover the cracks, or do I still need to repair first?
You can, but you need to treat the crack depth and slab movement, not just the crack line. If the patio is uneven and causing pooling, fix drainage and low areas first, typically with a foam lifting step for settlement followed by an overlay. Otherwise, resurfacing can crack along the same movement lines soon after it cures.
How can I tell whether the crack is a joint problem versus a structural problem?
Not always. Joint sealers designed for concrete joints can work for true expansion or control joints, but they often fail on cracks caused by structural movement or spalling. If one side of the crack is raised, it is displacement, and you should not treat it like a simple caulkable joint.
How long should I wait before sealing or staining after repairing cracks?
For stains and overlays, plan for a cure window. Most patch, resurfacer, and epoxy repairs require full curing before sealing or staining, and staining too early can lead to blotchy absorption or poor adhesion. If you’re unsure, do a small patch test area first and confirm dryness by checking for cool damp spots and proper hardness.
What if there are weeds or moss growing in the crack?
Yes, and it’s a common mistake. If you see moss, weeds, or roots in the crack, remove them and clean thoroughly, then dry the crack faces before applying any filler. Otherwise, the plant debris and moisture create a weak bond line and the crack can reopen as roots expand.
Can I grind down a raised crack edge before repairing it?
Mark the high edge now, then grind or feather only after you have a stable plan for repair. Cutting/grinding on an actively moving slab can remove material that was supporting the displacement boundary. If displacement is minor, grind first to remove the tripping hazard, then patch and seal, but if movement is ongoing, address lifting/settlement first.
Does climate change what I should use to fix a cracked patio?
Choose repair material based on crack behavior and weather exposure. In freeze-prone climates, you want flexible, water-blocking protection where appropriate (like polyurethane joint caulk for non-displaced cracks), and you must stop infiltration quickly for deeper leaks. Rigid patch compounds on moving cracks tend to pop out sooner.
How can I track crack progression to decide repair versus replacement?
A good next step is to take photos and record crack width measurements (at the widest point) and whether it’s wider after winter versus summer. If width changes with seasons, prioritize flexible joint-type materials and sealers, and watch for drainage issues. If width and displacement increase over time regardless of temperature, plan for a structural evaluation or replacement budgeting.