
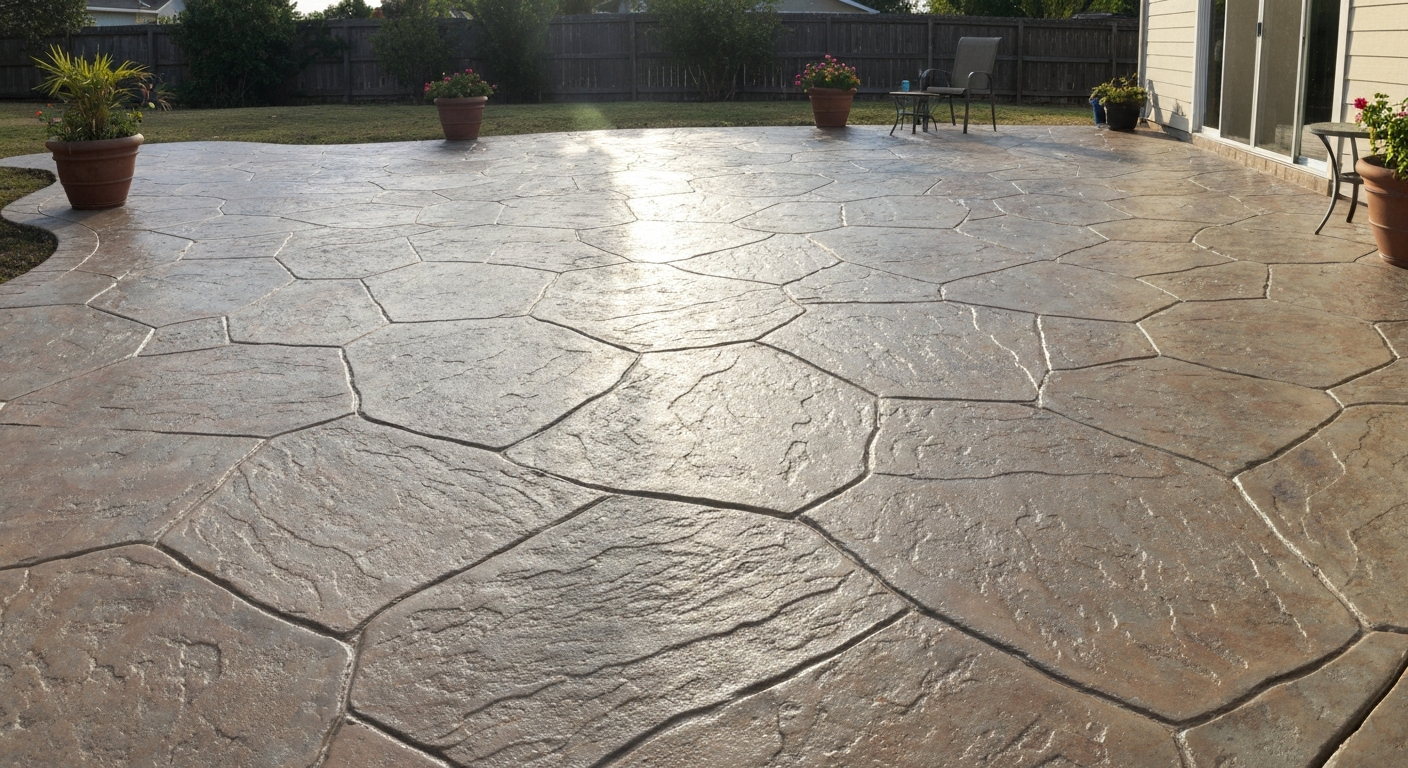
You can absolutely paint a concrete patio to look like stone, and when it's done right, the result is genuinely impressive. The process involves cleaning and repairing the slab, applying a masonry primer, laying down base and mid-tone colors, then using sponging, stippling, or stenciling techniques to mimic the veining and depth of natural stone, finished with a textured sealer that ties the whole look together. A well-executed faux-stone finish on a sound slab can last 5 to 10 years with basic maintenance, and the total materials cost typically runs $150 to $400 for an average 200–300 sq ft patio. That's a fraction of what you'd spend replacing it with real stone.
How to Paint Concrete Patio to Look Like Stone: DIY Guide

Silas Morrison
7 Aug 2026
What this guide will help you do (and what to expect)
This guide walks you through the complete project from inspection to final seal coat. By the end, you'll know whether your specific slab or block surface is a good candidate, which products actually work, how to prepare the surface so paint bonds and stays bonded, and how to apply three practical faux-stone painting techniques that look convincing in natural light. I've done this on my own backyard patio, on a neighbor's aging block surround, and helped a family member tackle a stamped concrete slab that had lost its factory color, so the advice here is based on real-world results, not just theory.
Realistic expectations matter. Paint will not make rough, pitted concrete look like polished marble. It will make a reasonably flat, well-prepped slab look like textured flagstone, slate, or limestone. The more time you invest in prep and layering, the more convincing the finish. Rushing the prep or skipping the sealer will cost you the whole project within a season.
Is painting the right choice for your surface?
Not every concrete surface is an equal candidate, and being honest with yourself here saves a lot of wasted effort. Here's how the main substrate types break down.
Poured concrete slabs
A poured slab is the best candidate for a faux-stone paint finish. It offers a relatively flat, continuous surface that accepts coatings well once it's properly etched or ground. The main concerns are age (new concrete needs at least 28 days to cure before painting), active moisture (more on testing below), and existing surface treatments like curing compounds or old sealers that can block adhesion. If your slab is structurally sound with no major cracks or spalling, you're in great shape.
Stamped decorative concrete
Stamped concrete is also workable, but there's a catch: the factory finish often includes release agents and curing compounds applied at the time of installation. These need to be completely removed before any new coating will stick. If the existing stamped color is just faded or worn, a faux-stone repaint can restore and change the look nicely. If the previous coating is peeling, delaminating, or bubbling, strip it all the way back before you start.
Concrete blocks (CMU)
Concrete masonry units, the kind used for block walls, raised planter borders, or patio surrounds, are highly porous and absorb moisture and alkali from within the block. This makes them trickier than a slab. You need a dedicated block-filler or masonry primer (sometimes two coats) to seal the porosity and prevent the finish coats from soaking in unevenly or delaminating from alkali attack. The good news is that CMU surfaces take paint well once properly primed and can look great with a faux-stone finish. The related guide on how to paint concrete patio blocks covers this substrate in more detail. See the related guide on how to paint concrete patio blocks for detailed steps and product recommendations. For step-by-step instructions specifically about painting a cement patio, see how to paint cement patio.
Concrete pavers and interlocking paving systems
This is where I have to be the bearer of bad news. The Concrete Masonry and Hardscape Association (CMHA) and most paver manufacturers advise against applying conventional film-forming paints to interlocking concrete pavers. The reason is that individual pavers flex and shift slightly relative to each other, and that movement, along with sand-filled joints, causes paint films to crack and peel within one to two freeze-thaw cycles. If you have pavers and want a new look, penetrating paver-specific sealers are a far better route than paint. If your heart is set on a painted faux-stone finish, a poured slab or a flat CMU surface will serve you much better. The article on whether you can paint cement patio blocks explores the paver and block question in more depth.
Paint vs stain vs real stone vs hiring a pro: which makes sense?
Before you buy a single can of primer, it's worth a five-minute decision check. Each approach has a different cost profile, lifespan, difficulty level, and visual ceiling.
| Option | Estimated Cost (200–300 sq ft) | Typical Lifespan | DIY Difficulty | Realistic Look |
|---|---|---|---|---|
| Faux-stone paint (this guide) | $150–$400 materials | 5–10 years with maintenance | Moderate | Convincing flagstone, slate, or limestone |
| Concrete stain (acid or water-based) | $100–$250 materials | 5–8 years | Moderate | Natural color variation, not stone texture |
| Polymer overlay with stamp/texture | $300–$700 materials | 10–15 years | Moderate-High | Excellent; closest to real stamped stone |
| Real stone installation | $1,500–$5,000+ installed | 25–50+ years | Pro-recommended | Authentic |
| Hire a decorative concrete pro | $600–$2,000+ labor+materials | 10–15 years | None (you supervise) | Professional-grade results |
My recommendation: if your slab is fundamentally sound and you're comfortable with a multi-day DIY project, the paint approach in this guide delivers excellent value. If your slab has deep structural issues, significant spalling over more than 20% of the surface, or you want a finish that genuinely rivals a professional install, the polymer overlay route or hiring a decorative concrete contractor is worth the extra investment. Staining (acid or water-based) is a great alternative if you want color variation without the faux-stone layering work, it just won't give you the raised texture and depth that makes paint mimic stone so effectively.
Full materials and tools checklist
Gather everything before you start. Running to the hardware store mid-project while paint is drying is one of those lessons you only need to learn once. Quantities below are based on a 250 sq ft patio; scale up proportionally.
Cleaning and surface prep
- Pressure washer (minimum 2,000 PSI) or rental unit
- Concrete degreaser/cleaner (1 gallon, e.g., Zep Concrete Cleaner or equivalent)
- Efflorescence remover or muriatic acid diluted to 10: 1 water:acid ratio (1 quart acid, handled with full PPE)
- Plastic sheeting (one 3 ft x 3 ft section for ASTM D4263 moisture test)
- Stiff-bristle scrub brush and push broom
- Garden hose with spray nozzle for rinsing
- pH test strips (to confirm neutral surface after acid wash)
- Concrete/masonry grinder or diamond-cup angle grinder wheel (for stubborn areas and old coatings)
Patching and repair
- Concrete crack filler or polyurethane caulk for hairline to 1/4-inch cracks (one tube per 50 linear feet)
- Vinyl concrete patching compound or Quikrete Vinyl Concrete Patcher for spalled areas and holes
- Floor resurfacer (e.g., Quikrete Re-Cap or Henry FeatherFinish) if leveling large uneven sections
- Putty knife, margin trowel, and 6-inch finish trowel
- Mixing paddle and drill (for bag-mix products)
Primer
- Masonry/concrete primer: 1–2 gallons (e.g., Sherwin-Williams Loxon Concrete & Masonry Primer, Behr Concrete & Masonry Bonding Primer, or Zinsser Bulls Eye 1-2-3 for lighter-duty use)
- Block filler primer if working on CMU: 1 additional gallon (Sherwin-Williams PrepRite Block Filler or equivalent)
- 4-inch masonry brush and 3/8-inch nap roller with extension handle
Base and faux-stone paint coats
- Masonry paint or 100% acrylic concrete/floor paint — base color (2 gallons, e.g., Rust-Oleum Concrete & Garage Floor Paint, Behr Premium Granite Grip, or Valspar Concrete Paint)
- 2–3 additional accent colors in coordinating stone tones (1 quart each; choose mid-tone, highlight, and shadow shades)
- Natural sea sponges (2–3 large; these are the workhorse of the stone technique)
- Small artist brushes (for veining, sizes 2–4 round)
- Chip brushes (1-inch and 2-inch for stippling)
- Paint trays and liners
- Painter's tape (2-inch and 1-inch rolls)
- Stone-pattern stencils if using the stencil method (purchased or DIY cut from Mylar sheet)
Textured coating (optional but recommended)
- Textured masonry coating or sand-finish additive (e.g., Rust-Oleum Textured Spray or Behr Granite Grip which has built-in texture): 1 gallon covers approx. 200 sq ft
- Fine silica sand additive (optional, mixed into sealer or clear coat for grip): 1 lb bag
Sealer
- Concrete/masonry sealer: 1–2 gallons of a UV-stable, water-based acrylic or polyurethane concrete sealer (e.g., Rust-Oleum EpoxyShield Concrete Sealer, Quikrete Concrete Sealer, or Ghostshield Lithi-Tek 9500 for penetrating option)
- Low-nap foam roller or lambswool applicator for sealer
Safety gear
- Chemical-resistant gloves (nitrile, heavy-duty for acid work)
- Safety glasses or goggles
- N95 respirator or half-face respirator with organic vapor cartridges (especially for solvent-based products or enclosed spaces)
- Old clothes and knee pads
Inspecting your slab before anything else
Skipping the inspection is the single most common reason DIY concrete painting projects fail. You need to know what you're working with before you spend money on paint.
Moisture testing
Moisture is the enemy of paint adhesion on concrete. Even if the surface looks dry, water can be moving upward through the slab by capillary action. The simplest test is the ASTM D4263 plastic sheet test: tape an 18-inch square of plastic sheeting to the concrete with all edges sealed, leave it for 16 to 24 hours, and check for condensation or darkening underneath. If you see it, moisture is actively moving through the slab and you need to address the source before painting. This qualitative test tells you there's a problem; for a more precise reading, the ASTM F2170 in-situ relative humidity probe test (taken at 40% of the slab depth) or an ASTM F1869 calcium-chloride test can give you a number to compare against your coating's technical data sheet. Many coating manufacturers, including Rust-Oleum, set a maximum moisture vapor emission rate of around 3 lb per 1,000 sq ft per 24 hours. If you're above that threshold, no coating system will give you lasting results without a moisture-mitigating primer designed for the job.
Crack evaluation
Run your hand across the slab and look closely in raking light. Hairline shrinkage cracks (under 1/16 inch wide, stable, not moving) are normal and patchable. Wider cracks, cracks with vertical displacement between the two sides, or cracks that have visibly grown since you last looked should be evaluated by a structural engineer before you paint anything over them, paint won't hide a structural problem, it'll just hide it temporarily. ACI guidance suggests getting professional eyes on any crack that's progressive or appeared after a loading event.
Spalling and delamination
Tap the slab in a grid pattern with a small hammer or coin. A hollow sound means the surface layer has delaminated from the substrate below, paint applied over a delaminated section will peel off in sheets. You need to remove that section down to sound concrete and patch it before proceeding. Light surface scaling on less than 10% of the area is manageable with a patching compound. Widespread spalling that goes deeper than 1/4 inch across a large portion of the slab is a sign the concrete itself is deteriorating, and you should strongly consider a polymer overlay or professional assessment rather than trying to paint over it.
Efflorescence
White chalky deposits on the surface are efflorescence, soluble salts carried to the surface by water moving through the concrete. If you paint over them without removal, the salts continue migrating and push the paint off from underneath. The right approach is to identify and minimize the moisture source first, then dry-brush the deposits, then use a commercial efflorescence remover or a carefully diluted acid wash (more on exact steps below). Control and Removal of Efflorescence (NCMA/CMHA TEK‑08‑03A) recommends identifying and stopping the moisture source first, dry‑brushing the deposits, then using a commercial efflorescence cleaner or a carefully controlled weak acid wash (test a small area first and contain and properly dispose of rinse water) Control and Removal of Efflorescence (NCMA/CMHA TEK‑08‑03A) recommends identifying and stopping the moisture source first, dry‑brushing the deposits, then using a commercial efflorescence cleaner or a carefully controlled weak acid wash (test a small area first and contain and properly dispose of rinse water).. Always test any acid-based cleaner on a small area first.
Slope and drainage
Your patio should drain away from the house with at least a 1/8-inch to 1/4-inch per foot slope. If water pools on the surface after rain, it will work under your paint finish over time. Note any low spots now. Minor ponding areas can sometimes be addressed with a skim coat of floor-leveling compound during the repair stage.
Repairs before you pick up a paintbrush
Every hour you spend on repairs multiplies into years of finish life. Here's how to handle the most common issues.
Hairline to 1/4-inch cracks
- Clean the crack with compressed air or a stiff brush to remove all dust, loose material, and debris.
- For cracks up to 1/8 inch wide: apply a concrete crack filler or flexible polyurethane caulk, forcing it into the crack with a putty knife or the nozzle tip. Slightly overfill.
- Smooth flush with the surrounding surface using a putty knife dampened with water.
- Allow to cure per product directions — most polyurethane crack fillers are tack-free in 1–2 hours and fully cured in 24–48 hours before topcoating.
- For cracks 1/8 to 1/4 inch wide: use a vinyl concrete patching compound. Dampen the crack, pack the compound in firmly, smooth flush, and allow 24 hours minimum cure before any coatings.
Spalled or pitted areas
- Chip away all loose, hollow-sounding, or flaking concrete with a cold chisel and hammer down to solid substrate.
- Undercut the edges slightly so the patch has mechanical grip.
- Dampen the repair area (concrete should be saturated surface dry — damp but no standing water).
- Mix vinyl concrete patcher or polymer-modified repair mortar per instructions; pack firmly into the void and trowel smooth.
- Allow 24–48 hours before applying primer or coatings. In cool weather (below 60°F), allow extra cure time.
Efflorescence removal
- Start with a dry stiff brush to remove loose salt deposits — sometimes this alone handles light efflorescence.
- Rinse with clean water. If deposits dissolve and don't return within a week, you may be done.
- For stubborn deposits, pre-wet the area with water, then apply a commercial efflorescence remover (follow the product label timing — typically 5–10 minutes of dwell time).
- If using a diluted acid solution (10 parts water to 1 part muriatic acid), apply to the pre-wet surface, scrub gently, and rinse thoroughly. Neutralize with a baking soda and water solution (1 cup baking soda per gallon), then rinse again.
- Confirm the surface is pH neutral with test strips (pH 6–8) before priming — acidic residue will attack alkaline concrete coatings.
Delamination
Any section that sounds hollow when tapped must be fully removed before painting. Use a diamond-cup grinder or cold chisel to take it back to sound material, then treat as a spalled area and patch as described above. Painting over delamination is the fastest path to a failed project.
Unevenness and low spots
Low spots deeper than about 1/4 inch that hold water need to be filled. A self-leveling floor resurfacer (like Quikrete Re-Cap or Henry FeatherFinish) works well for this. Mix per instructions, pour into the low area, and let it self-level. FeatherFinish can be applied in layers as thin as a feathered edge, making it ideal for gradual slope corrections. Allow the full 24-hour cure period before proceeding, some products specify longer in humid conditions.
Surface prep sequence and day-by-day schedule
This is where the actual work happens. Follow this order exactly, each step creates the conditions for the next one to work. I've learned the hard way that jumping ahead because a surface 'looks dry' leads to peeling paint. Drying times assume temperatures between 60°F and 85°F and moderate humidity (50–70% RH). Adjust for your conditions.
| Day | Task | Key Notes and Drying Times |
|---|---|---|
| Day 1 — Morning | Pressure wash entire surface at 2,000–3,000 PSI with concrete degreaser | Rinse thoroughly; no standing water should remain |
| Day 1 — Afternoon | Plastic sheet moisture test (tape down, leave 16–24 hours) | Check the next morning before proceeding |
| Day 2 — Morning | Check moisture test; spot-treat efflorescence if present; allow any acid/neutralizer rinse to dry | Surface must test pH neutral before etching |
| Day 2 — Afternoon | Acid etch or mechanical grind for surface profile (CSP 2–3 for paint; CSP 3–4 for polymer overlay) | Rinse etch thoroughly; allow 4–6 hours drying minimum; 24 hours ideal |
| Day 3 | Complete all crack and spalling repairs with patching compound | Allow 24–48 hours cure; do not prime over uncured patches |
| Day 4 | Apply masonry primer (1–2 coats per TDS; CMU needs block filler first) | Recoat window typically 4–8 hours; allow full overnight dry before base coat |
| Day 5 | Apply base color coat of masonry/concrete paint (2 coats) | 2–4 hours between coats; allow overnight before faux-stone decoration begins |
| Day 6 | Apply faux-stone decorative layers (sponging, stippling, stenciling, veining) | Allow 2–4 hours between each color layer; test dry time in a hidden corner |
| Day 7 | Apply sealer (1–2 coats, allow 2–4 hours between coats) | Light foot traffic after 24 hours; full cure 72 hours; no furniture for 7 days |
A note on surface profiling: the ICRI 310.2R Concrete Surface Profile (CSP) scale runs from CSP 1 (very smooth) to CSP 9 (very rough). Most acrylic concrete paints require a CSP of 2 to 3, which a thorough acid etch or light diamond-cup grind achieves. Polymer overlays and heavier textured coatings often require CSP 3 to 5, which means mechanical grinding is more reliable than acid etching alone. If your slab has an existing sealer or curing compound, acid etching won't penetrate it effectively, you need a grinder to remove it and establish the right profile.
Choosing the right products for your surface
Walk into a paint store and ask for 'concrete paint' and you'll get pointed toward a dozen options with overlapping claims. Here's how to actually sort them out.
Masonry primers
A dedicated masonry primer is not optional if you want the finish to last. Products like Sherwin-Williams Loxon Concrete & Masonry Primer or Behr's Concrete & Masonry Bonding Primer are formulated to penetrate porous concrete, seal alkali from the substrate, and give topcoats something to grip. Standard interior or exterior wall primers are not the same thing and don't perform as well on horizontal concrete. For CMU blocks, use a block filler primer first (it has a thicker consistency that fills the open pores of the block face) and then a standard masonry primer over it. Check the product TDS for minimum substrate age requirements, most specify that concrete must be at least 28 days old and that surface temperature must be between 50°F and 90°F during application.
Concrete and acrylic masonry paints
For the base coat, you want a 100% acrylic latex paint rated for concrete or masonry horizontal surfaces. Products like Behr Premium Granite Grip, Rust-Oleum Concrete & Garage Floor Paint, or Valspar's masonry line are all solid choices. Granite Grip is particularly useful because it has a built-in fine aggregate texture that adds grip underfoot and gives a slightly stone-like surface quality right out of the can, good for both safety and aesthetics on an outdoor patio. Avoid interior paints and standard exterior house paint; they lack the flexibility and abrasion resistance needed for foot traffic on a patio.
Polymer overlays and textured coatings
If you want the most durable and most convincing stone look, a thin polymer or cementitious overlay is worth considering in place of (or as a base under) the decorative paint. Products like Quikrete's Micro-Topping or Ardex Feather Finish create a fresh, flat surface over an old slab that then accepts stains and paints perfectly. They're more labor-intensive to apply (think skim-coat plastering skill) but the result is exceptional. Textured coating products with built-in stone aggregate (like Rust-Oleum's Rock Solid or similar granite-finish products) can also be used as a single-step base that already reads as stone without extensive layering.
Sealers
The sealer is what keeps your entire project looking good through rain, UV, foot traffic, and freeze-thaw cycles. Use a UV-stable, water-based acrylic or polyurethane concrete sealer in a finish that matches your desired look (matte for natural stone, satin for slate, gloss for polished marble effect). For outdoor patios in freeze-thaw climates, a flexible acrylic sealer handles thermal movement better than a rigid epoxy. If you want added slip resistance, mix in a fine silica sand or anti-skid additive at the ratio specified on the sealer label before application. Reapply sealer every 2 to 3 years for best protection.
A quick word on VOCs and weather
Water-based acrylic products have lower VOC levels and are safer to use outdoors without special respiratory equipment (though a dust mask and safety glasses are always smart). Solvent-based products have stronger fumes and require better ventilation, on an open patio this usually isn't a problem, but be mindful if you're working near windows or in a partly enclosed courtyard. Never apply any concrete coating when rain is forecast within 24 hours, when temperatures are below 50°F or above 95°F, or when direct sun is baking the slab (above 90°F surface temperature). Hot surfaces cause paint to dry too fast, trapping solvent and causing bubbles or poor adhesion.
Three faux-stone techniques, step by step
After your primer and base coat are fully dry, it's time for the fun part. These three methods produce different looks, choose based on the stone you're mimicking and your comfort level. You can even combine them: use the sponge technique for the broad field and add stenciled grout lines over the top for a more structured appearance. For a quick visual walkthrough, check a YouTube how-to video on painting a concrete patio to see the layering and brush motions in real time youtube how to paint concrete patio.
Technique 1: Sponged and stippled natural stone
This is the most flexible technique and the easiest to make look natural. It mimics irregular stone like slate, bluestone, or granite. Your base coat is your lightest color. Once it's dry, dampen a natural sea sponge (not a synthetic one, the irregular cell structure of a sea sponge creates random, organic-looking marks), dab it into your mid-tone color, blot off the excess on a paper towel, and then lightly dab it across the base coat with a random rotating motion. Work in roughly 2-foot square sections. Apply your mid-tone in 60 to 70% coverage, leaving some base showing through. Then use a slightly darker color on a fresh sponge for the shadow areas, corners, edges, and irregular patches. Finally, use a near-dry chip brush and a lighter highlight color to stipple in bright spots. Vary your pressure and angle constantly to avoid repeating patterns. Allow 2 hours between each color layer. The layered result has real depth.
Technique 2: Stenciled tile and grout lines
This technique mimics cut stone tiles, think limestone pavers, slate squares, or travertine. After your base coat, lay out your stencil pattern and tape it down firmly. Apply your stone-texture color through the stencil with a dense foam roller or stipple brush. Move the stencil, align carefully using registration marks (small notches on the stencil corners), and repeat across the whole surface. Once all tiles are painted and dry (2–4 hours), use a small artist brush loaded with a darker gray or brown to hand-paint thin grout lines between the tiles. A steady hand and a paint consistency just thin enough to flow helps here. The guide on how to paint faux tile on concrete patio covers this technique in significantly more depth, including how to cut your own Mylar stencils for custom stone sizes.
Technique 3: Layered textured coatings with veining
This is the most advanced technique and produces the most convincing result for marble or high-end stone looks. Apply your base color. While it's still slightly tacky (not wet, but not fully cured, test in a corner), use a 2-inch natural bristle chip brush loaded with a watered-down darker color to drag irregular veins across the surface at a diagonal angle. Real stone veins don't run straight: twist the brush slightly as you drag, and lift pressure at irregular intervals. Then dry-brush a lighter metallic or pearl-tone color very lightly across raised textured areas (if using a textured coating) to highlight the peaks. Allow 4 hours before sealing. This technique requires practice, test it on a piece of cardboard first until you're happy with the motion.
Sealing, curing and long-term maintenance
Once your faux-stone layers look the way you want, sealing locks it all in. Apply the first sealer coat with a low-nap foam roller or lambswool applicator in thin, even passes. Avoid puddling. Allow 2 to 4 hours before the second coat, and apply it in a perpendicular direction to the first. Let it cure 24 hours before light foot traffic, 72 hours before moving furniture back, and a full 7 days before heavy use.
For ongoing maintenance, sweep the patio regularly to prevent grit and debris from abrading the surface. Rinse with a garden hose as needed, avoid high-pressure washing directly on the painted surface because it can degrade the sealer over time. Reapply sealer every 2 to 3 years, or when water stops beading on the surface (that's the visual signal the sealer is depleted). Touch up any chips or worn patches with matching paint before resealing rather than waiting for full failure.
Troubleshooting common problems
Paint is peeling or bubbling
Peeling almost always comes down to one of three causes: moisture moving through the slab pushing the paint off from underneath, inadequate surface prep (old sealer or contaminants blocking adhesion), or skipping the primer. If it's moisture-related, the peeling typically appears first in low spots or near the house foundation where water concentrates. Strip the failed area, address the moisture source, apply a moisture-mitigating primer, and repaint. If contaminants are the culprit, the paint will peel in large sheets with little concrete residue on the back, strip, regrind the area to a clean CSP, reprime, and repaint.
Uneven color or blotchy coverage
Blotchy color on the base coat usually means the primer coat was too thin or missed sections. The solution is a second full primer coat, allowed to dry fully, followed by a fresh base coat. On the decorative faux-stone layers, uneven coverage is often part of the natural stone look, step back and look at it from 10 feet before deciding it's a problem. If an area is genuinely too dark or too light, wait for full cure and glaze a corrective color layer over it with a lightly loaded sponge.
Color mismatch when touching up
Concrete paint weathers and UV-fades over time, so a fresh patch of the original color will look noticeably different. Always save paint from the original project in a sealed, labeled container. When touching up, feather the new paint into the surrounding area with a dry-brush technique and apply sealer over the whole section rather than just the spot to blend the sheen level.
Efflorescence appearing through the new paint
If white deposits appear through the finish after painting, the underlying moisture issue wasn't resolved before the project started. Strip the affected area, stop the moisture source if possible (improving drainage, sealing foundation wall penetrations, regrading soil away from the slab edge), treat the efflorescence, apply an alkali-resistant masonry primer, and repaint.
When to call a pro instead
Most homeowners with a sound slab can handle this project over a long weekend. But there are a few situations where I'd genuinely recommend picking up the phone instead of the paintbrush: structural cracks with displacement or active movement (a structural engineer needs to evaluate those before any cosmetic work), pervasive spalling or delamination covering more than 25 to 30% of the slab (the repair work alone is a major project), significant subslab moisture problems that require drainage improvements or vapor mitigation systems, or any situation where the patio is a primary selling point of a property and you need guaranteed results. Decorative concrete contractors who specialize in overlays and faux finishes can produce results that are genuinely difficult to distinguish from real stone, and their work often comes with a warranty that DIY can't match.
FAQ
Is painting a concrete patio to look like stone a good DIY option for all concrete substrates?
Yes for many situations, but suitability depends on substrate and conditions. Poured slabs, stamped concrete, concrete pavers and CMU/block can be finished to look like stone — but each has constraints: poured slabs and stamped concrete work well when structurally sound and free of curing compounds; CMU needs block‑filler or masonry primers to seal high porosity; interlocking pavers are often better left uncoated or sealed with paver‑specific sealers because joint movement and sand migration can cause coating failure. Always inspect moisture, structural cracks and surface contaminants before proceeding.
How do I check concrete moisture before applying coatings?
Start with the ASTM D4263 plastic‑sheet (18" plastic) surface test: tape a plastic sheet to the slab for 16–24 hours; visible condensation means active capillary moisture and you need further testing. For quantitative checks many manufacturers require ASTM F1869 (calcium‑chloride MVER) or ASTM F2170 (in‑situ relative humidity at 40% slab depth). Confirm the coating’s Technical Data Sheet (TDS) moisture limits — typical limits are ~3 lb/1000 ft²/24 hr (F1869) or RH limits in the mid‑70s–80s% (F2170). If tests fail, address moisture sources or choose vapor‑tolerant systems.
What surface preparation steps are required before painting to get a durable faux‑stone finish?
1) Repair structural issues and active leaks (address drainage, grading, gutters). 2) Remove dirt, oil, mildew and curing compounds with appropriate cleaners. 3) Eliminate efflorescence (dry brushing, pressure washing, or a tested commercial efflorescence cleaner/weak acid rinse as needed). 4) Profile the surface to the CSP required by your coating (mechanical grinding or shot‑blasting is preferred for consistent bond; acid etch is less controlled). 5) Repair cracks: route and fill non‑structural cracks with an appropriate flexible filler; inject structural dry cracks with epoxy or use polyurethane for active/wet cracks. 6) Apply a masonry/concrete primer per manufacturer TDS. Allow all repairs and cleaning to dry fully before coating.
What basic materials and tools do I need (materials checklist)?
Materials: masonry/concrete primer, base concrete paint or acrylic masonry paint, 1–2 accent glaze/antiquing colors, textured coating or polymer cement overlay (if using layered textured method), grout‑color paint for stencil lines or sanded caulk for faux grout, paver sealer or film‑forming topcoat (urethane/acrylic) rated for exterior slabs, crack filler (epoxy or polyurethane), efflorescence cleaner, degreaser. Tools: pressure washer or hose with nozzle, stiff brushes, diamond cup grinder or floor grinder (or acid etch kit for small jobs), rollers and brushes, sponges/stippling pads, stencils/templates, spray bottles, paint sprayer (optional), mixing buckets, masking tape, respirator, gloves, and timing/temperature thermometer/hygrometer.
Which three practical techniques give realistic stone appearance and when should I use each?
1) Sponged/Stippled Natural Stone: best for irregular fieldstone or flagstone look; uses layered base coat, multiple glaze colors applied with sponges or stipple pads, and soft blending. Good for most slabs and stamped concrete. 2) Stencil/Tile & Grout Lines: best for cobble, cut‑stone or tile patterns; use stencils or tape to lay out stone shapes, paint field stones, then add grout lines with darker paint or sanded caulk for texture. Good when uniform pattern and grout realism are desired. 3) Layered Textured Coatings: use thin cementitious polymer overlays or textured coatings to create raised edges and mortar profiles before painting; ideal when you want pronounced texture or to hide unevenness. Choose this when surface irregularities need hiding or tactile texture is important.
Step‑by‑step: how to do the sponged/stippled natural stone technique?
1) Prep: clean, repair cracks, profile surface, and prime per TDS. 2) Base coat: apply a mid‑tone concrete paint or acrylic base color and let dry fully (follow TDS drying times, usually 2–24 hours depending on product). 3) First glaze layer: mix a translucent latex/acrylic glaze with pigment and apply with large sponge or roller; while wet, use natural sea sponges to add irregular blotches of darker and lighter tones. 4) Blend: mist with water or glaze thinner and soften hard edges with a clean sponge. 5) Add veins/highlights: use a small sponge or brush to add thin lines or flecks of contrasting color. 6) Cure: let glaze dry per manufacturer (often 24–48 hours). 7) Seal: apply an exterior sealer/topcoat compatible with your paints (usually 2 coats). Allow full cure before foot traffic.