
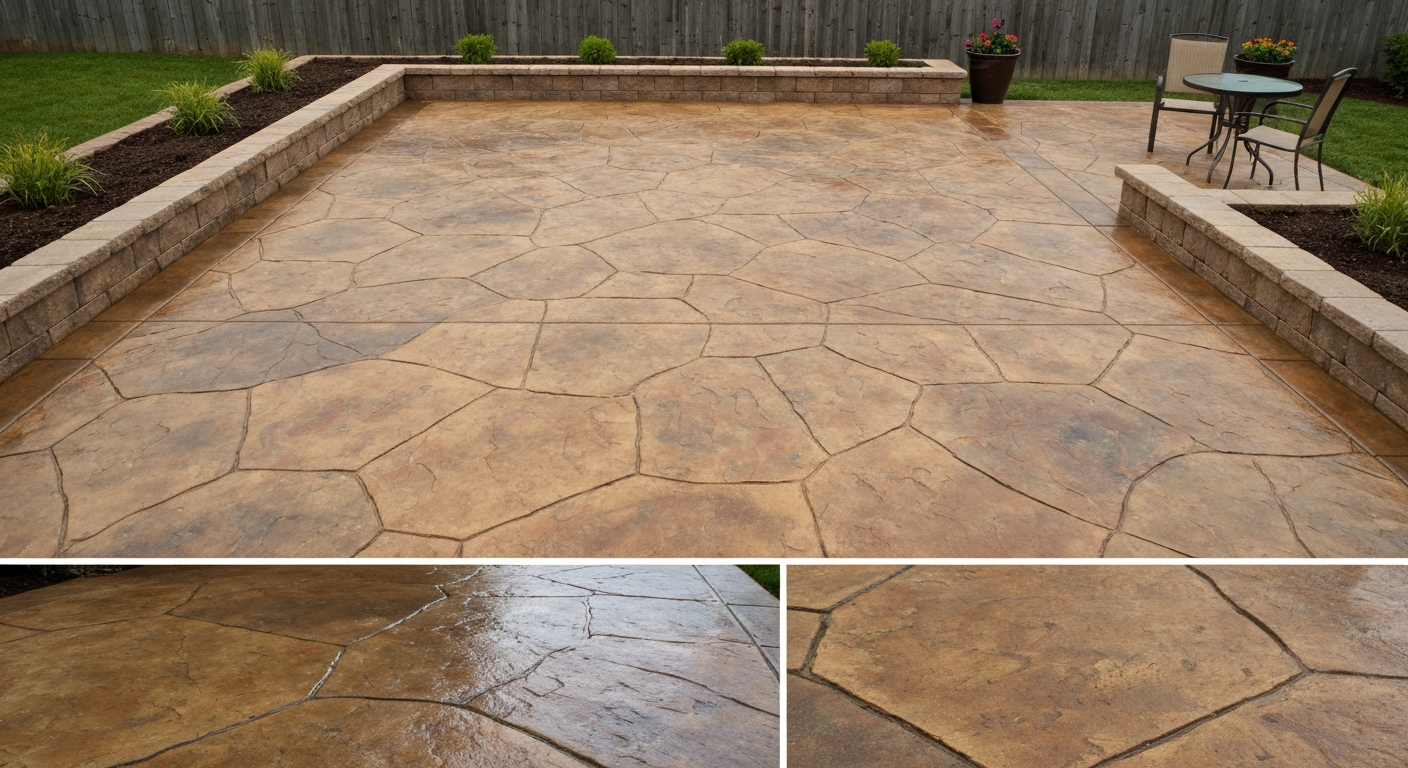
You can stain a concrete patio to look convincingly like natural stone using acid stain, water-based stain, a decorative overlay, or a combination of stamping and stenciling. The most realistic stone effect comes from layering two or three complementary colors, working in irregular patches rather than even coats, and finishing with a quality sealer that mimics the depth of polished or honed stone. Done right, a DIYer with a weekend and roughly $1–$4 per square foot in materials can transform a flat gray slab into something that genuinely reads as slate, flagstone, or travertine.
How to Stain Concrete Patio to Look Like Stone: DIY Steps

Silas Morrison
18 Jul 2026
What to expect: goals and realistic results
Let's be straightforward about what staining achieves and what it doesn't. Staining changes the color and visual character of the surface; it doesn't change the texture or hide significant damage. A well-executed acid stain job on a clean, sound slab will produce deep, mottled, earth-toned color with natural variation, exactly the quality that makes stone look like stone. Acid stains produce variegated, mottled, natural‑stone appearances because the chemical reaction is heterogeneous across the slab, while dye/stain penetrants produce more even color Acid stains produce variegated, mottled, natural‑stone appearances because the chemical reaction is heterogeneous across the slab, while dye/stain penetrants produce more even color.. Water-based stains give you more color choice and a more predictable finish. Overlays and stamped systems add texture and pattern on top of color, which pushes the illusion further. What you won't get is a surface that feels like rough-cut granite underfoot unless you add texture physically. Expect labor time of one to three days depending on method, plus 24–72 hours of cure time before sealing.
Choosing the right method for your patio
There are four main routes to a stone look on concrete, and picking the wrong one is the most common expensive mistake I see homeowners make. Here's how each one works and what it's actually suited for.
| Method | How it works | Stone realism | DIY difficulty | Approx. material cost/sq ft | Best for |
|---|---|---|---|---|---|
| Acid stain | Metallic salts in an acidic (muriatic acid) carrier chemically react with free lime in the cement paste, producing permanent variegated color | High — natural mottling mimics stone grain | Moderate (safety precautions required) | $0.50–$1.50 | Sound existing slab, earth-tone palette |
| Water-based stain | Pigment or dye suspended in water/polymer carrier; semi-penetrating, not chemically reactive | Medium-high with layering technique | Low-moderate | $0.50–$1.00 | Wider color range, lower-odor projects |
| Decorative overlay / microtopping | Polymer-modified cement resurfacer applied 1–12 mm thick, then stained or colored | Medium-high; hides damage, adds texture | Moderate-high | $1.50–$4.00 | Spalled, pitted, or damaged slabs |
| Stamped/stenciled finish | Texture mats or stencils pressed into a fresh overlay or used with stain to create grout lines and stone shapes | Very high with color layering | High | $2.00–$5.00 | New pours or full overlay resurfacing |
My personal go-to for existing patios in reasonable condition is a two-color acid stain with a water-based accent wash, it gives you that authentic, slightly unpredictable stone quality that's hard to fake with flat color. If you're dealing with a rough, pitted surface, skip straight to an overlay; staining over spalled concrete just highlights the damage.
Decision checklist: which method fits your situation
- Slab is in good condition (no major cracks or spalling) → acid stain or water-based stain
- You want earth tones: rust, tan, brown, green, or blue-gray → acid stain
- You want bright, custom, or cool-toned colors → water-based stain or dye
- Surface has significant pitting, spalling, or shallow depressions → overlay first, then stain
- You want actual stone texture underfoot, not just color → stamped overlay or texture mat system
- Patio was previously sealed or painted → must strip coating first; overlay may be more practical
- New pour (concrete cured 28+ days) → any method works; acid stain gives best mottling
- You have limited time or experience → water-based stain is the most forgiving
Matching your method to the patio's actual condition
Before you buy anything, get down on your hands and knees and really look at your slab. Run your palm across it. Pour a small cup of water on it and watch how fast it absorbs. These quick checks tell you more than any surface assessment tool.
New concrete (cured at least 28 days, no sealer applied) is the ideal candidate for acid staining. The free lime content is high, which means the chemical reaction that creates mottled color is vigorous. Expect rich, deep variation. For a water-based stain, new concrete also works perfectly, just make sure no curing compound was applied at the pour, because most curing compounds block stain penetration. If a curing compound was used, you'll need to grind it off mechanically.
Existing concrete that's been exposed to weather and traffic for years will have less free lime near the surface, which produces a subtler, less reactive acid stain result. That's not necessarily bad, it's often more understated and elegant, but go in knowing the color may be lighter than the product sample. Existing slabs that are painted or have a film-forming sealer require full stripping before any stain will work. You can test for a coating by dripping water on the surface: if it beads up, there's a sealer or paint present. A stripper or mechanical grind is needed before staining.
Pitted, spalled, or delaminated concrete is where overlays earn their keep. A cementitious microtopping (typically applied at 1–3 mm) or a stampable overlay (applied at 6–12 mm for heavier texture work) bonds to the sound concrete beneath, giving you a fresh surface to stain or stamp. The key requirement is that any loose, delaminated, or crumbling concrete must be removed back to sound material before the overlay goes down, the overlay can't bridge weak concrete.
Planning colors and stone patterns before you touch a brush
This is the step most people rush, and it's where the difference between a professional-looking result and a muddy mess is decided. Natural stone is never one color. Look at a piece of flagstone or slate and you'll see a base tone, a secondary undertone, and often a third highlight or vein color. Your goal is to replicate that layered quality.
For an acid stain stone effect, a common starting palette is a warm tan or golden brown as the base, a darker walnut or English red applied in irregular overlapping patches, and a charcoal or dark green as a shadowing tone along the edges of simulated stone shapes. Earth-tone palettes work because acid stain chemistry naturally produces rust, brown, tan, olive, and blue-gray colors from the metallic salt reactions. You can't acid stain a patio fire-engine red, but you can achieve almost any natural stone tone in that warm-to-cool earth range.
For water-based stains, the palette is unlimited. If you're targeting limestone, a warm cream with a light gray wash and occasional buff accent does it well. For slate, layer a cool blue-gray with dark charcoal and a hint of purple-brown in the recessed areas. Search actual stone photos online before committing, save three or four reference images and use them as your target when mixing and testing.
Sketching a simple layout on paper before application pays off enormously. Decide where your simulated stone 'joints' will fall. Common approaches include a random flagstone pattern (organic irregular shapes, 12–24 inches across), a rectangular slate pattern (brick-offset rectangles), or a cobble pattern (smaller, rounder shapes). You can tape out these shapes with painter's tape or score lines into an overlay, or use a stone stencil. The layout doesn't need to be precise, natural stone isn't either, but having a rough plan prevents you from painting yourself into a corner and running out of a color in an awkward spot.
Tools, materials, and safety gear you'll actually need
One of my first acid stain jobs taught me the hard way that 'just using what I had' with acid stain doesn't work. Acid stain is dilute muriatic acid. It eats through cotton clothing, irritates lungs, and will spot any metal tool it touches. Gear up properly and have everything staged before you open a bottle.
Safety gear (non-negotiable for acid stain)
- Chemical-resistant nitrile or neoprene gloves (not latex, not fabric)
- ANSI-rated chemical splash goggles (not just safety glasses)
- N95 respirator minimum for acid stain; P100 half-face respirator strongly preferred
- Old clothing or a full-body Tyvek suit — acid stain will destroy fabric on contact
- Rubber boots or old shoes you'll discard after
- A bucket of baking soda solution (1 cup baking soda per gallon of water) staged nearby for neutralizing spills
Application tools and materials
- Plastic pump garden sprayer (for acid stain — never metal) or a plastic watering can
- Acid-resistant plastic bristle brush or broom for working stain into texture
- Nylon brushes and sponges for water-based stain layering
- Painter's tape and plastic sheeting to mask adjacent surfaces, walls, and landscaping
- Pressure washer (1500–2500 PSI) for initial cleaning
- Concrete degreaser (alkaline, biodegradable)
- Acid etch solution (10–15% muriatic acid or phosphoric acid etching product)
- Baking soda for neutralizing acid etch residue
- Concrete crack filler or patching compound for prep
- Stain or dye of choice (acid-based or water-based, in planned colors)
- Decorative overlay or microtopping mix if resurfacing
- Concrete sealer: solvent-based acrylic for high gloss/deep color, water-based acrylic for lower sheen, or penetrating epoxy/polyurethane for heavy traffic
- Lamb's wool roller or pump sprayer for sealer application
- Anti-slip additive if patio sealer will be high-gloss
The most important material difference to understand is acid stain versus water-based stain. Acid stains are metallic salt solutions in a muriatic acid carrier, the color becomes part of the concrete through a chemical reaction with calcium compounds in the cement paste, so it cannot peel or flake. According to Choose the Right Type of Concrete Stain or Dye - Concrete Network, acid stains bond by chemical reaction into the top layer of cement paste and therefore will not flake or peel like surface coatings; color wears away only as the concrete surface itself is abraded. Water-based stains are pigment or dye suspensions in a water or polymer carrier; they are semi-penetrating and rely on good absorption rather than a chemical bond, which means surface prep is equally critical but the handling is far safer and less corrosive. Neither is better in all cases, they're different tools for different situations.
Testing before you commit: sample patches and color prediction
I cannot stress this enough: test in a hidden corner or on a spare piece of concrete before touching the main slab. Acid stain color on a finished slab will not look exactly like the product sample card, because the reaction depends on your specific concrete's chemistry, age, and porosity. The product card shows a controlled lab result. Your slab will show its own character.
Apply your test patch at the same dilution and dwell time you plan to use on the full slab. Let it fully react (30–60 minutes is typical for acid stain), neutralize, rinse, and let it dry completely before judging it. Wet concrete looks much darker than dry concrete, a common mistake is neutralizing a test patch, seeing it look great while wet, and then being surprised when it dries significantly lighter. Apply a small amount of your planned sealer to the test patch once dry; this shows you the final wet-look depth and sheen.
Weather matters too. Acid stain applied in hot sun (above 90°F) will dry faster than the reaction can complete, leaving uneven or lighter color. Apply stain in the morning or on a cloudy day, ideally when temperatures are between 50°F and 80°F. High humidity slows drying but doesn't typically harm the stain reaction. Cold temperatures below 50°F can slow the chemical reaction significantly and are best avoided.
Surface preparation: the step that determines everything
Every experienced decorative concrete person will tell you the same thing: 80% of a stain job's success is in the prep. A beautiful acid stain on top of a dirty, oily, or poorly prepared slab will look blotchy, uneven, and disappointing, not in an attractive stone-like way, but in a clearly botched way. Do not rush this phase.
- Clear the patio completely: remove all furniture, planters, and anything stored on the concrete. Sweep off loose debris.
- Identify and repair cracks and holes: use a concrete crack filler or hydraulic cement for cracks wider than 1/8 inch. Let repairs cure fully per product instructions (usually 24 hours minimum) before continuing. Note that repaired areas may accept stain differently than surrounding concrete — factor this into your color plan.
- Degrease the entire surface: apply an alkaline concrete degreaser according to product directions, scrub with a stiff nylon brush, and rinse. Oils, grease, and tire marks will resist stain penetration and create obvious light spots. If the slab is in a garage-adjacent or heavily used area, apply degreaser twice.
- Pressure wash at 1500–2500 PSI: rinse the entire slab thoroughly and let it dry completely — typically 24 hours in warm weather, 48 hours in cool or humid conditions. Starting stain application on a wet slab dilutes the product and causes uneven color.
- Remove any existing sealers or paint: if water beads on the surface, a coating is present. Use a chemical stripper rated for the coating type, or grind the surface with a floor grinder fitted with diamond tooling. Film-forming coatings are incompatible with penetrating stains.
- Do a final surface inspection: look for any oil spots, residue, or areas that still bead water. Address each one before moving on to etching.
Etching the concrete: when to do it and how to do it safely
Etching opens the pores of the concrete surface so stain can penetrate properly. For step-by-step instructions and safety tips, see how to etch concrete patio. For acid staining, the stain itself does light etching, but a separate etch step is often still recommended for older slabs or any surface that may have a light contamination layer. For water-based stains and overlays, etching is a required prep step to create adequate surface profile for adhesion. The ICRI (International Concrete Repair Institute) defines Concrete Surface Profiles (CSP 1–10) as a standard for how much texture/roughness a surface needs for different coatings, most stains need CSP 1–2, while thick overlays need CSP 3–5, typically requiring mechanical preparation rather than acid alone.
Acid etching step-by-step
- Pre-wet the concrete with clean water — the surface should be damp but not puddling. This prevents the acid from being absorbed too aggressively in dry spots.
- Mix your etch solution: a standard dilution for muriatic acid etching is 1 part acid to 10 parts water. ALWAYS add acid to water, never water to acid. Alternatively, use a premixed phosphoric acid etching product, which is safer to handle and produces less fume.
- Put on all your chemical safety gear before opening any acid container.
- Apply the etch solution evenly across the surface using a plastic watering can or plastic sprayer. Work in manageable sections (about 100 sq ft at a time).
- You should see light fizzing — this is the acid reacting with the calcium carbonate in the cement paste. If there's no fizzing, the surface may still have a coating blocking it. If fizzing is very aggressive, your dilution may be too strong.
- Let the solution dwell for 5–10 minutes. Do not let it dry on the surface.
- Scrub with a stiff nylon (not metal) brush to work it into the surface evenly.
- Neutralize completely: apply the baking soda and water solution (1 cup baking soda per gallon of water) across the etched area. Scrub and let it sit 5 minutes. You'll see slight fizzing as the acid is neutralized.
- Rinse thoroughly with clean water and a pressure washer. Rinse at least twice.
- Test pH with litmus paper: the rinsed surface should read pH 7–8 before you proceed. Residual acid will interfere with stain adhesion and color development.
- Let the slab dry completely — 24 hours minimum.
Mechanical abrasion as an alternative
If you're uncomfortable with acid or if the slab needs more aggressive profiling (for an overlay, or to remove a thick coating), mechanical prep is the better route. A rented floor grinder with diamond cup wheels, or a shot blaster, will open the surface without chemicals. This is also the right approach for overlays requiring CSP 3 or higher. Grinders are available at most tool rental shops for $50–$100 per day. Wear a P100 dust respirator, not just an N95, concrete dust contains crystalline silica and is a serious respiratory hazard with extended exposure.
Applying acid stain to mimic stone: step-by-step
With a clean, etched, dry slab, you're ready for the most satisfying part. Here's how I approach a two-color acid stain to get a flagstone or slate effect. If you want a simple step-by-step guide on how to concrete stain a patio, read our detailed how-to.
- Mask all adjacent surfaces: tape plastic sheeting over walls, siding, door thresholds, and any landscaping beds bordering the patio. Acid stain will spot and permanently stain anything it contacts.
- Sketch your stone layout on the slab lightly with a lumber crayon or chalk line if you want defined stone shapes. This is optional — for a more natural slate look, you can work freehand.
- Apply your base color first: pour acid stain into a plastic pump sprayer and apply in a sweeping, slightly overlapping motion. Do not back-spray over wet areas — let the first pass set before adding more. Work the stain into the surface with a plastic-bristle brush in circular and figure-eight motions to encourage the natural mottling.
- Let the base color dwell: typically 30–60 minutes. You'll see the concrete darken and the color deepen as the reaction proceeds. The surface should look slightly wet and uneven — this is exactly right.
- Apply the second color in irregular patches while the base is still damp but not puddling. Use a brush or a damp sponge to feather the second color at its edges, blending it into the base in some areas and keeping hard contrasts in others. Think of how different mineral layers in stone don't have sharp lines.
- For a third accent or vein color (optional but recommended for realism): thin the stain slightly with water (10–15%) and use a narrow brush to create irregular lines — not perfectly straight, but branching, organic. Vein lines that follow a roughly consistent direction look more natural than random scribbles.
- Allow the full dwell time specified by the stain manufacturer (typically 2–8 hours for complete reaction).
- Neutralize: apply the baking soda solution across the entire stained surface. Scrub gently with a nylon brush. Let sit 5 minutes.
- Rinse thoroughly with clean water. Rinse multiple times until the rinse water runs completely clear — residual acid stain residue left on the surface will appear as a dark, sludgy film and will prevent sealer adhesion.
- Allow to dry completely — at least 24 hours, 48 hours preferred. Do not walk on the surface until sealed.
Applying water-based stain for a stone look
Water-based stain application for a stone effect is more forgiving than acid stain because you can add more color or adjust as you go, and there's no aggressive chemical reaction to manage. The trade-off is that the natural mottling you get automatically with acid stain has to be created deliberately with water-based products, through layering, sponging, and varied application.
Start with a diluted base coat (typically 1 part stain to 1–2 parts water, depending on the product) applied evenly with a nylon roller. Let it dry per product instructions, then apply a second coat in a complementary tone using a large sea sponge or crumpled plastic bag rather than a roller. The irregular texture of the sponge creates the broken, varied color surface that reads as stone grain. A third application using a slightly darker tone with a dry-brush technique along any scribed or taped stone joint lines deepens the shadows between simulated stones. Always work wet-into-wet at the color edges to avoid hard lines.
One thing to note on water-based stains: some products, particularly solvent or acetone dyes, can fade significantly outdoors with UV exposure. Always check the manufacturer's technical data sheet for exterior and UV stability ratings before purchasing for a patio application. Many modern water-based formulas are rated for exterior use and are UV-stable, but confirm this for each specific product rather than assuming.
Using stencils, stamps, and texture mats for deeper stone realism
Stenciling and stamping take you to another level of realism because they add physical dimension, actual recessed grout lines, surface texture, and defined stone shapes, not just color variation. These techniques pair naturally with staining, and together they're how the pros produce work that genuinely fools people from a few feet away.
For an existing slab, stencils work with either overlays or stain alone. Adhesive concrete stencils designed for stone patterns are applied to the clean, prepared surface before staining. You apply a base coat of color over the whole slab, remove the stencil after the stain has set (leaving lighter grout-line impressions), then apply a darker tone over the stone shapes to create depth. The result is a clean flagstone or cobblestone pattern with color variation in each 'stone' shape.
Texture mats and rubber stamps are used on fresh stampable overlays (applied at about 6–12 mm thick). You apply the polymer-modified overlay, let it reach the right green strength (firm enough to hold an impression but soft enough to accept the mat), press the texture mat firmly across the surface, and lift cleanly. You then apply color releases and stains to the textured surface. This is unquestionably the most labor-intensive DIY route, but it also produces the most realistic stone texture, because you're creating actual raised and recessed surfaces, not just painted ones. If this interests you, it's worth reading up on how to stencil a concrete patio as a starting point before committing to a full stamped overlay. For step-by-step guidance on patterns and application, see how to stencil a concrete patio. For step-by-step instructions on coloring already-installed slabs, see our guide on how to color existing concrete patio. For step-by-step guidance on adding texture to an existing slab, see how to texture a concrete patio. For a full step-by-step walkthrough and material list, see our guide on how to stain cement patio to get professional-looking results.
Sealing and finishing for durability and that stone depth
Sealing is what takes a stained patio from looking like painted concrete to looking like actual polished or honed stone. The sealer creates the wet, deep appearance that makes color look rich rather than flat, and it protects the stain from UV fading, abrasion, and moisture penetration.
Solvent-based acrylic sealers produce a high-gloss, wet-look finish that maximizes the depth of acid stain color and does the best job of mimicking polished stone. They're effective and durable but have higher VOC content and require good ventilation during application. Water-based acrylic sealers offer lower sheen (satin to semi-gloss) and lower VOCs, and their performance has improved substantially in recent years. Penetrating epoxy or polyurethane sealers are more durable and abrasion-resistant for heavy traffic areas but are harder to apply and re-coat.
Apply sealer in two thin coats using a pump sprayer or lamb's wool roller, allowing the first coat to dry fully before the second (typically 1–2 hours between coats). Two thin coats outperform one thick coat every time, thick application leads to bubbling, haziness, and uneven sheen. If the patio gets wet or will be walked on when wet, add a non-slip aggregate (fine aluminum oxide powder is most common) to the final coat of sealer before application, mixing it in per the product ratio, usually about 4–8 ounces per gallon.
Time and cost estimates for a typical DIY project
| Method | Prep time | Application time | Cure/dry before use | Material cost (per sq ft) | Rental equipment needed |
|---|---|---|---|---|---|
| Acid stain (2 colors) | 1 day (clean + etch) | 4–6 hours | 48–72 hours after sealing | $0.80–$2.00 incl. sealer | Pressure washer |
| Water-based stain (layered) | 1 day (clean + etch) | 3–5 hours | 24–48 hours after sealing | $0.70–$1.80 incl. sealer | Pressure washer |
| Microtopping + stain | 1 day (grind + clean) | 1–2 days (topping + stain) | 72 hours after sealing | $2.00–$4.00 incl. sealer | Floor grinder, pressure washer |
| Stencil + stain | 1 day (clean + etch) | 4–8 hours | 48–72 hours after sealing | $1.00–$2.50 incl. sealer | Pressure washer |
| Stamped overlay | 1 day (grind + clean) | 2–3 days | 72–96 hours after sealing | $3.00–$6.00 incl. sealer | Floor grinder, pressure washer, mixer |
These ranges assume a 200–400 sq ft patio and DIY labor. Material costs vary by region and product quality. Don't cut corners on sealer, it's the smallest part of the material budget and the biggest factor in long-term appearance and durability.
Troubleshooting common problems
Color came out too light or uneven
For acid stain, light color usually means the slab had a sealer or contamination layer that blocked the reaction, the stain dried too fast in heat or wind, or the concrete is older and low in free lime. You can apply a second coat after re-etching lightly, or layer a water-based stain over the acid stain once it's neutralized and dry to build depth. Uneven color on a water-based stain usually means inconsistent surface porosity, use a diluted additional coat, applying more in the lighter areas.
Patchy or spotty areas
Spots that resist stain are almost always contamination, oil, grease, or a residual chemical that wasn't fully removed in prep. If you find them after staining, your options are limited: a decorative overlay over the whole slab, or embracing the variation as part of the stone look. Prevention is the only real fix, thorough degreasing before application is everything.
Sealer turned cloudy or white
Sealer cloudiness (blushing) almost always means moisture was present when the sealer was applied, either the concrete wasn't dry enough, or humidity was too high. Strip the sealer with a solvent stripper, let the slab dry completely (test with plastic sheeting taped down overnight, if moisture condenses on the underside of the plastic, the slab is still wet), and re-apply. Never seal over a damp surface.
Overlay delaminated or lifted at the edges
Overlay delamination means the substrate wasn't properly profiled (not enough CSP) or there was contamination at the bond line. Edges are the most common failure point because they're thinner. Grind the lifted material back to sound concrete, re-profile, prime with the overlay manufacturer's recommended primer, and re-apply. If you're seeing widespread delamination, the overlay system you used may not be rated for your application conditions, check the product data sheet for minimum temperature, substrate moisture, and surface profile requirements.
Maintenance after the project is done
A sealed, stained patio is relatively low maintenance but not zero maintenance. Clean it regularly with a pH-neutral cleaner and a soft-bristle brush, avoid acidic cleaners like vinegar (yes, people use this on patios and it slowly degrades acrylic sealers) and strong alkaline degreasers on the finished surface. Re-seal every 1–3 years depending on traffic and UV exposure. In high-traffic areas or very sunny exposures, check annually: if water no longer beads on the surface, it's time to re-seal. You don't need to strip and re-stain, just clean the surface, let it dry, and apply a fresh coat of the same sealer type.
When to stop DIYing and call a pro
Most healthy concrete patios in the 200–600 sq ft range are within DIY reach for acid or water-based staining with careful prep and patience. But there are situations where I'd recommend getting a professional quote before committing. If your slab has structural cracks (moving cracks, cracks wider than 1/4 inch, or cracks with vertical displacement on one side), staining over them is temporary, you need a structural assessment first. If the slab has widespread spalling across more than 30% of the surface, a proper overlay system installed by an experienced contractor will likely outlast a DIY attempt. And if you've never worked with acid before and the project is large, at minimum have a helper who can manage rinsing and neutralizing while you apply, acid stain doesn't wait for you to be ready.
Finally, if you're interested in pushing the effect further, stamping and stenciling techniques, adding texture to the surface, or even attempting a marble finish are all directions this kind of project can go. The fundamentals, clean surface, quality products, patient application, good sealer, carry through all of them. Get those right on the stain project and you'll have the confidence to tackle the next level.
FAQ
Which method should I choose to make a concrete patio look like natural stone?
Decision checklist: 1) If you want variegated, permanent, natural-earth tones and the slab is in good condition: consider acid stain. 2) If you want predictable colors, lower odor, and exterior-rated options: choose a quality water‑based concrete stain/dye. 3) If the slab has cracks, spalling, level problems or you want textured/3‑D stone shapes: use a cementitious overlay (microtopping for thin, stampable overlay for deeper texture) then color/antiquing. 4) If you need realistic stone patterning without changing slab profile: combine stains (acid or water) with stenciling, layered washes, and anti‑slip sealer. 5) If budget and invasiveness are lowest priority: staining alone is least expensive; overlays/stamping cost more and require more prep. Pick stain for color-only transformation on sound concrete; pick overlay/stamp for surface repairs, texture, or dramatic patterning.
How do acid stains and water-based stains differ, and how does that affect the outcome?
Key facts: Acid stains are inorganic metallic salts in an acidic carrier that chemically react with concrete to produce mottled, permanent colors that become part of the surface; outcomes are variegated and depend on concrete chemistry (natural stone look). Water‑based stains contain pigments in a water/polymer carrier: they give more predictable, controllable color ranges, lower odor, and many are formulated for exterior UV stability. Expect acid stains to give translucent, variegated earth tones and water stains to give more uniform or layered effects; water stains can be blended and layered for faux stone too. Always check the product's technical data sheet for UV/exterior suitability.
How should I evaluate my existing patio before choosing a method?
Inspection checklist: 1) Look for structural issues: large cracks, settlement, sinking, or drainage problems—these may require repair before decorative work. 2) Surface damage: spalling, delamination, or heavy pitting favors overlays. 3) Previous coatings/paint: you must remove paints, sealers, or membranes before staining. 4) Surface profile: overlays and coatings need a specific Concrete Surface Profile (CSP); light staining needs a clean, porous surface. 5) Test spots: perform small sample applications for chosen method to check color and adhesion. If more than minor cosmetic defects exist, plan for repairs or an overlay.
What surface preparation steps are required (cleaning, etching, removing coatings)?
Step-by-step checklist: 1) Clear area, protect nearby surfaces and plants with plastic and tape. 2) Repair active leaks and fix drainage. 3) Remove loose debris, oil, grease, mildew—use degreaser and scrub brushes; rinse thoroughly. 4) Remove old coatings/paint/sealer by mechanical methods (grinding, shotblasting, scarifying) or chemical strippers—do not apply stain over remaining coatings. 5) For staining, create a clean, porous surface: acid stains often need light etching (manufacturer directions) but avoid over-etching; water stains usually require clean, sound concrete. 6) For overlays, profile the surface to the manufacturer’s recommended CSP (use grinding or shotblast). 7) Repair cracks and spalls: rout and epoxy/inject for structural cracks; use polymer-modified patch for surface repairs. 8) Allow concrete to fully dry per product instructions before staining or overlaying.
How do I repair common surface defects before staining or overlaying?
Repair checklist: 1) Small hairline cracks: clean, press in penetrating sealant/epoxy or use crack filler designed for decorative concrete. 2) Larger cracks (>1/8"): saw or route to create V-groove, bond in epoxy or polymer-modified patch, and feather to level. 3) Spalling: remove loose concrete back to sound substrate, apply bonding agent, and fill with polymer-modified repair mortar; feather edges. 4) Uneven slab/low spots: for small deviations use skim coats or microtopping; for larger level corrections consider thicker overlay or grinding high spots. 5) Delamination: remove unsound concrete back to solid material and repair before overlays. Follow manufacturer cure times before decorative work.
How do I test stains and color combinations before committing to the whole patio?
Testing checklist: 1) Choose representative areas (sun/shade, near edges). 2) Clean and prepare each test patch exactly as you will the whole project. 3) Apply stains/overlays, color washes, or antiquing techniques at full scale (1–2 sq ft) and let fully cure and seal per product instructions. 4) View tests at different times of day and when wet (some stains deepen when wet). 5) Photograph and compare. 6) Note expected variation: acid stains are unpredictable; expect mottling and color shifts. Use test results to adjust dilution, layering sequence, or choose different product.