
A concrete patio done right will last 30 to 50 years with minimal fuss. Done wrong, you get cracks by spring, puddles by the door, and a slab that shifts every freeze-thaw cycle. The difference almost always comes down to a handful of decisions made before a single bag of concrete is opened: proper slope, adequate base, the right mix, and joints in the right places. This guide walks you through every stage, from the first measuring tape stretch to the final sealer coat, including how to attach Trex composite stairs, fix an existing slab that's already giving you trouble, and keep the whole thing looking good for decades.
Concrete Patio Tips: DIY Plan, Pouring, Repair & Upgrades

Silas Morrison
8 Aug 2026
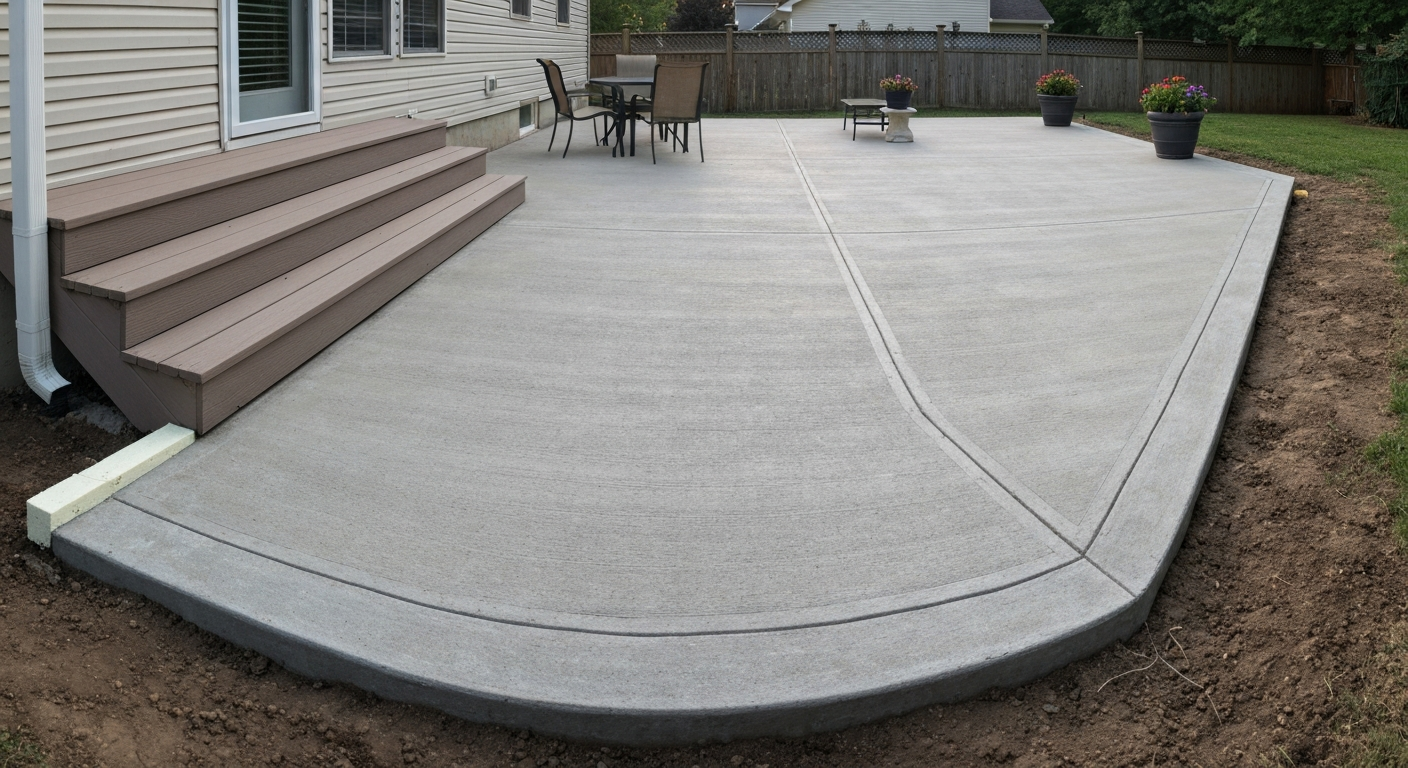
Project scope, goals, and DIY decision checklist
Before you order anything, nail down the scope. Patios vary enormously in complexity, and what looks like a straightforward pour can balloon into a permit-required, engineer-stamped project once you factor in size, load, and finish. Work through the checklist below honestly.
- Size: Slabs under 200 sq ft are manageable for one or two experienced DIYers. Beyond that, you need a crew, a concrete pump or chute, and a realistic timeline.
- Load: Standard pedestrian patio = 4 in. slab minimum. Occasional vehicle access (golf cart, riding mower) = 6 in. minimum. Full vehicle load = consult an engineer.
- Finish: Broom finish is beginner-friendly. Exposed aggregate, stamping, and polishing all require skill, timing, and sometimes rented equipment.
- Timeline: Allow 3–5 days for site prep and forming, 1 day for the pour, and a minimum 7 days of curing before light foot traffic. Full strength arrives at 28 days.
- DIY vs. pro: Can you safely operate a plate compactor and screed a wet slab? Do you have two or three helpers available all day on pour day? If either answer is no, price out a contractor before committing.
- Access: Can a ready-mix truck reach the site? If not, bagged mix or a pump truck adds cost and planning.
- Budget: Have a 15–20% contingency. Concrete projects almost always uncover surprises during excavation.
Permits, codes, utility location, and site constraints
This is the part most DIYers skip and later regret. Many jurisdictions require a permit for any patio over a certain square footage (commonly 200 sq ft, but it varies widely), and some require permits for any permanent concrete structure. Check with your local building department before breaking ground. If you skip the permit and a neighbor or buyer's inspector finds the work later, you may be required to remove it.
- Call 811 (USA) at least 3 business days before digging. This is legally required in most states. Utility companies will mark gas, water, electric, and telecom lines at no charge.
- Check setback requirements: most zoning codes require impervious surfaces to stay a certain distance from property lines. Common requirement is 5 ft minimum.
- IRC R401.3 mandates that impervious surfaces within 10 ft of the foundation slope at least 2% (1/4 in. per foot) away from the house. This is not optional — it protects your foundation.
- HOA rules may restrict patio materials, colors, or total impervious coverage. Check your CC&Rs.
- Stormwater rules: many municipalities limit how much impervious surface you can add. If you are over the threshold, a permeable paver system or drainage plan may be required.
- Soil bearing capacity: if you have expansive clay or fill soil, get a soil report or at minimum a local contractor's opinion before designing a slab without reinforcement.
Tools, materials, and safety equipment checklist
Tools
- Measuring tape, string lines, and line level (for layout and slope)
- Excavation: sod cutter, flat spade, and wheelbarrows (or a mini excavator rental for large projects)
- Plate compactor (rental, typically $80–$150/day)
- Circular saw or hand saw for form lumber
- Drill and screws or duplex nails for forms
- 4 ft level and 8–10 ft straightedge or screed board
- Concrete mixer (rental for bagged mix, up to 6 cubic yards) or chute from ready-mix truck
- Bull float (4–6 ft for larger slabs) and hand float
- Mag float (magnesium) and steel trowel for finish work
- Broom for broom finish
- Concrete vibrator or tamping rod for consolidation
- Margin trowel, edger, and groover for detail work
- Angle grinder or concrete saw for control joints and repairs
- Curing blankets or plastic sheeting
Materials
- Concrete (ready-mix or bagged): minimum 3000 psi for residential patios, 4000 psi preferred in freeze-thaw climates
- Rebar (#3 or #4) or welded wire mesh (6×6 W1.4×W1.4 or heavier)
- Rebar chairs or wire mesh supports (hold reinforcement at mid-slab, approx. 2 in. from bottom)
- Form lumber: 2×4 for 3.5 in. slabs, 2×6 for thicker slabs, or steel form stakes
- Crushed stone or road base: 4 in. compacted layer minimum
- Polyethylene vapor retarder: 6-mil minimum, lapped 12 in. at seams
- Form release agent (vegetable oil or commercial release)
- Isolation joint material (felt or foam expansion joint strips)
- Concrete sealer appropriate for the finish selected
- Bonding agent (for overlays and repairs)
PPE (personal protective equipment)
- Rubber or neoprene gloves (fresh concrete is caustic and causes chemical burns with prolonged contact)
- Rubber knee pads and rubber boots (not leather — concrete will destroy them and burn skin)
- Safety glasses or goggles, especially when cutting, grinding, or mixing
- Dust mask or respirator rated for silica dust (N95 minimum) when cutting, grinding, or opening bagged mix
- Hearing protection when operating power equipment
Pre-construction planning: layout, grading, drainage, and slope
Good patios start on paper. Sketch the patio footprint to scale, mark the door threshold location, note any steps, and establish the finished surface elevation relative to the door sill. The finished slab should sit at least 4 in. below the door threshold to allow for water management, and in some door configurations 6–8 in. is better. From there, slope the slab away from the house at a minimum of 1/4 in. per foot (2%). On a 12-ft-deep patio, that means the far edge is 3 in. lower than the house edge. Mark this on your grade stakes before you excavate.
Drainage strategy matters most at the edges. Where does water go when it leaves the patio? If it sheets into a garden bed, no problem. If it runs toward a neighbor's property or a basement window well, you need a channel drain, a swale, or a French drain at the perimeter. Plan this before you pour, retrofitting drainage after the fact is expensive and disruptive.
Site preparation and subbase: excavation, compaction, and base material
The subbase is the foundation of your foundation. I have seen perfectly good concrete crack within two winters because the homeowner skipped proper compaction. Remove all sod and organic material, roots and organic soil will compress and rot, causing the slab to settle unevenly. Excavate to a depth that accommodates your base layer plus your slab thickness. For a 4 in. slab over a 4 in. base, you are digging down 8 in. from finished grade, plus an inch or so depending on final elevation needs.
- Remove all vegetation and topsoil. Even a thin layer of organic material under a slab will eventually cause settlement.
- Compact the native subgrade to at least 95% Standard Proctor density (ASTM D698). For DIY, this means multiple passes with a plate compactor.
- Place 4 in. of compacted crushed stone or road base (3/4 in. crushed stone or recycled concrete aggregate is common). Compact in 2 in. lifts.
- Check for soft spots or pumping (soil that moves under compactor foot) — if found, over-excavate and replace with compacted stone.
- Install a 6-mil polyethylene vapor retarder over the compacted base, lapping seams by 12 in. and folding it up the inside of the forms.
- Do not add water to the subgrade thinking it will compact better — this causes pumping. Moisture should be at or near optimum for the soil type.
Forms and forming techniques
Forms define the final slab edges, so they need to be straight, level (or correctly pitched to your slope), and strong enough to resist the lateral pressure of wet concrete. For a 4 in. slab, 2×4 lumber is standard. Stake the outside of forms every 18–24 in. using steel form stakes driven to resist outward movement. Double-stake corners. Check your forms with a level and string line after staking, they should perfectly match your planned finished surface elevation.
- Coat form faces with form release agent (old motor oil works but vegetable oil or commercial release is cleaner) to prevent concrete from bonding.
- For curves, use 1/4 in. hardboard or flexible composite bender board instead of lumber.
- Tolerances: forms should be within 1/8 in. of the design elevation along their length. A long straightedge is your best check.
- Where the patio meets the house, use a felt or foam isolation joint strip (1/2 in. thick) fastened to the house foundation or wall. This prevents the slab from bonding to the structure and allows independent movement.
- Radius any exposed corners with a 2 in. radius if possible — sharp corners chip and crack more easily.
- Remove forms after the concrete has cured enough to hold its shape (typically 24–48 hours in warm weather, longer in cold).
Reinforcement and joint planning
Unreinforced concrete patios crack. The question is where and how badly. Reinforcement and control joints work together to keep any inevitable cracking tight and in predictable locations. For a residential patio, you have two main reinforcement options: welded wire mesh or rebar. ACI 318, shrinkage and temperature reinforcement spacing guidance (code commentary) notes that shrinkage and temperature reinforcement should generally be spaced no farther than five times the slab thickness and not greater than 18 in. to control cracking ACI 318 — shrinkage and temperature reinforcement spacing guidance (code commentary).
| Option | Best for | Practical notes | Cost |
|---|---|---|---|
| Welded wire mesh (6×6-W1.4×W1.4) | Small to medium patios with stable subgrade | Easier to handle solo; must be lifted to mid-slab during pour, not left flat on the ground | Lower |
| #3 rebar on 18 in. grid | Most residential patios, freeze-thaw climates | More labor but better performance; ACI temperature/shrinkage rules limit spacing to max 18 in. | Moderate |
| #4 rebar on 12–18 in. grid | Larger slabs, vehicle-access areas, clay soil | Recommended where settlement risk is higher | Higher |
| Fiber reinforcement (polypropylene) | Supplement only, not primary reinforcement | Reduces plastic shrinkage cracking; does not replace rebar or mesh for structural integrity | Low |
Whatever you choose, keep the reinforcement at roughly the mid-point of the slab depth, about 2 in. from the bottom. Use rebar chairs or mesh supports, never let mesh sit flat on the vapor retarder. Concrete with reinforcement sitting at the very bottom provides almost no crack control.
Control joints (also called contraction joints) are intentional weak points that guide inevitable shrinkage cracks to predictable locations where they are hidden and manageable. ACI 302.1R and PCA guidance recommend spacing control joints at 24 to 30 times the slab thickness. For a 4 in. slab, that means joints every 8 to 10 ft. They should be cut or tooled to a depth of 1/4 of the slab thickness, so 1 in. deep on a 4 in. slab. Bays should be roughly square, never more than 1.5 times as long as they are wide. Keep control joint layout away from re-entrant corners (inside corners), those are stress concentration points and need their own diagonal joint or extra reinforcement.
Concrete mix and delivery options
For a residential patio, you want a minimum 3000 psi (28-day compressive strength), though 4000 psi is worth the modest upcharge in freeze-thaw climates. See ACI 301-16 (preview), guidance on specified compressive strengths and project selection for specification guidance on selecting fc' and typical minimums such as 3000 psi ACI 301-16 (preview) — guidance on specified compressive strengths and project selection. If your area gets freezing temperatures and road salt (or you salt your own patio), specify air entrainment at 5–7% air content. Portland Cement Association research consistently shows that air-entrained concrete dramatically outperforms non-air-entrained concrete against freeze-thaw and scaling damage. Do not skip this in cold climates.
Water-cement ratio is the other key durability lever. For exterior flatwork exposed to freeze-thaw and deicers, keep w/c at or below 0.45 if possible. Adding extra water to make the mix more workable is the single most common mistake I see on DIY projects. It feels easier to work with, but it dramatically weakens the surface and leads to scaling and dusting within a few years.
| Option | Best for | Pros | Cons | Decision trigger |
|---|---|---|---|---|
| Ready-mix truck (ASTM C94) | Any slab over ~1 cu yd (roughly 80 sq ft at 4 in.) | Consistent mix, air entrainment available, faster pour | Minimum order (usually 1 cu yd), truck access required, must be placed quickly | Use for any patio over 80–100 sq ft |
| Bagged mix (80 lb bags, rented mixer) | Very small patches or accent slabs under 40 sq ft | No minimum order, flexible timing | Labor intensive, harder to maintain consistent w/c, no air entrainment available in standard bags | Use only for small repairs or patches |
| Volumetric mixer (metered truck) | Mid-size projects, tight-access sites | Mix on-site, pay only for what you use | Higher per-yard cost, less common in some regions | Use when truck access is limited or exact quantity is uncertain |
When ordering ready-mix, communicate the following to the plant: specified compressive strength (e.g., 4000 psi), maximum aggregate size (3/4 in. for a 4 in. slab), air content if required (5–7% for freeze-thaw exposure), and slump target. A slump of 4–5 in. is workable for most residential flatwork. ASTM C143 is the slump test method the driver or inspector will use at delivery. Do not let the driver add water on site without retesting slump.
Pouring process: step-by-step
Pour day is the one part of a concrete project where speed and teamwork actually matter. Have your crew, tools, and plan ready before the truck arrives. Once that concrete starts coming down the chute, you are on the clock. For a full step-by-step concrete patio process, see the linked guide for detailed sequencing, checklists, and timing tips.
- Inspect forms, reinforcement, and grade stakes one final time before the truck arrives. This is your last chance to fix anything.
- Wet down the subbase lightly (not saturated) to prevent the dry base from sucking water out of the concrete too quickly.
- Begin placing concrete at the far end of the slab, working back toward the truck. Never drag concrete long distances — place it close to final position.
- Consolidate as you go using a concrete vibrator or by rodding/tamping. Work the vibrator vertically, spacing insertions about 18 in. apart. Do not over-vibrate — it causes segregation.
- Strike off (screed) the surface to the top of the forms using a straight 2×4 or screed board in a sawing motion. Two people on a long screed board is far more effective than one.
- Follow immediately with a bull float pass (for larger slabs) to embed aggregate and begin closing the surface. Work the float in overlapping arcs, angled slightly to avoid digging in.
- Allow bleed water to fully evaporate before any finishing. This is critical. Finishing over bleed water weakens the surface layer. In hot or windy conditions, bleed water evaporates fast — in humid, cool conditions it can take an hour or more.
- Apply edger along all form edges to round the slab perimeter. Tool control joints (groover) at planned locations now if you are not saw-cutting later.
- Broom finish: drag a concrete broom across the surface in one direction for texture. Do final passes before the surface stiffens. Coarser broom = more traction, rougher look.
- Protect the finished surface immediately from direct sun, wind, and rain until curing begins.
Practical warnings: Never pour concrete over frozen ground or when overnight temperatures will drop below 40°F without cold-weather concrete protection measures in place. Never add water to stiffening concrete in the form. If the truck is taking too long and the concrete is getting stiff, reject the load and order a new batch, you cannot save over-stiffened concrete.
Finishing sequences and surface options
The finishing sequence is screeding, bull floating, edging, waiting for bleed water, then the final surface treatment. After bull floating, how you finish determines the look, texture, and durability of the top surface. Each finish option requires a different timing and skill level.
| Finish | Skill level | Timing window | Slip resistance | Key notes |
|---|---|---|---|---|
| Broom finish | Beginner | Just before surface stiffens | High | Most common residential patio finish; drag a stiff broom in one direction |
| Smooth trowel | Intermediate-Advanced | After bull float + one mag float pass | Low (add non-slip additive) | Requires proper bleed water evaporation timing; densifies surface |
| Exposed aggregate | Intermediate | 2–4 hrs after pour (weather-dependent) | High | Seed or seed-and-roll aggregate before pour, then wash off surface paste at right time |
| Stamped concrete | Advanced | Just after bull float, when footprint-firm | Medium (add texture sealers) | Requires stamp mats, release agent, and color hardener; very timing-sensitive |
| Concrete overlay | Intermediate | Applied after existing slab is cured and prepped | High | Can refresh old or finished slabs; requires bonding agent and proper surface prep |
| Polished concrete | Professional | Post-cure (days to weeks later) | Low (add anti-slip sealer) | Requires progressive diamond grinding; best done by a pro on residential projects |
Curing, protection, and drying times
Curing is simply keeping the concrete moist and protected from temperature extremes while it gains strength. Skipping proper curing is one of the most common causes of surface dusting, cracking, and premature scaling. The goal is to maintain moisture in the slab for at least 7 days. In hot or windy conditions, the slab can lose surface moisture in minutes, so start curing immediately after finishing.
- Wet curing: cover with damp burlap and plastic sheeting, or use curing blankets. Re-wet as needed to keep burlap damp. Most reliable method.
- Curing compound: spray-applied liquid membrane curing compound (ASTM C309). Apply immediately after finishing, before the surface can dry. Coverage rate matters — follow manufacturer instructions.
- Plastic sheeting: 6-mil poly laid directly on the slab works well in mild conditions but can cause color blotching on decorative finishes from pooled condensation.
- Minimum crossover times: light foot traffic at 24–48 hours; furniture and normal use at 7 days; full design strength at 28 days.
- Hot weather (above 90°F or hot/windy): shade the slab, pre-wet forms and base, and be ready to begin curing the moment finishing is complete.
- Cold weather (below 50°F): concrete gains strength very slowly below 50°F and can freeze and be permanently damaged below 40°F. Use insulating blankets and potentially heated enclosures.
Saw cutting joints and timing
If you tooled your control joints during finishing, you can skip this step. If you want a cleaner, deeper cut, or if you are working on a larger slab where tooled grooves are impractical, saw cutting is the way to go. The challenge is timing: cut too early and the saw ravels the aggregate out of the joint, leaving a ragged edge. Cut too late and the concrete has already cracked on its own.
The target window is usually 6 to 18 hours after the pour, depending on temperature, humidity, and mix design. A good field test: drag a nail or key across the surface. When it scratches without raveling, you can start cutting. Use a walk-behind concrete saw with a dry-cut or wet diamond blade. Cut to 1/4 of the slab depth (1 in. on a 4 in. slab). Follow the joint layout plan you made during forming, joint bays should be roughly square and spaced 8 to 10 ft apart for a 4 in. slab. Mark your cut lines with chalk before you start the saw. You will not get a second chance to reposition a cut.
Connecting the patio to the house: door thresholds, flashing, and thermal breaks
The joint between your patio slab and the house is a critical detail that is often handled sloppily. If the slab bonds to the foundation wall or sill plate, it will transmit heave and settlement forces directly into the building structure. Always place a 1/2 in. foam or felt isolation joint strip against the house face before forming. This strip stays in the joint permanently and allows the slab to move independently.
- Finished patio surface should sit at least 4 in. below the door threshold to prevent water intrusion and allow for a door threshold transition or step.
- Where the slab abuts a wood-framed wall, ensure positive flashing or a gap behind the isolation joint so water cannot wick into the wall assembly.
- Thermal breaks matter in cold climates: a concrete slab in direct contact with a foundation wall can act as a cold bridge. The isolation joint provides a partial thermal break by default.
- Caulk or seal the isolation joint at the surface with a polyurethane or self-leveling sealant rated for concrete-to-masonry joints. Re-inspect and re-seal every 3–5 years.
- Door threshold height: check the door manufacturer's installation spec for minimum sill-to-exterior-surface clearance. Most sliding doors and most hinged exterior doors require at least 4 in. clearance to finished exterior surface. Steps or a threshold transition piece bridge this gap.
Concrete steps and patio door steps: design, formwork, and finishing
Steps at the patio door or at grade transitions are among the most heavily used and most commonly damaged concrete elements in any residential project. Getting the dimensions right makes a real difference in day-to-day safety and usability. Standard residential step dimensions are a rise of 7 to 7.5 in. and a run (tread depth) of at least 11 in., with a minimum tread width matching the door width plus 12 in. on each side if possible.
Formwork for concrete steps is more complex than flat slabs. You need forms on the sides (cheek walls), the risers, and sometimes the treads if the slope is steep. Riser forms are typically removed after 24 hours to allow troweling of the riser face. Use 2 in. foam isolation joint between steps and the house wall. Reinforce steps with #4 rebar running longitudinally through each tread and vertically through the side walls at 12 in. spacing. Steps are subject to freeze-thaw stress at the nosing (front edge), use air-entrained concrete and a good nosing radius. See concrete steps and patio for detailed guidance on integrating steps with your patio layout. For detailed guidance on dimensions, reinforcement, and finishing, see patio door concrete steps. For more on integrating steps with your patio layout, the design approach for concrete steps and patio connections covers these transitions in detail.
- Rise: 7 to 7.5 in. per step (consistent throughout the flight — inconsistent risers are a tripping hazard).
- Run (tread depth): minimum 11 in., 12 in. preferred for comfort.
- Nosing: 1 in. rounded nosing reduces chipping and improves safety.
- All steps in a flight must be within 3/8 in. of each other in rise height (IRC R311.7 requirement).
- Slope the tread surface 1–2% toward the front edge to shed water.
- Cure steps with wet burlap for at least 7 days, same as the slab.
Attaching Trex composite stairs to concrete: anchoring, fasteners, and installation
Trex and other composite stair systems are increasingly popular as an alternative to cast concrete steps or wood stairs at the patio door. They look clean, resist rot, and can be replaced without breaking concrete. The critical detail is anchoring the stringer base securely to the concrete so the stairs do not shift or tip under load. Here is the practical process. For step-by-step guidance on installing Trex steps on a concrete patio, see trex steps on concrete patio.
- Plan the landing pad: The base of the Trex stringer lands on the patio slab or a separate concrete landing pad. The concrete surface must be level side-to-side and at the correct elevation for the stringer angle.
- Lay out anchor bolt locations per the Trex stair system instructions (typically two anchor points per stringer, minimum). Mark locations with a marker.
- Drill anchor holes using a rotary hammer with a correctly sized masonry bit (typically 1/2 in. or as specified for the anchor being used). Drill to the required embedment depth (3 in. minimum for most wedge and sleeve anchors in 4 in. concrete).
- Blow out and vacuum anchor holes completely to remove dust. Residual dust prevents proper anchor seating.
- Set anchors: for Trex stringer base plates, wedge anchors or sleeve anchors work well in solid concrete. Epoxy anchors are the strongest option and are preferred near slab edges (minimum 3 in. from edge for most epoxy anchors). Follow the manufacturer's torque specification.
- Attach stringer base brackets to the set anchors. Check for level before final torquing.
- Install stringers per Trex instructions, ensuring proper bearing and any required blocking.
- Fasten composite treads per Trex fastener spacing requirements using the recommended hidden fasteners or stainless screws.
- Where stringers attach to the house rim or ledger, use joist hanger hardware rated for composite materials and stainless or hot-dipped galvanized fasteners. The patio door concrete steps interface details in the related topic on patio door concrete steps cover this ledger connection in more depth.
A few important cautions: standard carbon steel concrete anchors will rust staining the patio and eventually fail near the surface. Use stainless steel, hot-dipped galvanized, or epoxy-coated anchors for any outdoor concrete connection. And always check the Trex installation guide for your specific product version, fastener types and spacing requirements have changed across product generations.
Drainage, slope management, and safety considerations
A slick, pooling patio is a liability in more ways than one. Beyond the structural damage standing water causes over time, it is a slip-and-fall hazard. Address all of these proactively.
- Minimum slope away from the house: 1/4 in. per foot (2%), as required by IRC R401.3. This is a code minimum, not a suggestion.
- Maximum recommended slope for pedestrian use: 1/2 in. per foot (about 4%). Beyond this, chairs slide and foot traffic becomes uncomfortable.
- Channel drains: if you cannot achieve adequate slope across the full patio, a linear channel drain at the low end intercepts water before it collects. Use a cast iron or polymer drain body with a cleanable grate.
- Perimeter French drain: where soils are slow-draining and the patio edge consistently stays wet, a gravel-filled trench with perforated pipe along the low edge of the patio redirects water away.
- Anti-slip finishes: broom finish is the baseline. For extra traction (near pools, in shady/damp locations), use broadcast anti-slip aggregate (aluminum oxide or similar) into the surface while wet, or apply an anti-slip additive to sealer.
- Handrails: any flight of concrete steps with 4 or more risers requires a graspable handrail per IRC R311.7.8. Use post bases anchored to the concrete with epoxy anchors.
- Lighting: low-voltage path lighting at step edges and perimeter significantly reduces nighttime trip hazard. Plan conduit sleeves under the slab before pouring if you want buried wire runs.
Common problems and how to fix them
Cracks
Hairline cracks (under 1/16 in. wide) are cosmetic and can be sealed with a penetrating concrete sealer or a crack filler. Cracks from 1/16 in. to 1/4 in. wide should be cleaned out with an angle grinder equipped with a crack-chasing blade, blown out with compressed air, and filled with a polyurethane caulk or semi-rigid epoxy filler. Cracks wider than 1/4 in. or those with vertical displacement (one side higher than the other) indicate structural movement. Stabilize the cause before filling, filling an active crack is pointless.
Spalling and surface scaling
Spalling (flaking, pitting surface) is almost always caused by freeze-thaw damage combined with deicing salts, or by finishing over bleed water. For shallow spalling (under 1/4 in. deep), grind the surface clean with an angle grinder or shot blaster, apply a concrete bonding agent, and resurface with a polymer-modified overlay product (1/4 in. minimum depth). For deeper spalling, use a repair mortar rated for overhead and vertical applications and follow the bonding agent manufacturer's instructions carefully, bond failure is the most common overlay problem.
Uneven slabs and trip hazards
Slabs that have settled unevenly create trip hazards at joint edges. Two options: slab lifting (mudjacking or polyurethane foam injection) or grinding down the high side. Mudjacking (pumping a sand-cement slurry under the slab through drilled holes) is cost-effective for large sunken areas. Polyurethane foam injection is faster, less invasive, and the foam does not wash out, but it costs more. For minor offsets (under 1/2 in.), an angle grinder with a diamond cup wheel can bevel the high edge to eliminate the trip hazard. Full slab replacement is warranted when settlement is severe, the subbase has washed away, or the slab is extensively cracked.
Sinking and settlement
A slab that sinks consistently (especially near the house or a downspout) has a subbase or drainage problem. Filling the void under the slab without fixing the drainage will just result in repeated sinking. Fix the drainage source first, then inject foam or mudjack to re-level. If the slab is sinking because the original compaction was inadequate, foam injection is the most practical solution for an existing slab.
Refinishing and aesthetic upgrades
An old, gray, blotchy patio can be transformed without demolition. The key is thorough surface preparation, the best stain or overlay will fail on a contaminated or weak surface. Here is the sequence that actually works.
- Clean the surface thoroughly: pressure wash at 3000 psi minimum, scrubbing with a degreaser or concrete cleaner. Remove all oil, mold, efflorescence, and curing compound residue.
- Repair all cracks and spalls before applying any coating or stain. Do not stain over active cracks — they will read through the finish.
- Profile the surface: acid etching or mechanical grinding opens the concrete pores for stain and sealer penetration. Muriatic acid etch (10% solution, followed by thorough neutralization and rinse) or shot blasting are the two most reliable methods.
- Apply stain or dye: acid stains react chemically with concrete minerals for a mottled, permanent color that cannot peel (though it can fade). Water-based concrete dyes provide more uniform color and broader color range. Both require a sealer top coat.
- For overlays: apply bonding agent per manufacturer instructions. Spread overlay product (polymer-modified cement) to minimum 1/4 in. depth using a gauge rake or squeegee. Texture if desired (broom, trowel, or knockdown finish). Allow to cure, then seal.
- For stamping on an existing slab, a stampable overlay is the only option (you cannot stamp cured concrete). Apply a 3/8 to 1/2 in. stampable overlay, add color release agent, then stamp while the overlay is in the workable window.
- Seal all stained, dyed, or overlaid surfaces with a penetrating sealer or a topical film-forming sealer appropriate for the finish. Solvent-based acrylic sealers enhance color and provide good protection. Water-based acrylics are lower-VOC but may require more frequent reapplication.
- Allow full cure before returning to service: most overlays require 24 hours before foot traffic and 72 hours before furniture.
Maintenance schedule and seasonal checklist
| Frequency | Task | Notes |
|---|---|---|
| Monthly (or after storms) | Clear debris and check drainage | Clogged drains lead to pooling and freeze-thaw damage |
| Annually (spring) | Inspect all control joints and expansion joints | Refill joints where sealant has cracked or pulled away |
| Annually (spring) | Check for new cracks, spalling, or settlement | Address promptly before water intrusion worsens damage |
| Every 2–3 years | Reseal the surface | Penetrating sealers may last longer; film-forming acrylics usually need resealing every 1–3 years depending on traffic and UV exposure |
| Every 3–5 years | Re-caulk isolation joint at house | Polyurethane caulk degrades with UV; inspect and replace as needed |
| Before winter (fall) | Clean surface, apply fresh sealer if due | Sealed concrete resists deicing salt damage far better than unsealed |
| Winter | Avoid chloride-based deicers on concrete | Use sand or calcium magnesium acetate instead; chlorides accelerate corrosion and scaling |
| As needed | Pressure wash | Annual pressure washing removes dirt and organic growth; use fan tip, not zero-degree, to avoid surface damage |
Cost and time estimates: how to budget your project
Concrete patio costs vary widely based on your region, site complexity, and finish selection. The numbers below are rough order-of-magnitude estimates for the contiguous U.S. as of mid-2026, and they exclude any permits, demolition, or major drainage work. Always get three quotes from local contractors if you are hiring out.
| Project scope | DIY material cost (approx.) | Contractor installed (approx.) | DIY time estimate |
|---|---|---|---|
| Basic 200 sq ft broom-finish patio (4 in. slab) | $800–$1,400 | $2,800–$4,500 | 3–5 days total (2 days prep, 1 day pour, 2 days curing/form removal) |
| 400 sq ft broom-finish patio with base prep | $1,600–$2,600 | $5,500–$9,000 | 5–7 days total |
| Stamped or stained patio (same size, upgraded finish) | $2,200–$4,000 (add rental/materials) | $8,000–$16,000+ | Add 1–2 days for finish work |
| Concrete steps (3-step landing, cast in place) | $200–$500 materials | $1,200–$2,500 | 1–2 days forming, 1 day pour, 1 day finish |
| Overlay/refinish existing 200 sq ft patio | $300–$800 materials | $1,500–$3,500 | 1–2 days prep, 1 day application |
| Crack and spall repair (per linear foot of crack) | $5–$20 materials | $8–$25/LF labor + materials | Few hours for most residential jobs |
Key cost drivers: site access (pump trucks add $600–$1,200), finish complexity, local concrete pricing, permit fees ($50–$300 typical), and subbase conditions. Time drivers: crew size, weather, concrete mix design (faster or slower setting options), and finish selection. Always build in a full day buffer for unexpected subbase issues discovered during excavation.
Troubleshooting quick-reference guide
| Symptom | Likely cause | Immediate action |
|---|---|---|
| Hairline cracks across slab surface | Normal drying shrinkage; possibly inadequate control joints or early traffic | Seal with penetrating concrete sealer; evaluate joint spacing if pattern repeats |
| Wide cracks with vertical displacement | Subbase failure, frost heave, or expansive soil | Investigate and fix drainage/subbase cause; then mudjack or replace slab |
| Surface scaling or flaking (pop-offs) | Freeze-thaw damage, deicing salt damage, or finishing over bleed water | Grind back, apply bonding agent, resurface with polymer overlay |
| Pooling water on patio surface | Insufficient slope or negative drainage toward house | Install channel drain or grind high spots to improve runoff |
| Water pooling at house wall | Negative slope toward building | Urgently address: saw cut and install channel drain, or fully re-grade perimeter |
| Slab sinking near house | Subbase washout from downspout or poor drainage | Redirect downspout, then foam inject or mudjack sunken slab |
| White powder on surface (efflorescence) | Soluble salts migrating to surface with moisture | Scrub with concrete cleaner, apply penetrating sealer to reduce moisture ingress |
| Stain or sealer peeling | Applied over contaminated, wet, or unprepared surface | Strip sealer with chemical stripper or grinder; properly prep surface and reapply |
| Concrete stuck in forms after stripping | Insufficient form release agent | Chisel carefully; next time coat forms thoroughly with release agent before pour |
| Trex stair anchor pulling loose | Inadequate embedment or edge distance, or standard steel anchor corroding | Remove, clean hole, and set with epoxy anchor at proper embedment; use stainless hardware |
When to hire a pro
I am all for DIY, and most homeowners can successfully pour a basic patio with proper preparation. But there are real situations where calling a licensed concrete contractor, structural engineer, or specialty trade is the smarter call. Here are the honest decision points.
- Permit triggers: if your jurisdiction requires an engineer-stamped drawing or structural review for the patio or associated retaining walls, hire a licensed engineer. Submitting an unstamped plan to a jurisdiction that requires a stamp will delay your project and may result in rejected permits.
- Slab size over 400 sq ft: managing a large pour requires a practiced crew and proper sequencing. If you have never screeded a wet slab, a 400+ sq ft project is not the job to learn on.
- Expansive or unstable soil (clay, fill, or areas with known settlement): a structural engineer or geotechnical consultant should review the design before you pour a slab on these soils.
- Any retaining wall taller than 24–30 in. (varies by jurisdiction): most codes require permits and sometimes engineering review for walls exceeding this height.
- Concrete steps with more than 3 risers connecting to a public entry or commercial-use space: ADA and IBC requirements apply, and design details should be reviewed by a professional.
- Stamped or polished decorative finishes on large slabs: timing and technique are unforgiving. The cost of a bad stamp job (which is nearly impossible to reverse) can exceed the contractor premium.
- Any slab that covers or is near utility infrastructure, drainage structures, or existing footings: get a utility locate and consider a structural review before excavating.
- Post-pour slab failure (major cracking, widespread settlement, or structural separation from the house): these conditions warrant professional assessment before repairs are attempted.
The goal of every section in this guide is to help you make an informed decision at each stage, whether that means doing it yourself with confidence or knowing exactly what to ask a contractor. A well-built concrete patio is genuinely achievable for a motivated, careful DIYer. The projects that go sideways are almost always the ones where someone skipped the planning, rushed the prep, or ignored a code requirement that existed for a good reason. Do those parts right, and the pour itself is the fun part.
FAQ
What building codes and authoritative standards must an accurate DIY concrete patio article reference?
Cite the relevant model codes and technical standards: IRC (foundation slope/grade away from structure, e.g., 2% minimum within 10 ft), IBC (minimum exposed slab thickness guidance), ACI 301 (specs for structural concrete), ACI 302.1R (slab/flatwork jointing and finishing), ACI 318 commentary (reinforcement and durability), ASTM standards for ready‑mixed concrete and slump (e.g., ASTM C94, ASTM C143), ASTM C150 for cement types, and PCA guidance on admixtures (air entrainment). Reference local municipal ordinances and utility/permit requirements where applicable.
What scope and timeline information should the article provide for a typical DIY patio project?
Define clear scope: slab size, thickness (4" pedestrian, 6" if occasional vehicle), finishes, steps/thresholds, and any overlays or stamping. Provide a phased timeline with approximate durations: planning & permits (1–3 weeks depending on jurisdiction), site prep & base compaction (1–2 days), forming & reinforcement (1 day), concrete delivery/pour & finishing (1 day for typical patios up to ~500–800 sq ft), initial cure (24–72 hours for foot traffic, 7 days for light loads), full cure (28 days for design strength), and additional time for stains/sealers/overlays (additional 1–7 days). Note weather can extend schedule.
What tools and materials checklist is required for planning and pouring a patio?
Tools: tape measure, marking paint, shovel, plate compactor, wheelbarrow, forms & stakes, level/laser level, carpenter's square, screed board, bull float, magnesium or wood float, edging tool, jointer/groover, concrete saw for joints, trowels, broom for final finish, curing compound sprayer/rollers, safety gear (gloves, eye protection, boots), vibrating screed or internal vibrator (for large pours). Materials: ready‑mixed concrete (specify psi), crushed stone base (3–6"), 6‑mil poly vapor retarder, form lumber, rebar or welded wire mesh/fiber reinforcement, air‑entraining admixture (if freeze‑thaw exposure), control joint filler, bond breaker (if required for overlays), curing compound/sealer, concrete mix additives as specified. Include fasteners and flashing details for thresholds/steps and manufacturer‑specified hardware for Trex stair attachment.
What are the code‑compliant slope and drainage requirements to protect the foundation and slab?
Follow IRC guidance: slope surfaces within 10 ft of the building at least 2% (≈1/4" per foot) away from the foundation. For the patio overall, provide a minimum slope of 1–2% away from the house or toward a designated drain. Design positive drainage paths, avoid ponding, and maintain grade transitions at thresholds. Incorporate edge drains or catch basins where necessary. Warn that improper slope can create water intrusion and void warranty/insurance claims.
What mix design and placement specifications should be recommended?
Specify a ready‑mixed concrete meeting ASTM C94, with typical residential compressive strength 3000–4000 psi at 28 days. Use appropriate cement type per ASTM C150 (Type I/II typical; Type V for high sulfate). Limit water‑cement ratio per ACI/ACI 318 guidance for durability (commonly ≤0.50; ≤0.40 for severe exposure) and use air‑entraining admixture for freeze‑thaw resistance where needed (PCA guidance). Specify slump per ASTM C143 for workability appropriate to placement method. Order pumpable/specified mix for the pour and verify delivery ticket and slump on arrival.
What site preparation, base, and vapor barrier steps must be described?
Remove topsoil and organics to required depth, scarify and compact subgrade to specified density (commonly 95% Standard Proctor or per local spec). Place and compact 3–6" of crushed stone (4" typical under a 4" slab). Install 6‑mil (or thicker per local code) polyethylene vapor retarder over the base, lapping and sealing seams. Set forms at finished elevation and slope, and apply bond break to edges per overlay or expansion joint needs. Warn to call utility locates before excavation.