
You can add onto a concrete patio by pouring a new concrete extension tied to the existing slab with dowels and a bonding agent, or by using pavers, a deck, or gravel if the situation calls for it. Which route makes sense depends on your existing slab's condition, the size of the addition, your budget, and whether you want a seamless look or are fine with a defined transition. This guide walks through every step: deciding what to build, pulling permits, prepping the site, forming and pouring, finishing, curing, and matching color and texture so the new section looks like it belongs. For step-by-step instructions, see our guide on how to extend a concrete patio.
How to Add Onto a Concrete Patio: Step-by-Step DIY Homeowner Guide

Silas Morrison
27 Jul 2026
Who this guide is for and what it covers
If you have an existing concrete patio that is simply too small and you want to expand it yourself, this is the resource you need. For step-by-step instructions on how to make a concrete patio bigger, see the dedicated guide (how to make a concrete patio bigger). I have done several of these projects, and the planning and prep stages take more time than the actual pour. This guide covers every option, not just new concrete, because sometimes pavers or a wood deck are the smarter call. By the end you will know how to measure, plan, permit, prep the old slab edge, form the new section, place reinforcement, pour and finish, cure properly, and troubleshoot problems that come up after the fact.
New concrete vs. alternatives: make the right call first
The biggest mistake I see homeowners make is deciding to pour new concrete before asking whether it is actually the right tool for the job. Run through this checklist before you buy a bag of Portland cement.
Pour new concrete when...
- The existing slab is cracked, settled, or structurally unsound and the new section needs to integrate with a replacement or tie into a sound base.
- You need monolithic load capacity, for example a hot tub pad or heavy outdoor kitchen.
- Large elevation or grade changes require full-depth correction.
- You want identical thickness, finish, and the longest possible service life.
- The design calls for integrated reinforcement or load-transferring dowels across the joint.
- You want a truly seamless appearance and are willing to invest in color/finish matching.
Consider pavers, a deck, or gravel when...
- The existing slab is in good structural shape and you only need more usable area adjacent to it.
- Height differences are small (an inch or less), making a transition strip manageable.
- You want to preserve future access to utilities under the extension area.
- Budget is tight — pavers and gravel have lower upfront material and labor costs.
- You might want to remove the addition later, or the area has drainage challenges a permeable surface would solve.
- The expansion is small (under 50 sq ft) and a full pour feels like overkill.
If you are leaning toward pavers or a non-concrete surface, it is worth exploring extension options that skip the pour entirely. If you'd like step-by-step options for pavers, gravel, or decking instead of concrete, see how to make a patio without concrete for practical alternatives and methods. A concrete patio can also look better than you think when a complementary paver section is laid flush against it with a clean edge. But if matching the look of the original slab matters most, or the project is large and structural, new concrete is the right move. Keep both paths in mind as you read through the planning sections.
Assess the existing slab before you plan anything else
You need a clear picture of what you are working with before you pick up a shovel. Spend 30 minutes on a thorough site assessment and you will avoid expensive surprises mid-project.
Measure the existing slab and the new footprint
Measure the overall existing slab, including any steps or grade changes at the edges. Then mark out your proposed addition on the ground with stakes and string or spray paint. Record door threshold elevations and the finished slab surface elevation at multiple points so you know exactly how much slope exists and where the new section needs to land in height. Measure the distance from the new footprint to property lines, the house foundation, and any outbuildings, and sketch a simple site plan with a north arrow and dimensions. You will need this for permit applications anyway, so do it right the first time.
Check slab thickness, slope, and drainage
Slab thickness matters for tie-in strategy. If you can access an exposed edge or a chip-out, measure it. Residential patios are typically 3.5 to 4 inches thick. Confirm the existing slab slopes away from the house. The widely used guidance from IRC/IBC-aligned inspection standards calls for at least 6 inches of fall within the first 10 feet from the foundation, which works out to roughly 5% grade. For concrete patios away from the foundation, 2% (1/4 inch per foot) is a common minimum to prevent ponding. If the existing slab drains poorly or pitches toward the house, the new section is your chance to correct that, but you may also be inheriting a drainage problem you need to solve with a channel drain or swale.
Look for cracks, settlement, and reinforcement clues
Map every crack on the existing slab. Hairline surface cracks that do not move under load are generally cosmetic. Cracks wider than 1/8 inch, cracks that are offset (one side higher than the other), or cracks that mirror soil settlement beneath are structural warning signs. If sections rock when you walk on them or if there is visible undermining at edges, the slab may need repair or partial replacement before you extend it. You typically cannot tell if there is rebar or wire mesh inside a slab without core drilling, but if the original patio is a few decades old and in good shape, assume some reinforcement is there and plan your tie-in accordingly.
When replacement beats extension
If the existing slab has multiple settled sections, widespread structural cracking, or a severely compromised base, extending it is throwing good money after bad. In that case, demolish and start fresh. A full replacement with properly compacted base and new reinforcement will outlast a patched-and-extended slab by decades.
Permits, codes, setbacks, and HOA rules
Permit requirements for patio additions vary a lot by location and I cannot stress enough that you need to call your local building department before you dig. Do not assume you are in the clear just because it is a ground-level slab.
When permits are typically required (and when they are not)
Many US jurisdictions do not require a building permit for small, ground-level patios placed directly on the ground. However, patio expansions almost universally count toward your lot's impervious surface or lot coverage limits, and exceeding those limits can trigger zoning review even without a building permit. Some cities explicitly exempt ground-level flatwork from a building permit but still require you to stay within impervious surface maximums, which can be as low as 40% of lot area in residential zones. If your new addition plus all existing hardscape pushes you over that threshold, you need zoning approval regardless of whether a building permit is required.
Grading permits and disturbance thresholds
If you disturb more than roughly 200 to 250 square feet of ground (a common threshold in many county-level grading ordinances), you may need a grading permit or at minimum a plot plan showing how drainage will be handled. Check your specific county or city requirements. Some jurisdictions require a grading plan any time impervious area is added, regardless of square footage.
Setbacks and HOA rules
Zoning setbacks apply to patios in many jurisdictions, though ground-level slabs sometimes have less restrictive setbacks than structures. Typical residential rear setbacks range from 5 to 20 feet depending on the zone. If you are in an HOA, get written approval before you break ground. HOAs often have their own paving material requirements, color restrictions, or limits on hardscape coverage that go beyond local code. Getting an after-the-fact variance is expensive and stressful, and I have seen homeowners forced to demo work because they skipped this step.
What to prepare for permit and code review
- A simple site or plot plan showing property lines, the existing patio footprint, proposed extension footprint, and dimensions to all property lines and the house.
- An impervious surface or lot coverage calculation: add all existing impervious areas (driveway, existing patio, walkways, roof footprint) plus the new addition to confirm you are within limits.
- Finished elevation notes showing proposed slab height relative to threshold and grade.
- Drainage plan or note describing how runoff will be managed, especially if adding more than 200 sq ft.
- HOA approval letter if applicable.
- Utility locate documentation (call 811 before digging, and note utilities on your site plan).
Materials and tools: what you actually need
For a pour of 50 square feet or less you can work with bagged concrete mix. For anything larger, order ready-mix. Here is a practical breakdown of everything you will need.
Concrete and admixtures
- Ready-mix concrete, 3,000–4,000 psi 28-day strength for residential patios (4,000 psi if loads are heavy). Calculate cubic yards using: (area in sq ft × thickness in inches) ÷ 324. Example: a 10 × 10 ft addition at 4 inches thick = (100 × 4) ÷ 324 ≈ 1.23 cu yd. Order 5–10% extra for waste and overrun, so round up to about 1.35 cu yd.
- Bagged concrete mix (80 lb bags, 3,500–4,000 psi) for small pours — one 80 lb bag covers roughly 0.6 cu ft, so you need about 27 bags per cubic yard.
- Fiber reinforcement admixture (polypropylene or steel micro-fibers) if you want added crack resistance in the mix rather than relying solely on wire mesh.
- Air-entraining admixture if you are in a freeze-thaw climate and ordering ready-mix (specify 5–7% air entrainment to the batch plant).
- Accelerator admixture if pouring in cool weather (below 50°F) to maintain cure time.
Reinforcement
- Welded wire fabric (WWF 6×6-W1.4 or equivalent) for standard 4-inch residential slabs — place in the upper third to middle of the slab depth, not on the ground.
- Deformed rebar, #3 or #4 bars at 12–18 inch spacing for heavier load applications (hot tub pads, vehicle-accessible areas).
- Epoxy-coated or stainless rebar for coastal or de-icing salt environments.
- Tie wire and wire chairs or plastic rebar chairs to hold reinforcement at the correct height.
- Dowel bars (smooth #4 or #5, typically 18 inches long) for load transfer across the construction joint where the new slab meets the old; epoxy-set into holes drilled in the existing slab at 18–24 inch spacing.
Bonding agents
- Epoxy bonding agent (two-part epoxy paste or liquid) for drilling and setting dowels into the existing slab — follow manufacturer pot life and set time requirements.
- Cementitious bonding slurry (Portland cement + water mixed to heavy cream consistency) to brush onto the existing cut edge immediately before placing fresh concrete against it; do not let it dry before the pour.
- For thin overlays only: polymer-modified bonding primer per the overlay product manufacturer's data sheet.
Formwork and subbase
- 2×4 or 2×6 dimensional lumber for forms (2×4 for 3.5-inch slabs, 2×6 for 5.5-inch slabs).
- Stakes (wood or steel) every 2–4 feet to hold forms at grade.
- Duplex nails for attaching forms to stakes (easy to pull for stripping).
- Compacted crushed stone aggregate base, 3/4-inch well-graded crushed stone: 3–4 inches deep for a standard 4-inch slab, 6 inches or more for heavy-load applications. Compact in 3-inch lifts targeting 95% Standard Proctor (ASTM D698).
- Plate compactor (rental) for compacting aggregate base.
- Geotextile landscape fabric if placing aggregate over soft or expansive soil.
- 4-mil or 6-mil poly sheeting as a vapor retarder if required by local conditions.
Finishing tools
- Screed board (straight 2×4 at least 12 inches longer than the pour width).
- Bull float with extension handle for initial surface smoothing.
- Magnesium hand float for intermediate finishing.
- Steel trowel for smooth finish if desired (or skip for broom finish).
- Concrete broom for texture.
- Edger tool for rounding form edges.
- Groover tool for cutting control joints if not saw-cutting.
- Concrete saw (angle grinder or walk-behind saw) for saw-cut control joints.
- Level, tape measure, and laser level or string line for checking grade.
Personal protective equipment and rental items
- Rubber gloves and rubber boots (concrete is caustic and causes chemical burns on prolonged skin contact).
- Safety glasses or goggles.
- Knee pads for finishing work.
- Dust mask or P100 respirator when cutting or grinding concrete.
- Concrete mixer rental (for bagged pours up to about 1 cu yd) or wheelbarrow and mixing tub for very small jobs.
- Plate compactor rental.
- Concrete vibrator (pencil vibrator) rental for larger pours to eliminate air voids.
- Circular saw or reciprocating saw with diamond blade or cold chisel and hammer for edge preparation.
Safety and job-site preparation
Concrete work is not particularly dangerous if you take it seriously, but it does have real hazards. Fresh concrete has a pH around 12 to 13, which causes chemical burns, and the dust from cutting or grinding dry concrete contains crystalline silica, which damages your lungs with repeated exposure. Gloves and boots go on before you touch wet concrete. Respiratory protection goes on before you cut or grind.
Utility locates
Call 811 (the national call-before-you-dig number in the US) at least 3 business days before you dig. This is free, and it is the law in most states. Mark all locate flags on your site plan and keep a buffer of at least 18 inches from marked utilities when cutting or excavating. If you see unexpected pipe or wire when digging, stop and call the utility before proceeding.
Weather and timing
Do not pour concrete when temperatures are below 40°F or forecast to drop below 40°F within 48 hours unless you have cold-weather protection (insulating blankets and a plan). Do not pour in direct sun with air temps above 90°F without misting the forms and subbase first and having curing blankets or plastic ready to deploy immediately. Ideal conditions are overcast skies, 50–80°F, with low wind. Afternoon pours in summer are a bad idea because the slab can dry faster than you can finish it. Schedule your ready-mix truck for early morning if you are pouring in summer.
Planning the layout: slope, joints, and matching the existing patio
Before you form anything, transfer your design to the ground and verify every elevation and slope. This is where the project either goes smoothly or creates headaches later.
Drawing the extension and establishing slope
Set stakes and string lines representing all four edges of the addition. Use a line level or laser level to check elevations at each corner. The new slab surface should match the existing slab surface height at the joint to create a flush transition, or step down by a set amount if design requires it. The slab must drain away from the house at a minimum of 1/4 inch per foot (2%), and the slope direction should be consistent with or complementary to the existing slab drainage. If the existing slab slopes to the right, continue that slope through the addition rather than creating a ridge or valley at the joint.
Control joint layout
Control joints allow the slab to crack in a controlled, straight line rather than randomly. For a residential patio, space control joints no more than 10 to 12 feet apart in each direction, or roughly 1.5 times the slab thickness in feet per foot of joint spacing as a general rule (though 10-foot maximum spacing is the most practical guideline for 4-inch slabs). Joints should be 1/4 of the slab depth, which means 1 inch deep for a 4-inch slab. Match joint locations in the new section to existing joints in the old slab where possible. If the addition runs parallel to a long edge of the existing slab, place the first control joint 8 to 10 feet into the new section rather than right at the construction joint.
The construction joint: where old meets new
The line where the new slab butts against the existing slab is a construction joint, not a control joint. It will move differently from the rest of the slab as each section expands and contracts independently. Dowels transfer load across this joint, and a bond breaker or premolded joint filler keeps the joint from locking and then cracking. Plan this joint location carefully: it should be straight, perpendicular or parallel to the dominant slab direction, and positioned where you can saw-cut or form a clean edge on the existing slab.
Preparing the old edge: the most important step you cannot skip
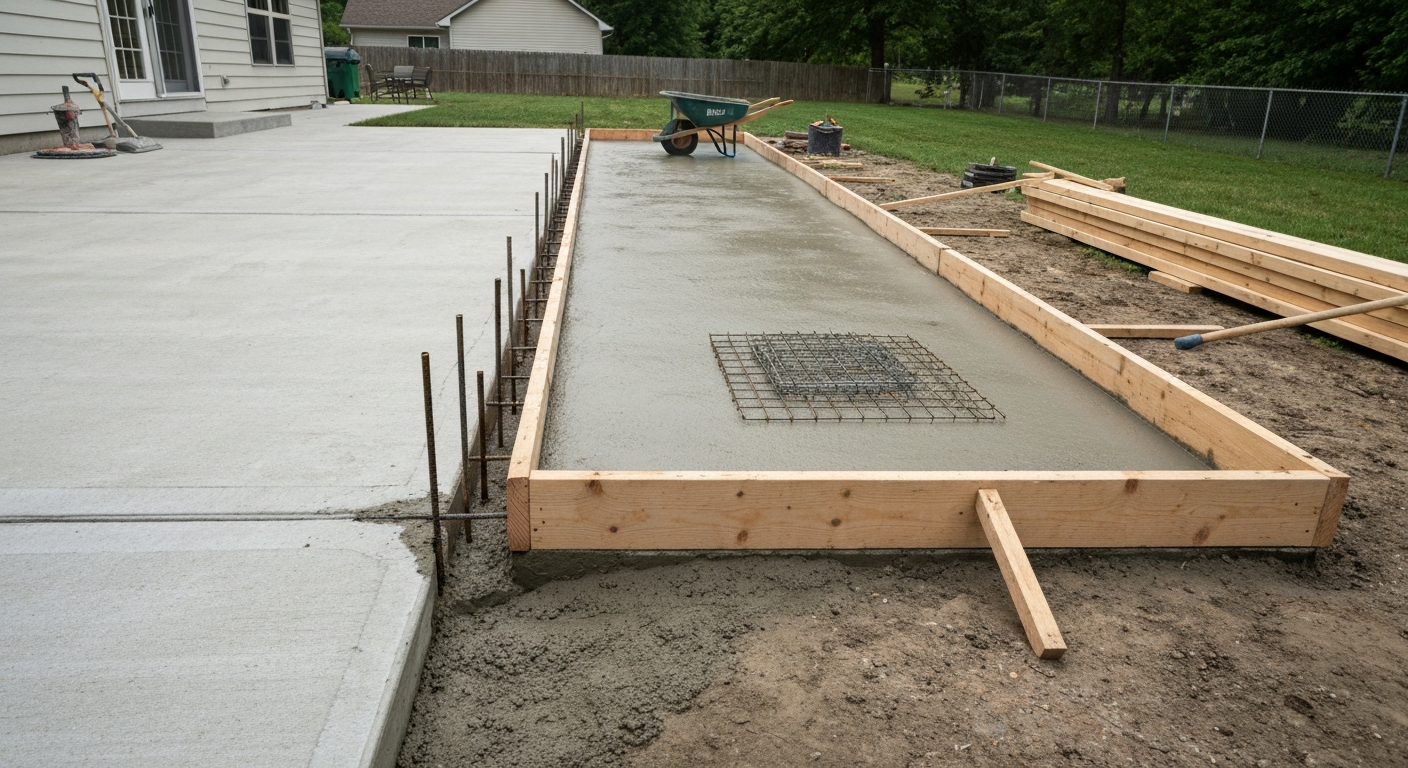
How well you prepare the existing slab edge determines how long the new addition stays bonded and level. For a full step‑by‑step walkthrough on how to add concrete to an existing patio, see the detailed guide on how to add concrete to an existing patio. I have seen extensions crack and separate within two years because the old edge was not properly prepared. Do not rush this.
Sawcutting vs. chipping out old concrete
Sawcutting with a circular saw equipped with a diamond blade or a walk-behind concrete saw gives you the cleanest, straightest edge. Cut a full-depth line (through the entire slab thickness) at the tie-in location. This creates a neat, vertical face for bonding and lets you remove any degraded concrete at the edge cleanly. Sawcutting is the right approach when the existing edge is ragged, damaged, or not straight enough to form against.
Chipping with a cold chisel and hammer or an electric demolition hammer is appropriate for removing degraded, spalled, or hollow sections near the edge before sawcutting. Chip out any loose, crumbling, or delaminated concrete until you reach solid material. If the slab face sounds hollow when you tap it, keep chipping. The goal is a sound, rough profile all the way around the tie-in zone.
Cleaning the existing edge
Once you have a clean cut edge, blast off all dust, laitance, oils, and debris with a pressure washer. Let it dry fully, then inspect again. Any oil stains or curing compound residue must be ground off mechanically because bonding agents will not adhere to contaminated surfaces. If you can see aggregate exposed at the cut face and the surface has a rough texture (similar to fine sandpaper), you have the surface profile you need. If the face looks smooth or glazed, grind it with an angle grinder to open the surface.
Creating a keyway and establishing the bonding profile
For a standard butt-joint tie-in with dowels, a flat vertical face with a good surface profile is sufficient when combined with a cementitious bonding slurry or epoxy bonding agent applied right before the pour. For a more mechanical interlock, some contractors cut or chip a keyway, a horizontal slot or notch in the face of the existing slab, so the new concrete locks into it. A keyway is most useful when you cannot use dowels (very thin existing slab) or when you want belt-and-suspenders security on a heavily loaded section. For most residential patio additions, drilled-and-epoxy-set dowels plus a bonding slurry is the standard and effective approach.
Setting dowels into the existing slab
Drill into the existing slab at mid-thickness depth using a rotary hammer drill with a carbide-tipped bit sized for your dowel bar diameter (typically 1/2 inch for #4 dowels). Drill holes at 18 to 24 inch spacing along the tie-in edge, going at least 4 to 6 inches deep into the existing slab. Blow out dust from each hole with compressed air, inject two-part epoxy adhesive following the manufacturer's instructions (most require inserting the epoxy cartridge and using a mixing nozzle to fill the hole from the back), and immediately insert the dowel bar. Let the epoxy cure fully before placing forms and pouring against it. The dowels will protrude 9 to 12 inches into the new slab and transfer load across the joint so the two sections behave more like one.
| Tie-in method | Best for | Complexity | Approximate added cost |
|---|---|---|---|
| Cementitious bonding slurry only | Very small pours, thin slabs, low-load patios | Low | Under $10 |
| Drilled + epoxy dowels | Standard residential patio additions, any size | Medium | $30–$80 in materials |
| Epoxy dowels + keyway | Heavy loads, hot tub pads, vehicular areas | High | $80–$150+ in materials |
| Epoxy bonding agent (liquid/paste) | Thin overlays and bonded toppings over sound slab | Medium | $20–$60 per gallon |
Building the forms and preparing the subbase
With the old edge prepped and dowels set, you can build the forms for the new section. Use straight, knot-free 2×4 or 2×6 lumber staked every 2 to 4 feet. Set the top of the forms at the finished surface elevation of the new slab using a level and measuring from your string lines. Oil or wax the inside face of the forms so they release cleanly when you strip them. Double-check that the top edge of the form at the junction with the existing slab matches the existing slab surface elevation exactly, because even a 1/4-inch mismatch at the joint will be visible and feel wrong underfoot.
Excavate the subgrade within the forms to accommodate your aggregate base plus slab thickness. For a 4-inch slab with a 4-inch base, you need 8 inches of total depth below the top of form. Place crushed stone in lifts no deeper than 3 inches and compact each lift with a plate compactor, targeting firm, stable material that does not deflect when you walk on it. A common residential target is 95% Standard Proctor density (ASTM D698). Many DOT and municipal technical specifications require subgrade/subbase compaction to a minimum of 95% Standard Proctor (ASTM D698) with in‑field density verification; see DWS‑974A / DOT Technical Specifications, subgrade compaction and density verification (95% std. proctor) DWS‑974A / DOT Technical Specifications — subgrade compaction and density verification (95% std. proctor). After compaction, check the aggregate surface elevation at multiple points and add or remove material as needed before you pour.
Placing reinforcement, mixing, pouring, and finishing
Reinforcement placement
Place welded wire fabric or rebar on chairs so it sits in the middle to upper third of the slab depth, which for a 4-inch slab means 1.5 to 2 inches from the bottom. Do not lay wire mesh flat on the ground and expect it to get kicked up during the pour; it never actually ends up at the right depth that way. Use plastic or wire chairs every 3 to 4 feet. Overlap adjacent sheets of wire fabric by at least 6 inches and tie the overlap. Keep reinforcement at least 2 inches from all form edges.
Applying bonding agent right before the pour
Mix a thick slurry of Portland cement and water (consistency of thick latex paint) and scrub it into the prepared face of the existing slab with a stiff brush immediately before placing concrete against it. The critical rule: the slurry must be wet and tacky, not dry, when the fresh concrete is placed against it. If the slurry dries before you pour, it becomes a bond breaker rather than a bonding agent. Have everything staged and ready so you can apply the slurry and pour within a few minutes.
Pouring and screeding
Place concrete from the far end of the form and work toward the truck or mixer, consolidating as you go with a concrete vibrator or by rodding with a piece of rebar. Do not drag concrete long distances; it separates the aggregate. Overfill the form slightly above the form top, then screed off with your straight 2×4, pulling it across the forms in a back-and-forth sawing motion while moving forward. You want a slightly overfilled screed so you have enough material to float the surface down to final grade.
Bull floating and waiting
Immediately after screeding, run the bull float across the surface to embed aggregate and close the surface. Then wait. This is where patience matters. The bleed water (the sheen of moisture on the surface) needs to evaporate before you do any hand finishing. Finishing too early traps bleed water into the top layer and creates a weak, powdery surface that dusts or scales later. Depending on temperature and humidity, waiting for bleed water to disappear can take 20 minutes to over an hour.
Hand finishing and texture
Once bleed water is gone and the surface will support your weight on knee boards without sinking more than about 1/4 inch, use a magnesium float to smooth and compact the surface further, then edge the perimeter. For a broom finish, drag a concrete broom in one direction (perpendicular to the main direction of foot traffic) immediately after floating. For a smooth trowel finish, do one or two passes with a steel trowel after the magnesium float, working in overlapping arcs. Cut tooled control joints with a groover tool to 1/4 of the slab depth before the concrete gets too hard to tool, or plan to saw-cut them within 4 to 12 hours of the pour.
Curing and sealing the new slab
Curing is the step most DIYers underinvest in, and it is one of the biggest factors in long-term slab strength. Concrete does not dry, it cures through a chemical reaction that requires moisture. If the slab dries out too fast in the first week, strength development is permanently compromised.
The simplest curing method for a residential patio is plastic sheet curing: cover the finished slab with 4-mil or 6-mil poly sheeting as soon as the surface can bear it without marking, weight the edges, and leave it in place for at least 7 days. Alternatively, apply a liquid membrane curing compound immediately after finishing using a pump sprayer, covering the entire surface and all edges in a single pass. Do not let the slab dry and then rewet it; keep it consistently moist for the full cure period.
After 7 days of curing and a minimum of 28 days before heavy loading, apply a penetrating concrete sealer (silane-siloxane for plain concrete) or a topical acrylic or epoxy sealer if you want a sheen. Sealing prevents water intrusion, reduces freeze-thaw scaling, and extends the surface life significantly. Strip the forms after at least 24 hours for most mixes, but wait 7 days before allowing foot traffic and at least 28 days before parking vehicles on the new section.
Matching color, finish, and texture
Getting the new section to match the existing patio is the hardest part of any concrete addition, and I will be honest: a perfect invisible match is extremely difficult if the original slab has any age or weathering on it. But you can get close enough that the transition looks intentional rather than patched.
Color matching
If the existing slab is plain, uncolored concrete, the new section will likely look lighter when fresh and gradually blend in over a year or two as it weathers. To speed up the match, use an integral concrete colorant in the mix formulated to approximate aged gray, or apply a concrete stain or dye to the new section after curing to match the existing surface tone. Test on a small area first. If the existing slab was integrally colored or stained, get a sample of the original mix design if possible (sometimes from the original ready-mix supplier's batch tickets) or use a concrete dye to approximate the color after curing.
Texture and finish matching
Match broom direction and pressure to the existing finish by practicing on a test board before working the actual slab. If the existing slab is stamped, use the same stamp pattern and alignment as the original; you will need to rent the same stamp tools, match the release agent color, and overlay the pattern from the existing edge to maintain continuity. If you cannot get an exact match, consider using a contrasting border pattern at the tie-in zone so the difference looks deliberate rather than accidental.
Costs and timeline: what to realistically expect
| Project phase | DIY time estimate | Approximate material cost |
|---|---|---|
| Site assessment and layout | 2–4 hours | Under $50 (stakes, string, spray paint) |
| Permits and plan prep | 4–8 hours (admin) | $50–$300 depending on jurisdiction |
| Utility locates (call 811) | 15 min + 3-day wait | Free |
| Excavation and subbase | 4–8 hours for 100 sq ft | $100–$250 (aggregate, rental) |
| Forms and edge prep | 3–6 hours | $50–$150 (lumber, stakes, diamond blade) |
| Dowels and bonding materials | 2–3 hours | $40–$120 (epoxy, dowel bars, slurry) |
| Ready-mix concrete (100 sq ft, 4 in) | 2–4 hours pour day | $200–$400 (varies by region) |
| Finishing, curing, and sealing | Same day + 7-day cure | $30–$80 (curing compound or poly, sealer) |
| Total for 100 sq ft DIY project | 2–3 weekends total | $500–$1,200 typical range |
Contractor pricing for the same 100 square foot addition typically runs $1,500 to $3,500+ depending on your region, local labor rates, and site conditions. The DIY savings are real, but so is the time commitment. Factor in rental equipment costs (plate compactor $80–$120/day, concrete saw $100–$150/day) and any permit fees when comparing to contractor quotes.
Common mistakes and how to fix them
The new slab is higher or lower than the existing slab at the joint
This almost always comes from forms set at the wrong elevation. If the new section ended up higher by 1/4 inch or less, you can grind the transition smooth with an angle grinder and a diamond cup wheel once fully cured. If it is more than 1/4 inch off, that is a trip hazard and will need to be addressed either by grinding down or by applying a feathered overlay to ramp the existing surface up to the new level.
Cracking along the tie-in joint within the first year
Some cracking at the construction joint is normal as the new slab undergoes initial shrinkage and the two sections move independently. If the joint was planned properly and dowels are in place, this is cosmetic. Fill hairline cracks with a polyurethane or epoxy crack filler rated for concrete joints. If the new slab has cracked and also shifted vertically at the joint (differential settlement), the subbase compaction was inadequate and the section may need to be lifted or redone.
Surface dusting, scaling, or flaking
A dusting or scaling surface almost always means the slab was finished too early while bleed water was still present, or curing was cut short. For minor surface dusting on a new slab, apply a penetrating hardener (sodium or lithium silicate densifier) after full cure. For scaling caused by freeze-thaw on a surface that was not air-entrained, apply a penetrating sealer and accept that the surface texture will be rougher. Severe scaling that exposes aggregate throughout is best addressed with a bonded polymer-modified topping after addressing the cause. ACI 302.1R, Guide for Concrete Floor and Slab Construction (bonded vs unbonded toppings) differentiates bonded toppings (which act monolithically and require rigorous surface preparation and higher strength mixes) from unbonded overlays and notes bonded toppings can effectively restore surface and riding/traffic characteristics but suitability depends on overlay thickness, substrate condition, and bond testing ACI 302.1R — Guide for Concrete Floor and Slab Construction (bonded vs unbonded toppings).
Drainage pooling on the new section
If the new slab ponds water, the slope is insufficient or running the wrong direction. A 2% slope (1/4 inch per foot) is the minimum. If you can identify a low spot during the cure window, you may be able to feather in a self-leveling polymer-modified topping to correct it. Once fully cured, low spots can be filled with a polymer-modified concrete resurfacer, though getting a feather edge to bond and last is challenging. The better fix is to install a channel drain at the low point to manage the water rather than trying to re-slope a hardened slab.
Maintenance after the project is done
Reseal the patio every 2 to 5 years depending on the sealer type and traffic level. Penetrating sealers need reapplication less often than topical coatings. Keep expansion and control joints clean and repack them with backer rod and joint sealant if they open up or the sealant degrades. Address cracks as soon as you notice them with appropriate crack filler rather than letting water infiltrate and freeze-thaw the crack wider. Clean oil and organic stains promptly before they penetrate the surface. With basic maintenance, a well-built concrete patio addition will last 25 to 40 years or more.
FAQ
When should I pour new concrete to extend a patio versus using alternatives (pavers, deck, gravel, bonded overlay)?
Decision checklist: - Pour new concrete when: existing slab is cracked/settled or structurally unsound; you need to correct large elevation/grade issues; you require monolithic load capacity (e.g., hot tub); you want identical thickness/finish and long life; you must integrate reinforcement/dowels to transfer loads. - Consider alternatives when: the existing slab is structurally sound with only minor surface problems; height differences are small or can be handled with transitions; drainage can be managed; budget is limited; you want an easier future removal or access to utilities. - Bonded overlay (thin topping) is only appropriate if the substrate is sound, has no through‑thickness cracking, and you can obtain the required surface profile and bond test results.
What measurements and permit considerations do I need before starting?
Measurements & permit checklist: - Measure new footprint and existing slab outline, door thresholds, and finished elevations; sketch property lines, north arrow, and dimensions to structures. - Locate utilities before digging. - Calculate concrete volume: cubic yards = (area ft² × thickness inches) ÷ 324; add 5–10% for waste. - Permits: many jurisdictions exempt small ground‑level patios from building permits but still count toward impervious‑surface/lot‑coverage limits—check local building/zoning department. For bigger expansions, grading disturbances, or load‑bearing features (hot tubs, retaining walls), a permit and plot/grading plan are often required.
What materials and tools will I need for a concrete patio addition?
Material & tool list (typical for a new 4" slab addition): - Materials: ready‑mix concrete (calculate volume), crushed stone aggregate subbase (3–6"), welded wire fabric or rebar (as specified), dowels/epoxy if tying to old slab, form lumber/ stakes, bond breaker/expansion joint material, curing compound, concrete sealer, colorants or stamps (if matching), gravel for drainage, geotextile (optional). - Tools: tape measure, string line, 2×4s for screeding, wheelbarrow or pump, plate compactor, tamp, concrete float/steel trowel, edger/jointing tool, broom for texture, drill with masonry bit (for dowels/epoxy), diamond grinder or shot blaster (for surface prep), level, laser/plumb bob, personal PPE (gloves, eye protection, dust mask), concrete saw (for control joints).
How do I prep the existing concrete edge so the new pour ties in properly?
Edge prep steps: 1. Clean: remove dirt, vegetation, and loose material from the tie‑in edge. 2. Soundness: tap and inspect for delamination/spalls—remove unsound concrete back to solid material. 3. Create a mechanical key: cut a straight vertical sawcut or form a keyway (1"–2" deep) along the existing edge to provide shear transfer. 4. Profile the surface: remove laitance and achieve an ICRI CSP 3–5 profile by shotblasting, grinding, or hydrodemolition for good bond if using an overlay or epoxy. 5. Clean again: pressure‑wash and allow to dry per adhesive/epoxy instructions. 6. For dowels: drill holes and install epoxy‑anchored dowels or plan for tied reinforcement per design.
How do I form, prepare the subbase, and set reinforcement for a new slab addition?
Forming/subbase/reinforcement: - Forms: build straight, sturdy forms at the desired thickness (typical 4"); slope forms for positive drainage (1/8"–1/4" per foot or local code—near foundations follow required fall). Brace forms to resist concrete pressure. - Subbase: remove topsoil to reach stable soil, lay and compact 3–4" of well‑graded crushed stone for a 4" slab; increase to 6"+ for heavier loads. Compact in lifts to ~95% Standard Proctor or as specified. - Reinforcement: place welded wire fabric in the upper third to middle of slab thickness for shrinkage control; for heavy loads or thicker slabs use rebar mats or individual bars. Support reinforcement on chairs to achieve correct cover. - Joints: plan control joints at 2–3× slab thickness in feet (e.g., 8–12 ft spacing for a 4" slab) and provide isolation joints at fixed vertical elements.
What are the common techniques to bond new concrete to old concrete?
Bonding techniques: - Mechanical keys/dowels: sawcut a keyway or drill and epoxy in dowels across the joint to transfer shear and limit differential movement. - Epoxy/ bonding agent: apply manufacturer‑recommended epoxy or polymer bonding agent to a clean, prepared surface when pouring fresh concrete against old. Follow pot life and temperature limits. - Roughen the surface: shotblast or grind to expose aggregate and remove laitance for a better mechanical bond—critical for bonded overlays. - Expansion/ isolation joints: use compressible joint filler where differential movement is expected (e.g., at house foundations or dissimilar materials).