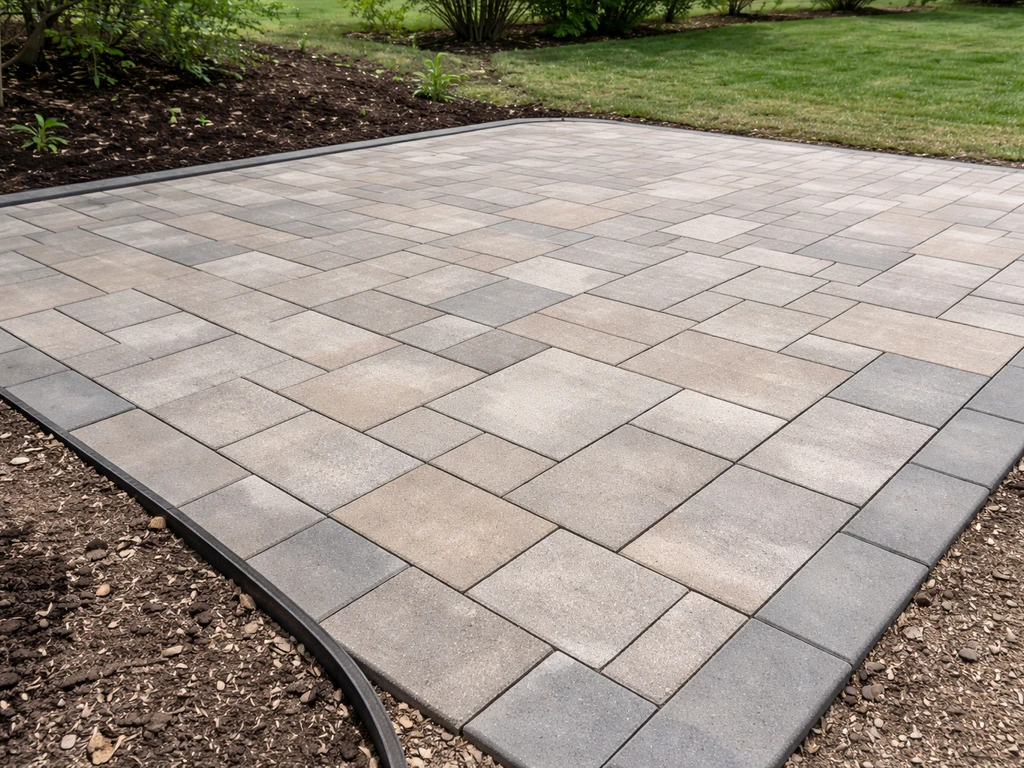
You can build a beautiful, durable patio without ever mixing or pouring concrete. The most practical approach for most DIYers is a dry-laid paver patio on a compacted gravel base with a sand bedding layer, no concrete needed, no waiting for cures, and the whole thing is fixable if something shifts. Other solid options include flagstone, gravel, decomposed granite, and interlocking deck tiles, depending on your budget and style. This guide walks you through every step, from picking your material to keeping it looking sharp years later.
How to Make a Patio Without Concrete: DIY Guide

Silas Morrison
28 Jun 2026
Picking the right no-concrete patio material
The material you choose shapes everything else, the base depth, drainage setup, maintenance, and cost. Spend a few minutes here before you buy anything.
| Material | Best For | Approx. Cost (materials) | Difficulty | Durability |
|---|---|---|---|---|
| Concrete pavers | Clean, formal look; high traffic | $3–$8/sq ft | Moderate | Excellent |
| Natural flagstone | Organic, rustic look; irregular shapes | $4–$10/sq ft | Moderate–Hard | Excellent |
| Pea gravel | Budget patios, informal spaces | $1–$3/sq ft | Easy | Good (shifts over time) |
| Decomposed granite (DG) | Dry climates, natural look | $1–$3/sq ft | Easy–Moderate | Good |
| Porcelain/stone deck tiles | Modern look, fast install | $4–$12/sq ft | Easy | Good–Excellent |
| Composite/wood deck tiles | Over existing surfaces or gravel base | $5–$15/sq ft | Easy | Moderate |
For most backyards, concrete pavers are the sweet spot. They're affordable, widely available at any home improvement store, forgiving during installation, and easy to repair later, you just pull up individual units if something goes wrong. Flagstone looks incredible but requires more skill to level properly because of the irregular shapes. Gravel and DG are the cheapest and easiest, but they aren't great for furniture-heavy patios or areas with heavy foot traffic because they migrate over time. Deck tiles (porcelain or composite) are the fastest DIY option if you want something that looks finished quickly, but they need a very flat, stable base underneath.
Climate matters too. In freeze-thaw climates (most of the northern US and Canada), flexible paver systems actually outperform concrete because the joints absorb movement rather than cracking. That's exactly why the interlocking concrete paver system was developed, the flexible jointed construction reduces cracking compared with rigid concrete slabs. In hot, dry climates, DG and gravel patios stay cooler underfoot and drain instantly. In wet climates, make sure whatever you choose has real joint drainage or permeability built in.
Planning the layout, grading, and drainage
Before you dig a single shovelful, you need a plan on paper. Measure your intended patio area, sketch it out, and confirm the dimensions work with your chosen paver or stone sizes to minimize cuts. For pavers, try to plan so you end up with at least a half-unit on cut edges, tiny slivers look bad and break easily.
Drainage is the most important design decision you'll make. If you need to add on to your existing patio, plan the join details, match the height and slope, and extend the base and drainage correctly so the new section doesn't settle differently Every patio needs a slope away from the house. Every patio needs a slope away from the house, the standard is 1/8 inch to 1/4 inch of drop per foot of horizontal run.
So a 12-foot-wide patio should drop between 1. 5 and 3 inches from the house side to the outer edge. This isn't optional. Flat or back-sloped patios collect water, push it toward your foundation, and ruin the base underneath over time.
Mark your slope with stakes and string lines before you start digging so you're building the grade in from the beginning, not trying to fix it after the fact.
Also think about where the water goes once it leaves the patio edge. If it drains into a lawn, you're usually fine. If it drains toward a neighbor's property or a low spot near your foundation, you may need a simple French drain or gravel trench along the lower edge to redirect it. Solve this on paper now, it's much harder to deal with after you've installed everything.
Site prep and building the base (no concrete involved)
A solid base is what separates a patio that lasts 20 years from one that looks bad after two winters. This part is the hardest physical work of the whole project, but it's not complicated.
Step 1: Mark and excavate
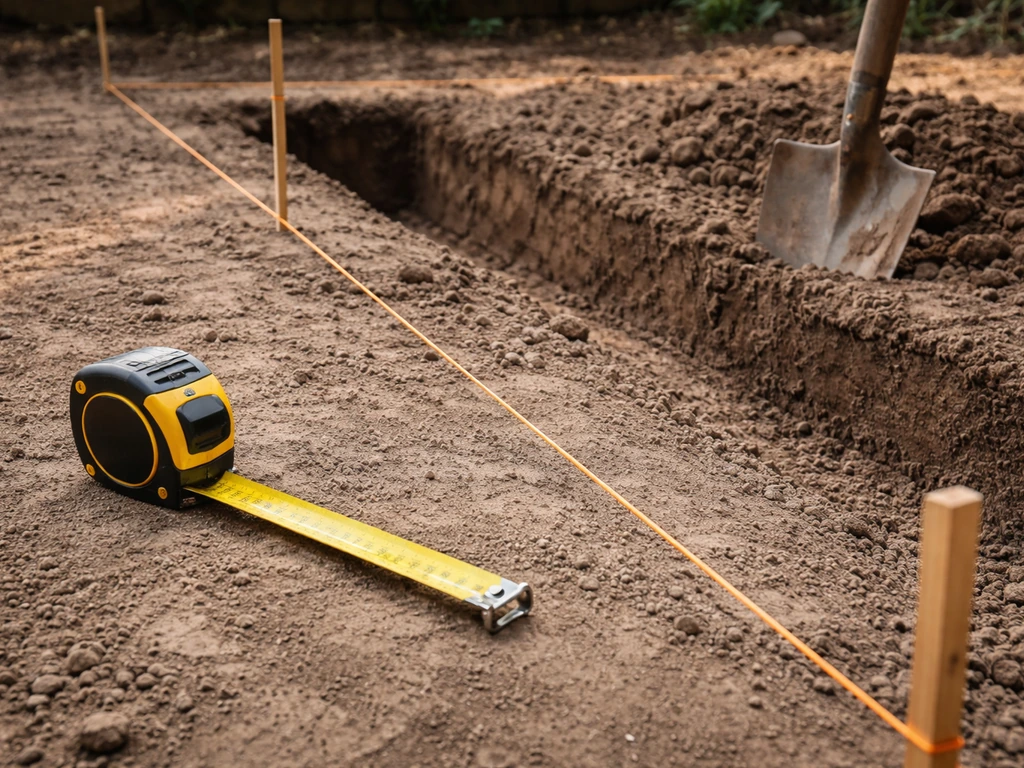
Mark out your patio footprint with spray paint or stakes and string. Then excavate. For a standard paver patio, you need to dig down at least 7 inches below your intended final paver surface elevation. That depth accounts for 4 inches of compacted gravel base, 1 inch of bedding sand, and the thickness of your pavers (typically 2.375 inches for standard 60mm pavers). Gravel-only patios need less depth, around 4 to 6 inches total. Always call 811 before you dig to check for buried utilities.
Step 2: Lay geotextile fabric
Once you've excavated, roll out landscape geotextile fabric across the entire excavated area before adding any base material. Overlap seams by at least 6 inches and stake the fabric so it stays in place when you start adding gravel. The fabric separates your base aggregate from the native soil below, preventing fines from migrating up and destabilizing the base over time. It also helps suppress weeds from underneath, a welcome bonus.
Step 3: Build and compact the gravel base
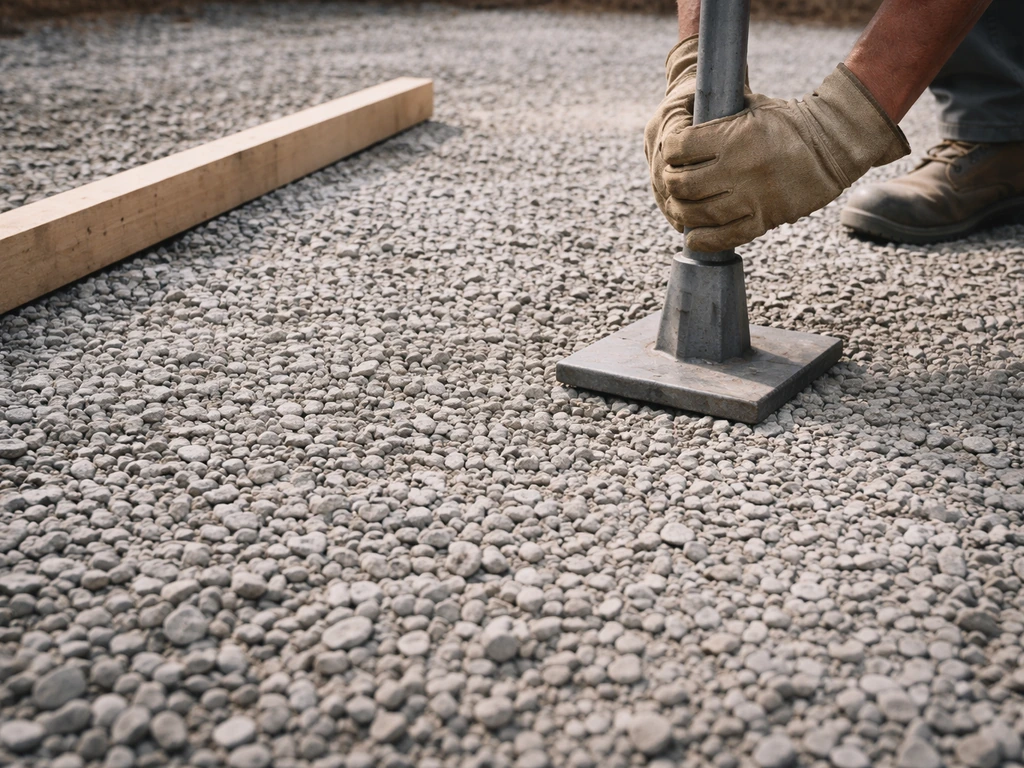
Use 3/4-inch minus crushed stone (also called crusher run or Class II base) for your base layer. This angular aggregate compacts tightly and doesn't shift the way rounded gravel does. Add it in 2-inch to 3-inch lifts, compacting each lift with a plate compactor before adding the next. For a 4-inch base, that means two passes. Rent a plate compactor from your local equipment rental shop for a day, it's worth every dollar. After compacting, check that your base is following your intended slope using a level and measuring tape. Adjust now, not after the sand goes down.
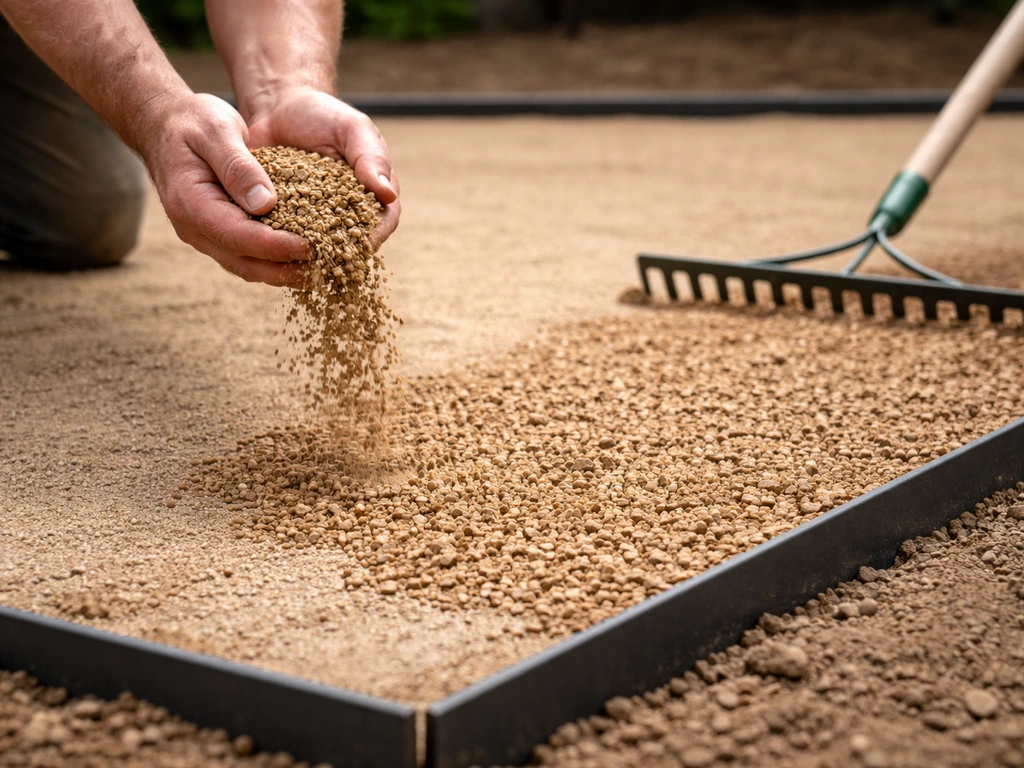
Step 4: Spread the bedding sand
For pavers or flagstone, you need a thin layer of coarse bedding sand (also called concrete sand) on top of the gravel base. Spread it to an uncompacted nominal thickness of 1 inch (25mm) and screed it flat using two parallel sections of 1-inch conduit as guides. Lay the conduit on the compacted gravel, pour sand between them, and drag a straight 2x4 across to level it out. Pull the conduit out carefully, fill the voids by hand, and don't walk on the screeded sand before placing pavers. For gravel or DG patios, skip the sand step and work directly on the compacted base.
Installing the surface layer
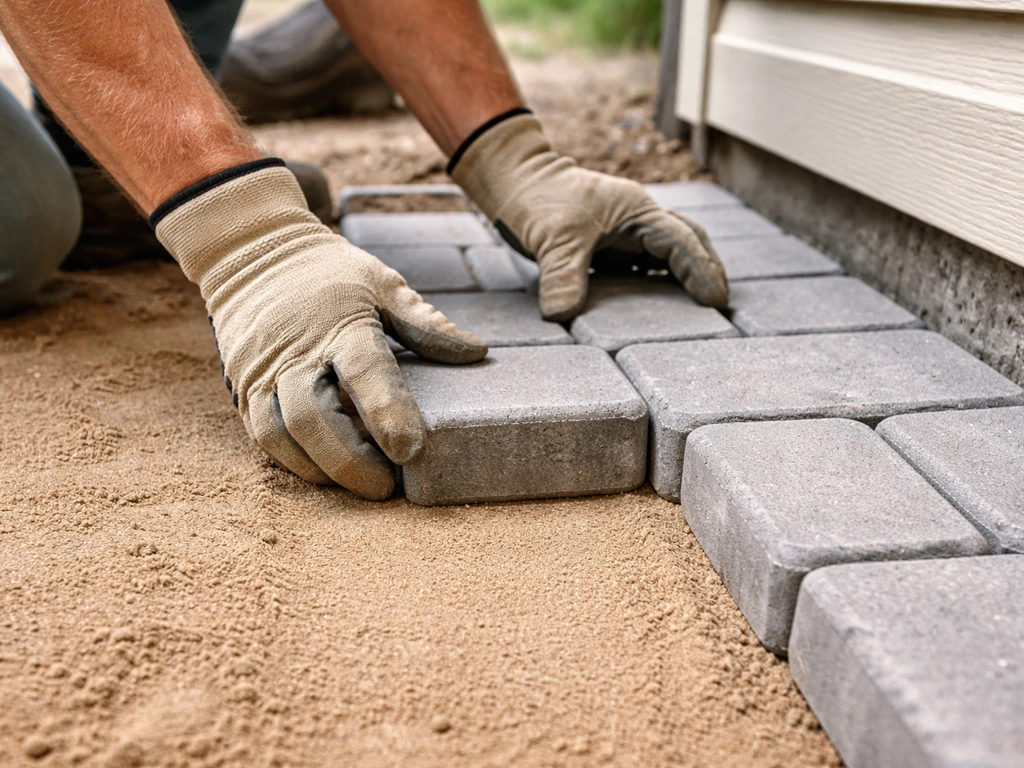
Laying pavers or flagstone
Start at a corner that's most visible or butts up against the house. Set pavers gently onto the screeded sand, don't slide them, just place them down. Keep consistent joint spacing of at least 1/16 inch (1. 6mm) between units, ideally in the 1/8 to 3/16 inch range for standard pavers.
For more detail, the Access Board's dimensional tolerances report reproduces ICPI construction tolerances, including sand-setting beds and recommended joint width ranges at least 1/16 inch (1. 6mm).
Use spacers if you have trouble keeping it consistent. Work from a kneeling board placed on already-set pavers so you don't disturb the screeded sand. Check your level and slope constantly, every 4 to 6 square feet, lay a level across multiple pavers to confirm you're tracking your intended slope. Small corrections are easy now; they're a headache later.
For flagstone, the process is similar but you'll be fitting irregular shapes together like a puzzle. Lay them out dry on the grass first to audition your pattern, then transfer them to the sand bed. Flagstone typically needs a slightly thicker sand bed (1 to 1.5 inches) to account for variation in stone thickness, and you'll shim individual pieces with extra sand to get them flush.
Installing gravel or decomposed granite
For a gravel patio, install your edge restraints first (see the next section), then pour and rake your gravel to an even depth of 2 to 3 inches across the prepared base. Tamp lightly with a hand tamper or roller. For DG, add it in one 2-inch layer, dampen lightly, and compact it. Stabilized DG (which has a binding agent mixed in) compacts harder and holds its surface better than unstabilized, worth the small extra cost if you're in a rainy climate.
Installing interlocking deck tiles
Porcelain or composite deck tiles snap or lock together over a flat base. The base needs to be extremely flat, within 1/8 inch over 10 feet, so either use a compacted gravel base that you've carefully leveled, or install them over an existing flat surface like an old concrete slab.
If you are working with an existing patio, you may be able to build a paver or deck-tile surface over it as long as the base is stable and level install them over an existing flat surface like an old concrete slab. Start in the center of the space and work outward. Cut edge tiles with a wet saw (for porcelain) or a circular saw with a fine-tooth blade (for composite).
Edge restraints, leveling, and finishing the joints
Edge restraints are non-negotiable for any paver or gravel patio. Without them, your pavers or gravel will slowly migrate outward and your whole surface will spread and gap. Use plastic snap-in paver edging (the kind with spikes) along all open edges. Install it so it butts tightly against the last row of pavers, then drive the spikes down through the edging and into the base layer every 12 inches. For curved edges, use flexible edging made specifically for curves. You don't need edging on sides where pavers abut a wall, house foundation, or other fixed structure.
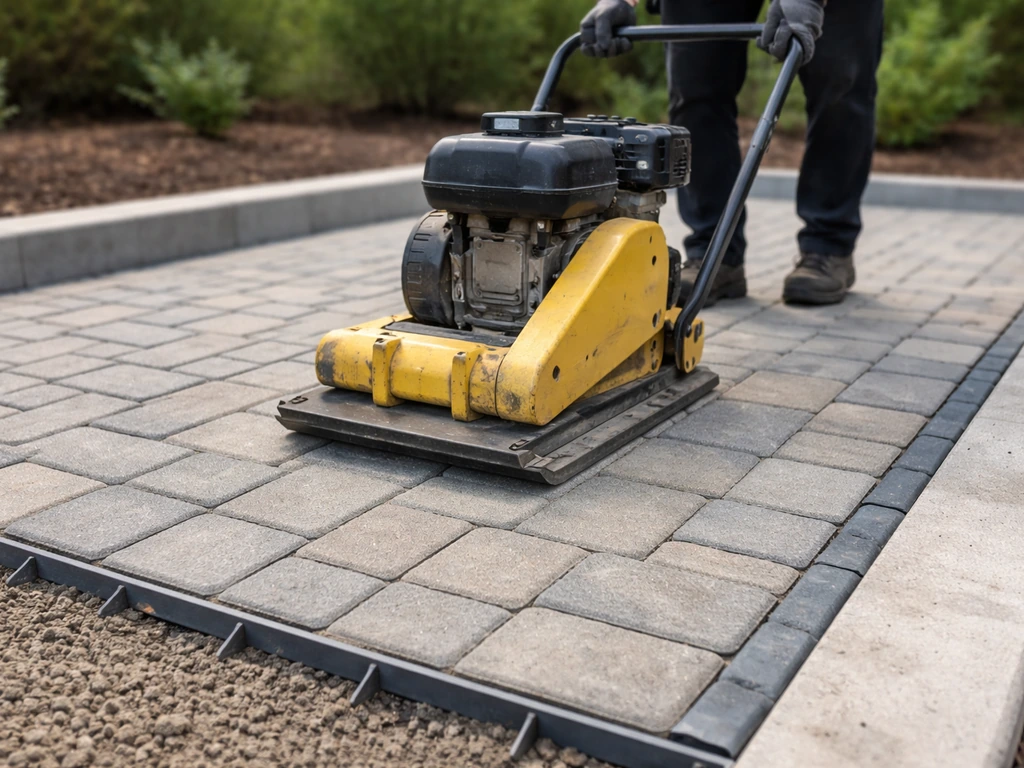
Once all pavers are set and edging is in place, run a plate compactor over the entire paver surface with a protective rubber pad underneath (many compactors come with one, or you can buy one cheaply). This final compaction seats the pavers firmly into the sand bed and locks in your level surface. After compacting, sweep fine polymeric sand across the entire surface, working it into the joints with a push broom.
Make multiple passes in different directions until the joints are full. Then lightly mist the surface with water per the manufacturer's instructions to activate the polymer binder in the sand. This is what locks joints in place and resists weeds. Don't over-water, a light mist is all you need.
For flagstone joints, you have two good options: polymeric sand (same product, same process) or ground cover plants like creeping thyme or moss. The plants look gorgeous but take a season to fill in. For gravel patios, the edging is your finish detail, make sure it sits flush with or just below the surrounding grade so it isn't a trip hazard.
Troubleshooting problems during (and after) installation
Pavers rocking or not sitting flat
This almost always means your bedding sand wasn't screeded evenly, or you walked on it before placing pavers and left depressions. Pull the offending paver up, add or remove sand underneath, and reset it. Check with a level against the surrounding pavers. If multiple pavers in an area are off, you may need to pull them all back, re-screed the sand in that zone, and relay.
Water pooling in the center
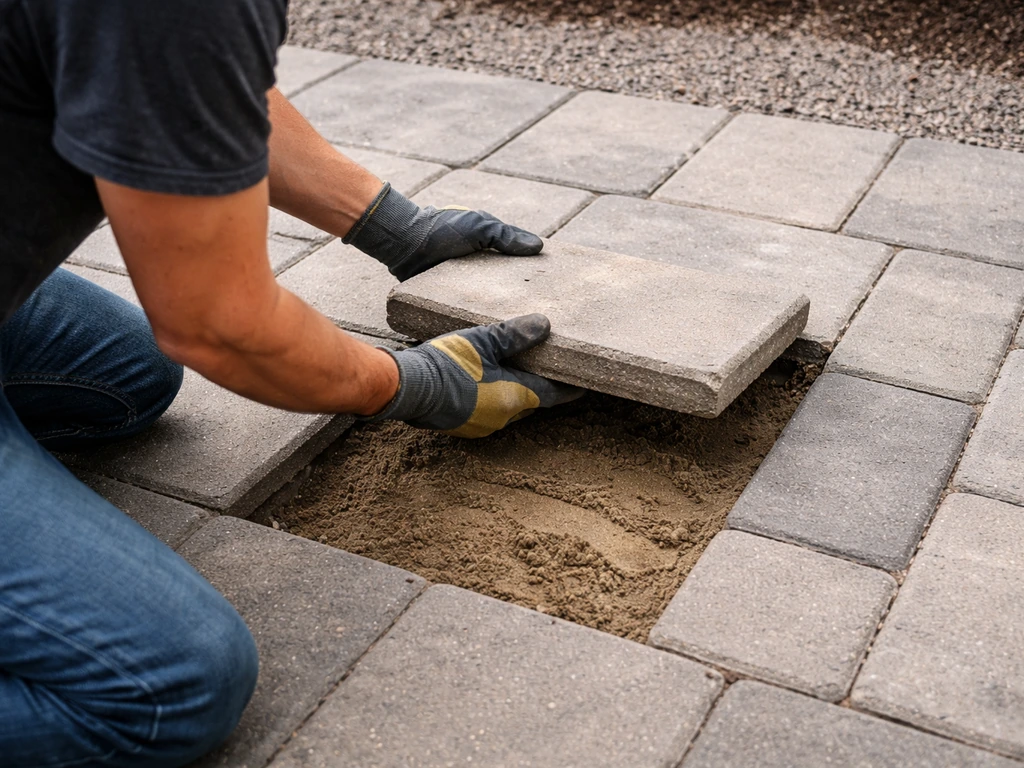
You didn't build in enough slope, or your base settled unevenly. If it's a small low spot (a paver or two), pull those pavers, add sand, and reset them slightly higher. If it's a large area, you've got more work, you'll need to pull a section, adjust the base grade, re-screed, and relay. This is why checking your slope throughout the installation is so important. Don't skip the string lines.
Pavers shifting at the edges
Edge migration almost always means your edging failed or wasn't installed. Check whether the spikes are still in the ground and the edging is flush against the pavers. If the edging itself shifted, pull it back into position, add new spike holes if needed, and pound new spikes in. If the base material eroded along the edge, tuck in additional crushed stone before resetting everything.
Weeds coming up through joints
Weeds in paver joints are almost always growing in the debris that collects on top of the sand, not coming from below. The fix is to pull or burn them, then top off the joints with fresh polymeric sand. A good geotextile under the base and properly set polymeric sand in the joints will stop most weed problems long-term. If you skipped the polymeric sand the first time and used plain jointing sand, now's the time to upgrade, sweep out the old sand, clean the joints, and refill with polymeric sand.
Gravel migrating onto the lawn
Your edging isn't holding. Dig back the edge of the gravel, check the edging, reinforce it with additional stakes, and add a slightly higher berm of soil on the outside if needed. You can also use a taller, heavier steel or aluminum edging for gravel patios instead of the lightweight plastic paver edging.
Keeping your no-concrete patio in good shape long term
One of the real advantages of a paver or gravel patio over a poured concrete slab is that maintenance is simpler and repairs are totally DIY-able. There's no cracking slab to resurface or spalling concrete to grind down. That said, a little regular care goes a long way.
- Sweep or blow off debris regularly — leaves and organic matter sitting in joints feed weeds and accelerate joint sand breakdown.
- Re-sweep polymeric sand into joints every 2 to 3 years, or sooner if you notice joints looking thin or weeds appearing. Blow out old debris first.
- Check edging each spring. Drive any lifted spikes back in and replace any sections that have cracked or moved.
- For gravel or DG patios, top off the surface material every 2 to 3 years as some material will compact down or get displaced.
- Inspect for low spots or pooling areas after heavy rain. Catching and fixing a single sunken paver costs 20 minutes; ignoring it leads to a spreading problem.
- Avoid using a metal snow shovel on pavers — use plastic or rubber-tipped blades to avoid scratching the surface. Sand and salt are fine for traction in winter.
- For porous systems (gravel, DG, permeable pavers), avoid pressure washing with high-impact nozzles that displace joint material. A garden hose rinse is usually enough.
If you ever want to expand your patio later, a dry-laid paver system is actually much easier to extend than a poured slab. You just pull the edging on the expansion side, prep and grade additional base material to match, and continue laying pavers from where you left off. That's a big practical advantage over working with concrete, where adding on means forming, pouring, and trying to match an existing surface, a completely different project.
Your next steps for this week
If you want to get moving quickly, here's how to go from reading this to having a patio in a weekend or two. A typical 12x12 patio (144 sq ft) takes two people about one full weekend for excavation and base work, and another half-day to a full day for paver installation and finishing.
- Measure your space and sketch a layout. Confirm material quantities needed (add 10% for cuts and waste on pavers).
- Call 811 at least 3 business days before digging to get utilities marked.
- Order or pick up materials: crushed stone base aggregate, bedding sand, pavers or your chosen surface, geotextile fabric, plastic paver edging, and polymeric jointing sand.
- Rent a plate compactor for the weekend — most rental shops have them for $60 to $100 per day.
- Excavate, lay fabric, build and compact the base, screed sand, and set your pavers over two days.
- Install edging, run final compaction, sweep in polymeric sand, and mist to activate.
This is genuinely one of the most beginner-friendly outdoor projects you can take on. The tools are rentable, the materials are available at any home center, and the skills are learnable in an afternoon. The main things that trip people up are skimping on base depth and not building in the drainage slope from the start, avoid those two mistakes and you'll have a patio that holds up for decades without a single bag of concrete mix. To make a concrete patio bigger without it failing, you still need the right base depth and slope so the extra area stays stable and drains properly skimping on base depth.
FAQ
Can I expand a patio later if I build without concrete?
Yes, but only if the system stays fully dry-laid. Use the same material family on the new section, match the base thickness, and extend edging and geotextile across the joint. The key is to blend at least the gravel base and slope, not just the top pavers, otherwise the seam becomes a future settlement line.
What if I want to make a patio without concrete over an existing concrete slab?
If you already have a concrete slab, avoid laying pavers directly on concrete unless it is very flat and sound. For deck tiles, the flatness requirement is extremely strict, within about 1/8 inch over 10 feet. For pavers, a thin topping mortar layer or setting bed can cause drainage and bond issues, so plan for either a new dry-laid overlay system with proper leveling or a full rebase if the slab is uneven.
How do I know polymeric sand will actually lock my joints, and what can ruin it?
Polymeric sand only works well when joint spacing is within the product’s intended range and the paver surface is clean. If you compact too early and leave debris in the joints, the sand won’t fill correctly. Also, avoid heavy misting, follow the exact activation time, and do not rain on the patio right after application (cover it if storms are expected).
Does a patio without concrete hold up in freezing climates?
For freeze-thaw areas, avoid materials that rely on loose, migrating fill at the surface. A dry-laid paver patio on compacted crushed stone with tight edging and filled joints is designed to move slightly without catastrophic cracking. Still, you should use real crushed stone base (like crusher run) and keep the slope correct, because shifting usually starts at low spots or weak edges.
How can I prevent dips or puddles after installation?
Start by checking your grade with a string line before you build any base. Then, after compacting gravel and before adding sand, take measurements across the full area, look for humps and dips, and correct while it’s still easy. Waiting until after pavers are down usually means lifting and resetting multiple units, so build the slope into the base, not just the surface.
My patio feels uneven and some pavers rock. What should I do first?
The biggest tell is base instability or clogged drainage. For pavers, weeds alone are not the main sign, they often mean debris on top. For instability, press on suspect areas, if they feel spongy or click, lift the pavers in that zone, add or recompact base, then rescreed sand. If the edge shifts, fix edging and reinforce with additional base stone along the perimeter.
Can I use interlocking deck tiles without concrete, and what base prep do they require?
Yes, but you need a stable, properly leveled base because tiles cannot tolerate unevenness. Confirm the base meets the required flatness tolerance, and do not place tiles over soft fill or over existing debris. Plan for edge restraints or perimeter blocking so tiles do not creep, and leave appropriate gaps at borders for drainage.
What’s the best material choice if I want a low-maintenance gravel or DG patio that won’t migrate?
Avoid using rounded gravel as the main base material, it compacts poorly and shifts. For gravel patios, choose angular, compactable base rock under your wearing layer, and keep the top layer thick enough for your expected traffic. If you want less migration, consider stabilized DG or a thicker wearing course, but still keep drainage and edging tight.
What are the most common mistakes that cause a dry-laid patio to fail early?
Many DIY failures come from underestimating total depth and skipping reinforcement under edges. Use at least the stated excavation depth for pavers (down to the final paver height plus gravel base plus sand bedding) and make sure the base is compacted in lifts. Also, never skip geotextile if native soil fines are likely to mix with the base, since that undermines long-term stability.
What if rainwater from the patio runs toward my foundation or a neighbor’s yard?
Yes, but treat it as a drainage and surface water problem. If runoff concentrates toward a foundation, you may need to daylight into a safe discharge path or install a French drain or gravel trench along the lower edge. Make sure the patio slope and the outlet slope work together, otherwise the patio can look fine while the base slowly deteriorates underneath.
How do I handle patio layout and edge cuts so I don’t end up with fragile slivers?
You can, but only if you follow the right installation rules. Plan cuts so you avoid tiny slivers, use spacers to keep joint width consistent, and check level every few square feet. If you end up with very small edge pieces, it’s usually better to adjust the layout lines early rather than force irregular cuts that can loosen over time.