Finishing a concrete patio means taking the slab from a freshly poured, wet mass to a smooth, textured, durable surface that sheds water, resists slipping, and doesn't crumble within a few years. The sequence goes: screed the surface level, bull float it flat, edge and cut control joints, apply your final texture (broom or trowel), let it cure for at least 7 days, then seal it.
How to Finish a Concrete Patio Step by Step

Silas Morrison
18 Jun 2026
Get those steps in the right order and with the right timing, and you'll have a patio that holds up for decades. Filling the gap between a concrete patio and the house usually means installing the right joint filler or backing material so movement and water control are handled correctly. Rush them or skip one, and you're looking at dusting, scaling, and cracking before the first winter.
What finishing a concrete patio actually involves
A lot of people think finishing concrete just means making it look nice. It's actually three distinct things happening in sequence: surface work (leveling, texturing), curing (controlling how the concrete dries), and protection (sealing or coating). Miss any of those and the slab suffers for it. The surface work happens in the first hour or two after the pour. Curing happens over the next week or more. Protection comes after that. Treat them as separate stages and you'll stay organized.
- Surface finishing: screeding, floating, edging, jointing, and texturing while the concrete is still workable
- Curing: keeping the slab moist or sealed so the concrete gains full strength over 7 to 28 days
- Protection: applying a sealer, stain, or top-coat to lock in durability and improve appearance
If your patio is already poured and you missed some of the surface work, don't panic. Most of what matters most at that point is curing and sealing, and you can still do both of those right. Then, when the concrete is fully cured, you can apply a patio sealer correctly to help protect it from weathering and water intrusion. I'll cover the full new-pour workflow first, then loop back to what you can do if you're working with an existing slab.
Prep and setup right after the pour
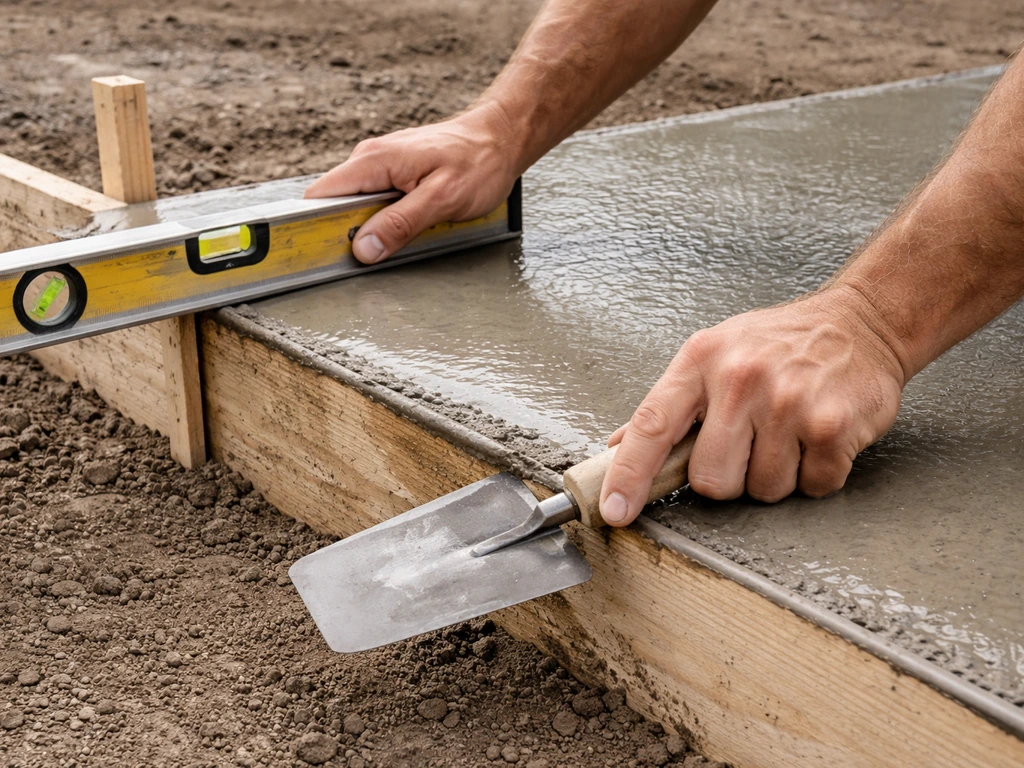
The window for surface work is tighter than most beginners expect. Once the concrete goes down, you're working against the clock. Depending on temperature, humidity, and mix design, you might have 45 minutes or you might have 3 hours. Hot, dry, or windy conditions eat into your time fast. Cool and humid conditions give you more breathing room. Before you even start the pour, have every tool within arm's reach and every person assigned to a task.
Your readiness check before starting: forms are secure and level, subbase is compacted and dampened (not soaked), your screed board (a straight 2x4 works fine) is cut to span the forms, your bull float or darby is on-site, edging tool is ready, jointing tool is ready, and your broom or trowel is close by. Knee boards are worth having too, especially on larger slabs, so you can move across the surface without sinking in once it's partially set.
- Screed board (straight 2x4 long enough to span your forms)
- Bull float (for large slabs) or hand float/darby (for smaller areas)
- Edging tool with a radius corner
- Groover or jointing tool for control joints
- Stiff-bristled push broom for texture
- Steel finishing trowel (if you want a smoother surface)
- Knee boards (plywood squares work) for moving on the slab
- Plastic sheeting or curing compound for the cure stage
- Garden hose nearby for cleanup
Screed, edge, joint, and control the slab
Start screeding immediately after placing and spreading the concrete. Rest the 2x4 screed board on both form edges and drag it toward you in a back-and-forth sawing motion, keeping it flat against the forms. You're shaving off the high spots and filling the low ones. Make two or three passes until the surface is roughly level with the top of the forms. Any pockets of aggregate or voids get filled by shoveling in a little concrete ahead of the screed.
Once you've screeded, go over the surface with a bull float. Push it away from you with the leading edge slightly raised, then pull it back with the trailing edge slightly raised. This embeds the aggregate below the surface and brings the cement paste up, which is what you'll actually be finishing. Don't overwork it. Two or three passes are enough. Overworking brings too much water and fine particles to the surface, which weakens it and leads to dusting later.
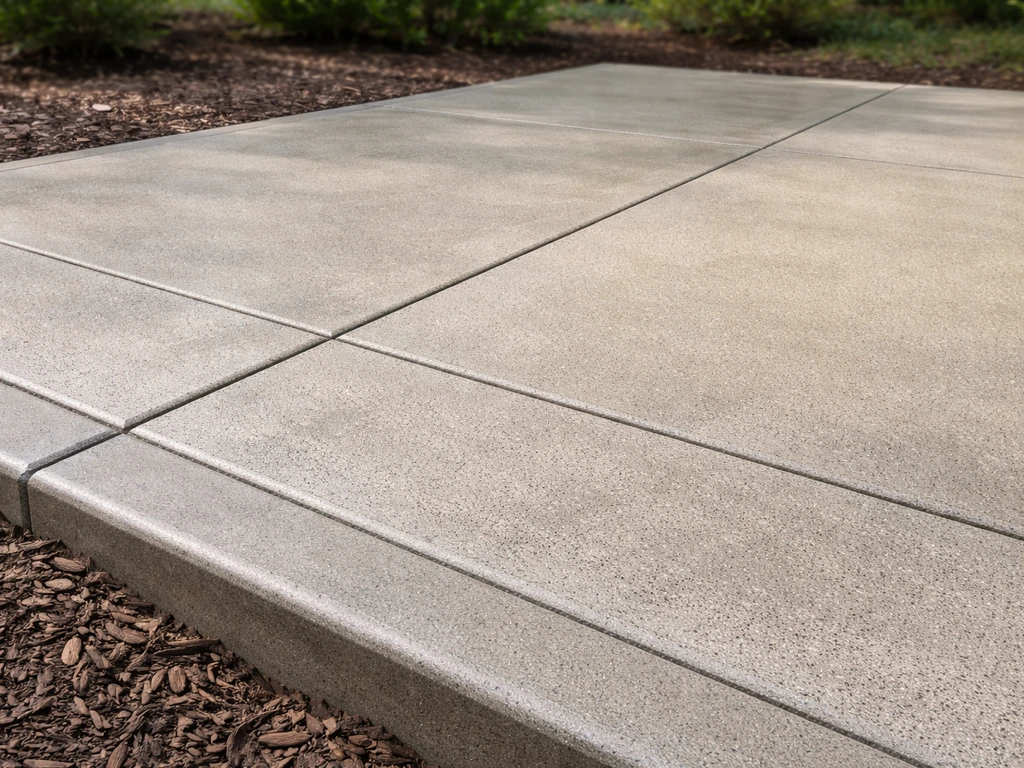
Now run your edging tool along every edge where the slab meets the forms. Press it firmly against the form and work it back and forth with light pressure to create a rounded, finished edge. This prevents chipping at the corners once the forms come off. After edging, cut your control joints. These are the intentional saw cuts or grooved lines that tell the slab where to crack (and it will crack somewhere, so you want to control where). Space them no more than 2 to 3 times the slab thickness in feet. For a 4-inch-thick patio, that means joints every 8 to 10 feet. Use a groover or jointing tool along a straight board to keep your lines clean.
Floating to the right finish: smooth vs. slip-resistant

After the bleed water on the surface has evaporated and the sheen disappears, it's time for final finishing. This is where you decide what kind of surface you want. For a patio, you almost always want some texture for traction. A fully smooth steel-troweled finish looks great but gets slippery when wet, which is a real hazard outdoors. I'd only go that route if the patio is covered or if you're planning to apply a textured coating on top later.
| Finish type | Tool used | Best for | Slip resistance | Skill level |
|---|---|---|---|---|
| Broom finish | Stiff-bristled push broom | Most outdoor patios, exposed areas | High | Beginner-friendly |
| Light trowel + broom | Steel trowel, then broom | Covered patios, smoother look with grip | Medium-high | Intermediate |
| Steel trowel (smooth) | Steel finishing trowel | Interior slabs, covered surfaces, decorative base | Low (slippery wet) | Intermediate to advanced |
| Exposed aggregate | Seeded or washed off | Decorative, high-traffic areas | Very high | Advanced |
For most homeowners doing a standard outdoor patio, the broom finish is the right call. Wait until the surface sheen is gone and the concrete has firmed up enough that your finger leaves only a slight indentation when pressed in. Then drag a stiff-bristled push broom across the surface in one consistent direction, applying light, even pressure. Parallel lines give a cleaner look than random strokes. One pass per strip is usually enough. If the concrete is still too soft, the broom will drag too deep and tear the surface. If it's too stiff, the broom barely marks it. You want lines about 1/16 to 1/8 inch deep.
If you want a slightly smoother look but still need outdoor traction, do one pass with a steel trowel to close up the surface, then come back with a softer broom for a fine texture. This is sometimes called a 'light broom' or 'medium trowel plus broom' finish, and it's a good middle ground for covered patios or areas that stay relatively dry. Avoid over-troweling at all costs. Troweling too hard or too early brings excess water to the surface and creates a weak, dusty layer that will eventually flake off.
Curing the patio floor properly
Curing is the most skipped and most important step in the entire process. Concrete doesn't dry, it cures through a chemical reaction called hydration, and that reaction needs moisture to happen correctly. If the slab dries out too fast, the hydration stops early, the concrete never reaches its full strength, and you end up with a surface that dusts, scales, and cracks. Full curing takes 28 days, but the most critical period is the first 7 days. Keep the surface moist or covered for at least that long. After it fully cures, learn how to seal aggregate concrete patio surfaces so they resist water, staining, and wear.
You have a few options for how to cure. The simplest is wet curing: cover the slab with burlap, canvas, or plastic sheeting and keep it damp by wetting it down once or twice a day. This works well but requires attention over 7 days. The easier option for a homeowner is a liquid curing compound or an acrylic cure-and-seal product.
You spray or roll it on right after finishing (once the surface sheen has disappeared and you're done with all surface work), and it forms a membrane that slows moisture loss so the concrete cures on its own. FHWA’s synthesis of ACI guidance similarly notes that curing should start after placement and finishing is complete, typically once the surface sheen has disappeared [cure-and-seal product applied right after finishing once the surface sheen has disappeared](https://www. fhwa. dot.
gov/publications/research/infrastructure/pavements/pccp/05038/002. cfm). QUIKRETE and similar brands make cure-and-seal products designed for exactly this use, and they double as a protective sealer, which saves you a step.
- Wet curing with burlap or plastic: keep damp for 7 days minimum, re-wet daily, especially in heat or wind
- Curing compound: spray or roll on after finishing, follow product dry time, reapply if rain hits it within the first hour
- Acrylic cure-and-seal (recommended for most DIYers): apply right after finishing, cures and seals in one step, available at most hardware stores
- Avoid curing on hot, sunny days without shade or wind breaks; evaporation happens faster than the concrete can bleed, causing plastic shrinkage cracks
Temperature matters a lot during curing. Ideal curing temps are between 50°F and 90°F. If temps are expected to drop below 40°F within the first week, cover the slab with insulating blankets after finishing. Cold concrete cures very slowly and can be damaged by freezing if the water in the mix hasn't had time to hydrate. On the flip side, extreme heat (above 90°F) accelerates surface drying and makes plastic shrinkage cracking much more likely. Shade the slab and mist it frequently if you're pouring in summer heat.
Sealing, staining, or top-coating after the finish
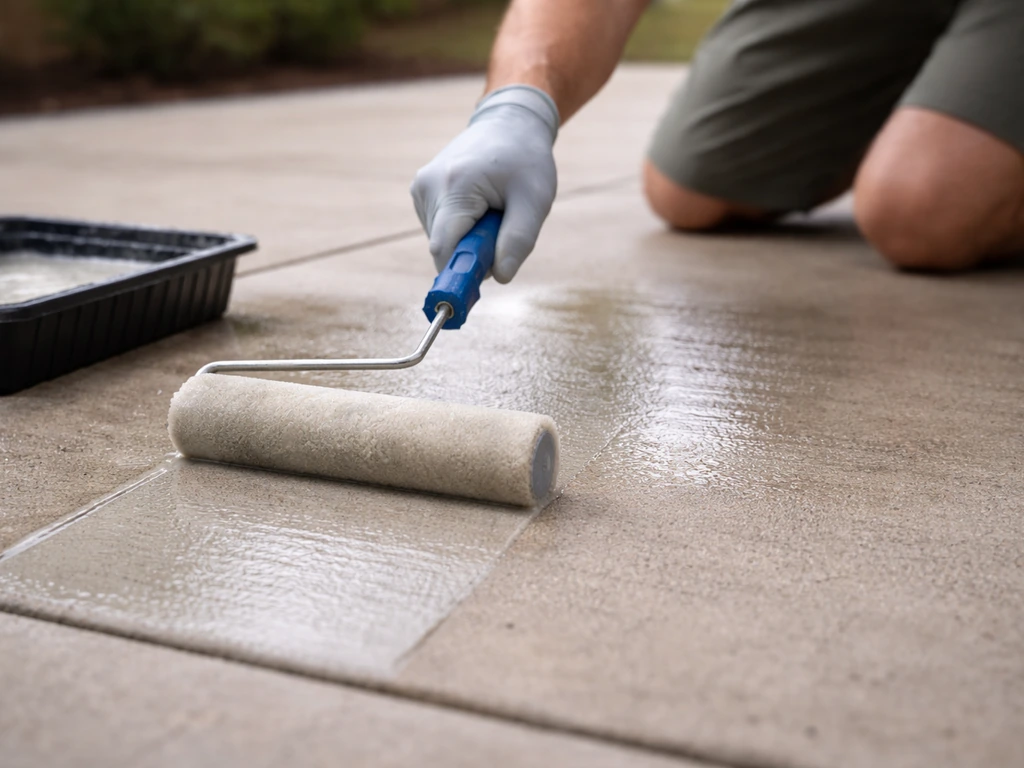
Once the slab has cured for at least 28 days (or 7 days if you used a cure-and-seal product that doesn't need to be recoated), it's ready for a sealer or finish coat. Sealing is not optional for an outdoor patio. It's what keeps water from penetrating the surface, slows down freeze-thaw damage, and prevents staining from oil, leaves, and dirt. A basic acrylic sealer is the most DIY-friendly option. Penetrating sealers (silane or siloxane-based) go a step further by soaking into the concrete and repelling water at a deeper level, which is better for high-moisture climates.
If you want color, apply a concrete stain before sealing. Acid stains react chemically with the concrete for a mottled, permanent look. Water-based stains give more uniform color and are easier to control. Both need to be applied to a clean, open surface, so do the staining before any sealer goes down. After staining, neutralize (if using acid stain), rinse, let dry completely, then seal over the top. The sealer locks in the color and protects both the stain and the concrete beneath it.
If your patio is already poured and you're just trying to improve what you have, sealing is the single most impactful thing you can do today. Clean the surface thoroughly with a concrete degreaser, let it dry for 24 to 48 hours, then apply a penetrating or acrylic sealer. For patios with exposed aggregate or stamped patterns, a sealer is especially important for maintaining the look and protecting the texture. Resealing every 2 to 3 years keeps the protection active. Those topics around sealing specific surface types (stamped, aggregate, or where the patio meets the house) go into more detail on the right product and timing for each scenario.
Common finishing mistakes and how to avoid them
Surface dusting
Dusting is when the top layer of the concrete turns powdery and rubs off. It happens when you add water to the surface mix during finishing to make troweling easier, or when you trowel too early while bleed water is still present. The fix is simple: never add water to the surface, and wait until the bleed water is completely gone before doing any troweling. Sealing a dusty surface slows the deterioration but doesn't fix the underlying weakness.
Scaling and spalling
Scaling is when thin flakes of the surface pop off, especially in the first winter after the pour. The main culprits are finishing while bleed water is on the surface, poor curing, and applying deicing salts to new concrete. Fresh concrete that hasn't fully cured is porous and can't handle freeze-thaw cycles well. Avoid deicers for at least the first winter, seal the surface before cold weather hits, and cure properly in the first place.
Cracking from poor curing or missing control joints
Some cracking in concrete is normal. Uncontrolled cracking through the middle of your patio is not. Cut control joints at the right spacing before the concrete fully sets, and cure the slab properly so shrinkage happens slowly and evenly. Plastic shrinkage cracks (the ones that show up within the first few hours) come from surface drying too fast before the concrete has any strength. Mist the surface or use a fine water fog if you see the surface starting to crack before you've even finished working it.
Uneven surface
Low spots that hold puddles usually come from poor screeding or a subbase that wasn't truly level. Check your form height with a level before pouring and screed carefully. Once the concrete is set, there's no easy fix for unevenness short of grinding down high spots or applying a self-leveling overlay, which is a whole separate project. Getting the screed right the first time is far easier.
Overworking the surface
More passes with the float or trowel is not always better. Every extra pass brings more water and fine particles to the surface and weakens it. Finish with the minimum number of passes needed to get the texture you want, then stop. The concrete looks a little rough when you walk away, and that's fine. It'll look great once it cures and you seal it.
Your finishing sequence at a glance
- Place and spread concrete into forms, slightly overfilled
- Screed with a 2x4 in a sawing motion to level with form tops
- Bull float the surface to embed aggregate and bring paste up (2 to 3 passes)
- Edge along all form edges with an edging tool
- Cut control joints every 8 to 10 feet with a groover and straight board
- Wait for the bleed water sheen to disappear before any final finishing
- Apply broom finish by dragging a stiff broom in one direction for slip resistance
- Apply cure-and-seal product immediately after finishing, OR cover with plastic and keep moist for 7+ days
- After 28 days (or per product directions), apply a concrete sealer or stain-then-seal if you want color
- Re-seal every 2 to 3 years to maintain protection
If you follow that sequence and keep your timing right, you're going to end up with a patio you're proud of. The biggest thing first-timers underestimate is the timing pressure during surface work. Everything after the pour needs to happen in a specific order, without rushing but without delays either. Read the whole sequence once before you pour, have your tools staged, and have enough people on-site to move quickly when needed. Once the concrete is down, there's no pausing.
FAQ
Can I finish my concrete patio later the same day if I missed broom texture or joint cutting?
You can still complete cure and sealing, but surface texture and joint timing are time-sensitive. If the concrete has already stiffened to the point where a broom will tear it, do not force the texture. For missed joint lines, you may need to saw cut as soon as the concrete is firm enough to saw without raveling, typically within the first day or two depending on weather and mix.
What’s the difference between a cure-and-seal product and wet curing, can I switch midway?
With wet curing, you maintain surface moisture for at least 7 days by keeping coverings damp. A cure-and-seal liquid creates a membrane after finishing, so it usually replaces the need for ongoing wetting. Switching midway is risky because the concrete’s early moisture management is what you cannot redo. If you used a cure-and-seal, follow its recoat and cure guidance rather than adding extra wet cure unless the product label allows it.
How do I know when it’s the right time to broom finish?
Use the “finger press” and visual cues together. When bleed water has fully gone and the surface no longer has a sheen, press with a finger, you should get only a slight indentation, not a deep trench and not a dusty imprint. If the broom drags or tears, wait longer, if it barely marks, give it less time between finishing steps or re-evaluate your ambient conditions and mix.
Should I seal immediately after the 7-day cure period, or wait the full 28 days every time?
For most outdoor patios, waiting until the concrete reaches full cure gives you the best long-term performance and reduces the chance of trapping moisture. The article notes some cure-and-seal systems may allow sealing after 7 days, but only do so if your exact product is designed to be recoated at that stage and the slab is dry enough to accept sealer.
Is a penetrating sealer always better than an acrylic sealer?
Not always. Penetrating sealers (silane or siloxane) often work well for moisture-prone climates because they repel water deeper into the concrete. Acrylics can provide more surface protection and a different look, but they may be more sensitive to surface preparation and can wear unevenly if the patio is heavily trafficked. Choose based on your staining risk, climate, and whether you want a film-forming sheen or a more breathable finish.
How should I protect the patio while it cures, can I cover it with plastic?
Yes, plastic sheeting is commonly used for wet curing, but ensure it fully contacts and covers the slab and keep edges sealed so wind cannot dry the surface underneath. Avoid laying plastic loosely where it can puff and expose areas. If temperatures are very hot or windy, use shading and more frequent dampening beneath the cover rather than relying on plastic alone.
What’s the best way to handle deicing salts on a new patio?
Avoid deicing salts during the first winter if the concrete is not fully cured. Salts can increase scaling risk because the surface is still too porous and weak for freeze-thaw stress. If you must manage winter traction, use non-salt options and prioritize mechanical removal (shoveling, scratching) rather than chemical deicers until after the slab has properly cured and you have sealed it.
My patio surface is dusty even after sealing, what went wrong?
Dusting usually points to surface weakness from over-troweling, finishing while bleed water was present, or adding water to the surface mix. Sealing can slow further deterioration, but it cannot fix a weak cement paste layer. The practical next step is to clean and evaluate, then consider grinding or an appropriate resurfacer if the dusting continues or if the surface is scaling.
How often should I clean before sealing or resealing, and what cleaning method should I avoid?
Before sealing, the surface needs to be clean and dry, degreaser can help remove oils, but allow adequate drying time (the article mentions 24 to 48 hours for existing patios). Avoid pressure washing right before sealing unless you’re sure the concrete has dried completely, because trapped moisture can interfere with penetration and adhesion. If there is chalking, cleaning alone may not be enough, you may need light abrasion or grind-in-place repairs.
If my patio has exposed aggregate, do I still broom, trowel, and seal the same way?
You still need traction, but you typically finish and protect exposed aggregate with a plan specific to that texture. Overworking the surface can blur aggregate, and the sealing step is especially important to maintain the look and protect the texture. Use a sealer compatible with exposed aggregate and ensure the surface is fully cured and clean before applying it.