You can fix a low spot in a concrete patio by cleaning the area thoroughly, applying a bonding agent, and filling it with a polymer-modified concrete patch or self-leveling resurfacer. The right product and method depend on how deep the depression is: shallow dips under 1/2 inch respond well to a resurfacer, while depressions up to 1 inch deep call for a polymer-modified thin patch. QUIKRETE® Polymer Modified Thin Patch is designed for non-structural horizontal, vertical, and overhead repairs with an ideal repair depth range of 1/16 in to 1 in blank" rel="noopener noreferrer">polymer-modified thin patch for depressions up to 1 inch deep. Once you know the depth and the cause, you can follow the steps in this guide to fix an uneven concrete patio fix uneven concrete patio. Either way, prep work is what makes or breaks the repair. Skip that part and the patch will pop off in a season.
How to Fix Low Spot in a Concrete Patio Step by Step


Diagnose the low spot and check your patio drainage first
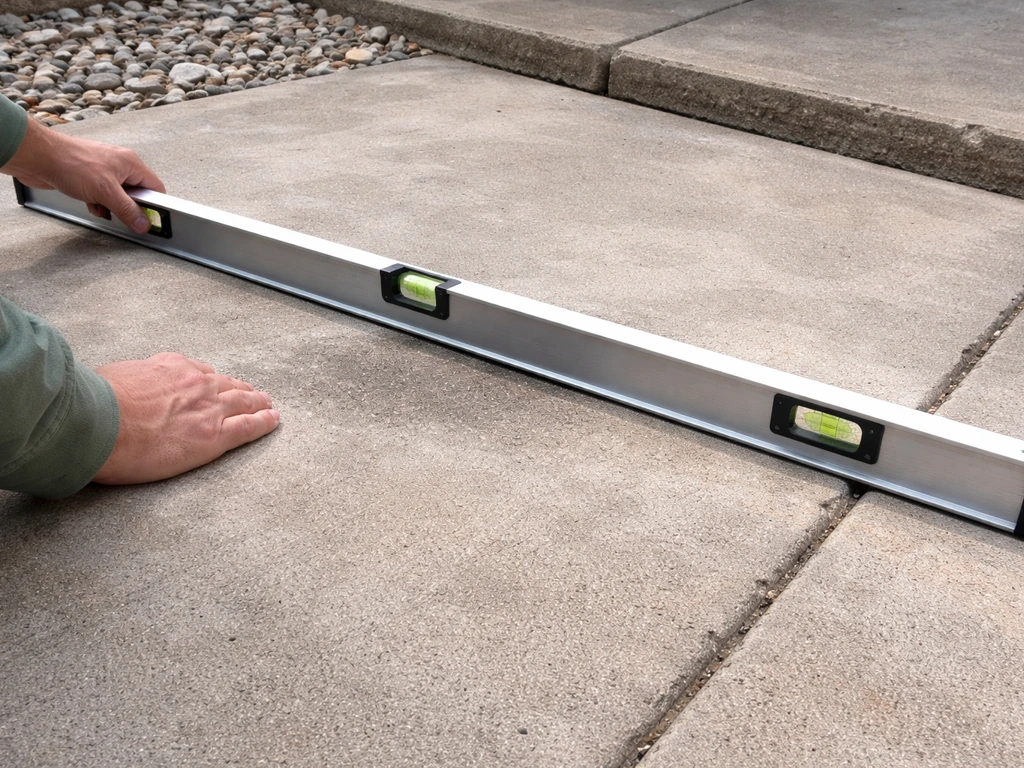
Before you mix anything, figure out exactly what you're dealing with. Grab a long straightedge or a 6-foot level and lay it across the depression in a few directions. Measure how deep the lowest point is with a tape measure or a pencil mark. That number determines your repair method, so don't skip this step.
While you're down there, think about why the low spot formed in the first place. A surface dip caused by wear, a bad original pour, or minor settlement is a simple fix. But if the concrete has dropped because the soil underneath has washed away or settled unevenly, filling the surface without fixing what's below is a temporary band-aid. To learn how to fill larger voids or gaps beneath a patio slab, focus on stabilizing the area and using the right under-slab filling approach a temporary band-aid. Check around the edges of the patio for gaps between the slab and the surrounding soil, and look for signs of erosion underneath. If you see daylight under the slab or the concrete flexes when you walk on it, you've got a subbase problem that needs to be addressed before any surface repair will last. Those issues go deeper than this guide, but they're worth knowing about upfront.
Drainage slope matters too. A properly pitched patio should slope away from your house at roughly 1/8 to 1/4 inch per foot. Use a level and a tape measure to confirm your patio still has adequate slope after you identify the low spot. If the whole area is pitched toward the house, or if water has been pooling and that's what led you here, you'll want to think about slope correction as part of your repair, not just filling the hole. If you still notice water ponding after filling the low spot, you may need to correct the patio slope and improve drainage so the problem does not return water ponding on concrete patio. Correcting water ponding and improving drainage are closely related problems worth addressing together.
Gather your materials and pick the right repair method
Your depth measurement from the diagnosis step drives this decision. Here's how I break it down:
| Depth of Low Spot | Best Product Type | Notes |
|---|---|---|
| Feather edge to 1/2 inch | Concrete resurfacer (e.g., SikaQuick Concrete Resurfacer) | Thin applications; can feather to nearly nothing at edges |
| 1/16 inch to 1 inch | Polymer-modified thin patch (e.g., QUIKRETE Polymer Modified Thin Patch) | Flexible, bonds well, great for low spots in this range |
| Over 1 inch | Hydraulic cement or concrete mix in layers, or self-leveling underlayment | May need multiple lifts; consult product specs for max depth per pass |
For most patio low spots, a polymer-modified thin patch or a quality resurfacer is exactly what you need. These products are designed specifically for horizontal repairs and bond well to existing concrete without a thick layer. Avoid using plain sand mix or general-purpose concrete for thin repairs. They don't bond reliably to old concrete and tend to crack and delaminate.
Here's a full materials list to have ready before you start:
- Polymer-modified thin patch or concrete resurfacer (amount depends on area and depth)
- Concrete bonding adhesive or primer (check product instructions, many require it)
- Angle grinder with diamond cup wheel or cold chisel and hammer
- Wire brush or stiff broom
- Pressure washer or garden hose with spray nozzle
- Shop vac
- Margin trowel and steel finishing trowel
- Magnesium or wood float
- Straightedge or screed board
- Mixing paddle and drill (or heavy-duty bucket for smaller patches)
- Concrete sealer for finishing
- Plastic sheeting or damp burlap for curing
- Safety glasses, gloves, and knee pads
Prepare the surface for a strong bond
This is the step most DIYers want to rush, and it's the one that determines whether the patch lasts five years or five months. I've seen plenty of failed concrete repairs, and almost every one of them comes back to bad prep.
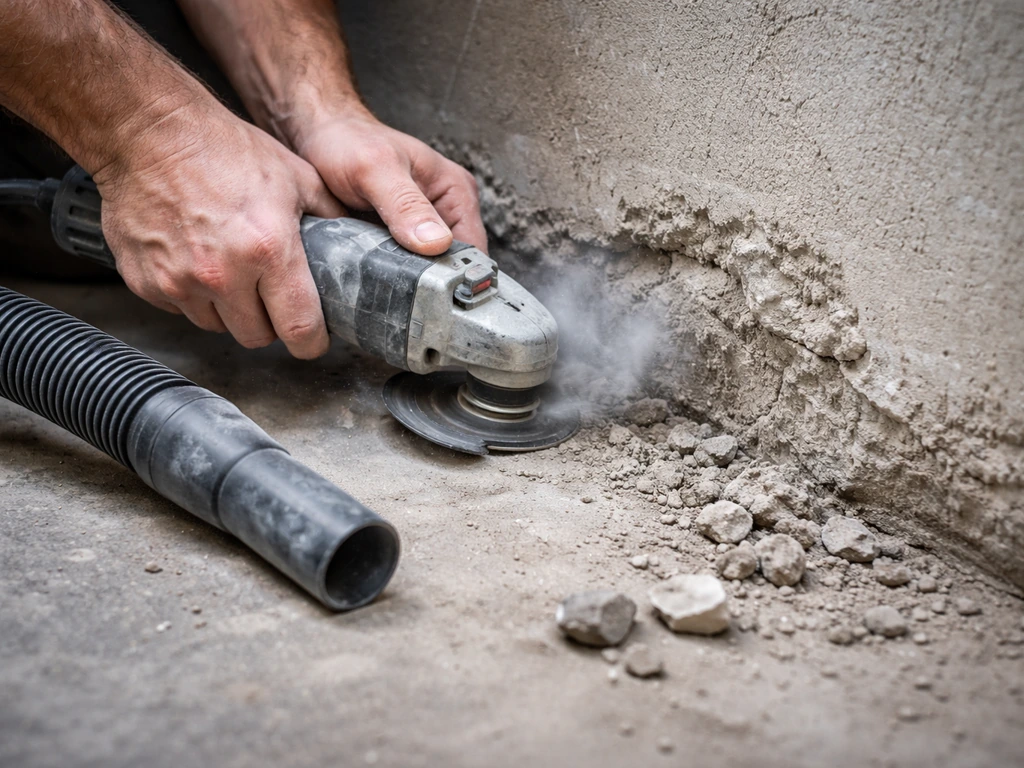
Start by removing any loose, flaking, or deteriorating concrete in and around the low spot. Use an angle grinder with a diamond cup wheel for the most efficient surface profiling, or chip away loose material with a cold chisel and hammer for smaller areas. You want to expose solid, sound concrete down to a clean surface. If the edges of your repair area are thin and tapered, consider cutting a defined perimeter with a circular saw and diamond blade so you have a clean, vertical edge to bond to. This prevents the thin feathered edges of old concrete from cracking off and taking your patch with them.
Once you've removed all the loose material, clean the area aggressively. A pressure washer works great here. Get out all the dust, dirt, oil, and debris. If there's any grease or chemical contamination, scrub with a degreaser first. After washing, let the area dry, then hit it with a shop vac to pull up any remaining dust from the pores. The surface should look and feel completely clean.
Next, apply a concrete bonding adhesive if your chosen product requires it (check the label, most polymer-modified patches do). Brush it on evenly and let it get tacky, which usually takes 20 to 30 minutes. Some products skip this step and use a slurry coat instead, where you mix a thick paste of the patch material and scrub it into the surface. Either way, you need something to chemically anchor the new material to the old slab. Skipping the bonding step is the single biggest reason patio patches fail.
Also, make sure the existing concrete is damp but not wet before you apply the patch. Dry concrete will pull moisture out of the repair mix too fast, weakening it. Saturated concrete with standing water will prevent bonding. The goal is a saturated surface-dry (SSD) condition: it looks damp, but no water pools on it when you press it.
Fill and level the low area step by step
Mix the repair material
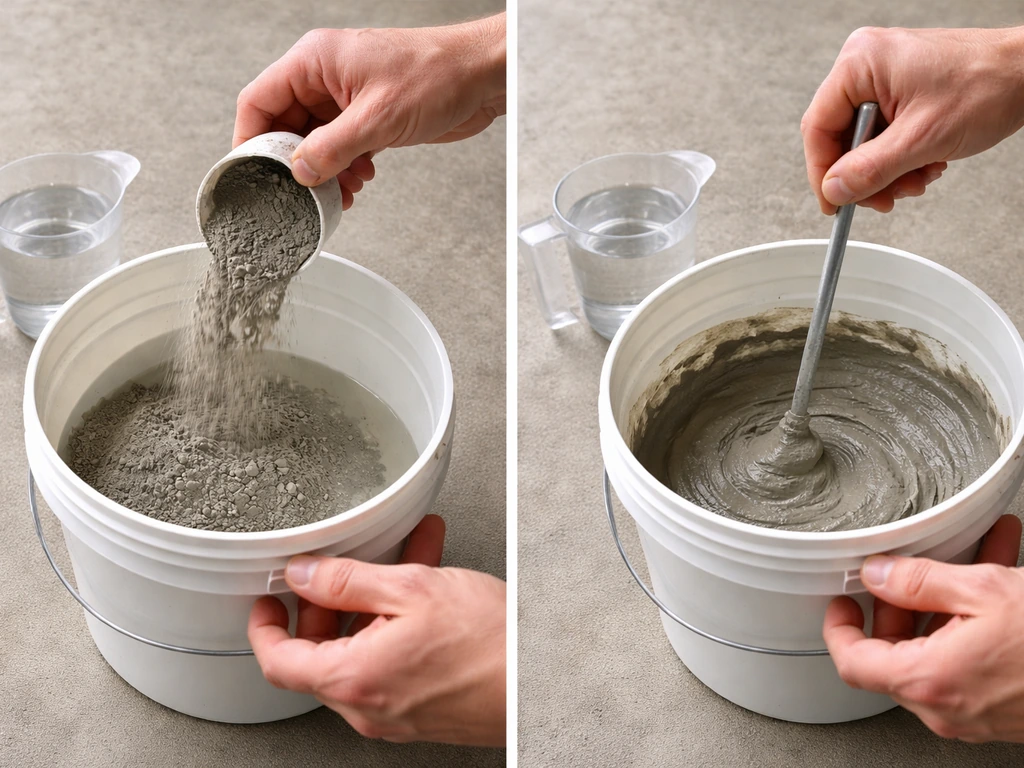
Follow the water ratio on the product bag exactly. Seriously, don't eyeball it. Too much water weakens the mix and causes shrinkage cracks. Too little and it won't work properly. For bagged polymer-modified patches, pour the measured water into your bucket first, then add the dry mix while stirring. Use a mixing paddle on a drill for anything more than a small bucket. Mix until you get a smooth, lump-free consistency, usually about 3 to 5 minutes. Let it slake (rest) for 2 to 3 minutes if the instructions say to, then give it one more quick stir.
Apply the patch
Work quickly once you start. Polymer-modified mixes have a limited working time, often 20 to 30 minutes depending on temperature. On hot days, that window shrinks fast. Mix only as much as you can use in that time.
Scoop the mix into the low spot and use your margin trowel to press it firmly into the depression, making sure you're pushing it into corners and edges without air pockets. Build it up slightly above the surrounding surface level to account for minor settlement during finishing.
Screed and shape to the right slope
Here's where the drainage work from your diagnosis pays off. Use a straightedge or screed board, resting it on the sound concrete on either side of the repair, and drag it across to bring the patch down to the correct level. If you're correcting a slope issue, you can angle your screed to build in the right pitch, but this takes some practice. I usually set up a reference line with string and line level first when I need to hit a specific slope target.
Once screeded, use a magnesium float to smooth and consolidate the surface. Work in circular motions to fill any voids left by the screed. For a slip-resistant texture that matches most patios, finish with a light broom drag before the surface stiffens. If you want a smoother finish, use a steel trowel and apply light pressure in overlapping arcs.
Blend the edges
Feathering the edges of the patch into the surrounding concrete is where the cosmetic result lives. For thin resurfacers (feather edge to 1/2 inch), this is easier since the material is designed to taper smoothly. For thicker patches, use your margin trowel to blend the transition as smoothly as possible. The color won't match right away, but it will get closer as both surfaces weather. If matching appearance matters to you, plan to resurface or seal the entire patio after the repair cures.
Curing, sealing, and blending the repair
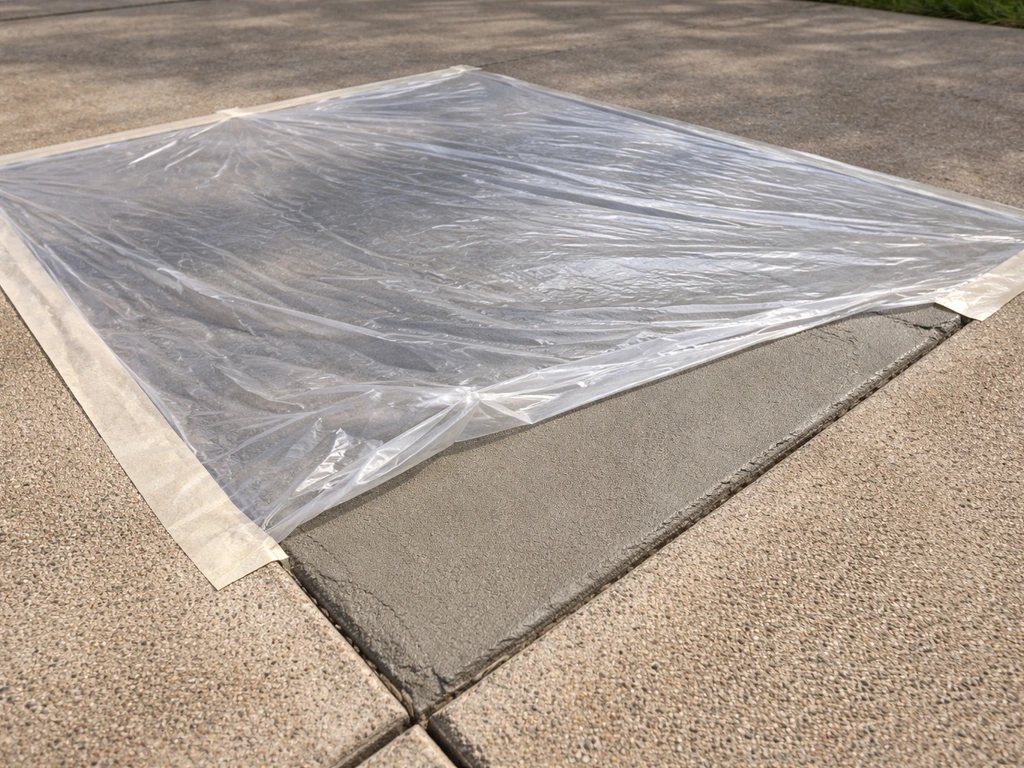
Proper curing is as important as anything you've done up to this point. Polymer-modified products still need moisture to fully hydrate and reach their rated strength. As soon as the surface is firm enough that you won't mark it, cover it with plastic sheeting or damp burlap. Keep it covered for at least 24 to 48 hours, or follow the product-specific recommendation. In hot, dry, or windy weather, you may need to mist the surface periodically to prevent it from drying too fast and cracking.
Don't let anyone walk on the repair for at least 24 hours. Keep vehicles and heavy furniture off it for at least 7 days, ideally longer. Most polymer-modified patches reach near-full strength in 28 days, just like regular concrete.
Once the patch has cured (typically 7 to 14 days minimum before sealing), apply a concrete sealer over the entire patio, not just the patch. This does two things: it protects the new repair from water intrusion and freeze-thaw damage, and it helps visually blend the patch into the rest of the slab by giving everything a uniform sheen. A penetrating silane-siloxane sealer is a good choice for outdoor patios since it doesn't change the appearance much but provides solid moisture protection. If you want a richer look, an acrylic sealer works well too. Either way, clean the entire patio surface before applying.
Troubleshooting common problems and when to call a pro
The patch is cracking or curling at the edges
This almost always means the repair dried too fast, was applied too thin at the edges, or the bonding step was skipped. If cracks appear within the first 24 to 48 hours, they're usually shrinkage cracks from rapid moisture loss. Keep the repair moist and covered going forward. For thin edge failures, grind back the affected area to a proper thickness and redo that section with bonding adhesive.
The patch is delaminating (lifting off the slab)
If the patch sounds hollow when you tap it or is visibly separating, it didn't bond. This usually means the surface wasn't clean enough, the bonding adhesive dried past the tacky stage before the mix was applied, or the old concrete was too wet. You'll need to remove the failed patch, prep the surface again correctly, and redo it.
Water is still pooling after the repair
If you filled the low spot but water is still sitting on the patio, the overall slope may be the issue rather than just that one depression. Check the pitch across the whole slab with your level. You may need to build up a larger area, not just the original dip, to get proper drainage. This is a broader fix that's more like resurfacing the patio with slope correction in mind.
The color match looks terrible
New concrete is almost always lighter than weathered concrete. This is normal and it will fade over time, but it can look stark initially. The best solution is to seal or resurface the entire patio after the repair cures. You can also use a colored concrete sealer to help blend things visually if appearance is a priority.
When to stop DIYing and call a pro
Some situations genuinely need professional attention. If your slab has sunk significantly because of soil erosion or washout underneath, a surface patch won't fix it. That's a mudjacking, slabjacking, or foam lifting job, or possibly a full slab replacement. Similarly, if you're seeing multiple large low spots across the whole patio, widespread cracking, or movement when you walk on the slab, the structural integrity of the slab or its base may be compromised. A surface repair won't solve that. A concrete contractor can assess whether lifting, grinding, or replacement is the right call, and it's worth paying for that diagnosis before spending money on materials for a repair that won't last.
FAQ
How soon can I seal after I fix the low spot? Are there signs I should wait longer?
Wait to seal until the repair has cured to the product’s minimum time, typically at least 7 to 14 days, and make sure the patch is fully hard and not cool to the touch. Sealing too early can trap moisture, weaken adhesion at the surface, and cause patch discoloration or peeling.
Can I fix a low spot on top of a moving or slightly flexing section?
Yes, but only if the depression is stable. If you have daylight under the slab, active cracking, or flexing when you step on it, stop and address the under-slab problem first. For minor, stable dips, you can mix and place a thinner resurfacer layer, but you still need bonding prep and feather-edge finishing.
What should I do if the repair fails at the edges instead of in the center?
If you applied patch too thin at the edges, the first failure usually shows as flaking or hairline separation along the feathered area. Remove the loose section back to sound material, re-profile the perimeter for good bond, reapply bonding adhesive at the correct tack stage, and rebuild with the right thickness for that product.
Can I fix a low concrete patio spot in cold or freezing weather?
Not safely, because freeze-thaw and adhesion depend on full hydration. If temperatures drop below the product’s limits or you cannot keep the surface covered and damp during curing, the patch may weaken or debond. Plan repairs for mild weather and follow the temperature guidance on the bag, especially for early-age curing.
I fixed the dip, but water is still pooling. Does that mean I used the wrong patch thickness?
If you have a localized depression but water still ponds, you may need a broader correction. Measure slope in multiple directions with a long level, then consider building up the surrounding area so water routes away from the house instead of just filling the lowest point.
What if my low spot is deeper than the product’s recommended thickness range?
Use the depth and the product label together. If the low spot is deeper than your product’s maximum lift, you risk shrinkage cracking and loss of bond. In that case, do a first lift to the product’s limit, let it cure per instructions, then add a second lift or use a resurfacer on top.
Why do small cracks sometimes appear within a day or two after the patch?
Moisture is usually the culprit, either the concrete was too wet during bonding or the repair dried too fast after placement. Confirm the substrate is saturated surface-dry, and keep the patch covered and protected from wind and sun during curing to reduce early shrinkage cracking.
My patch mix seemed too thick or too runny. Can I just add more water to correct it?
You should rework if it’s the wrong consistency, because adding water later usually increases cracking risk and reduces strength. If the mix already started setting, discard it. For small batches, verify by making a consistent mix each time, using measured water first, then dry mix.
Can I use mortar or a bagged sand mix instead of a polymer-modified resurfacer?
Do not feather plain sand mix or general-purpose concrete into a thin edge. Thin repairs need a patch designed for horizontal applications and thin layers, and they require the bonding adhesive and proper surface profiling for reliable performance.
Will the patched area always look darker or different, and how can I blend it?
Yes. If matching appearance matters, plan for full-patio blending after cure, because new concrete is lighter initially and texturing differences will show. A whole-patio seal also reduces sheen contrast and makes the repair less noticeable.
How do I know when this is a slab/base problem instead of a surface low spot?
Drive it toward stability checks first. If there are multiple low areas, significant cracking, or you notice the slab shifting with foot traffic, a patch may just mask a base problem. A contractor evaluation (lifting, slabjacking, foam injection, or replacement) can be the cheaper path than repeated surface repairs.