
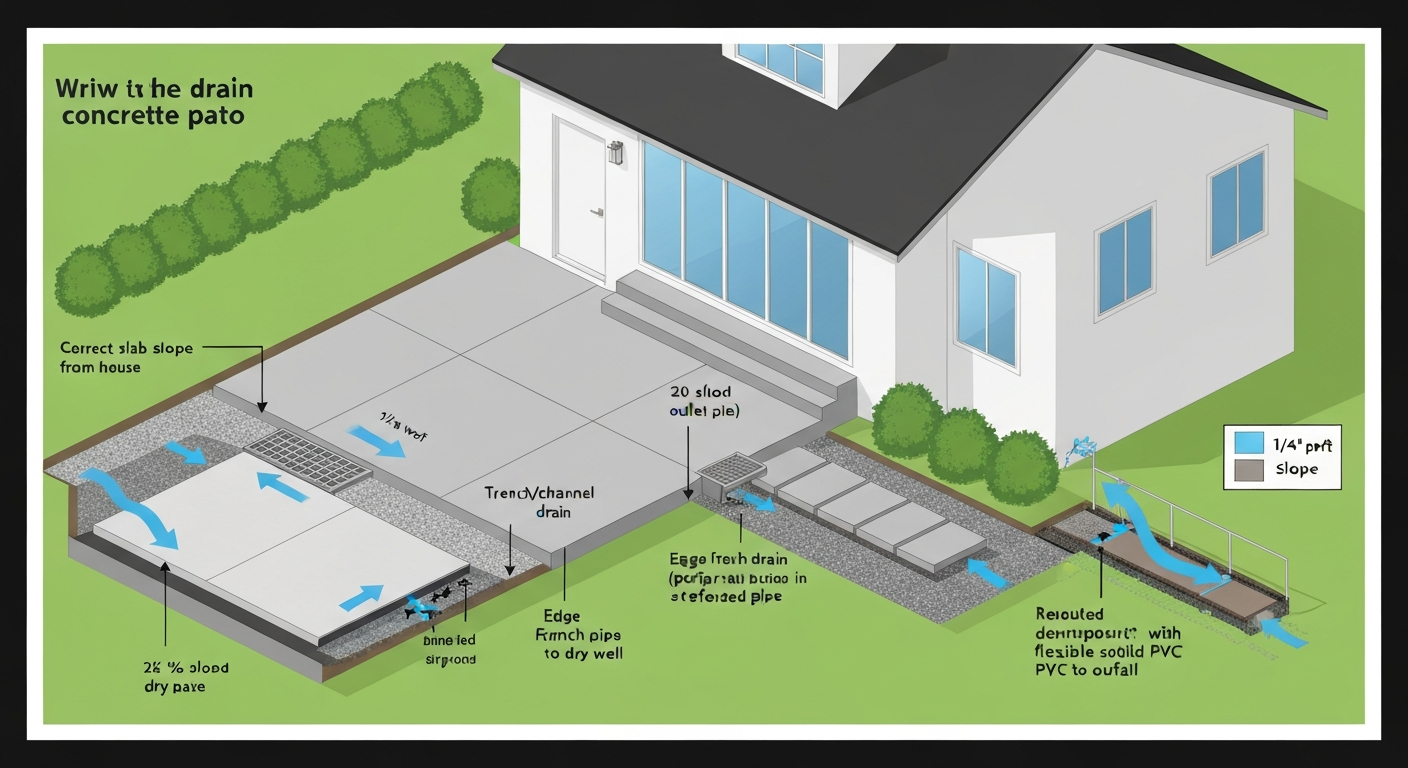
You can drain a concrete patio by correcting its slope, cutting in a trench or channel drain, installing a French drain at its edge, or rerouting downspouts and runoff away from the slab. Which fix you need depends on whether water is pooling on the surface because the concrete is too flat, running toward the house because the slab tilted the wrong way, or rising from below because of a subsurface drainage problem. Most homeowners can handle surface drainage repairs themselves with basic tools and a weekend or two of work. The sections below walk you through diagnosis, temporary fixes, permanent solutions, and how to know when the job calls for a pro.
How to Drain Concrete Patio: DIY Steps and Drainage Options

Silas Morrison
26 Jul 2026
Why drainage actually matters (and the signs yours is failing)
A wet patio is more than a nuisance. Standing water softens the soil beneath the slab, which leads to voids, settled sections, and cracks. When that water freezes and expands in winter, it speeds up spalling and joint damage. Water that pools near the house and migrates toward the foundation is a serious structural concern, and most municipal codes (following IRC R401.3 language) require finished grade to slope away from a foundation at least 6 inches within the first 10 feet. If your patio is working against that code requirement, it's working against your foundation.
Here are the warning signs I look for before diagnosing any drainage project:
- Puddles or "ponds" that remain on the surface for hours after rain stops
- Water consistently collecting in one corner or along one edge of the slab
- Mud, silt, or sediment washing onto the patio from the yard, indicating misdirected runoff
- Erosion channels or bare soil visible at the perimeter of the slab
- Cracks running parallel to the house or at slab corners (a sign of movement from water-saturated subbase)
- A soft, hollow sound when you walk over part of the slab (subbase voids caused by erosion)
- Damp or efflorescence-stained concrete surface even on dry days
- Water intrusion into a basement or crawlspace that corresponds with rain events on or near the patio
Any one of those signs warrants a closer look. Several of them together, especially ponding combined with slab movement or hollow sound, means you need to address the problem before it gets more expensive. Fixing erosion under the slab or filling voids is a separate repair that sometimes must happen alongside or before drainage work, and those processes are covered in depth in the companion guides on fixing erosion under a concrete patio and filling holes under a concrete patio.
Before you pick up a tool: safety, permits, and what you'll need
Safety basics and utility locating
Call 811 (the national "Call Before You Dig" line in the US) at least 3 business days before you break ground for any trench, French drain, or excavation. Underground utility lines, irrigation pipes, and electrical conduit run through yards constantly, and a shovel through a gas line is a bad day. Once you know what's buried, mark it with spray paint or flags before digging. For any work involving cutting or jackhammering existing concrete, wear ANSI-rated eye protection, hearing protection, a dust mask rated N95 or better (concrete dust contains silica), and work gloves. Knee pads save you during slab inspections and finish work.
Permits: when you need one
Purely surface-level drainage repairs (filling a low spot with overlay, adjusting grade soil at the patio edge) rarely need a permit. Cutting a trench drain into an existing slab, installing a dry well, or connecting to a municipal storm drain system usually does require a permit, and some jurisdictions restrict where you can discharge drainage. Check with your local building department before starting any subsurface work or any modification that ties into existing piping. Failing to permit work that's later discovered can complicate a home sale or insurance claim.
Tools and materials master checklist
What you'll actually need varies by repair type, but this is a solid master list to check against before starting any drainage project. You won't need every item for every job.
| Category | Item | Notes |
|---|---|---|
| Measurement | 4-ft level or longer straightedge | For finding low spots and checking slope across the slab |
| Measurement | String line + line level or laser level | For measuring elevation differences over longer distances |
| Measurement | 25-ft tape measure | For recording run distances |
| Measurement | Chalk line | For marking cut lines and flow paths |
| Measurement | Felt-tip marker or lumber crayon | For marking slab |
| Diagnosis | Hammer or chain for sounding | Used to detect hollow areas under slab |
| Diagnosis | Moisture meter (surface) | Non-destructive screening only — confirm with probes |
| Diagnosis | ASTM F2170 RH probes (rental) | For confirming internal slab moisture if suspected |
| Temporary fixes | Wet/dry shop vacuum | For small shallow ponds |
| Temporary fixes | Submersible utility pump + hose | For larger volumes; check discharge location legality |
| Temporary fixes | Sandbags | Temporary berm/diversion |
| Cutting concrete | Angle grinder with diamond blade | For narrow cuts and trench edges |
| Cutting concrete | Circular saw with diamond/concrete blade | For straight, controlled slab cuts |
| Cutting concrete | Rotary hammer + chisel bit | For breaking out concrete in trench areas |
| Excavation | Spade shovel | For trench and French drain excavation |
| Excavation | Garden hoe or mattock | For grading soil |
| Drainage hardware | Channel/trench drain kit (ACO, NDS, Zurn, or equivalent) | Size to match flow volume and slab load class |
| Drainage hardware | 4" perforated PVC pipe + fittings | For French drain systems |
| Drainage hardware | Drain fabric/filter sock | Wraps perforated pipe to prevent clogging |
| Drainage hardware | Clean angular gravel (3/4" crushed stone) | Bedding and surround for French drains |
| Drainage hardware | Solid PVC pipe for outfall | Connects drainage to outfall point |
| Concrete work | Concrete mix (60 or 80 lb bags) or ready-mix | For encasing trench drains or patching |
| Concrete work | Concrete bonding adhesive | For repair patches |
| Concrete work | Concrete float and trowel | For finishing |
| Safety | N95 or P100 dust mask | Mandatory when cutting concrete |
| Safety | Safety glasses, hearing protection, gloves | Always during cutting and demo work |
Diagnosing the problem: surface issue or something deeper?
The most important step in any drainage repair is figuring out where the water is actually coming from. I've seen homeowners install a trench drain to fix ponding, only to discover six months later that the water was wicking up from a high water table, not running across the surface. The fix has to match the cause or you'll be back at it again.
Visual inspection
Start by watching the patio during and after a rain event. If water puddles during rain and drains away within a few hours of the rain stopping, you're almost certainly dealing with a surface slope or low-spot issue. If water reappears on the slab hours or days after the rain ended and the sky is dry, subsurface water is likely migrating up through or around the slab. Also note where water comes from: is it sheeting off the roof and hitting the patio from above? Running across the yard from a neighbor's lot? Both are addressable differently than a slope problem built into the slab itself.
Hollow-slab sounding test
Walk the entire patio and knock on the surface with a hammer handle, a length of chain dragged slowly across it, or a wooden mallet. A healthy, fully supported slab produces a dull thud. A hollow area produces a noticeably higher-pitched, almost ringing sound. Mark hollow areas with chalk. Those zones represent voids in the subbase, often caused by water erosion washing fine particles out from under the slab. Hollow spots contribute to local ponding because the slab has deflected downward, and they need to be filled (via mudjacking or polyurethane foam injection) before or alongside drainage work. The guide on fixing erosion under a concrete patio goes into that repair process in detail.
Moisture testing for subsurface causes
If you suspect water is coming from inside or below the slab rather than running across the surface, surface moisture meters give you a starting point. They're inexpensive and fast, but they only read the top fraction of an inch of concrete. For authoritative answers, the industry standard is ASTM F2170 in-situ relative humidity (RH) probes drilled to 40% of the slab's depth. You can rent the probes or hire a testing contractor. Thermal or infrared imaging can also locate moisture and temperature anomalies quickly across a large area, which helps you decide exactly where to drill, but IR findings always need to be confirmed with direct moisture measurements. Think of IR as a guide that tells you where to look, not a final answer.
For suspected high groundwater, dig a test hole about 18 to 24 inches deep at the lowest point near the patio and check back over a few days. If water accumulates and holds at a consistent depth, you have a groundwater table issue, not just a surface drainage problem. That changes your solution significantly.
Surface vs. subsurface: quick field guide
| Sign | Likely cause | Next step |
|---|---|---|
| Pond drains in 2–4 hours after rain | Surface slope or low spot | Measure slope, consider overlay or trench drain |
| Pond persists 1–3 days after dry weather | Subsurface inflow or high water table | Test hole, RH probe, possibly French drain or sump |
| Hollow sound under slab | Void from subbase erosion | Mudjack or foam injection before drainage repair |
| Efflorescence or white crust on surface | Moisture migrating through slab from below | RH testing, possible vapor barrier or French drain |
| Water enters home during or after rain | Grading directs water toward foundation | Regrade, slope correction, edge French drain |
| Sediment washes onto patio from yard | Offsite runoff misdirected to patio | Regrade yard edge, install berm or swale upslope |
Measuring slope, finding low spots, and calculating what you've got
You can't fix a slope problem without measuring what you currently have. This is one of the steps I see homeowners skip, and it almost always costs them time later. Grab a 4-foot level, a tape measure, and a notepad. For projects that discharge or infiltrate stormwater, consult blank" rel="noopener noreferrer">Los Angeles County LID / stormwater guidance (site assessment and infiltration calculation requirements) for local site‑assessment and infiltration calculation requirements.
The slope you're aiming for
The industry target for concrete patios is 1/4 inch of vertical drop per foot of horizontal run, which works out to about 2% slope. That's enough to move water reliably without being so steep that furniture rocks or you feel like you're standing on a ramp. The practical minimum for reliable drainage is 1/8 inch per foot (roughly 1%). Slopes below 1/8 inch per foot consistently produce ponding and aren't recommended. Anything steeper than about 1/2 inch per foot (4%) starts to feel noticeably sloped underfoot. Code minimums for grade near foundations often reference 6 inches of drop within 10 feet, which is exactly 2%.
How to measure your existing slope
- Set a 4-foot level flat on the slab surface in the direction water should drain (usually away from the house). Lift the low end until the bubble centers.
- Measure the gap between the level's lower end and the slab surface. That's your rise over 4 feet of run.
- Calculate: slope (%) = (rise in inches / 48 inches) × 100. If the gap is 3/4 inch over 4 feet, slope = (0.75 / 48) × 100 = 1.56% — just under the 2% target.
- For measuring across a longer span, use a string line pulled taut from one end of the patio to the other, with a line level clipped to the middle. Measure the vertical gap between the string and the slab at multiple points. A laser level speeds this up considerably on larger patios.
- Record: horizontal run from house wall, total vertical drop, location and depth of any low spots, slab thickness if you can probe a crack or joint edge, and all downspout and gutter outlet locations.
Slope percentage is calculated as: slope (%) = (vertical drop / horizontal run) × 100. For a concrete patio running 12 feet from the house with a 3-inch total drop, that's (3 / 144) × 100 = 2.08%, right at target. If your total drop is less than 1.5 inches over 12 feet, you're below the 1% minimum and ponding is almost guaranteed. That tells you right away that slope correction or a surface drain is necessary.
Finding and marking low spots
Walk the slab with your 4-foot level held flat, rocking it slowly. Any rocking indicates a high point; any gap between the level and the concrete indicates a depression. Mark depressions with chalk. Then pour a small amount of water over the slab and watch where it collects and stops moving. That's your drainage map in real time. Measure the depth of any pools with a ruler once the water settles. Depressions deeper than about 1/4 inch consistently produce ponding and should be addressed either with an overlay, mudjacking, or a strategically placed drain. Low spots that also produce a hollow sound underfoot indicate erosion and void formation, which connects to the related problem of low spots in concrete patios.
Mapping where water goes: flow lines, catchment points, and outfalls
Before you decide on a fix, you need to trace the entire path water takes from the moment it lands on your patio to wherever it ends up. Sometimes that path reveals a simple fix upstream (like a downspout shooting water directly onto the patio) that you'd otherwise overlook.
Start at the highest elevation point of your patio (usually nearest the house) and pour a bucket of water slowly. Follow where it goes. Mark the flow line with chalk. Note every point where it slows, collects, or changes direction. When it leaves the patio, follow it across the yard to its eventual outfall: a storm drain, a planting bed that absorbs it, the street, or a neighbor's yard. That last one matters legally; in many jurisdictions you can't direct concentrated drainage onto an adjacent property.
Draw a simple sketch of the patio and yard with these notes marked on it:
- Flow direction arrows across the slab
- All low spots and their approximate depth
- Catchment points where water stops or collects
- Downspout and gutter outlet locations and the direction they discharge
- Where water currently exits the patio and enters the yard
- Final outfall point (storm drain, swale, or absorption area)
- Any structures, walls, or fences that block flow paths
- Soil type and approximate grade of the yard beyond the patio
That sketch becomes your design document. Every drainage solution you consider needs a viable outfall point, and if your yard doesn't have a natural one, creating it (often with a dry well or a connection to the storm system) becomes part of the project scope.
Stop the ponding now: temporary fixes while you plan the real repair
If you have standing water on the patio today, especially water that's migrating toward the house or into a basement, you don't have to wait until you've planned the permanent fix. These temporary measures buy you time without costing much.
Remove standing water immediately
For shallow puddles covering a small area, a wet/dry shop vacuum clears it in minutes. For larger ponds, a portable submersible utility pump routed to a hose discharges hundreds of gallons per hour. Run the discharge hose to a legal outfall (a lawn area, planting bed, or storm drain depending on local code), not onto the neighbor's property. Always check the pump's head rating: if you're pumping uphill or over a long distance, verify the pump can handle the lift. Use a check valve on the discharge line to prevent backflow when the pump shuts off. Never run an electric pump in standing water while standing in it yourself.
Redirect water away from vulnerable areas
Sandbags stacked into a low berm along the edge of the patio closest to the house can block surface flow from reaching the foundation. A heavy-duty plastic tarp weighted at the edges and sloped away from the house can divert roof runoff that's landing directly on the patio. If a downspout is discharging near or onto the slab, add a downspout extender (flexible corrugated tubing available at any hardware store for under $15) to direct that water at least 4 to 6 feet away from the patio edge. This single step fixes a surprising number of drainage complaints, especially on newer patios where the patio itself is fine but the gutter system is overwhelming a small area.
Temporary diversion channels
You can shape a shallow berm of packed soil or sand along the upslope edge of the patio to intercept water running onto it from the yard. Line it with plastic sheeting if you need it to hold through a few rain cycles. This is a stopgap, not a solution, but it protects the slab and your foundation while you work on the real fix.
Choosing the right repair: a practical decision guide
There's no single right answer for every patio. The best fix depends on why the drainage is failing, how much you're willing to spend, and what your site will actually allow. Use this guide to narrow down your options.
| Root cause | Best primary fix | Approximate DIY cost range | Difficulty |
|---|---|---|---|
| Slab slope below 1/8"/ft, no structural damage | Concrete overlay to rebuild slope | $3–$8 per sq ft in materials | Moderate |
| Localized low spot, slab otherwise intact | Self-leveling overlay or mudjacking | $200–$800 for mudjacking; $1–$4/sq ft overlay | Easy to Moderate |
| Correct slope but water has nowhere to go | Trench/channel drain at low edge | $300–$900 in materials for typical patio | Moderate |
| Water running toward house, grading issue | Regrade soil at patio perimeter + surface drain | $100–$500 materials | Moderate |
| Subsurface water / saturated subbase | French drain at perimeter or edge | $500–$2,000+ depending on length and outfall | Moderate to Hard |
| High water table, persistent saturation | French drain + sump pump system | $1,500–$5,000+ | Hard — often pro territory |
| Voids / erosion under slab causing ponding | Mudjacking or foam lift + drainage correction | $500–$2,500 for lifting; drain on top of that | Hard — often pro territory |
| Slab beyond repair, severely settled or cracked | Remove and repour with correct slope | $6–$12 per sq ft repour | Hard — pro recommended |
My honest recommendation: if the slab is structurally sound (no major cracks, no voids, no settlement), start with the simplest fix that addresses the actual cause. A trench drain at the low edge costs a few hundred dollars in materials and a weekend of work. A full repour costs many times that. But if the slab has settled significantly and has hollow sections, don't just add a drain on top of a failing slab. Fix the subbase first, otherwise you're draining water from a slab that's still going to crack and sink.
Surface drainage options: channels, trench drains, and grates
Surface drainage is the most common category of patio drainage fix, and for most homeowners with a slope problem or a low edge that collects water, it's where the solution lives. For step-by-step instructions and troubleshooting tips on how to fix water ponding on concrete patio, see a dedicated guide covering diagnosis and common repairs. The core idea is simple: give water a place to go before it ponds.
Correcting surface slope with an overlay
If the slab is too flat or has a subtle reverse slope (pitching toward the house), the cleanest fix is to build slope back into the surface with a concrete overlay or a polymer-modified topping. You're essentially adding a thin wedge of new concrete that's thicker at the high end and tapers to nothing at the low end, redirecting water away from the house. This works well when the existing slab is structurally sound and relatively level. The slab needs to be clean, free of loose material, and primed with a bonding adhesive before the overlay goes on. Most overlays used for slope correction run 1/2 inch to 2 inches thick at the high point. Stay aware that adding thickness raises the slab surface relative to door thresholds and step heights, which you'll need to plan for. Fixing an uneven concrete patio and addressing low spots in a concrete patio are closely related repairs that often happen alongside slope correction.
Trench and channel drains
A trench drain (also called a linear channel drain or slot drain) is the most versatile surface drainage solution for patios. You cut a slot in the concrete, set a prefabricated channel unit (typically polymer concrete, HDPE, or cast iron) into the trench, surround it with new concrete, and cap it with a removable grate. Water flowing across the slab surface runs into the channel and is piped away to a legal outfall. Manufacturers like ACO, NDS, and Zurn make residential-grade systems specifically for patios. Installation manuals specify exact excavation depth, required concrete surround thickness, and load class ratings. For a residential foot-traffic patio a Class A or Class B rated channel is typically sufficient. Follow the manufacturer spec exactly, because under-supporting a channel drain leads to rocking grates and cracked surrounds.
Trench drains are typically placed at the lowest edge of the patio (often the edge farthest from the house, or at the base of a slope), perpendicular to the direction of water flow. On a patio that slopes correctly away from the house, a channel at the far edge catches everything and pipes it to a downslope outfall. On a patio that collects water in a central low spot, a channel running through the low point works well. The main installation steps are: mark and cut the slab with a diamond blade saw, excavate to the depth specified by the channel manufacturer plus a concrete bed, set the channel at the correct elevation (slightly below slab surface so water flows in freely), pour concrete surround, allow to cure, then connect to your outlet pipe and install the grate.
Point drains and catch basins
If your patio has a single low spot rather than a linear drainage problem, a round catch basin (a square or round grated inlet set into the slab) may be a simpler option than a full trench drain. The basin connects to a 4-inch solid PVC pipe that runs underground to the outfall. Installation is similar to a trench drain: core or cut the slab, excavate, set the basin, concrete around it, connect the pipe, and restore the surface. The main limitation is that a single point drain only helps if water can flow to it from all sides, which requires the slab to slope toward it. If your patio is essentially flat, a single point drain may not collect water efficiently; a linear trench drain is usually more effective in that case.
Comparing surface drainage options
| Option | Best for | Pros | Cons | Typical DIY material cost |
|---|---|---|---|---|
| Concrete overlay (slope correction) | Flat or reverse-sloped slab, structurally sound | No cutting, restores aesthetic, addresses root cause | Must fix voids first; raises surface height; 28-day cure | $1.50–$4 per sq ft |
| Trench/channel drain (linear) | Low edge, consistent unidirectional flow | Very effective, easy to clean, handles high volume | Requires cutting slab, concrete work, piped outfall | $300–$900 for 8–12 ft run |
| Point/catch basin drain | Single low spot with slope toward it | Simpler install than trench, lower cost | Less effective on flat slabs; single inlet | $100–$300 |
| Slot drain (flush grate) | Clean aesthetic, pool deck, patio edges | Low profile, looks great, handles surface sheet flow | Smaller capacity, clogs faster, more expensive units | $400–$1,200 |
| Edge berm + regrading | Water running onto patio from yard | No concrete cutting needed | Soil only, may need ongoing maintenance | $50–$200 |
Siting a trench drain on your specific patio
Where you place the drain matters as much as which type you choose. On a typical house-adjacent patio sloped away from the home, the channel goes at the far edge, parallel to the house wall. On an L-shaped or irregular patio, you may need two shorter runs that connect to a single outlet. Avoid placing a trench drain where it would require cutting through control joints or existing expansion joints in a way that disrupts them; work with the joint pattern where possible. Also verify that your outlet pipe can reach a legal discharge point (yard, street, storm drain) without requiring a pump. If it can't run by gravity, you'll need a sump basin with an automatic pump, which adds cost and complexity.
FAQ
How do I determine whether ponding on my concrete patio is a surface drainage problem or a subsurface/groundwater issue?
Start with visual and simple field tests: 1) Observe after a heavy rain — if water disappears within hours it’s likely surface runoff; if it remains days after dry weather suspect subsurface inflow or high groundwater. 2) Use a straightedge/4‑ft level or laser level to find low spots and measure pond depth. 3) Sound the slab (tap across the surface with a hammer or chain) to detect hollow areas that trap water. 4) Probe surrounding soil with an auger or hand‑probe to check for saturated soils and dig a shallow test hole to watch for water inflow. 5) Scan with a moisture meter or thermal camera to locate wet areas, then confirm with ASTM F2170 in‑situ RH probes or cores if internal slab moisture or groundwater is suspected. Combine observations — persistent standing water and wet soils under/around the slab indicate subsurface issues; quick draining points to surface-slope problems.
What measurements and checks should I record before starting any repair or drainage work?
Record: 1) horizontal run from the house to patio edge, 2) vertical drop(s) over that run (use a laser level, line level, or transit), 3) pond depths and exact low‑spot locations, 4) slab thickness (drill a small test hole or check an exposed edge), 5) locations of cracks, joints, and downspouts, 6) surrounding finished grade elevations and distance to the nearest legal outfall, 7) soil type and visible erosion or voids, and 8) time‑to‑dry after rain (hours/days). Use these to compute slope (slope % = vertical drop / horizontal run ×100) and to select an appropriate fix.
What slope should a patio have to reliably drain water away from a house?
Aim for about 1/4 inch per foot (≈2% slope) away from the foundation. The practical minimum is about 1/8 inch per foot (≈1%); anything less often results in ponding. Also verify local code/municipal requirements — many jurisdictions require a finished grade that falls roughly 6 inches within the first 10 feet away from a foundation (≈2%).
What temporary emergency fixes can I use to remove standing water quickly?
Options: 1) Wet/dry shop vacuum for small shallow puddles. 2) Portable submersible utility pump or trash pump for larger volumes — direct discharge to a legal location downhill or storm inlet, use a check valve and appropriate hose. 3) Siphon with garden hose for low volumes. 4) Temporary sandbag berms, shallow diversion trenches, or flexible channeling to route future runoff away from sensitive areas until a permanent fix is installed.
What permanent drainage options are suitable for a concrete patio?
Common permanent solutions: 1) Surface channel/trench drains with grates (linear drains) tied to a storm outlet or buried drain pipe. 2) Channel/grate drains recessed into the patio edge connected to PVC/HDPE pipe to an outfall. 3) French drains (perforated pipe in gravel) installed at the patio edge or under surrounding grade to collect subsurface flow and route it to an outfall or dry well. 4) Dry wells or infiltration pits for dispersement on site (where allowed and soil permits). 5) Regrading to add continuous slope away from structure. 6) Sump and submersible pump where gravity drainage is not available. Choose based on whether the issue is surface water, subsurface inflow, or high groundwater.
How do I install a surface trench (channel) drain in a patio?
Basic steps: 1) Plan route to a legal outfall and check utilities. 2) Mark and saw‑cut concrete to remove a channel width per the chosen drain system. 3) Excavate to required depth (manufacturer specs) and add compacted bedding gravel or concrete base as specified. 4) Install the channel sections, set invert slope toward the outlet (1–2%), and connect to PVC/HDPE outlet pipe. 5) Backfill and encase channel with concrete surround per manufacturer load‑class instructions, secure grate, and finish surface. 6) Test with water to confirm flow. Follow manufacturer installation manual for clearances and surround concrete strength.