You pour a concrete patio in sections by dividing the total area into manageable pour zones (usually 10 to 12 feet wide), building forms for each zone, prepping a consistent compacted base, and pouring, screeding, and finishing one section at a time. Between sections, you create proper construction joints so the concrete bonds or moves correctly, maintain the same slope across every pour, and cure each section before moving to the next. Done right, a sectioned patio is just as strong and good-looking as a single pour. Done wrong, you end up with cold joints, uneven grades, and visible seams. This guide walks you through every step.
How to Pour a Concrete Patio in Sections Step by Step

Silas Morrison
4 Jul 2026
Why pouring in sections makes sense (and when it doesn't)
Pouring a large patio all at once sounds like the cleaner approach, but for most DIYers it's actually the riskier one. Concrete starts to set fast, especially in warm weather, and if you're mixing bags yourself or waiting on a ready-mix truck, you simply can't place, screed, and finish 400 square feet before the edges start to stiffen. Sections solve that problem. They also let you work on weekends, spread out rental costs, and make mistakes on a smaller scale where they're easier to fix.
That said, pouring in sections isn't just splitting the slab randomly. Each pour boundary becomes a construction joint, and construction joints need to be planned deliberately. The difference between a construction joint (created intentionally by stopping a pour) and a contraction joint (a groove cut or tooled into the surface to control cracking) matters here. Construction joints can become weak points if they're not placed at logical locations or if the concrete on one side has set too long before you pour against it. The rest of this guide covers how to handle all of that.
Planning the patio layout and section strategy
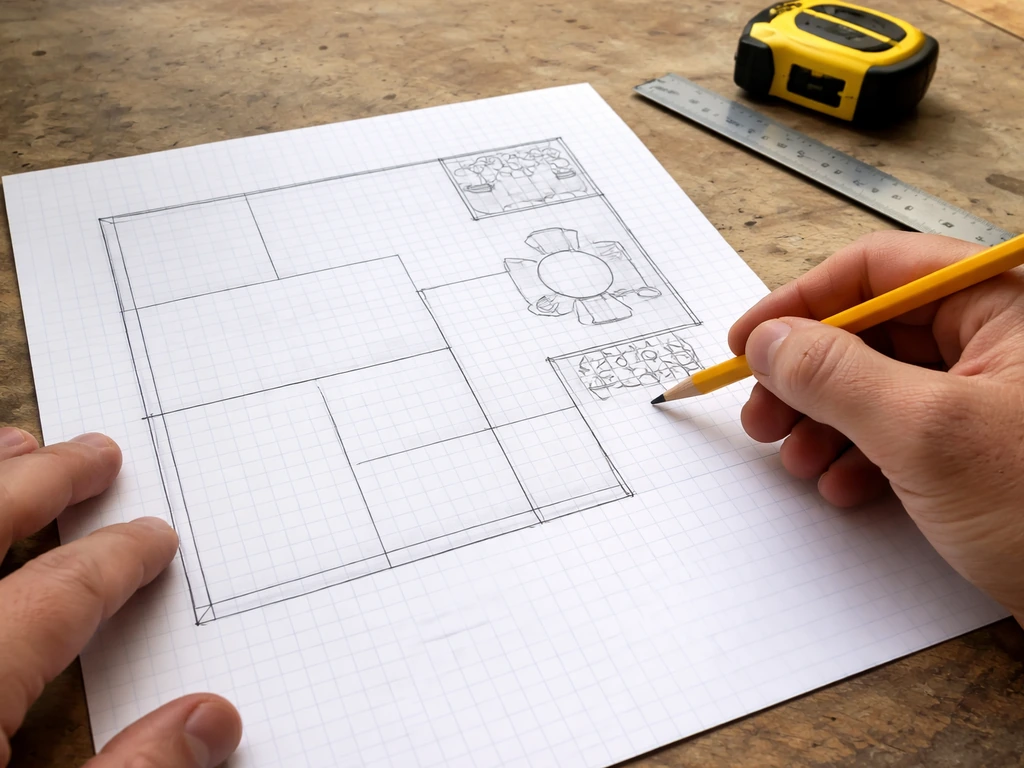
Start with a sketch on paper. Draw your full patio footprint, then divide it into pour sections that are each no wider than about 10 to 12 feet. That width is easy to screed with a standard 2x4 or screed board, and it keeps your joint spacing in line with the guideline from NRMCA that joint spacing should be roughly 24 to 36 times the slab thickness. For a 4-inch slab, that works out to about 8 to 12 feet between joints, so a 10-foot wide section hits right in the sweet spot.
Think about the shape of each section, too. Rectangular or square sections are easiest to screed and finish. Avoid narrow sections less than 4 feet wide because they're hard to consolidate properly and prone to cracking. If your patio has an L-shape or irregular footprint, locate the pour breaks at the inside corners where the shape changes direction. Those natural transitions make good construction joint locations.
Mark the slope direction on your sketch before you do anything else. The slope needs to run away from the house consistently across every section. The standard slope target is 1/8 inch per foot minimum, with 1/4 inch per foot being a better all-around target for most climates. For a 12-foot deep patio at 1/4 inch per foot, the outer edge should be 3 inches lower than the house end. That drop needs to be consistent from section 1 to section 3, not just within each individual pour. Plan this now, or you'll be fighting elevation mismatches later.
- Keep individual sections 10 to 12 feet wide maximum for easy screeding
- Use 4-inch slab thickness as your standard residential depth
- Target 1/4 inch per foot slope away from the house (1/8 inch per foot is the minimum)
- Place pour breaks at natural shape transitions like inside corners or step-downs
- Sketch the full layout before ordering materials so you know exactly how many sections you're dealing with
Base prep and forms for section-by-section pouring
Here's something I've learned the hard way: prep the entire base before you pour your first section, not just the base for section one. If you excavate, grade, and compact the whole area up front, your elevation control stays consistent and you're not disturbing finished sections to work on adjacent ones later. Dig out 7 to 8 inches total to accommodate 4 inches of compacted gravel base plus 4 inches of concrete. Set your grade stakes for the entire patio at once, using a level and string lines to establish the correct slope across all sections.
Compact the subgrade, then lay 4 inches of compacted crushed stone or gravel as your base layer. Compact it in two passes with a plate compactor. This base is what keeps sections from settling at different rates later. If section one settles half an inch and section two doesn't, you've got a trip hazard at the joint no matter how good your concrete work was.
For forms, use 2x4 lumber set to the finished concrete height. The tops of the forms are your screed guides, so they have to be absolutely level with your intended slope built in. For a section-by-section pour, the interior forms that sit between sections do double duty: they act as screed guides for the first pour, then as a backstop for the second pour when you want a clean construction joint. These interior forms are typically left in place until the first section has cured enough to hold its own, then removed before the adjacent section is poured.
One tip that saves a lot of frustration: oil your forms with a form-release agent or even used motor oil before pouring. This makes removal much easier and reduces the risk of chipping the slab edge when you pull the boards. For the interior forms specifically, removal timing matters. Pull them after the first section reaches initial set (typically 24 to 48 hours) but before you pour the adjacent section, so the fresh concrete can bond against the existing slab face rather than against a wood form.
Mixing and batching concrete for consistent results
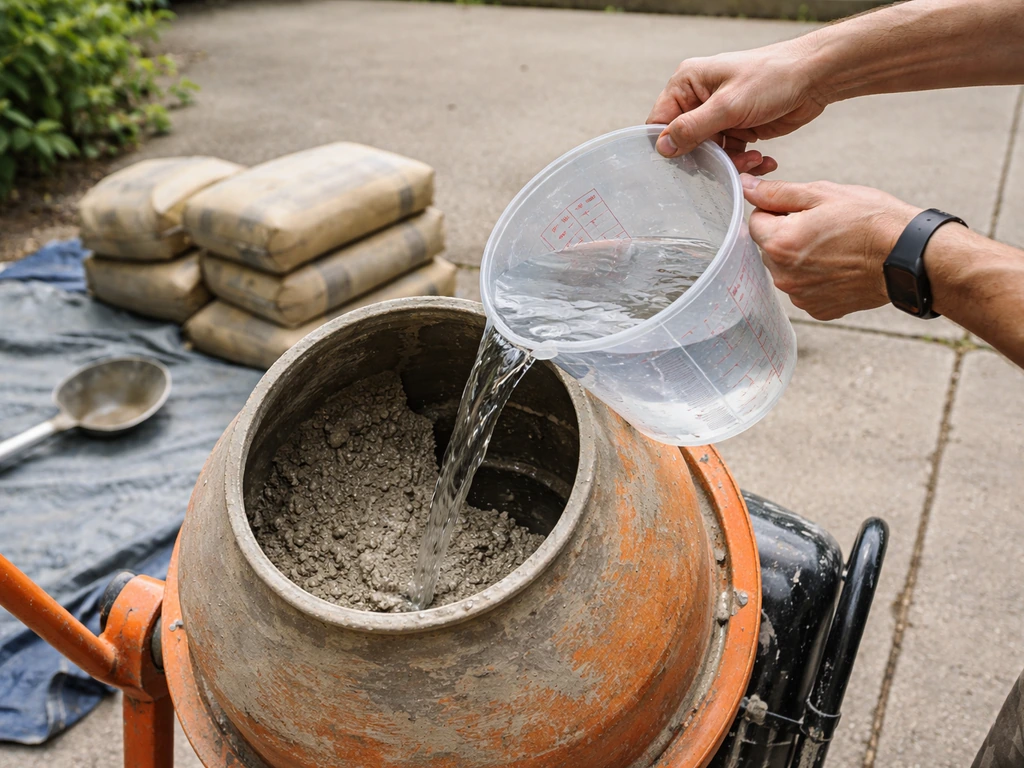
Consistency between sections is the whole game when you're pouring on different days. If section one has a slightly different water-to-cement ratio than section three, the color and finish will look different even if you use the same technique. Use the same concrete mix design for every section, source it from the same supplier or use the same bag product, and follow the same water ratio every single time.
For a typical DIY patio section in the 100 to 150 square foot range, you can use bagged concrete mix (something like a 4000 psi mix) in a rented drum mixer or even a mortar mixer. If you want to pour your own concrete patio, focus on consistent base prep, proper section layout, and careful jointing between pour days bagged concrete mix. For sections larger than that, a ready-mix truck delivery is worth the cost because the mix comes consistent by definition. If you're going with bags, measure your water by the bucket, not by eye. One extra half-gallon per batch sounds minor but it changes the water-cement ratio and you'll see it in the finished color.
Never add extra water to loosen concrete that's starting to stiffen. This practice, called retempering, weakens the mix by disrupting the water-cement ratio. If your concrete is getting stiff, that batch needs to be placed immediately or discarded. Instead, plan your pour timing so you're placing concrete within 90 minutes of batching, and batch in quantities you can place in that window.
If you're pouring multiple sections over multiple days, keep a simple log: date, time, ambient temperature, water amount per bag, and supplier batch number if using ready-mix. This sounds like overkill but it's exactly the kind of detail that helps you troubleshoot if one section comes out a slightly different shade or doesn't cure at the same rate.
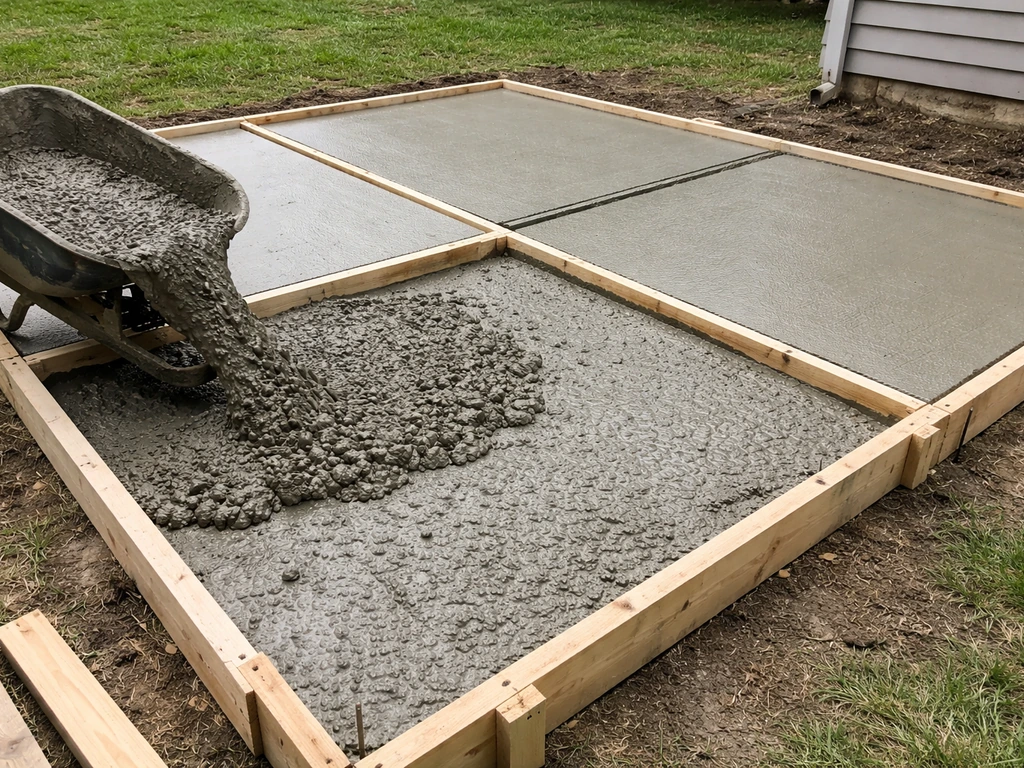
Pouring technique by sections: placement, consolidation, and screeding
Pour concrete into the form starting at one end and working toward the other, depositing it in what pros call leads or rows. Don't dump the whole load in one pile and try to spread it, because that causes aggregate segregation and makes screeding harder. Fill the form to slightly above the form height, then consolidate.
Consolidation means working out air pockets and voids. Use a concrete vibrator if you have one, or work a shovel, rod, or even a piece of rebar up and down along the edges and along any embedded reinforcement. For a 4-inch residential slab you don't need a massive internal vibrator, but you do need to make sure the concrete is dense against the forms and there are no honeycombed areas near the edges. For slab-on-ground residential construction, ACI 332.1R-0 preview discusses jointing requirements in its “Jointing” section blank" rel="noopener noreferrer">residential slab.
Screeding is the step that determines your finished level and slope. Place a straight 2x4 or screed board across the tops of your forms and drag it toward you in a slight sawing motion. Make two passes: the first to knock down high spots and fill low spots, the second to level everything out. If you find voids after the first pass, shovel in more concrete and screed again. Your form tops are your guide, so they need to be set correctly before you start, not adjusted during the pour.
At construction joint locations (where this section meets a future pour), the edge of the concrete should be finished clean and vertical, not sloped or feathered. A vertical face gives the adjacent section maximum contact area for load transfer. If you're not using dowel bars or rebar across the joint (which is fine for most residential patios), at least make sure the face is clean and will be dampened before the next pour.
Finishing, joints, and curing between sections
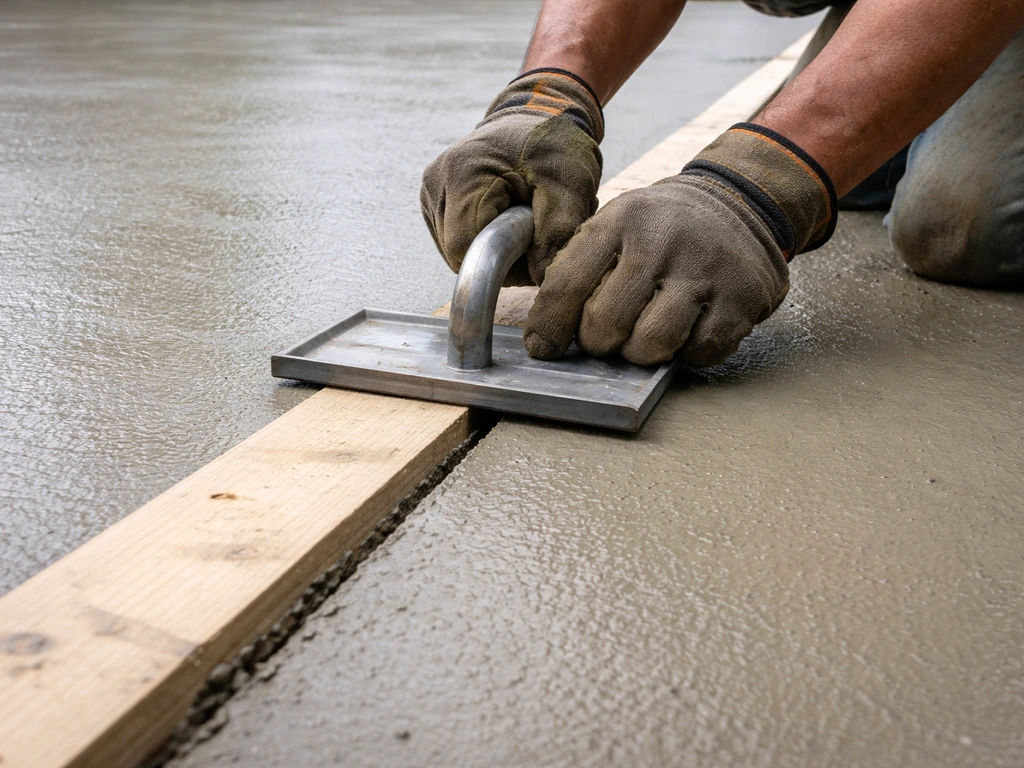
Finishing the surface
After screeding, the bleed water (that shiny watery sheen on the surface) needs to disappear before you finish. Don't touch the surface while bleed water is present. If you want a low-slump mix, follow drying steps such as reducing added water and using controlled placement so your patio surface cures correctly dry pour concrete patio. Floating and troweling while bleed water is still present weakens the surface and causes dusting and scaling later. Once the sheen is gone and the surface can support your weight on a kneeboard without leaving deep impressions, you're ready to float and finish.
For a residential patio, a broom finish is the most practical choice. It's slip-resistant, it hides minor surface inconsistencies, and it's forgiving across section-to-section color variations. Drag a stiff-bristled concrete broom lightly across the surface in one direction. Do all sections with the same broom, the same direction, and the same pressure. This consistency matters a lot for the final appearance.
Cutting contraction joints
Within each section, you still need contraction joints to control where the inevitable shrinkage cracks appear. Tool these with a grooving tool and a straight 2x4 as a guide, or saw-cut them after the concrete sets. The groove depth needs to be at least 1/4 of the slab thickness, so for a 4-inch slab that's a minimum 1-inch deep groove. Shallower grooves don't redirect cracking and are a common reason why patio cracks appear in random locations instead of the clean lines you cut.
If you're saw-cutting instead of tooling, you can use an early-entry dry-cut saw starting about 1 to 4 hours after finishing, depending on how fast the concrete is setting. The goal is to cut before the concrete develops enough tensile strength to crack randomly, but after it's firm enough to not ravel at the cut edges. Temperature and humidity affect this window significantly, so watch the surface closely.
Curing before the next section
Start curing immediately after finishing. The most reliable method for a DIY project is to wet-cure by covering the section with plastic sheeting or wet burlap and keeping it damp. The minimum curing period for most residential applications is 7 days. Don't skip this because you're eager to pour the next section. Concrete that cures too fast in dry or hot conditions shrinks more and cracks more, and no amount of good jointing fixes a section that was rushed.
Before pouring the adjacent section, remove the interior forms, clean the construction joint face of any dirt or debris, and dampen the existing concrete face. A dry concrete face will absorb water from the fresh mix, weakening the bond at the interface. Dampening it (not soaking it, just bringing it to a saturated surface-dry condition) prevents that absorption and gives the new concrete the best possible contact with the existing pour.
How to avoid common failures
Cold joints
A cold joint happens when fresh concrete is placed against concrete that has already achieved initial set, and the two layers don't bond. It looks like a crack but it's actually a failure plane. In section pouring, the intentional construction joint between sections won't become a cold joint as long as you treat the existing face properly before pouring against it: clean it, dampen it, and pour within a reasonable timeframe. A cold joint becomes a real problem only when you try to pour against concrete that's already been sitting for days without removing the form first, or when you pour a small repair batch against a dry old face.
Uneven grades between sections
This is the failure mode I see most often on DIY multi-section patios. Section one is poured at the correct slope, but section two ends up a quarter-inch high or low at the joint. Usually this happens because the form for section two wasn't set from the same reference points as section one. Always pull your slope measurements from a fixed benchmark: the house foundation, a hub stake set at the start, or a laser level. Don't measure section two's forms off the top of section one's concrete, because that surface might have a slight bow or crown in it. Go back to your original reference point every time.
Visible seams and color differences
Some seam visibility between sections is unavoidable and normal. The construction joint line will always be faintly visible. What you want to prevent is a dramatic color difference between sections. The main causes are inconsistent water ratios, different curing conditions (one section got rained on, another dried out fast in wind), or using a different concrete product for different sections. Stick to the same mix, the same water ratio, and the same curing method for every section. If color consistency is a high priority, consider applying a penetrating concrete stain or sealer over the finished patio once all sections are fully cured. A uniform coating ties the whole surface together visually.
Cracking from poor prep or jointing
Cracks that appear in the middle of a section rather than at your tooled or saw-cut joints almost always trace back to two things: inadequate base compaction or joints that were too shallow or too far apart. For a 4-inch slab, keep contraction joints no more than 10 feet apart and at least 1 inch deep. And compact that base. Soft spots in the subgrade let sections flex and crack independently, no matter how good your concrete work is.
| Problem | Most Likely Cause | How to Prevent It |
|---|---|---|
| Cold joint at section boundary | Concrete face dried out before adjacent pour; no dampening | Dampen the existing face before pouring; remove forms first |
| Elevation mismatch between sections | Form heights set from inconsistent reference points | Re-check all forms against a single fixed benchmark |
| Color difference between sections | Different water ratios or curing conditions | Same mix, same water per batch, same curing method every time |
| Random cracks mid-section | Joints too shallow/far apart or poor base compaction | Joints at least 1 in deep, max 10 ft apart; compact base fully |
| Surface scaling or dusting | Finished while bleed water was still on the surface | Wait for bleed water to disappear before floating or troweling |
| Section sinking or settling | Subgrade not compacted; base depth insufficient | Compact in two passes with a plate compactor; 4 in gravel base minimum |
What to do if things go wrong
If you end up with a noticeable lip between sections (say, 3/8 inch or more), a concrete grinder can bring the high section down. For lips under 1/4 inch, a hand-held angle grinder with a diamond cup wheel works fine. Do this after the concrete has fully cured (at least 28 days for full strength). For sections that cracked unexpectedly, assess whether the crack is structural (wide, with displacement on one side) or cosmetic (hairline, flat). Hairline cracks can be routed and sealed with a flexible polyurethane caulk. Wide or displaced cracks point to a base problem and may require cutting out that section and repouring.
Color differences that bother you can often be addressed with a concrete stain, overlay, or sealer applied after everything has fully cured. A concrete overlay can also fix minor surface texture inconsistencies between sections if the finish came out uneven. These are exactly the kinds of repairs and upgrades covered in more detail throughout the rest of this site, so if your patio needs a second pass after the pour, there are good options.
Your next steps before you start pouring
- Sketch the full patio layout and mark every section boundary and slope direction before touching the ground
- Excavate and prep the entire base area at once, compacting gravel in two passes
- Set all form stakes from a single fixed reference benchmark with your slope (minimum 1/8 in per foot, target 1/4 in per foot) built into every form
- Source enough of the same concrete mix for all sections, and plan water measurement so every batch uses the same ratio
- Pour section one, screed, tool or cut contraction joints at least 1 inch deep, broom finish, and start curing immediately
- Cure section one for at least 7 days before removing interior forms and pouring against it
- Before each subsequent pour, dampen the existing concrete face, verify form heights against your benchmark, and match your mix and water ratio exactly
Pouring in sections is genuinely one of the most DIY-friendly ways to build a concrete patio, because it turns an overwhelming single-day project into a manageable multi-weekend one. If you also need guidance on the actual placement and finishing order, see our full walkthrough on how to pour a concrete patio build a concrete patio. The keys are planning the slope and joints before you start, prepping the base as one complete job rather than section by section, and being consistent with your mix and curing. Get those three things right and the section-by-section approach will give you a durable, good-looking patio that lasts for decades.
FAQ
Can I pour concrete patio sections on completely different weeks without weakening the joint?
Yes, but only when you can meet the practical timeline for bond. You still need construction joints where pours stop, and the next batch must be placed quickly enough that the first pour face has not gone beyond initial set for multiple days. If you are past the point of dampening a fully cured surface, treat the project as a repair or use mechanical connectors, otherwise you are more likely to get a weak, visible seam.
Where should I put construction joints if my patio shape is irregular?
Avoid jointing that relies on “random straight lines.” Place construction joints at logical transitions (inside corners of an L-shape, changes in direction, or near the ends of a rectangular grid) and keep them aligned from section to section. If a joint crosses a heavy load path (like a wheel track), consider relocating it or adding reinforcement to reduce cracking risk.
Do I need dowel bars or rebar at the construction joints between patio sections?
You generally do not need dowels or rebar across typical residential section joints, but you do need reinforcement where it matters (for example, thickened edges, control-joint regions you cut deeply into, or areas with known soil movement). If you expect significant freeze thaw movement or the base is questionable, plan for dowels or mid-panel reinforcement, because construction joints alone do not prevent vertical displacement.
What if the construction joint face gets dusty or gets rain before I pour the next section?
Do not pour into a section gap that has dried out, been contaminated, or been left uncovered and full of dust or debris. Before the next pour, remove any loose material, clean the face, then dampen to saturated surface-dry, not so wet that water puddles. If the face is already dirty or has laitance, grinding or thorough brushing is often needed for consistent bond.
How can I prevent the broom finish from looking different from section to section?
If you use a broom finish, keep everything consistent, same broom type, same direction, and same pressure. If one section dries slower due to shade or wind, you may finish at a different time and get different texture. A practical workaround is to schedule so each section is finished at roughly the same bleed-water disappearance stage, and to do spot touch-ups only when the surface is still workable.
What causes a noticeable height lip between sections, and how do I stop it?
If you cannot keep the same slope reference while setting forms, you will likely see a lip at the seam. Use a fixed benchmark like a laser level or a string line at the house reference, then set every form height from that. Do not set section two forms by measuring from the cured top of section one, even if it looks “close.”
My cracks keep showing up in the middle of each section, what is wrong with my joint spacing?
Use control joints as your primary crack strategy, and avoid creating joints that are too close together or too shallow. For a typical 4-inch slab, keep cut or tooled grooves deep enough and do not exceed the recommended spacing, because long, unsupported spans tend to crack randomly in the middle of panels.
Why do my patio sections cure with different colors even though I used the same finish steps?
Color mismatch usually comes from variability, not from broom technique alone. Biggest drivers are inconsistent water added, different concrete products, and different curing exposure (wind drying one area, rain or heavy cover on another). Keeping your batch water measured and your curing method uniform, plus using the same supplier or bag product for all sections, is the most reliable fix.
Should I use expansion joints where the patio meets the house, or only control and construction joints?
Yes, if you anticipate moving temperatures, but plan it around curing. Expansion joints or soft joints are different from construction and contraction joints, they are meant to allow movement at specific transitions like where the patio meets a structure. Do not substitute construction joints for expansion joints at the house line, and do not seal control joints rigidly.
Can I grind down a lip between sections, and when is it safe to do?
For lips or minor texture differences, grind only after full cure, commonly at least 28 days for strength, and wear proper PPE because concrete dust is hazardous. If the difference is bigger than what grinding can safely remove, consider routing and leveling, or an overlay after cure, because aggressive grinding can thin the surface layer and change slip resistance.