To redo a concrete patio, you assess the damage first, decide whether to patch and resurface or tear out and re-pour, prep the surface thoroughly (clean, repair cracks, profile the concrete), apply the right resurfacer or coating system, then seal and cure it properly. Most patios in decent structural shape can be fully transformed with a grinder, a bag of resurfacer, and a good sealer for under $300 in materials. The key is matching the fix to the actual problem, not every patio needs a full redo, and not every cracked patio can be saved with just a skim coat.
How to Redo a Concrete Patio Step by Step DIY Guide

Silas Morrison
29 Jun 2026
Quick check: what's wrong with your patio and what it means
Before you buy anything or rent a grinder, spend 20 minutes doing a real inspection. What you find determines everything downstream. Walk the slab and look for these specific problems.
Surface problems (cosmetic or shallow)
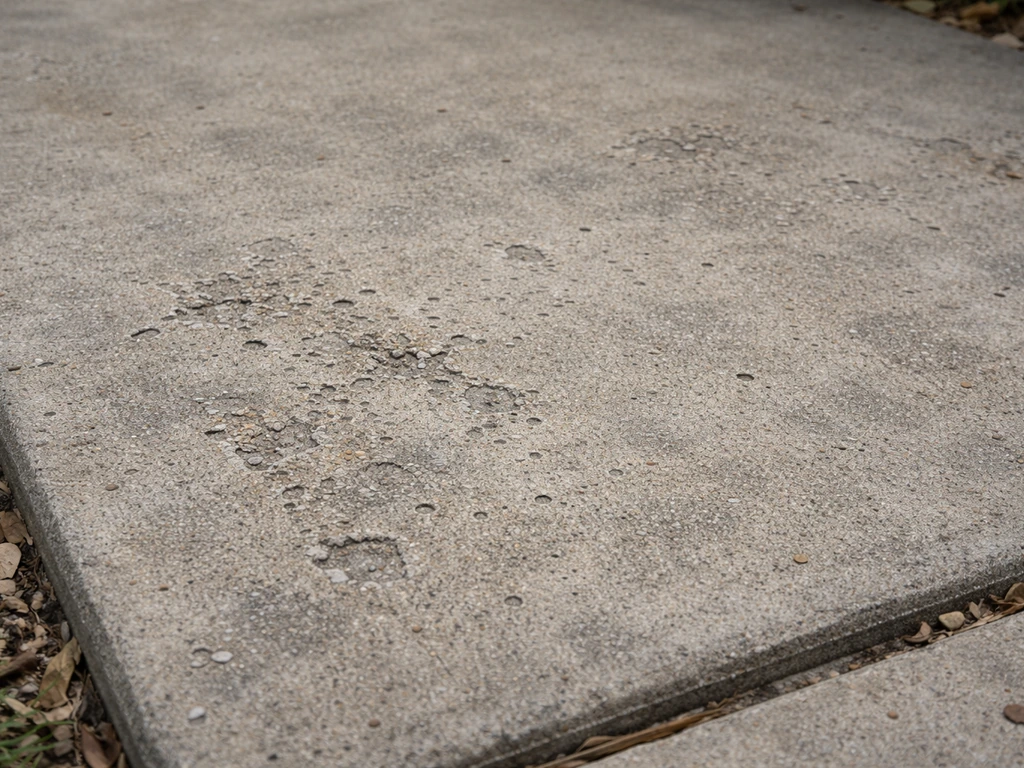
- Spalling: the top layer is flaking or pitting, usually from freeze-thaw cycles or deicers. Common and very fixable with resurfacing.
- Discoloration, staining, or general dullness: cleaning plus staining or sealing handles this.
- Hairline cracks under 1/8 inch wide: normal shrinkage cracks, fill and resurface.
- Rough, worn, or pitted texture: good candidate for a skim coat or overlay.
Structural or drainage problems (more serious)
- Cracks wider than 1/4 inch or cracks that are actively moving: may signal a base or soil issue. Fix the cause before resurfacing or the crack returns.
- Sunken or heaved sections: if one section is more than 1/2 inch higher or lower than the adjacent section, you have a settlement or frost-heave problem.
- Drainage running toward the house: the slope is wrong. Concrete should drop at least 1/4 inch per foot of run (about a 2% grade) away from the structure.
- Hollow spots when you tap the slab: use a hammer or a piece of rebar and walk the surface listening for a dull thud instead of a solid ring. Hollow areas mean delamination or voids beneath, and any coating applied over them will pop off.
- Deep spalling or exposed aggregate more than 1/2 inch deep: a standard resurfacer won't bridge this reliably. You need either a thicker overlay system or section replacement.
Also check for moisture. Look for efflorescence (white salt deposits) on the surface or edges, which tells you water is moving through the slab from below. If you see it, a topical coating will fail. Press plastic sheeting flat against the slab with tape on all edges and leave it for 24 hours, if moisture beads under the plastic, you have a vapor emission problem that needs addressing before you coat anything. Serious cases can be tested with an ASTM F1869 calcium chloride test kit.
Decide the redo strategy: patch and resurface vs. full tear-out and re-pour
This is the decision that saves or wastes the most money. Here's a straight framework.
| Condition | Recommended Approach |
|---|---|
| Surface spalling, pitting, or worn texture with sound base | Clean, profile, skim coat or resurfacer |
| Hairline to moderate cracks (under 1/4 inch), solid slab | Fill cracks, then resurface |
| Isolated damaged areas, rest of slab is solid | Patch damaged areas, then resurface entire surface |
| Uneven surface but structurally sound (settled evenly) | Self-leveling underlayment or grind high spots, then resurface |
| Drainage slope toward house but slab is otherwise sound | Build up low areas with leveling compound, regrade as much as possible |
| Wide moving cracks, hollow sections covering more than 30% of slab | Tear out and re-pour (or consider pavers over the slab) |
| Slab heaved or sunken more than 1 inch, base failure evident | Full replacement |
| Concrete under 1.5 inches thick (rare, but happens with old patios) | Replacement — resurfacer needs a sound, thick base to bond to |
A full tear-out and re-pour runs roughly $6 to $12 per square foot depending on your region, slab thickness, and whether there's rebar. A resurfacing job using DIY labor costs $1 to $3 per square foot in materials. If your slab is structurally sound, resurfacing wins every time on cost. But if the base has failed, resurfacing is throwing money at a sinking ship, you'll be back in two years doing it again. For more detail on the full replacement path, that's a project in its own right. If you need the full, step-by-step plan for the refresh itself, you can follow this guide on how to update concrete patio. If you're leaning toward a lighter refresh that's mostly cosmetic, there are also approaches that stop well short of a full resurface.
Prep the concrete properly: cleaning, profiling, crack and damage repair
I can't stress this enough: prep is where the job succeeds or fails. I've seen brand-new coatings peel off in sheets within a year because someone skipped the bonding prep. Give this section more time than you think it needs.
Step 1: Strip and clean the surface
- Remove all furniture, planters, and anything attached to the slab.
- Degrease thoroughly: use a concrete degreaser or trisodium phosphate (TSP) on any oil or grease spots. Scrub in and rinse completely. Oil contamination kills bonding.
- Pressure wash the entire surface at 3,000 PSI or higher. A surface cleaner attachment on a pressure washer works better than a wand for even cleaning.
- Let it dry completely. For most coating systems you want surface dry, but not bone-dry inside — a dampened surface (SSD: saturated surface dry) is actually ideal for resurfacers. For sealers and topical coatings, dry is better.
- Remove any existing sealers or coatings: if the surface beads water, there's sealer on it. Grind it off or use a chemical stripper rated for concrete sealers.
Step 2: Profile the surface (mechanical prep)
For a resurfacer, stain, or coating to bond properly, the concrete needs to have an open, slightly rough texture. This is measured using the ICRI Concrete Surface Profile (CSP) scale, which runs from CSP 1 (nearly smooth) to CSP 10 (very aggressive). Most resurfacers and overlays want a CSP 3 to 5, which looks like medium-grit sandpaper under your fingers. A penetrating sealer on a clean, sound slab can work at CSP 1 to 2.
- Angle grinder with a diamond cup wheel: best for small patios or spot work. Fast and controllable.
- Floor grinder (rental): the right tool for patios over 100 square feet. A 7-inch or 10-inch electric floor grinder runs $60 to $100/day to rent and gets you to CSP 3 to 4 efficiently.
- Shot blasting (rental or contractor): produces CSP 3 to 5, very uniform. Overkill for most DIY patios but useful for large areas or epoxy coatings.
- Acid etching: muriatic acid (10% solution) will open the surface to roughly CSP 1 to 2, acceptable for penetrating sealers. It's cheaper but messier and less reliable than grinding for overlay work. Always neutralize with baking soda and rinse thoroughly.
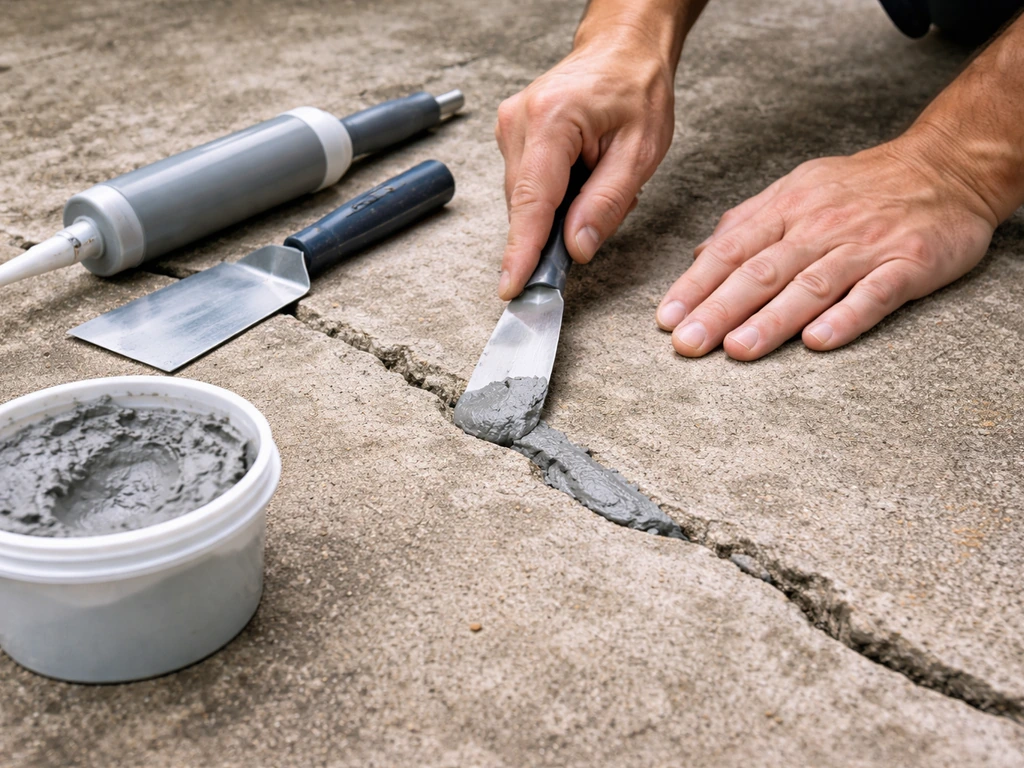
Step 3: Repair cracks and damaged areas
Do crack repairs before you resurface, not after. Use a concrete crack filler or polyurethane caulk for hairline cracks. For cracks 1/8 inch or wider, use an epoxy injection or a flexible polyurea crack filler, these stay flexible and move with the crack instead of cracking again. Widen the crack slightly with an angle grinder (make a V-groove) so the filler has something to grip. For spalled or delaminated areas, chip out all the loose material until you hit sound concrete. Hollow sections must be removed. Use a cold chisel and hammer or an electric chipping hammer for larger spots. Feathered edges don't hold, undercut the repair area so it's deeper at the center and the edges are cut square or slightly undercut.
Fill deep spots (over 1/2 inch) with a structural patching mortar like Quikrete Vinyl Concrete Patcher or a Sika hydraulic cement product. Follow the manufacturer's mix ratio and don't add extra water, a wetter mix shrinks more and bonds worse. Let patches cure fully, at least 24 hours (48 is better in summer heat), before you apply any resurfacer over them.
Step 4: Edge and transition details
Check all edges where the patio meets the house foundation, steps, or other slabs. These transition joints are the most common places for cracks and water infiltration. Clean out any debris from control joints and re-fill with a backer rod and self-leveling polyurethane sealant. Don't skim coat over control joints, they're there for a reason. Don't skim coat over control joints, because they're designed to move and relieve stress in the slab. Score or mark them before applying resurfacer so you can cut them back in.
Surface leveling and resurfacing steps
Once the slab is clean, profiled, and patched, you're ready to apply the resurfacer or leveling system. With this setup in mind, you can follow a step-by-step approach to how to refinish a concrete patio from cleaning through resurfacing and finishing. Here's how to execute it correctly.
Option A: Skim coat or resurfacer (most common)
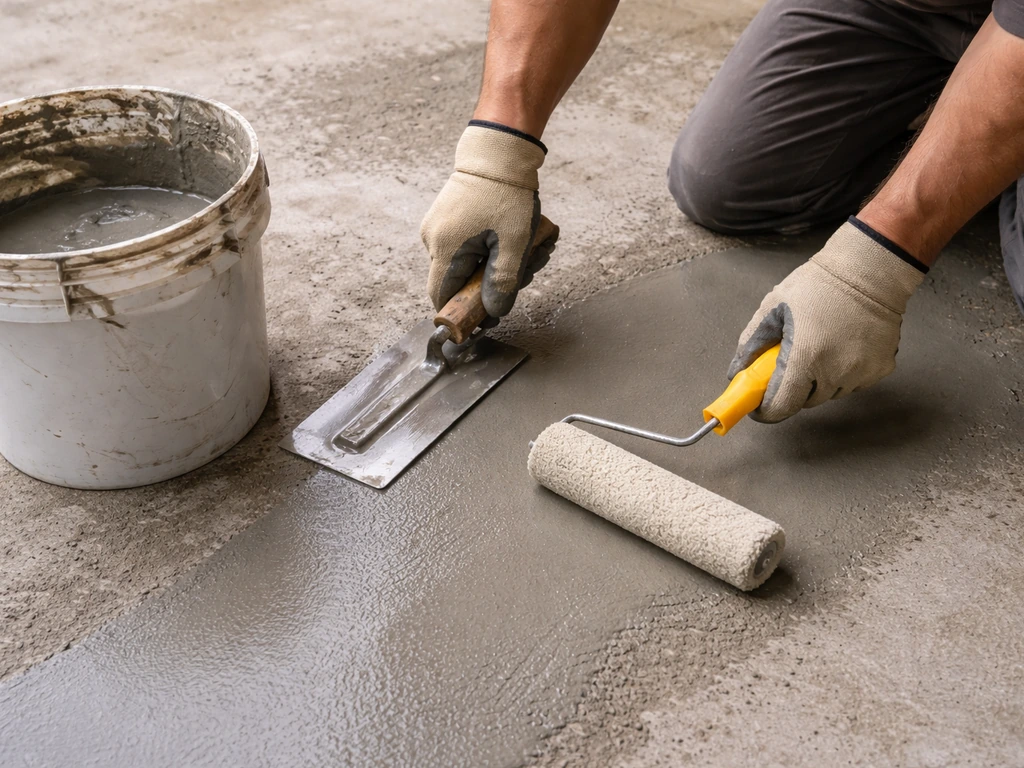
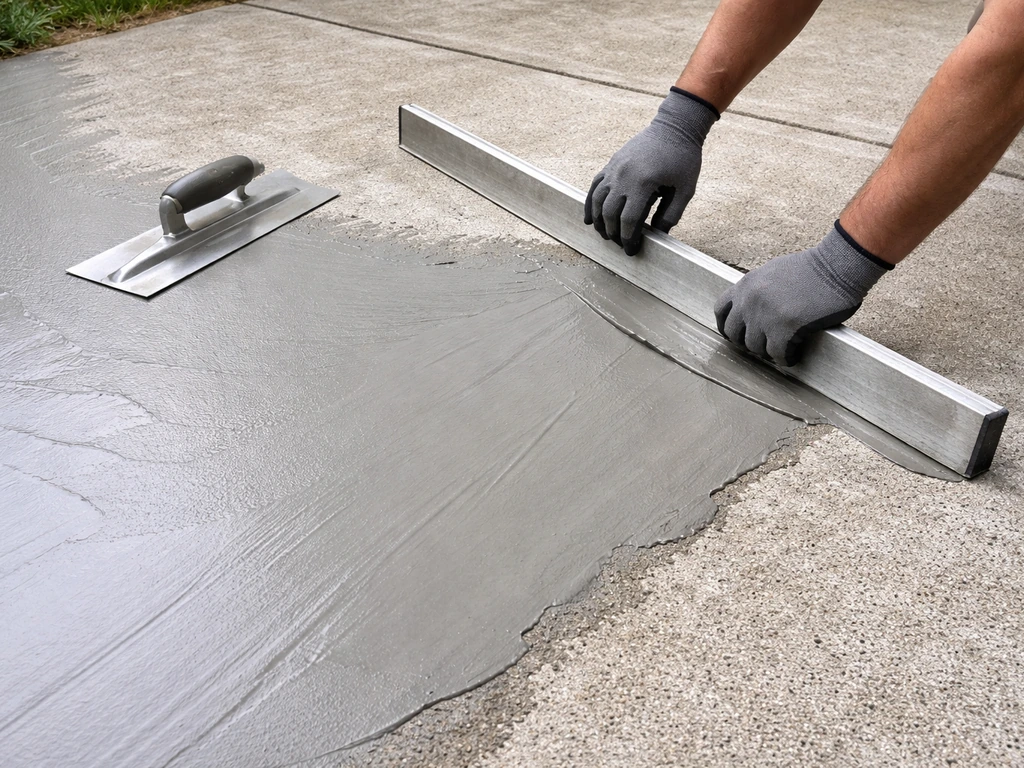
Products like Quikrete Concrete Resurfacer or SikaQuick Concrete Resurfacer are designed to go on in thin layers (1/16 inch to 1/4 inch) and bond to existing concrete. They're polymer-modified, which gives them better adhesion and flexibility than plain cement.
- Dampen the slab with water before applying — you want it damp but with no standing water (the SSD condition mentioned earlier).
- Mix the resurfacer to a pourable but not soupy consistency, following the product's exact water ratio. Rushing the mix causes weak results.
- Pour and spread with a squeegee, working in sections of about 50 square feet so you can texture it before it sets.
- Apply a broom finish or texture while the product is still workable — usually within 5 to 10 minutes depending on temperature.
- Keep it from drying too fast in hot or windy conditions by misting lightly or covering with plastic sheeting. Rapid moisture loss causes cracking.
- Recut control joints to match the original layout using a circular saw with a diamond blade.
Option B: Self-leveling underlayment for uneven surfaces
If your patio has low spots or areas that don't drain properly, a self-leveling underlayment (SLU) can build up specific areas. These products flow to find level, you mix them thin (almost water-like), pour them, and they flatten out on their own. Apply a bonding primer first (required by most SLU manufacturers). Pour and spread with a gauge rake or smoothing tool. Most SLU products can be applied from 1/4 inch to 1.5 inches in a single pour, which gives you some real slope correction ability.
One important note: if your drainage slope issue is significant (meaning water currently pools near the house), you may need a professional to evaluate whether SLU alone can fix it or whether mudjacking or partial slab replacement is needed. If SLU will not solve the drainage problem, you may need to plan a full patio replacement and new base prep replace a concrete patio. Building up the low side of a slope with SLU can work if the differential is small. If you need to raise a large section by more than an inch, the material cost starts to rival replacement.
Option C: Bonding primer before overlay
Some overlay systems and all epoxy coatings require a dedicated bonding primer or epoxy primer coat applied to the clean, profiled surface and allowed to tack up (usually 30 to 60 minutes) before the overlay goes down. Don't skip this step if the product calls for it. The primer bridges the chemistry between old concrete and the new material. Applying an overlay over a surface that needed primer but didn't get one is the most common DIY mistake that leads to delamination.
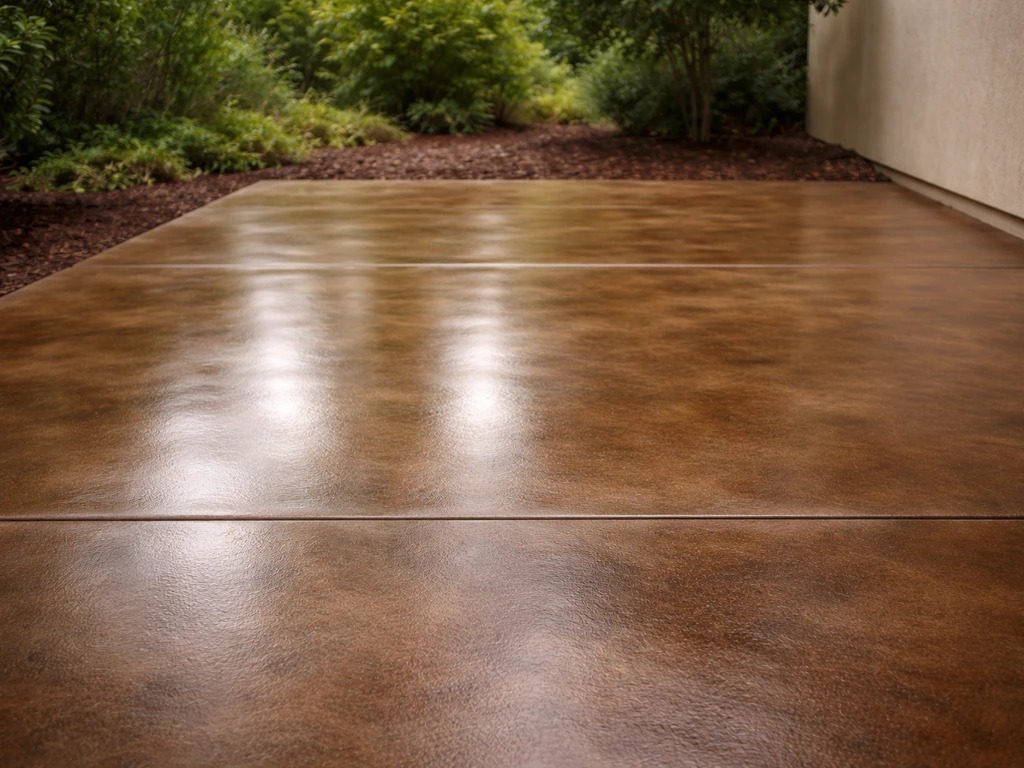
Stain, paint, and coating options, and when to use each
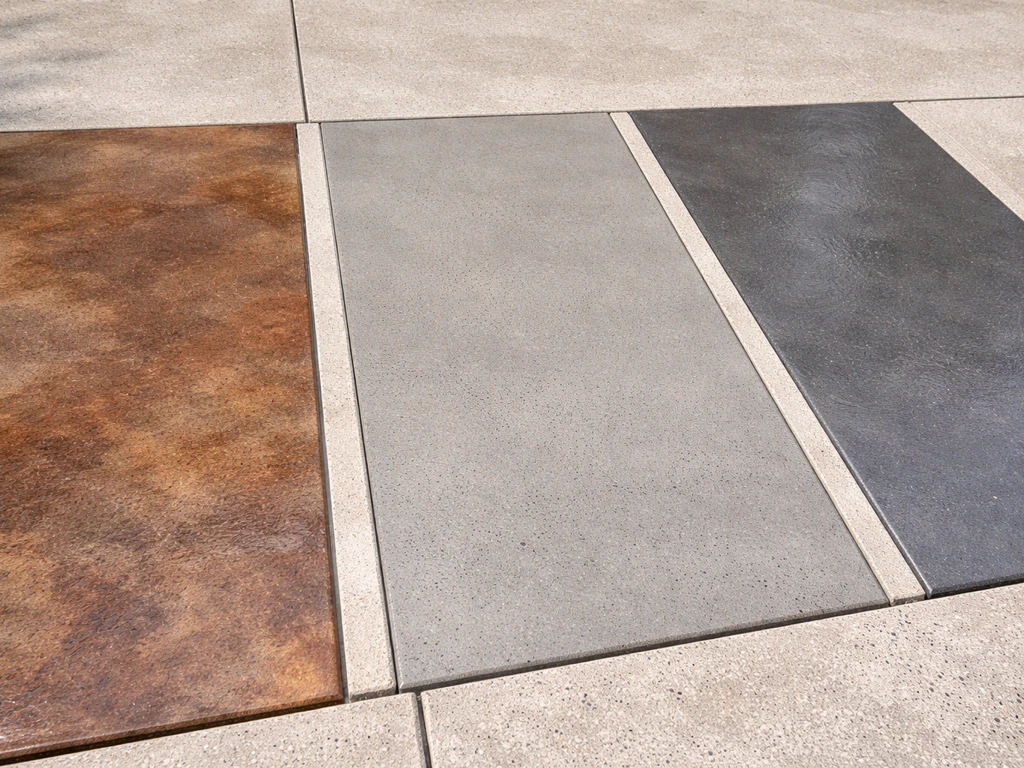
Once the surface is level and cured, you can add color and finish. Your main choices are acid stain, water-based stain, concrete paint, or a topical coating like epoxy or polyurea. Each has a different look, durability, and skill requirement.
| Option | Look | Durability | DIY Difficulty | Best For |
|---|---|---|---|---|
| Acid stain | Mottled, variegated, natural stone-like | Good if sealed | Medium (safety precautions needed) | Decorative finish on smooth, sound slabs |
| Water-based concrete stain | More uniform color, still translucent | Good if sealed | Easy | DIY color refresh, easier to control |
| Concrete paint (latex/masonry) | Opaque, uniform | Moderate (chips with traffic) | Easy | Budget cosmetic update, low-traffic areas |
| Epoxy coating | Solid or decorative flake, glossy | Excellent (hard, chemical resistant) | Medium-High (prep is critical) | Heavy-use patios, garage-adjacent spaces |
| Polyurea/polyaspartic coating | Similar to epoxy but more flexible | Excellent, UV stable | Medium-High | Best long-term topical coating for exteriors |
| Penetrating silane/siloxane sealer | No color change, invisible | Very good (internal protection) | Easy | Protecting a patio you want to keep natural |
A few honest notes on these options. Concrete paint is the easiest and cheapest, but it also peels the fastest on exterior slabs. If you paint, use a masonry-specific latex formula and expect to reapply every 2 to 4 years. Acid stains are beautiful but require neutralizing and careful cleanup, wear chemical-resistant gloves and eye protection. Epoxy coatings are durable but they're also the most moisture-sensitive: if you apply them over concrete with high vapor emission, they will bubble and peel. Polyurea/polyaspartic coatings are more forgiving on moisture and UV-stable (epoxy yellows in sun), which makes them a better choice for outdoor patios. Water-based stains are my go-to recommendation for most DIYers because they're forgiving, look great, and the cleanup is easy.
Apply stains before the final sealer coat. Most stains need 24 hours to fully react or dry before sealing. Apply coatings in thin, even layers, two thin coats always outperform one thick coat for adhesion and appearance.
Sealing, curing, and protecting for long-term results
Sealing is not optional. A bare concrete or resurfaced patio that isn't sealed will absorb water, stain easily, and degrade faster. ACI 302.1R (Concrete Floor and Slab Construction) emphasizes that finishing, jointing, and especially curing are critical to achieving a durable, hard surface Sealing is not optional.. But the type of sealer matters, and so does timing.
Curing before you seal
Fresh concrete or a fresh resurfacer coat needs time to cure before you put a topical coating on it. The general rule cited by many coating manufacturers is 28 days for a new slab before applying most protective coatings. Resurfacers cure faster, but still follow the product's waiting/recoat time guidance, SikaQuick and similar products include specific recoat windows and you need to stay within them. Rushing this step is how you get blistering and adhesion failure. If you used a resurfacer and want to stain and seal it, check the data sheet. Many allow a topcoat within 24 to 72 hours of application. For penetrating sealers, you typically need the concrete to be dry but don't need to wait 28 days.
Choose the right sealer
There are two main sealer families for outdoor concrete patios: penetrating (reactive) sealers and topical (film-forming) sealers. Penetrating sealers like silane/siloxane blends (Sikagard 740 W is one example) soak into the concrete and chemically bond, creating a breathable water-repellent barrier without a surface film. These are excellent for patios because they let the concrete breathe, which means moisture vapor can still escape from below without building pressure under the sealer. The tradeoff is they don't add gloss or color. They also won't protect against hydrostatic pressure or efflorescence driven by interior moisture sources.
Topical sealers (acrylics, epoxies, polyurethanes) form a surface film and can add sheen or gloss. Acrylic cure-and-seal products like Quikrete's Acrylic Concrete Cure and Seal can be applied soon after finishing and provide a light protective film plus help the concrete cure. They're a good choice for freshly resurfaced patios where you want a mild sheen and some protection. For heavier protection on decorative finishes, a two-part polyurethane or polyaspartic topcoat is worth the extra cost.
How to apply sealer

- Make sure the surface is clean and dry. Even small wet spots will cause topical sealers to turn white.
- Apply penetrating sealers with a pump sprayer in two passes — one horizontal, one vertical — until the surface is wet but not puddling. Work it in lightly with a brush or roller.
- Apply acrylic or topical sealers with a 3/8-inch nap roller in thin coats. Backroll to even out any bubbles.
- Avoid applying in direct sun or above 90°F — the sealer skins over before it penetrates properly.
- Most sealers allow foot traffic in 24 hours and furniture in 48 to 72 hours. Vehicle traffic (if you're bordering a driveway) typically needs 7 days.
Maintenance and troubleshooting after you redo the patio
Ongoing maintenance
- Re-seal penetrating sealers every 3 to 5 years, or when water no longer beads on the surface.
- Re-seal acrylic topical sealers every 1 to 3 years on outdoor surfaces.
- Clean annually with a pH-neutral cleaner and pressure washer. Avoid harsh acid-based cleaners that strip sealers.
- Inspect control joints every spring. If the caulk or filler has cracked or separated, clean out and refill before water gets under the slab.
- Avoid deicers (especially calcium chloride and ammonium nitrate) on sealed or resurfaced concrete — they accelerate spalling and attack the sealer.
Common problems and fixes
Peeling or bubbling coating: almost always a prep or moisture issue. The coating didn't bond because the surface had sealer residue, oil contamination, or moisture vapor coming up. Strip the coating, identify and fix the moisture source if present, reprep to the correct CSP, and reapply. Skipping the moisture test before re-coating just repeats the failure.
Recurring cracks in the same location: the crack is moving, which means the underlying cause (soil settling, tree root, frost heave) hasn't been addressed. A flexible polyurea filler helps, but if the movement is ongoing you'll need to investigate the base. Resurfacer alone won't hold over an active crack, it will reflect the crack within a season.
White haze or efflorescence after sealing: water is moving through the slab and depositing mineral salts. Remove the haze with a diluted muriatic acid wash, neutralize, rinse, and switch to a penetrating silane/siloxane sealer that allows the slab to breathe rather than a film-forming sealer that traps the moisture vapor.
Water still pools after resurfacing: your slope correction wasn't sufficient or the surface leveling compound settled unevenly. Check the grade with a long level and a tape measure, you want at least 1/8 inch per foot fall away from the house, ideally 1/4 inch per foot. If a specific low area collects water, grind the high edges or apply an additional leveling coat to the surrounding area to redirect flow.
New resurfacer cracking or delaminating quickly: either the mix water ratio was too high, the surface wasn't profiled adequately before application, or the resurfacer was applied too thick in a single coat. Most resurfacers have a maximum single-layer thickness, check the data sheet. For deep fills, build up in two thin layers rather than one thick one.
FAQ
Can I redo a concrete patio if it already has an old coating or paint on it?
Yes, but you usually cannot coat over well-adhered film-forming coatings. Plan on removing contaminants and any loose or glossy layer (often by grinding), then re-profile to the target CSP before you apply primer and resurfacer or epoxy. If the existing coating is intact and well bonded, test a small area and confirm you can still achieve the needed surface roughness for the new system.
What’s the best time of year to redo a patio for best curing results?
Aim for warm, dry weather with stable temperatures. Heat can shorten working time and cause rapid surface drying, while cold slows cure and can trap moisture under overlays. If you can’t avoid cool conditions, extend cure times beyond the minimum guidance and verify recoat windows using the specific product data sheet.
How do I confirm my patio has enough slope before I resurface or level it?
Use a long level or laser level plus measurements at the edges. Mark low and high spots, then calculate the fall away from the house. If you are targeting at least 1/8 inch per foot (ideally 1/4 inch per foot), identify whether low areas are small localized dips you can fill, or broad drainage failure that may require more extensive base correction.
If I see efflorescence, does that always mean I must replace the slab?
Not always. Efflorescence indicates moisture movement, but the key is whether you can stop or reduce the moisture source and choose the right sealer. You may still be able to resurface if you address vapor emission, allow correct cure periods, and use a breathable penetrating sealer system that does not trap moisture pressure.
Should I seal my patio before I apply stain or decorative color?
No. For most stain and overlay workflows, the stain or color goes first, then the final sealer goes on afterward. Applying sealer too early can prevent proper stain penetration or block the chemical reaction. Always follow the product’s specified wait and recoat timing for stain-to-sealer compatibility.
Can I use a resurfacer as a substitute for a bonding primer or as a stand-alone coating?
Usually no. Resurfacer may level and bond to prepared concrete, but many decorative overlays, epoxies, and polyurethanes require a dedicated bonding or epoxy primer coat with a defined tack-up time. Using resurfacer alone when a primer is required is a common reason for delamination.
What grit or tool should I use to get the right surface profile (CSP 3 to 5)?
You need mechanical profiling, typically grinding with diamond tooling or appropriate scarifying, not just chemical cleaning. The right “look” matters, but the reliable check is achieving the target roughness by touch and, ideally, a CSP reference guide or professional assessment. If you can’t get consistent medium-grit texture, stop and re-profile before applying the resurfacer.
How thick can I apply resurfacer or patch in one go without causing failure?
Do not exceed the product’s maximum single-layer thickness. For thicker areas, build up in multiple thin applications so the bottom does not remain under-cured. A common workaround is to do an initial leveling layer, allow full cure, then apply a second thin layer to reach the final texture.
What’s the safest way to repair control joints and keep them from cracking again?
Clean out debris from the joints, then use a backer rod sized for the joint width and a self-leveling polyurethane sealant to restore flexibility. Avoid skimming or filling control joints with rigid resurfacer because they are designed to move and relieve stress. If you must cross them visually, you can cut them back and keep them functional.
If my coating starts bubbling, what’s the most likely cause and how do I fix it?
Most bubbling is trapped moisture vapor or improper bonding. Strip the failed material, then retest moisture with the plastic sheeting method (and calcium chloride testing for serious cases). After correcting the moisture issue and re-profiling to the required CSP, reapply using the correct primer and the moisture-compatible coating system.
Do I really need to seal a patio that will be covered or under a roof?
If it is fully protected from rain but still exposed to humidity, sealing still helps against staining, efflorescence risks, and surface wear from foot traffic. However, the sealer choice can be simplified. Penetrating sealers are often a good “maintenance-light” option because they keep the concrete breathable.
How do I know whether SLU (self-leveling underlayment) is the right fix versus mudjacking or replacement?
SLU works for local level correction when the slab is sound and the elevation change is modest. If water currently pools near the house, measure the problem and evaluate whether you can restore adequate drainage with limited buildup. If you need to raise large sections significantly, costs can approach replacement, and you may need an installer to assess base failure and stability.