
Stenciling a concrete patio is one of the most cost-effective ways to turn a plain gray slab into something that looks like tile, slate, cobblestone, or even marble, without the cost or labor of a full overlay or replacement. You clean and profile the surface, anchor a stencil, roll or brush color through it, pull the stencil, repeat the pattern, then seal the whole thing. Most DIYers can complete a 200–300 sq ft patio over a weekend for roughly $150–$400 in materials, depending on the products you choose. That said, the prep work is what makes or breaks the result, so do not rush it.
How to Stencil Concrete Patio: Full DIY Guide, Prep to Seal

Silas Morrison
19 Jul 2026
What concrete patio stenciling actually is, and when to choose it
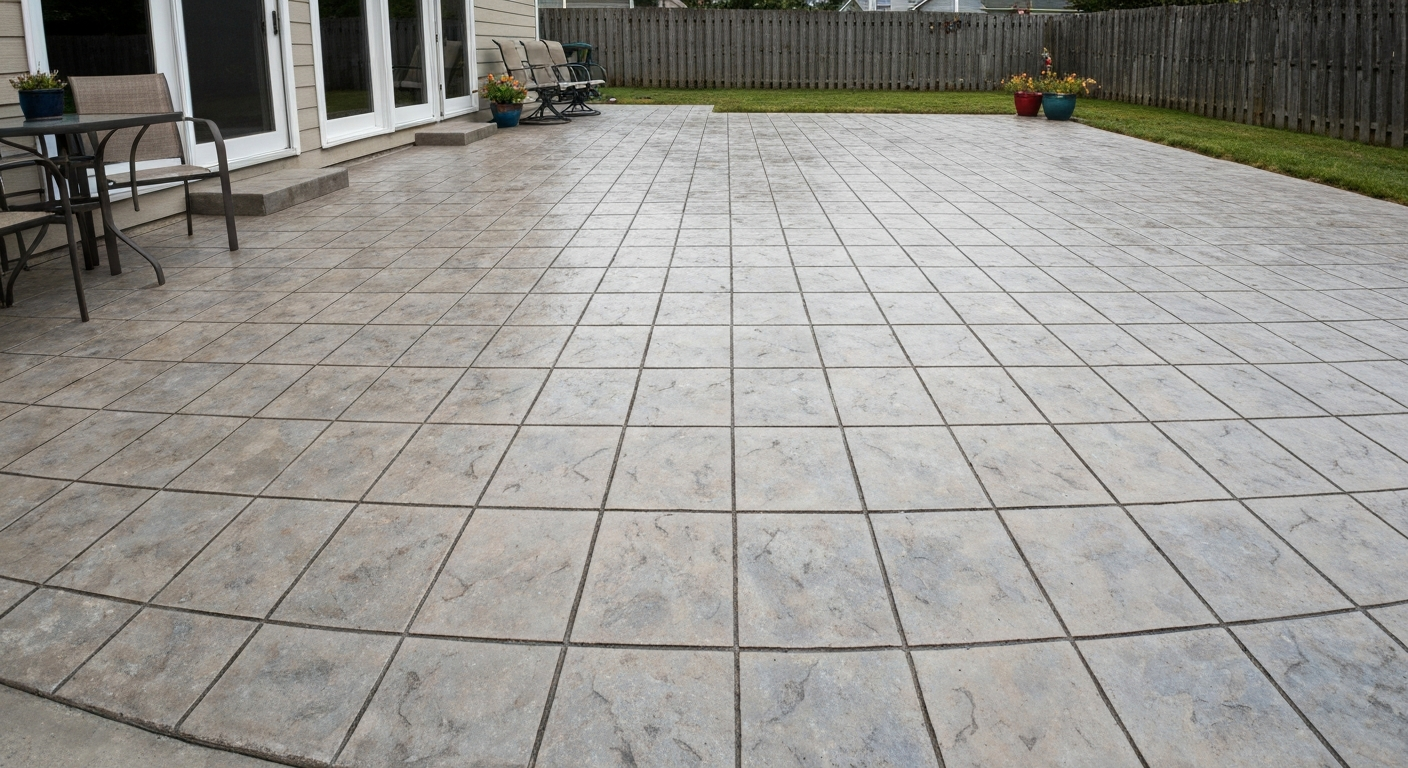
Stenciling is a decorative technique where you lay a physical template (a cut-out polyester or vinyl film) on the concrete surface and roll or spray pigment through the openings to leave a crisp, repeating pattern. The result mimics grout lines, tile shapes, geometric designs, or natural stone. It works on both new and existing concrete, but the path to get there differs depending on which situation you are in.
On a new pour, patience is the first rule. Manufacturers including Rust-Oleum specify a minimum 28-day cure before applying any surface-applied decorative coating, stain, or sealer. Apply before that and the concrete is still off-gassing moisture and alkali, which will lift or cloud the finish. If your slab was just poured, mark a date on your calendar and do not touch it decoratively until that 28-day window has closed.
On an existing patio, the main question is condition. A patio that is structurally sound, relatively flat, and free of active moisture intrusion is a great stenciling candidate. One with widespread spalling, deep cracks, or major heaving is a different story. Stenciling adds visual interest but it does not fix structural problems, and it will not hide a deteriorating surface for long. Repair first, stencil second.
Compared to concrete staining (which penetrates the slab and creates translucent, variegated color) or texturing methods that physically alter the surface, stenciling gives you precise, repeatable pattern control. If you want the look of random stone variation, combining a base stain with a stenciled pattern on top is a popular approach. For step-by-step instructions on creating a stone-like base with stain before stenciling, see how to stain a concrete patio to look like stone. Concrete staining and coloring are complementary techniques worth exploring alongside stenciling, especially if you want a layered, natural-looking result. For step-by-step guidance on staining concrete, see how to stain a cement patio.
Is stenciling right for your patio? Quick decision checklist
Before you commit to this project, run through the following checks. If you answer 'no' to any of them, there is a note on what to do instead.
- Is the concrete structurally sound with no active heaving or widespread spalling? (If not, address structural issues first or consult a contractor before any decorative work.)
- Has the concrete cured for at least 28 days if it is a new pour? (If not, wait. No shortcuts.)
- Are major cracks repaired or at least stable? (Active cracks that are still moving need routing and sealing or epoxy injection before you stencil over them.)
- Is the surface reasonably flat, within about 1/4 inch over 10 feet? (Significant low spots will cause stencil lift and paint bleed.)
- Is there no standing moisture or visible efflorescence on the surface? (Both indicate moisture migration that will cause adhesion failure.)
- Can you keep foot traffic off the patio for 24–48 hours after application? (Most products need that window before light use.)
- Will the project area be sheltered from rain for at least 24 hours post-application? (Rain on fresh paint or sealer ruins the finish.)
- Are you comfortable working with chemical products (acid etch, primer, sealer) with proper PPE? (If not, hire out the prep work at minimum.)
Site and weather: plan around these before you open anything
Outdoor concrete work is highly sensitive to temperature, humidity, and sun exposure. Most concrete paints and sealers share a common application window: ambient temperature between 50°F and 90°F (10–32°C) and relative humidity below 85%. Rust-Oleum's concrete product TDS documents list these as standard restrictions, and most other manufacturers land in a similar range. Outside those numbers you risk poor adhesion, blushing, or film failure.
Direct sunlight is a particular problem with stenciling. The sun heats the concrete surface well above ambient air temperature, which speeds up drying so fast that you get brush drag and ragged edges before the stencil is even lifted. I learned this the hard way on a west-facing patio one August afternoon. Work in the early morning or late afternoon, or on an overcast day. If the slab is in full sun, check the surface temperature with an infrared thermometer. Anything above about 90°F on the slab itself is too hot.
Check a 72-hour forecast before you start. You need at least 24 hours of dry weather after application, and ideally longer. Wind can also be a problem: it dries product faster than you want and blows dust onto wet paint. If conditions are marginal, wait for a better window. A postponed stenciling day is always better than a ruined one.
Everything you need: materials and tools checklist
Here is the complete kit. Some items are optional depending on your specific situation, but the core list covers the full job from prep to sealing.
Stencils and layout
- Concrete stencils: 10–15 mil polyester (Mylar) or reusable vinyl film. Mylar is the industry standard for solvent resistance and crisp edges. Buy 10–15% more than your square footage to account for pattern repeats and edge cuts.
- Measuring tape and chalk line for layout grid
- Carpenter's square and level
- Low-tack spray adhesive (stencil-specific, like a repositionable spray mount)
- Painter's tape for anchoring stencil edges if needed
- Small weights or sandbags for large stencil sections
Surface preparation
- Pressure washer (electric models typically 1,600–2,000 psi for cleaning; keep under 3,000 psi to avoid surface scarring)
- Stiff-bristle scrub brush and concrete degreaser
- Muriatic acid (for acid etching) or phosphoric acid (gentler option)
- Baking soda and water for acid neutralization
- Concrete patch compound or epoxy filler for cracks
- Diamond hand pads or angle grinder with diamond cup wheel for mechanical profiling
- Shop vacuum and broom for debris removal
Paints, primers, and color products
- Concrete primer or bonding primer (masonry-grade, compatible with your topcoat)
- Base coat paint: acrylic latex or 100% acrylic concrete/masonry paint in your background color
- Stencil accent colors: same product line, different shades
- Optional: penetrating concrete stain for a base color layer before stenciling
- Stir sticks and paint buckets
Application tools
- 4-inch dense foam rollers (best for stencil work — minimizes bleed)
- Short-nap (3/16 to 1/4 inch) rollers for base coat
- Natural-bristle or foam brush for cut-in areas and touch-ups
- Paint tray and liners
- Optional: low-pressure airless or HVLP sprayer for base coat (not recommended through stencils for beginners due to overspray risk)
Sealer
- Concrete sealer compatible with your topcoat system: acrylic sealer for most painted finishes; polyurethane or polyaspartic topcoat for high-traffic areas
- Sealer applicator: lambswool roller or dedicated sealer roller
- Note: epoxy sealers yellow outdoors under UV unless topcoated with a UV-stable urethane, so avoid straight epoxy sealers for exterior patios
Safety gear
- Chemical-resistant gloves (nitrile or neoprene, especially for acid etching)
- Safety glasses or goggles
- N95 respirator or half-face respirator with organic vapor cartridges (for solvent-based products and during acid etching)
- Rubber boots or chemical-resistant shoe covers
- Old clothes that cover your skin
Product selection: paints vs stains, primers, sealers, and stencil adhesives
Choosing the right product category matters more than choosing a specific brand. Here is how the main options compare for stenciling work specifically.
| Product Type | Opacity | Stencil-Friendly? | UV Stability | Best For | Watch Out For |
|---|---|---|---|---|---|
| Acrylic/latex concrete paint | Fully opaque | Yes, easiest option | Good with UV-stable formulas | Clear pattern definition, easy cleanup | Film can peel if prep is poor; needs resealing every 2–3 years |
| Penetrating acid/reactive stain | Semi-transparent | Limited (no color control through stencil) | Excellent (no film to UV-degrade) | Background color layer before stenciling | Cannot achieve crisp opaque stencil lines alone |
| Water-based concrete stain | Semi-transparent to light opaque | Moderate | Good | Layered, natural-color effects | Less opacity than paint; may need multiple coats through stencil |
| 100% solids epoxy coating | Fully opaque | Yes, but fast pot life | Poor outdoors (yellows without UV topcoat) | Garage floors and covered patios only | Must topcoat with UV-stable urethane for any sun exposure |
| Polyurethane/polyaspartic topcoat | Clear or pigmented | As sealer/topcoat only | Excellent | Final sealer on high-traffic patios | Higher cost; professional application recommended for full coats |
For most DIY homeowners stenciling an outdoor patio, a 100% acrylic concrete paint for both the base coat and stencil colors, topped with a UV-stable acrylic or water-based polyurethane sealer, is the right system. It is forgiving to apply, comes in hundreds of colors, and holds up well when properly sealed and maintained. Penetrating stains (acid or water-based) are a great complementary option if you want to lay down a mottled, stone-like base color before your stencil pattern goes on, which is exactly the approach for faux-stone or marble effects.
For primers, use a concrete bonding primer that is explicitly listed as compatible with your topcoat on the manufacturer's TDS. Do not skip the primer on existing concrete. It dramatically improves adhesion and gives you a uniform base so your stencil colors read consistently across the slab. Check the TDS for recoat window after priming, typically 1–4 hours for water-based systems, and do not exceed the maximum recoat time or adhesion drops.
For stencil adhesives, use a repositionable low-tack spray mount designed for stencil work. Standard spray adhesive is too aggressive and can pull up primer when you peel the stencil. The goal is just enough tack to hold the stencil flat and prevent paint creeping underneath, not a permanent bond.
Prep checklist: what to do before a single drop of paint touches the slab
I cannot overstate how much the quality of your prep determines the quality of your finish. A beautiful stencil job on poorly prepped concrete will be peeling within a season. Here is the full sequence.
- Clear the patio completely: remove all furniture, pots, grills, and mats.
- Inspect for cracks and damage: mark all cracks, spalling, and low spots with chalk so you do not miss them during repair.
- Repair cracks: route non-structural cracks to at least 1/4 inch deep and fill with a flexible polyurethane or epoxy crack filler. For narrow structural cracks, epoxy injection is the appropriate repair method. Allow full cure per the product TDS before proceeding.
- Address spalling and low spots: fill with a concrete patching compound or self-leveling resurfacer. Feather edges smooth and allow to cure fully.
- Degrease: apply a concrete degreaser to any oil-stained areas (grills, bikes, cars). Scrub and rinse thoroughly. Oil contamination is the number-one cause of adhesion failure and it will not come off with just water.
- Pressure wash the entire surface: use clean water at 1,500–2,500 psi. Work systematically in overlapping passes. Keep the wand moving to avoid surface scarring.
- Check for moisture: tape a 24x24 inch piece of plastic sheeting to the slab (ASTM D4263 plastic sheet test), seal all edges with tape, and leave it for 16–24 hours. If moisture condenses under the sheet, the slab has moisture migration that needs to be addressed before coating.
- Profile the surface via etching or mechanical abrasion (full detail in the next section).
- Rinse and neutralize (if acid etched): rinse thoroughly and apply a baking soda solution to neutralize residual acid, then rinse again.
- Allow the surface to dry completely: at minimum 24 hours after washing or etching, longer in cool or humid conditions. The surface must be dry to the touch and the plastic sheet test must show no moisture before you prime.
- Vacuum and sweep: remove all dust and debris immediately before priming.
Surface preparation: cleaning, degreasing, and profiling for adhesion
After the crack repairs and initial wash, the goal of this phase is to create a surface profile that gives your primer and paint something to grip. Concrete fresh from the forms or that has been smooth-troweled has a nearly glassy surface that coatings will not bond to reliably. You need to open up the surface texture.
The International Concrete Repair Institute (ICRI) defines a standardized Concrete Surface Profile (CSP) scale from CSP-1 (nearly smooth) to CSP-10 (very aggressive). For thin decorative coatings like the acrylic paints used in stenciling, you typically want CSP-1 to CSP-3, which is equivalent to fine sandpaper texture. This is achievable with acid etching for most existing residential patios, or with light diamond grinding.
Start with degreasing before any profiling. Apply a dedicated concrete degreaser (alkaline degreasers work well) per label directions, scrub with a stiff brush, and rinse with the pressure washer. Do this before etching or grinding because contamination inside the pores will block the etch from working evenly. ASTM D4258 covers the standard practice for surface cleaning of concrete prior to coating and is the reference most coating manufacturers expect to be followed.
Etching and surface profile: acid vs mechanical methods
You have two primary options to create your surface profile: chemical etching (acid-based) or mechanical abrasion. Each has genuine advantages and tradeoffs. Here is an honest breakdown.
| Method | CSP Achieved | Best For | Pros | Cons | Safety Level |
|---|---|---|---|---|---|
| Muriatic (hydrochloric) acid etch | CSP-1 to CSP-2 | Sound, lightly scaled residential slabs | Inexpensive, widely available, effective on laitance | Hazardous fumes, requires neutralization and thorough rinsing, inconsistent on dense concrete | High: requires full PPE, ventilation, and careful disposal |
| Phosphoric acid etch | CSP-1 to CSP-2 | Homeowners wanting a safer acid option | Milder fumes than muriatic, still effective on laitance | Slightly less aggressive, may need repeat application on dense slabs | Moderate: still requires gloves and eye protection |
| Diamond grinding (angle grinder with cup wheel) | CSP-1 to CSP-3 | Smooth or hard-troweled surfaces | Consistent profile, no chemicals, can target specific areas | Dusty (use a vacuum shroud), slower for large areas, requires equipment | Low-moderate: dust control is the main concern |
| Shot blasting | CSP-3 to CSP-7 | Large areas needing medium-to-high CSP for heavy coatings | Fast, consistent, excellent for high-build coatings | Requires rental or contractor, overkill for thin decorative stencil coatings | Moderate: ear and eye protection required |
| Scarifying/milling | CSP-6 to CSP-9 | Removing thick contamination or failed coatings | Aggressive removal capability | Way too aggressive for stenciling prep on intact concrete | High: heavy equipment, significant dust |
For most homeowners stenciling an existing residential patio, acid etching or light diamond grinding will get you to the right CSP. ASTM D4259 covers mechanical preparation methods for coating adhesion and is what contractors reference when specifying grinding or blasting. Here is how to do the acid etch correctly. For a step-by-step guide on how to etch a concrete patio, see how to etch concrete patio.
How to acid etch a concrete patio (step by step)
- Put on your PPE before opening the acid container: chemical-resistant gloves, goggles (not just safety glasses), rubber boots, and an N95 or respirator with acid gas cartridges. Work in open air with the wind at your back.
- Mix the acid solution: for muriatic acid, a typical dilution is 1 part acid to 3–4 parts water (always add acid to water, never the opposite). For phosphoric acid, follow the label rate exactly.
- Pre-wet the concrete with plain water. A slightly damp surface helps the acid etch more evenly and reduces fuming on contact.
- Apply the acid solution using a plastic watering can or acid-resistant sprayer. Work in 10x10 ft sections. The surface should bubble and fizz where the acid contacts laitance and carbonated paste. No bubbling means the surface is contaminated or the concrete is very dense.
- Let it dwell for 5–10 minutes (do not let it dry).
- Scrub with a stiff plastic-bristle brush (not metal, acid will corrode it).
- Rinse thoroughly with a garden hose or pressure washer to remove all acid residue.
- Neutralize with a baking soda solution (1 cup baking soda per gallon of water), applied with a mop or watering can, then rinse again with clean water.
- Allow to dry completely, at minimum 24 hours and ideally 48 hours in cooler weather, before applying any primer or paint.
- After drying, run your hand across the surface. It should feel like fine sandpaper. If it still feels smooth and chalky, the etch did not fully remove the laitance layer. A second etch or light diamond grinding may be needed.
One important note on moisture: even after the surface looks dry, a concrete slab can hold significant internal moisture. For critical applications, use the ASTM F2170 in-situ relative humidity probe method (the gold standard) or at minimum the ASTM F1869 calcium chloride test to confirm the slab is within the moisture limits on your product's TDS. Many manufacturers specify a maximum acceptable RH in the range of 75–85%; check yours specifically. Applying paint over a wet slab is one of the most common causes of peeling and adhesion failure.
Applying the base coat
Once the surface is profiled, neutralized, dry, and confirmed moisture-free, you are ready to prime and base coat. Apply your concrete bonding primer with a short-nap roller, working in 4-foot-wide sections. Cut in edges with a brush. Follow the TDS for dry time before topcoating, usually 1–4 hours for water-based primers, but check your specific product. Do not rush this.
After the primer, apply your base coat color. This is the background color that will show through the 'grout lines' or negative space of your stencil pattern. Apply two thin coats rather than one thick coat. Thin coats dry more evenly, build better adhesion between layers, and reduce the risk of roller marks. Allow each coat to dry to the touch and within the recoat window listed on the TDS. Let the second coat fully cure (typically 24 hours) before you start stenciling over it.
Laying out and anchoring the stencil
Layout is where you earn your crisp result. Do not just start at one corner and work across. Snap a chalk line down the center of the patio in both directions to find your true center, then work outward from the center toward the edges. This ensures that if you end up with partial tiles or patterns at the border, they are symmetrical on both sides rather than having one wide border row and one thin strip on the opposite edge.
Before committing to the entire patio, do a dry run by laying the stencil out across the full length and width with no adhesive to check your pattern alignment and cut-offs at borders. Mark your registration lines in chalk. Good stencil systems have registration marks built in (small notches or alignment dots) that let you match the repeat precisely as you move the stencil.
Spray the back of the stencil lightly with repositionable low-tack adhesive. ConcreteNetwork, decorative concrete how‑tos and contractor guidance (stenciling/workflow best practices) recommends anchoring stencils with a repositionable low‑tack adhesive or light weights, working from the center out, and allowing the base color to fully cure per the product TDS to prevent bleed and ensure crisp edges ConcreteNetwork — decorative concrete how‑tos and contractor guidance (stenciling/workflow best practices). Press it flat on the concrete, working from the center outward to push out any air bubbles. For large stencil sections, use additional weights at the corners or a couple of strips of painter's tape at the very edges. The goal is zero gap between the stencil and the surface. Any lift creates a path for paint to bleed underneath, giving you ragged edges instead of crisp lines.
Applying color through the stencil
Use a 4-inch dense foam roller for stenciling. Load it lightly, then offload most of the paint by rolling on a piece of cardboard or the edge of the tray until the roller is almost dry. This is the key technique: you want to stipple or lightly roll the color through the openings with minimal paint on the roller. Too much paint bleeds under the stencil edges. Think of it as building color up in two or three very light passes rather than applying full coverage in one pass.
Roll in multiple directions (back and forth, then perpendicular) to get even coverage in corners and tight areas of the cutout. For a single-color stencil job, this is straightforward. For multi-color or antiquing effects, here is the process I use.
Multi-color and faux-stone blending
To mimic stone, slate, or marble through stenciling, apply your primary stencil color first and let it get tacky (not fully dry, about 15–30 minutes depending on conditions). Then load a small sea sponge or a second foam pad with a contrasting or darker shade of the same color family and stipple it randomly over the still-tacky base color inside the stencil openings. Keep the second color to maybe 30% coverage so the base reads through. The blended edges where wet meets tacky create a natural-looking variation that mimics stone grain. This pairs extremely well with a penetrating stain base coat applied before stenciling, which adds depth and color variation below the stencil layer. For techniques on adding surface texture before stenciling, see how to texture concrete patio.
For a marble look, you can also drag a thin artist's brush loaded with a darker accent color in irregular diagonal lines through the still-wet stencil color to create veining. This is a more advanced technique but very achievable with practice on scrap cardboard first. If that particular effect interests you, the techniques used in making concrete look like marble go into more depth on the veining and glazing methods.
Moving and repeating the stencil
Peel the stencil back carefully, lifting from one corner at a low angle. Do not yank it straight up. Clean the back of the stencil with a damp rag to remove any paint buildup before repositioning, especially around the cut edges where bleed accumulates. Let each completed section become at least tack-dry before you place the stencil over it for the next repeat, or you will pick up wet paint and smear it.
Align the stencil registration marks with the chalk layout lines you snapped earlier. Press flat, anchor, and repeat. Work across the patio systematically. Keep a small artist's brush and the base coat color nearby for immediate touch-ups if you get any bleed lines. A quick swipe with the base color while everything is still fresh is much easier than trying to fix bleed lines after everything has dried.
Drying, curing, and sealing the finished patio
After the last stencil section is complete, let the entire surface cure for at least 24 hours before you apply sealer. Check the specific cure time on your paint's TDS; some products need 48–72 hours before sealing. Do not rush this step. Sealing over incompletely cured paint traps solvents and can cause clouding or adhesion failure between the paint and sealer layers.
For an outdoor patio that will see furniture, foot traffic, and UV exposure, apply two coats of a UV-stable acrylic sealer or water-based polyurethane. These topcoats protect the paint film from abrasion, UV fading, and water penetration. Avoid straight epoxy sealers outdoors because most epoxies yellow significantly under UV unless they are specifically formulated with UV stabilizers or are intended to be topcoated with a urethane. Epoxy.com / manufacturer guidance and FAQs (examples of epoxy vs topical vs penetrating systems) notes penetrating stains remain breathable and translucent, acrylic/latex concrete paints create an opaque film that may need periodic resealing, and many 100%‑solids epoxies will yellow under UV unless topcoated with a UV‑stable urethane. Apply each sealer coat in thin, even passes with a lambswool roller or sealer-specific roller, following the product's recommended dry time between coats.
Keep traffic off the sealed surface for at least 24 hours for foot traffic and 72 hours before moving heavy furniture back. Full hardness on most acrylic sealers is 7 days, so avoid dragging furniture across it in the first week.
Time and cost: what to actually expect
| Phase | Time Required | Estimated Cost (200–300 sq ft patio) |
|---|---|---|
| Crack repair and patching | 2–4 hours + cure time (24 hrs) | $15–$40 in materials |
| Cleaning and degreasing | 2–3 hours | $10–$25 (degreaser, brushes) |
| Acid etch or mechanical profiling | 2–4 hours + dry time (24–48 hrs) | $15–$30 (acid etch kit) or $25–$50 (diamond cup wheel) |
| Primer application | 1–2 hours + dry time (2–4 hrs) | $25–$50 (primer) |
| Base coat (2 coats) | 2–4 hours + cure time (24 hrs) | $30–$60 (concrete paint) |
| Stenciling (layout + application) | 4–8 hours depending on pattern complexity | $30–$80 (stencils + accent paints) |
| Sealing (2 coats) | 2–3 hours + cure time | $25–$60 (sealer) |
| Total (spread over 3–4 days) | 15–25 hours of active work | $150–$365 in materials |
These numbers assume a DIY approach with standard consumer-grade products. Professional contractors typically charge $3–$8 per square foot for decorative stenciling work (including prep and sealing), which works out to $600–$2,400 for the same 200–300 sq ft patio. The DIY savings are real, but they come with time investment and a learning curve on the stenciling technique itself.
Troubleshooting common problems
Paint bleeding under the stencil
This is the most common beginner mistake and it almost always comes from too much paint on the roller. Fix it by switching to a drier roller technique (offload more paint before applying) and pressing the stencil edges more firmly. For immediate repair of bleed lines, use a small artist's brush loaded with your base coat color to paint over the bleed before it fully cures. Once dry, it is very hard to fix neatly.
Uneven coverage inside the stencil
Uneven coverage usually means the base coat was not uniform, or the stencil color was applied too thinly in one pass. Build up color in two or three light passes rather than trying to achieve full opacity in one. If the surface texture is very rough (from aggressive etching), you may need an extra coat of primer to fill the peaks and valleys before stenciling.
Peeling after a season or two
Peeling nearly always traces back to preparation problems: inadequate surface profiling, moisture in the slab at application time, incompatible products, or a missed layer of primer. If you are dealing with existing peeling on a previously stenciled patio, all the loose material needs to be mechanically removed (scraping and grinding) before any new coating goes down. Painting over peeling paint just adds a new layer of a failing system.
Pattern misalignment
Misalignment accumulates over a large patio if you skip the center layout step. If you are two-thirds of the way across and notice drift, you can usually correct by making a very slight angle adjustment at the next repeat and working it back to true over 2–3 repeats. Do this gradually and the correction is nearly invisible in the finished pattern.
Maintenance: keeping the stenciled patio looking good
- Sweep or blow off debris regularly. Grit and sand act as abrasives on the sealed paint surface.
- Wash with a mild detergent and a soft brush annually, or whenever there is visible buildup. Avoid harsh chemicals and pressure washing the finished surface at high PSI, which can erode the sealer.
- Reseal every 2–3 years for pedestrian-traffic patios, or annually for areas with heavy use, furniture dragging, or strong UV exposure.
- Check the sealer integrity annually by dripping water on the surface. If water soaks in rather than beading, it is time to reseal. Clean and lightly scuff the existing sealer before applying a fresh coat.
- For staining or scuffing in the stencil color layer, spot-touch with the original paint color, let cure, then reseal the entire area (not just the spot) for a uniform sheen.
When to hire a pro instead
Stenciling is genuinely DIY-friendly when the concrete is in good shape and you are comfortable with prep work. But there are situations where hiring a decorative concrete contractor is the smarter call. If your slab has widespread structural cracking, significant unevenness requiring grinding or resurfacing over a large area, active moisture migration from below, or if it needs shot-blasting to remove old coatings or achieve a consistent CSP, the prep work alone justifies professional involvement. Similarly, if you want a high-end finish with multi-color blending, custom pattern cutting, or you are planning to sell the property and need the result to look perfect, a pro brings tools and repetition-based skill that is hard to replicate on a first DIY attempt.
If budget is the main constraint but the surface is in rough shape, consider hiring a contractor for the prep and base coat phases only, then doing the stenciling and sealing yourself. That split approach keeps costs down while ensuring the foundation of the project is done right. And if you later want to take the finish in a different direction, knowing how to color existing concrete, apply a faux-stone look, or add texture opens up options beyond just the stencil pattern itself.
FAQ
What core manufacturer requirements about concrete readiness must the article include?
Document the 28‑day minimum cure for new concrete (verify per chosen product TDS), ASTM moisture limits (manufacturer‑specific RH or MVER thresholds), and recommend in‑situ RH testing (ASTM F2170) or calcium‑chloride (ASTM F1869) as required. State that products often require a dry slab, maximum allowable moisture (%RH or MVER) and that failure to meet those limits risks adhesion and delamination.
Which concrete surface‑profile (CSP) and preparation standards should be referenced?
Reference ICRI guidance (ICRI 310.2R/03732) and the CSP scale (CSP‑1 through CSP‑10). Explain typical prep methods tied to CSP (diamond grinding ≈ CSP‑1–3, shot‑blasting ≈ CSP‑3–7, scarifying ≈ CSP‑6–9) and instruct readers to match the target CSP specified on the chosen product’s TDS.
What ASTM standards and test methods must readers know for safe and correct prep?
Cite ASTM D4258 (surface cleaning of concrete for coating), ASTM D4259 (abrasion/mechanical prep), ASTM D4263 (plastic‑sheet moisture check for quick field screening), ASTM F1869 (calcium‑chloride MVER) and ASTM F2170 (in‑situ relative humidity probes). Explain when to use each method and that project specs should reference applicable standards.
What moisture‑testing procedures and acceptance criteria should be discussed?
Describe ASTM F2170 RH probes (gold standard) with probe depth guidance (typically 40% of slab thickness or per manufacturer) and ASTM F1869 calcium‑chloride for surface emission. Note manufacturers’ RH acceptance ranges (commonly ≤75–85% RH but must be confirmed on product TDS) and that acceptable limits are product‑specific.
What surface cleaning and mechanical prep details are required?
List cleaning options: degreasing, pressure washing (note <~3000 psi guidance to avoid over‑etch), chemical cleaners, acid etching (with dilution guidance), diamond grinding, shot‑blasting, scarifying. State when each is appropriate, the risk of over‑etching, and the need to achieve product‑specified CSP and remove laitance and contaminants.
How should acid etching be presented (dilution, neutralization, PPE)?
Provide typical muriatic acid dilutions (examples: 1:3 to 1:4 acid:water for light etch—confirm on product PDS), full‑rinsing and neutralization with baking soda solution, thorough drying before coating, and strict PPE/ventilation protocols. Advise checking the specific product PDS for exact etch strength and safety measures.