Cement patio steps are one of the most satisfying concrete projects a homeowner can tackle, and one of the most punishing when done wrong. Get the dimensions, base prep, and mix right and you'll have steps that last decades. Skip any of those and you're looking at cracked edges, spalling treads, or steps that slowly sink and become a trip hazard. Whether you're building from scratch or fixing a set that's already falling apart, this guide walks you through every stage: layout and forms, pouring and curing, repairing damage, leveling sinking steps, and finishing or upgrading the surface for looks and longevity.
Cement Patio Steps: Build or Repair in a Weekend

Silas Morrison
26 Jun 2026
How to Build Cement Patio Steps
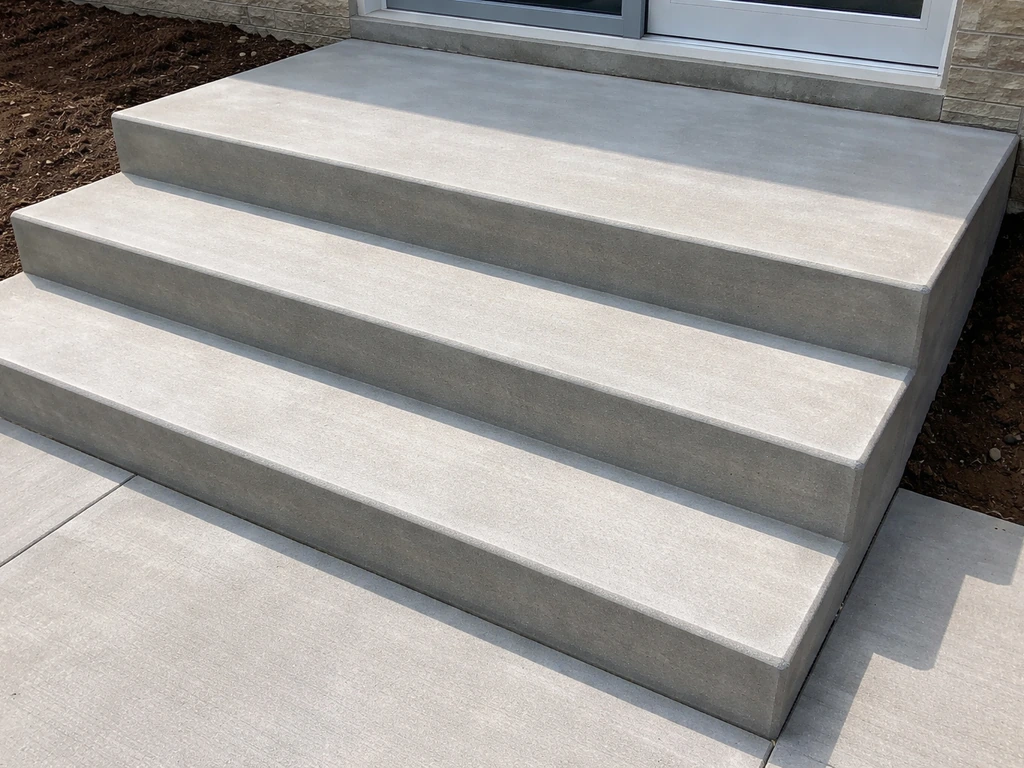
Before you mix a single bag of concrete, you need solid numbers. If you want the step-by-step walkthrough, start with how to pour a concrete patio with steps, then dial in risers, treads, and drainage before you place concrete. The IRC caps riser height at 7-3/4 inches, but for outdoor patio steps aimed at comfort and safety, shooting for risers in the 6 to 7 inch range with treads of 11 to 13 inches is the sweet spot most experienced builders use. The classic "7-11" rule (roughly 7-inch riser, 11-inch tread) gives you a comfortable, natural stride. Concrete Network similarly summarizes the common residential comfort and geometry “7-11” guideline as a maximum 7-inch riser and a minimum 11-inch tread depth, noting that code minimums can vary slightly “7-11” residential stair comfort/code geometry. ADA guidelines actually call for a minimum 11-inch tread depth if you're building for accessibility. One rule that often gets ignored: all your risers must be within 3/8 inch of each other. A step that's even a half inch taller than the others is enough to send someone sprawling.
Start your layout by measuring the total rise, which is the vertical distance from the patio surface (or ground) up to the door threshold or landing. Divide that number by your target riser height to get your step count, then multiply the number of treads by your tread depth to find your total horizontal run. For example, if you have 21 inches of total rise and want 7-inch risers, you need 3 steps. With 12-inch treads, your form will extend 36 inches out from the structure. Mark that footprint on the ground and check that you have room.
Base prep and drainage
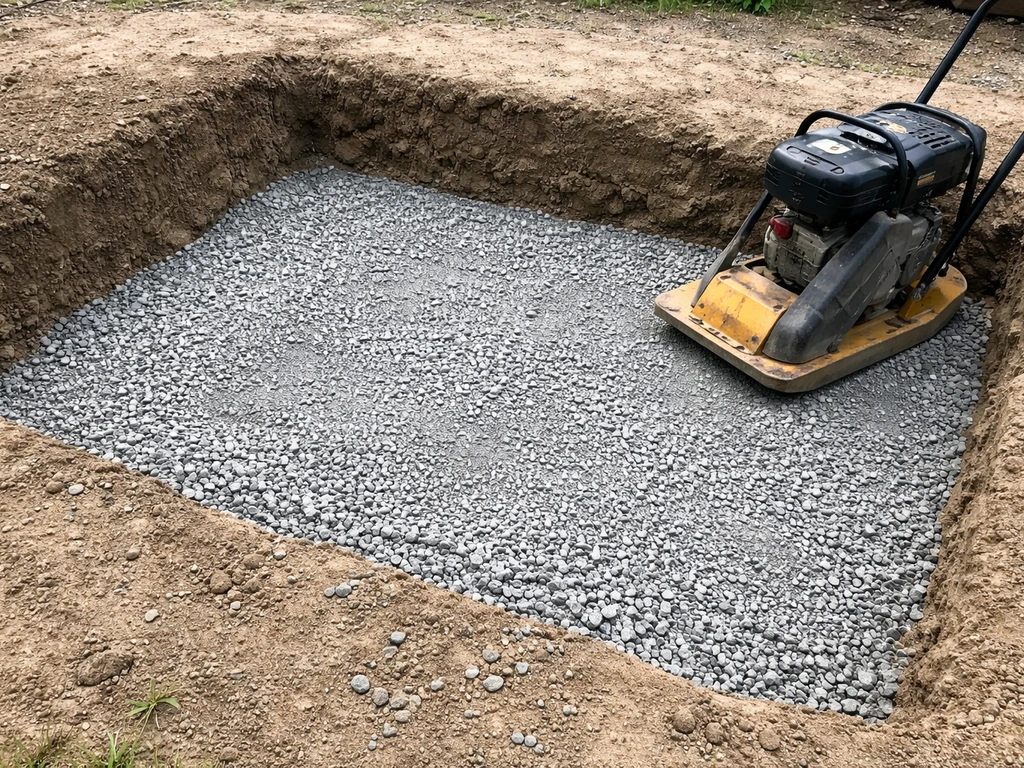
Excavate the footprint down about 8 inches below your finished step surface elevation. Fill that with 4 inches of compacted gravel, compacting in 2-inch lifts with a plate compactor. You want the gravel firm enough that you can walk on it without leaving deep impressions. For most outdoor step projects, placing a sheet of 6-mil poly over the gravel before pouring helps break capillary moisture movement and reduces curling risk. Also plan your landing drainage now: the patio or landing surface below the steps should slope away from the structure at a minimum of 1/8 inch per foot so water doesn't pool at the base of the steps. If you are planning a complete patio layout around them, concrete block steps for patio layouts is a useful alternative to pouring cement steps.
Building the forms
For most DIY step projects, 3/4-inch plywood or 2x lumber works well for forming. The side forms (called stringers) carry the stepped profile; the riser boards face the front of each step. Brace everything thoroughly because wet concrete exerts a lot of pressure and forms that flex even slightly will ruin your dimensions. Oil or wet the form boards before the pour so they release cleanly. If you're pouring steps that attach to an existing slab or foundation, drill in some rebar dowels or use a concrete bonding adhesive to connect the new concrete to the old.
Reinforcement basics
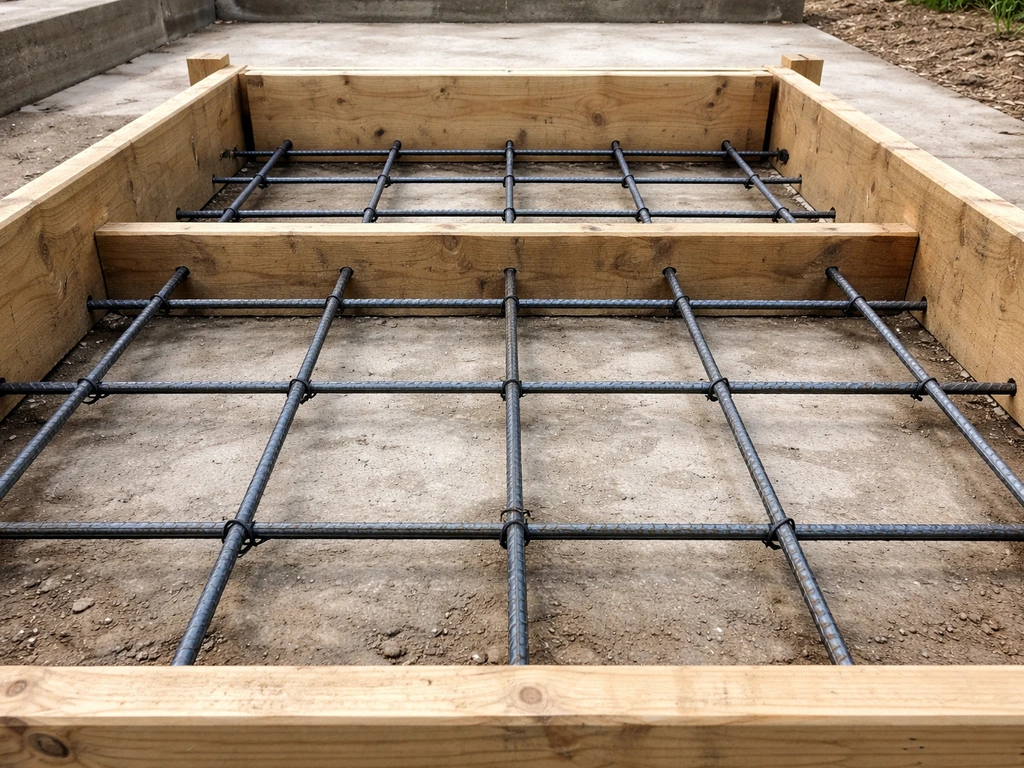
Don't skip the rebar. For residential patio steps, #4 rebar (1/2-inch diameter) on a roughly 12-inch grid works well. Run horizontal bars through the body of each step, keeping them at least 3 inches from any surface so you don't end up with corrosion pathways. At corners and edges, L-shaped rebar helps tie the structure together and prevents the classic corner spall. If you're building precast-style or want something faster, wire mesh is a minimal alternative, but for steps that take daily foot traffic, rebar is the better investment. If you're curious about precast options as an alternative to pouring in place, precast concrete patio steps are worth comparing for speed and cost.
Pouring Concrete Steps
For exterior steps, use a 4000 PSI mix with air entrainment. If you're in a climate that sees freeze-thaw cycles, air entrainment is non-negotiable. You want 5 to 8 percent air content, typically achieved with an admixture like ASTM C260-spec air-entraining agent added at the batch. This creates micro-bubbles in the paste that give water somewhere to expand when it freezes, preventing surface scaling. Keep your water-cement ratio low, around 0.45 or less. Adding extra water to make the mix easier to place is the single most common DIY mistake and it significantly weakens the finished concrete and hurts freeze-thaw durability.
Pour from the bottom step up. Fill each form completely, rod or vibrate the concrete to consolidate it, and screed each tread level. Each tread needs to drain, so slope treads very slightly forward, about 1/8 inch per foot of tread depth, so rain runs off the face of the riser rather than pooling at the back. Minimum step thickness, measured through the body of the step from the tread surface down to the base, should be at least 4 inches at the thinnest point to give you structural mass. For a detailed walkthrough of the pouring process specifically, the guide on how to pour a concrete patio with steps goes deeper on mix ratios and sequence.
Curing the right way
Curing is where most DIYers rush and regret it. ACI guidance calls for a minimum of 7 days of moist curing for concrete flatwork, and steps deserve at least that. Keep the surface damp by covering with wet burlap and poly sheeting, or spray on a curing compound right after finishing. Don't let the surface dry out in the first week, especially in hot or windy weather. If temperatures drop below 50°F, you'll need to protect the steps with insulating blankets or stop the pour entirely. New concrete that freezes before it gains strength is essentially ruined.
Repairing Cement Patio Steps
Repair is where most homeowners end up, because steps take more abuse than any other part of the patio. The three main problems are cracking, spalling, and settling. Each has a different fix, and knowing which you're dealing with saves you from wasting time and money on the wrong approach.
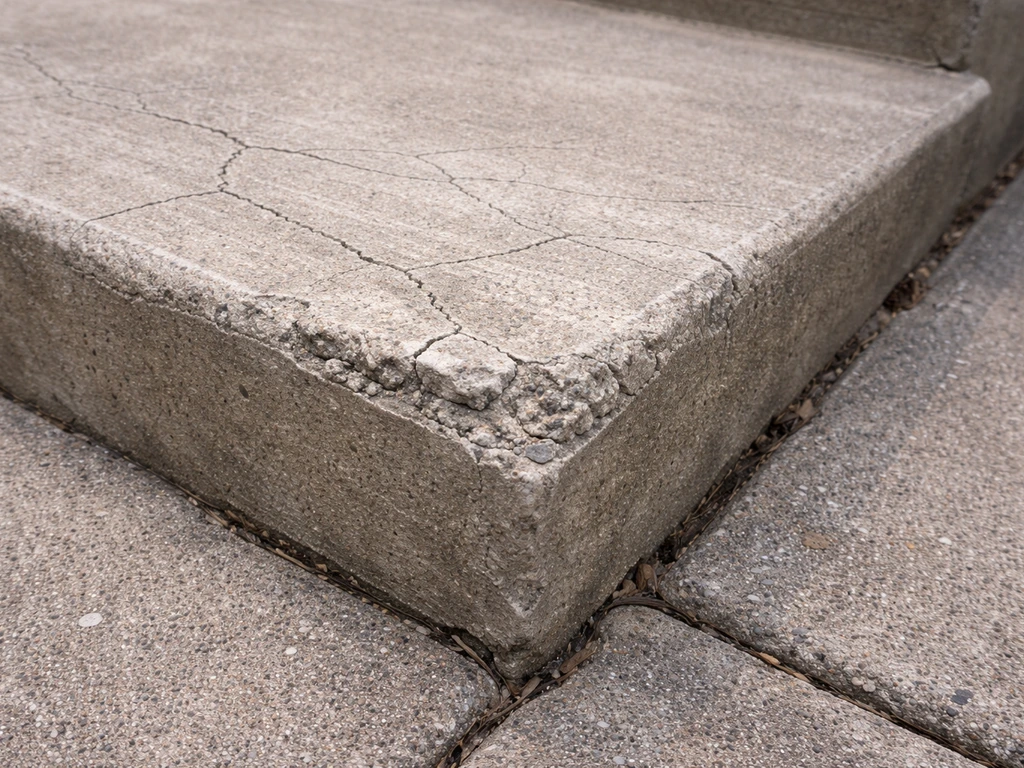
Cracks
Hairline cracks (less than 1/8 inch wide) that aren't growing are mostly cosmetic. Clean them out with a wire brush or angle grinder, blow out the dust, and fill with a concrete crack filler or polyurethane caulk rated for concrete. For cracks wider than 1/4 inch, especially ones that run down the riser face or across the nose of a tread, use a polymer-modified concrete repair mortar. Undercut the crack edges with a grinder to give the patch a mechanical key, prime with bonding adhesive, and tamp the mortar in firmly. Any crack that keeps reopening after repair is almost always a sign of movement underneath.
Spalling
Spalling, where the surface flakes away and exposes aggregate, is usually caused by freeze-thaw damage, deicing salts, or a weak surface layer from overwatering the original mix. For surface spalling up to about 1/2 inch deep, a polymer-modified repair mortar or resurfacing product applied with a trowel works well if you prep aggressively: chip off all loose material, clean thoroughly, and use a bonding adhesive before applying the patch. Thin patches less than 1/4 inch thick almost always delaminate, so feathering the edges of your patch area down to create at least 1/4-inch depth everywhere is critical.
Settling and unevenness
Steps that have sunk, tilted, or become uneven are a trip hazard. Recall the code requirement: no two risers in the same flight can differ by more than 3/8 inch. A step that's sunken even 1/2 inch out of plane with its neighbors is technically non-compliant and genuinely dangerous. If the settlement is minor and the concrete is otherwise solid, a build-up using a self-leveling or trowelable repair mortar can restore the geometry. But if the base has washed out or the steps have cracked structurally from the movement, patching the surface without fixing the foundation just delays the same problem.
Leveling and Re-Pouring Options for Sinking Steps
When steps have dropped noticeably, you have three realistic options: mudjacking (also called slabjacking), foam lifting, or a partial or full re-pour. Mudjacking pumps a slurry of cement and soil beneath the slab to lift it; foam lifting injects expanding polyurethane foam instead and is generally faster and lighter on the base. Both work when the concrete itself is structurally intact and the base has just compressed or eroded. Expect to pay a contractor for either of these, but they're often cheaper than a full re-pour.
If the steps are crumbling, heavily cracked, or have shifted so much that the rebar is exposed or the structure is compromised, a partial or full re-pour is the right call. A partial re-pour means removing the damaged steps down to solid material and pouring new concrete against the existing base, using rebar dowels to tie the new section in. A full re-pour means demolishing everything and starting over. For DIYers, partial re-pours are doable if the remaining structure is sound. A full re-pour is a bigger weekend project but very achievable using the build process described above. The guide on how to build concrete patio steps goes into more granular detail on forming and sequencing a pour from scratch. If you want to compare methods or plan your exact layout from scratch, this guide on how to build concrete patio steps covers the full process.
| Problem | Best Fix | DIY Viable? | Approx. Difficulty |
|---|---|---|---|
| Hairline surface cracks | Crack filler or caulk | Yes | Easy |
| Wide or growing cracks | Polymer-modified repair mortar | Yes | Moderate |
| Surface spalling | Trowelable resurfacer | Yes | Moderate |
| Slightly sunken but intact steps | Mudjacking or foam lifting | No (hire out) | N/A |
| Severely settled, crumbling steps | Partial or full re-pour | Yes (partial) | Hard |
Finishing and Protecting Your Cement Steps
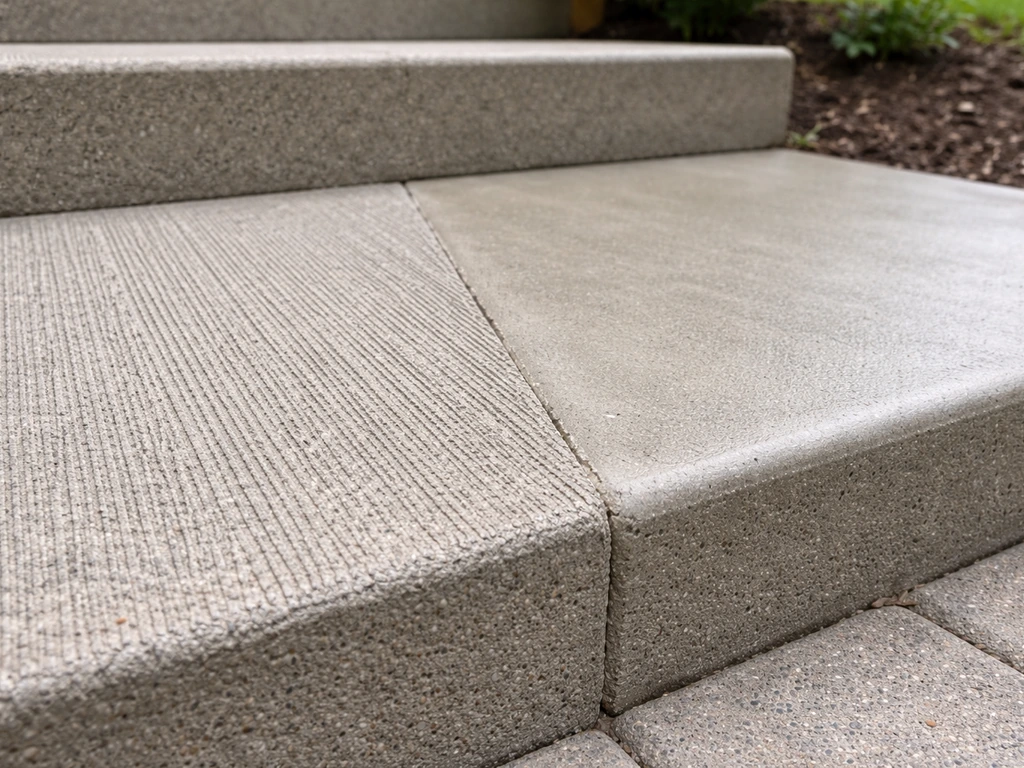
How you finish the surface matters a lot for both safety and durability. Two main options are a trowel finish and a broom finish.
- Trowel finish: smooth, dense surface achieved by steel-troweling after the bleed water evaporates. It looks clean and professional but can be slippery when wet, which is a real concern on outdoor steps.
- Broom finish: after initial troweling, a stiff-bristle broom is dragged across the surface to add texture. This is the standard choice for outdoor steps because the ridges give foot traction in wet conditions.
For tread nosings (the front edge of each tread), use an edging tool to create a rounded or chamfered profile. A 1/2-inch radius bull-nose edge is far less likely to chip than a sharp 90-degree edge, and it softens the look of the step.
Sealing for long-term protection
Seal your steps once they've fully cured, which typically means waiting at least 28 days for full strength gain before applying a penetrating sealer. For exterior concrete steps exposed to freeze-thaw and deicers, a penetrating silane-siloxane sealer is the top choice. It soaks into the surface, repels water and chlorides, and doesn't change the look of the concrete. Film-forming acrylic sealers add a slight sheen and can enhance color, but they peel over time and need more frequent reapplication. Either way, reapply every 2 to 3 years for continued protection.
Staining, Resurfacing, and Aesthetic Upgrades
Plain gray steps work fine but a little color or texture goes a long way. The two most practical upgrade paths for existing or newly poured steps are acid staining and concrete resurfacing overlays.
Staining
Acid-based stains react chemically with the concrete's minerals to create variegated, earthy tones: browns, tans, and reddish-coppers. The look is organic and doesn't peel because it's a chemical reaction, not a coating. Water-based concrete stains offer more consistent, predictable color in a wider palette. Both require a clean, open surface to penetrate, so grind or acid-etch first if the concrete has been sealed or is old and dense. The stamped concrete patio with steps concept extends this further, adding texture patterns on top of color for a high-end look, though that requires more equipment and skill.
Resurfacing overlays
If the surface is spalled, discolored, or just dated, a polymer-modified resurfacing product (like Quikrete Re-Cap or similar) can give you a fresh, uniform surface in a day. Apply at 1/4 to 1/2 inch thickness over thoroughly cleaned and bonded existing concrete. You can broom-finish, stamp, or stencil the overlay before it sets. This is one of the most cost-effective ways to restore old steps that are structurally sound but visually rough. Just don't apply an overlay over concrete that's actively moving, cracking, or delaminating. The overlay will crack too.
Edge and border details
Edging strips, tile nosings, or cast-in-place contrasting borders are low-effort ways to make steps look intentional and finished. Bullnose pavers or stone veneer applied to the riser faces are popular upgrades that dress up plain concrete without a full rebuild. If you want to incorporate steps directly into a broader patio design, looking at build steps on concrete patio approaches can show you how to tie the step geometry into the surrounding slab work cleanly.
Safety, Codes, and When to Call a Pro
Step geometry isn't just a style choice. Uneven risers and shallow treads cause falls. The IRC's 3/8-inch maximum variance between risers in a flight is a hard number, and local inspectors enforce it. Before you pour or patch, check your local code because some jurisdictions have adopted amendments to the IRC, and permit requirements vary. If your steps connect to a door threshold or a raised structure, you may need a permit even for a repair.
From a structural standpoint, DIYers can confidently handle: pouring new steps on a solid compacted base, patching surface cracks and spalling, applying resurfacers and sealers, and minor leveling with repair mortar. Where you should seriously consider calling a professional: steps that have settled due to erosion or soil failure underneath (a contractor can diagnose and fix the base properly), steps connected to a structural foundation wall where cutting or drilling could affect building integrity, and any situation where a significant trip hazard has existed long enough to create liability. A step that's sunk more than an inch, or that rocks when you stand on it, needs more than a surface patch.
Drainage is a frequently overlooked safety and durability issue. If water is pooling on your treads or at the base of the steps, it will cause ice in winter and accelerate spalling year-round. Confirm that every tread has a slight forward slope (1/8 inch per foot minimum) and that the landing or patio drains away from the steps. If the grade works against you, it may be worth installing a small channel drain at the step base before finishing. Fixing drainage before you seal or resurface means your improvements actually last.
One last practical note: if you're on the fence about whether to do a full DIY build or go with something faster, precast concrete patio steps are worth pricing out. For a small set of 2 to 3 steps, precast units can be set in a weekend with minimal forming work, and they're manufactured under controlled conditions which often means better air entrainment and freeze-thaw resistance than a field-mixed pour. The trade-off is less flexibility on dimensions and aesthetics, but for a straightforward entrance step, they're a legitimate shortcut.
FAQ
Can I repair cement patio steps without fixing the base underneath?
Yes, but only for small, non-structural issues. You can patch hairline cracks and shallow spalls if the step does not rock and the base is still sound. If the step has sunk more than about 1/2 inch, shows repeated cracking at the same seams, or exposes rebar, surface-only repairs usually fail because the movement continues underneath.
What’s the biggest cement patio steps mistake that ruins the mix?
Do not use leftover concrete or “improvise” with extra water. For air-entrained exterior concrete, the air content can drop when you add water on site, which weakens freeze-thaw performance. Follow the bag instructions, measure water precisely, and remix only within the workable time window specified by the product.
Do cement patio steps repairs usually require a permit?
If your steps connect to a raised porch, garage slab, or foundation element, confirm with your local permitting office before you cut, drill, or remove concrete. Even minor repairs can require a permit if they affect load paths, egress routes, or code-required clearances. A permit is especially common when the work involves structural demolition or re-pouring near door thresholds.
Which crack filler should I use on cement patio steps, caulk or mortar?
You can, but choose the right type of filler. For true structural movement cracks, patching with standard crack filler or caulk will likely reopen. Use polymer-modified repair mortar for cracks that are wider, active, or cut across the tread nose, and keep repairs aligned with the riser-to-tread geometry to avoid weak edges.
How do I avoid ending up with uneven risers after forming?
Aim for consistent riser heights across the same flight, and check both the overall count and the individual measurements before you pour. A common error is correcting one high spot by shaving a single riser, which can push another riser outside the allowed variance and create a trip hazard even if the layout “looks” right.
Should I add expansion or control joints to cement patio steps?
Plan for joints, especially if your steps are part of a larger slab. If you have existing control joints in the surrounding concrete, try to align new work with them rather than randomly “breaking” the geometry. Skipping joints or cutting them too late increases the chances of cracking across treads.
Can I seal cement patio steps that are already spalling or scaling?
Not always. A penetrating sealer is best for freeze-thaw and deicer exposure, but it will not stop a surface that is actively scaling or delaminating. If you currently have spalling or flaking, repair first, then cure fully, then seal. Sealing over loose material traps moisture and can worsen deterioration.
What if water still pools at the base of my cement patio steps after I slope the treads?
Install a proper drainage path before finishing. If you have pooled water, the forward slope on treads alone may not solve the problem, because water can still collect at the base where it matters most. A small channel drain or regrading that sends water away from the step base is often necessary before you apply resurfacer or sealer.
When should I choose acid stain, versus resurfacing overlay, versus replacing the steps?
For minor, cosmetic improvements on cured concrete, resurfacing and staining are fine. Avoid overlays on steps that are actively moving, rocking underfoot, or showing delamination. Also check thickness limits and make sure the overlay won’t create an abrupt lip at the transition to the landing or door threshold.