Building a concrete patio slab is a fully achievable DIY project if you follow the right sequence: plan the size and slope, excavate and compact a solid base, set your forms and reinforcement, pour and finish the concrete, cut control joints, cure it properly, and seal it once it hardens. Get each of those steps right and you end up with a durable, flat patio that can last 30-plus years.
How to Build a Patio Concrete Slab: Step-by-Step DIY

Silas Morrison
27 May 2026
This guide walks through the full process, from planning and excavation to pouring and finishing, so you know exactly how to install a concrete patio. If you want the full walkthrough, review our guide on how to concrete patio slab from excavation to curing. Skip or rush any one of them and you're dealing with cracks, soft spots, or standing water a season later.
Plan the size, thickness, and drainage slope first
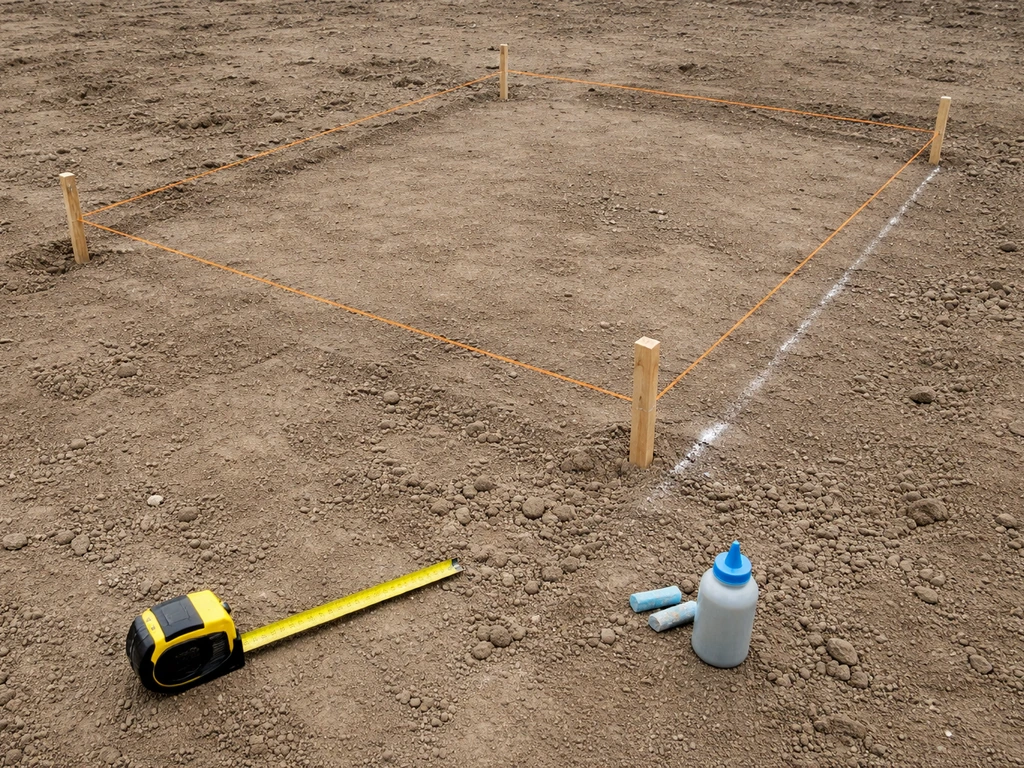
Before you touch a shovel, get your design locked down on paper. Decide the exact dimensions of the slab and mark them out with stakes and mason's line so you can see the footprint in real life. A 10x12 or 12x16 foot patio is a comfortable size for most backyards and still manageable for a first-time pour. Sketch it out, check local setback requirements, and pull any permits your municipality requires for flatwork.
For thickness, 4 inches is the standard for a residential patio that will see foot traffic, furniture, and maybe a grill. If you expect heavier loads, like a hot tub or a vehicle overhang, bump that up to 5 or 6 inches. The extra concrete costs more but it's cheap insurance compared to a cracked slab.
Drainage slope is non-negotiable on an outdoor slab. You want at least 1/8 inch of drop per foot of run, which works out to roughly a 1% slope. Always slope the slab away from the house and toward a lawn, drain, or swale. That gentle tilt is invisible once the patio is built but it makes the difference between a dry patio and one with a permanent puddle against your foundation. Set your form boards to reflect this slope before you pour a single drop of concrete.
Excavate, grade, and compact the subgrade
Once your layout is staked out, it's time to dig. You need to remove enough soil to accommodate your gravel base (typically 4 inches), your slab thickness (4-6 inches), and keep the finished surface at or slightly above surrounding grade. For a 4-inch slab on a 4-inch gravel base, you're excavating roughly 8 inches below where you want the top of the slab to land.
Dig out all organic material, roots, and soft soil. These compress over time and cause uneven settling. Once you've reached native soil, use a plate compactor (rent one for about $80-100 a day) to compact the subgrade. The target is 95% of maximum dry density, which is the standard engineers use for concrete flatwork subgrades. For a DIYer, that means making multiple passes with the compactor until the ground no longer gives or deflects under foot. If you're working with loose or sandy fill, add a little water to help it bind during compaction.
After compacting the subgrade, spread 4 inches of crushed gravel or compactable fill (Class II base rock or crushed limestone are both common options). Rake it to a uniform depth, then compact it in the same way. The gravel base does two important things: it provides a stable, well-drained platform for the concrete, and it reduces moisture wicking up from the soil. Check your grade with a long level or a builder's level and string line before you move on, because fixing the grade after forms are up is a headache.
Set forms, vapor barrier, and reinforcement
Building the forms

Forms are the molds that give your slab its shape and hold the wet concrete in place. For a 4-inch slab, use 2x4 lumber (actual thickness is 1. 5 inches, so you'll double up or use 2x6 to get the full 4-inch height). Set the form boards along your layout lines, secure them with 1x2 or 2x2 stakes driven into the ground every 2-3 feet, and screw the stakes to the boards.
Check that the top edge of the forms matches your desired finished slab height and maintains your drainage slope throughout. Coat the inside faces of the forms with a light layer of motor oil or commercial form release agent so they strip off cleanly later without pulling chunks of concrete.
Vapor barrier
On top of the compacted gravel base, roll out a polyethylene vapor retarder before you place reinforcement. Use at least 10-mil poly sheeting, which is the ACI minimum guidance for slabs in direct contact with soil. Thicker (15-mil) is even better if you can get it, since it resists punctures from reinforcement and foot traffic during the pour. Overlap seams by at least 12 inches and tape them. Lap the edges up the inside of your forms and trim them flush with the top of the slab after the pour.
Reinforcement
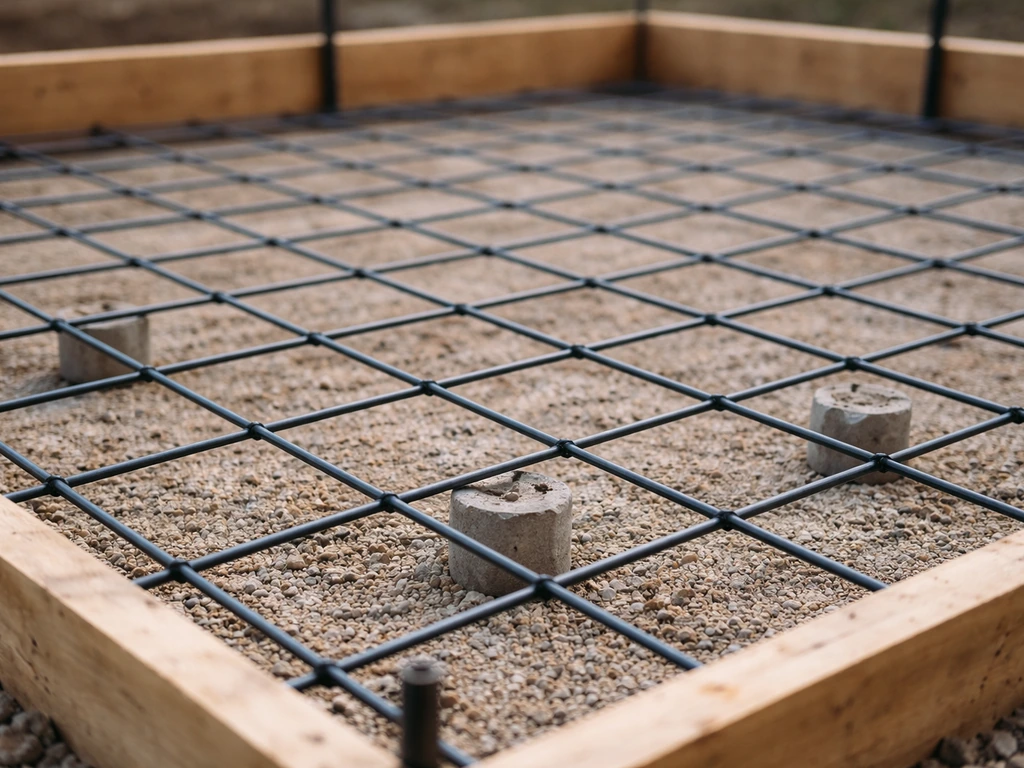
For a typical 4-6 inch patio slab, welded wire mesh (6x6 W1. 4/W1. 4 is the most common spec) works well and is easier to handle than rebar on a small project. The critical thing most DIYers get wrong is laying the mesh flat on the ground and leaving it there.
Mesh sitting on the base does almost nothing for tensile strength because it ends up buried at the bottom of the slab with no concrete below it. Use wire mesh chairs or small concrete block spacers to elevate the mesh so it sits roughly in the middle to lower-middle of the slab depth, with at least 1. 5-2 inches of concrete cover below it. For a 4-inch slab, that means lifting the mesh to about the 1.
5-2 inch height mark.
Mixing, pouring, screeding, and finishing the concrete
How much concrete and what mix to order
Calculate your concrete volume in cubic yards: multiply length (ft) x width (ft) x thickness (ft), then divide by 27. For a 12x16 slab at 4 inches thick, that's 12 x 16 x 0.333 / 27 = roughly 2.4 cubic yards. Always order about 10% extra to account for waste and any low spots. For a slab this size, ordering ready-mix delivered by a truck is strongly worth it, and it means the concrete is batched consistently. If you're doing a very small slab (under about 1 cubic yard), bagged mix is viable. A standard 4,000 psi mix is appropriate for most residential patios.
Pouring and placing

On pour day, have your crew ready, because concrete doesn't wait. Start filling from the far corner and work toward the truck. Use a square shovel or a concrete rake to spread the concrete and fill the forms. Don't use a standard garden rake because it drags aggregate to the surface. Fill sections completely rather than spreading a thin layer and going back, since partially-set concrete doesn't bond well to fresh concrete placed over it.
Screeding
Once you've filled the forms to the top, screed the surface using a straight 2x4 or a purpose-made screed board that spans your form boards. Use a side-to-side sawing motion as you pull the screed toward you to strike off excess concrete and fill low spots. Do a second pass if needed. The goal is a surface that's flat, at form height, and has no high or low spots. This step sets up everything that comes after, so take your time.
Bull floating and edging
After screeding, immediately run a bull float over the entire surface. The bull float embeds any exposed aggregate, fills small surface voids, and smooths out the ridges left by the screed. Push it away from you with the leading edge slightly raised, then pull it back with the trailing edge slightly raised. After bull floating, run an edging tool along all four form edges to create a rounded edge that resists chipping. Do your edging passes before the concrete stiffens too much.
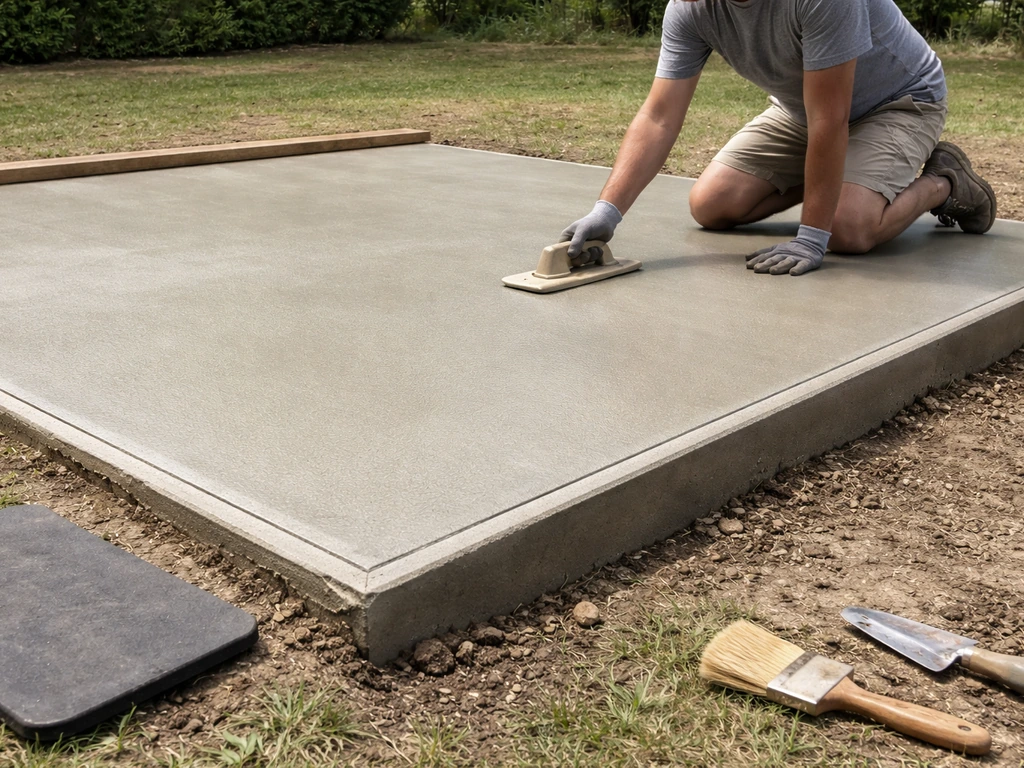
Final finishing
Wait for the bleed water to evaporate before doing any final finishing. This is the water that rises to the surface naturally as the concrete consolidates. Working the surface while bleed water is still present is one of the most common mistakes in flatwork, and it causes a weak, dusty surface layer that scales off later.
When the sheen is gone and the concrete has firmed up to a point where you can press your thumb about 1/4 inch in, it's ready for final finishing. For a broom finish (the most practical for outdoor use), drag a stiff-bristle push broom across the surface in one direction after doing a light trowel pass. For a smooth finish, use a steel trowel in circular then straight passes.
A broom finish gives better traction in wet conditions and is generally the right call for a patio.
Curing and cutting control joints
Curing the slab
Concrete gains its strength through a chemical hydration process, not by drying out, and that process needs moisture to continue. Start curing immediately after finishing. The most effective method for a DIY patio is to cover the entire surface with plastic sheeting or burlap kept continuously wet. Keep it covered for at least 7 days at temperatures above 50°F. In hot or windy conditions, moisture can evaporate from the surface faster than bleed water replenishes it, which causes surface shrinkage cracks, so start curing as soon as finishing is done. You can also use a liquid curing compound (spray it on right after finishing) if covering with plastic isn't practical.
Don't walk on the slab for at least 24-48 hours, and keep heavy furniture and loads off it for at least 7 days. Full design strength (for a 4,000 psi mix) is reached around 28 days.
Control joints: where and how
Control joints are planned weak points that guide cracking. Concrete shrinks as it cures, and it will crack somewhere. Control joints make sure cracks happen where you want them, in a straight line at the joint, rather than randomly through the middle of your slab. The standard rule is to space control joints at intervals (in feet) equal to 2 to 2.5 times the slab thickness in inches. For a 4-inch slab, that means joints every 8-10 feet. For a 5-inch slab, every 10-12 feet. Divide your slab into roughly square panels wherever possible, since long, rectangular panels tend to crack diagonally at the corners.
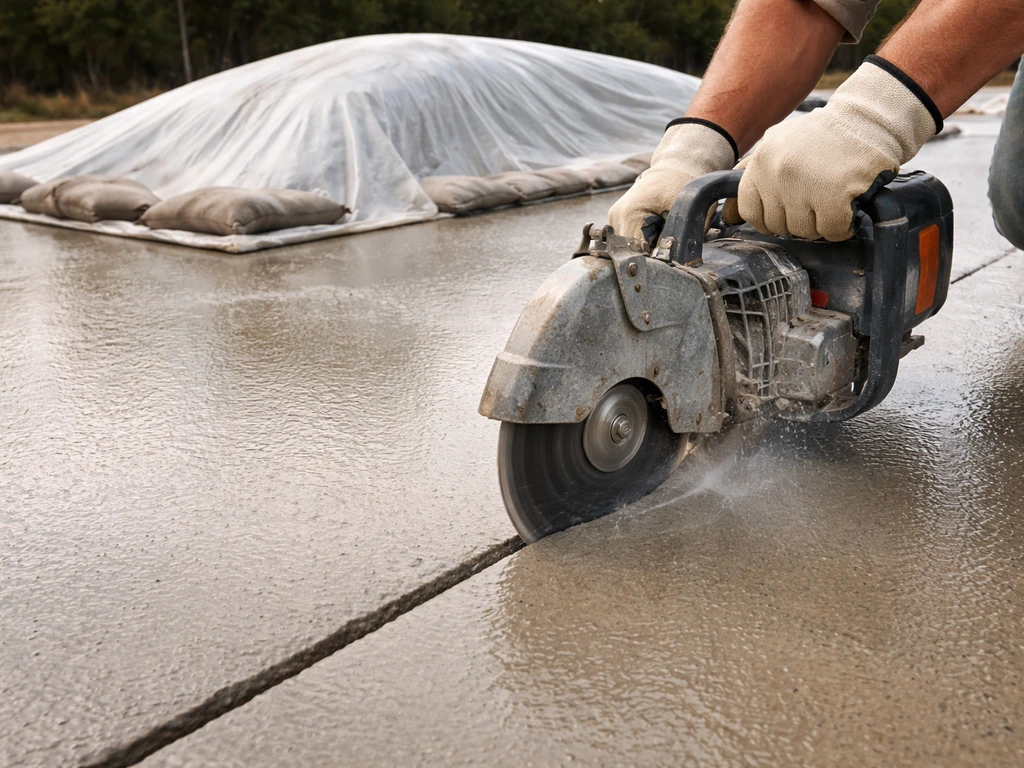
You have two options for making control joints: tool them into the fresh concrete during finishing using a groover, or saw-cut them after the slab has hardened enough to support a saw without raveling (typically 4-12 hours after pour, depending on conditions). Saw-cut joints need to be at least 1/4 of the slab depth, so 1 inch deep on a 4-inch slab. Tooled joints need to be similarly deep. Mark your joint locations before you pour so you're not guessing later.
What to do when things go wrong
Cracks
Hairline cracks that appear within the first few days are usually plastic shrinkage cracks caused by too-rapid moisture loss during early curing. They're mostly cosmetic if they're tight and shallow. If cracks are wider than about 1/8 inch or show vertical displacement (one side is higher than the other), that points to a base problem, usually inadequate compaction or a soft spot. Tight, shallow cracks can be filled with a polyurethane or epoxy crack filler once the slab has cured for 28 days.
Surface scaling or spalling
Scaling is when the top layer of concrete flakes or peels off in sheets. The most common causes are finishing while bleed water is still on the surface (which dilutes the cement paste at the top), or applying deicing salts to a new slab. If you're in a freeze-thaw climate, never use rock salt or calcium chloride on fresh concrete, especially in the first winter. Use sand for traction instead. Surface scaling can be repaired with a concrete resurfacer product for minor cases, but severe scaling often means the surface needs to be ground or overlaid.
Unevenness or low spots
Low spots that hold water are almost always a screeding or form-setting problem. If the finished slab has a low area, you can address it after full cure with a self-leveling concrete overlay or by grinding down high spots with an angle grinder fitted with a diamond cup wheel. For future pours, take extra time checking the form elevation with a level before pouring and do two screed passes to make sure you catch every low spot.
Curling at edges
Edge curling happens when the top of the slab dries faster than the bottom, causing it to curl upward at the edges or joints. Proper curing (keeping the whole slab uniformly moist) is the best prevention. Control joints also help manage the stress that causes curling by giving the slab predictable places to relieve that differential movement.
Sealing, staining, and keeping your slab looking good
When and why to seal
Wait at least 28 days before applying any sealer so the slab has fully cured and off-gassed. Sealing protects concrete from moisture, staining, freeze-thaw damage, and deicing salts, all of which degrade the surface over time. Skipping it is false economy on a slab you just spent a weekend building.
Choosing the right sealer
There are two main categories of sealer for a patio slab, and the right choice depends on what you want from it.
| Sealer Type | How It Works | Lifespan | Appearance Change | Best For |
|---|---|---|---|---|
| Penetrating (silane/siloxane) | Absorbs into concrete, repels water from within | 5-10+ years | None (invisible) | Low-maintenance protection, freeze-thaw climates |
| Film-forming (acrylic/urethane) | Coats the surface with a protective film | 1-3 years | Slight sheen or wet look | Enhanced appearance, color enhancement after staining |
For most bare concrete patios, a penetrating silane/siloxane sealer is the smarter long-term choice. It lasts 5 to 10 or more years without changing how the concrete looks, and it doesn't peel. Film-forming acrylics give a nice sheen and are great if you've stained the slab and want to protect the color, but plan on reapplying every 1-3 years on an exposed exterior surface.
Stain and texture upgrades
If plain gray concrete isn't what you had in mind, you have good options. Acid stain creates a mottled, variegated look that's popular on patios and works by reacting chemically with the concrete itself, so it won't peel. Water-based concrete stains are easier to apply and available in more colors, though they don't have quite the same depth. Both are applied after full cure and before sealing. For added texture or to cover minor surface blemishes, a concrete overlay or microtop applied at 1/8-inch thickness can give you a smooth, even canvas in any color.
Ongoing maintenance
A sealed concrete patio needs very little regular care. Sweep it periodically, rinse off organic debris (leaves left sitting will stain the surface), and reapply sealer on the schedule appropriate for the type you used. Check control joints every couple of years and refill any that have opened wider than 1/8 inch with a flexible polyurethane joint filler to keep water from infiltrating and freezing in the joint. Catch problems early and your slab can easily outlast the house it sits behind.
Quick reference: tools and materials checklist
- Stakes and mason's line for layout
- Plate compactor (rental)
- Crushed gravel or compactable base (4 inches)
- 2x4 or 2x6 lumber for forms, with 1x2 stakes
- 10-mil (minimum) polyethylene vapor barrier
- Welded wire mesh 6x6 W1.4/W1.4 and wire chairs/spacers
- Ready-mix concrete (4,000 psi) or bagged mix for small slabs
- Screed board (straight 2x4 spanning forms)
- Bull float
- Edging tool and groover (for tooled joints)
- Concrete rake or square shovel
- Steel trowel and/or push broom for finish
- Curing compound or plastic sheeting and water
- Concrete saw for saw-cut joints (rental if needed)
- Penetrating or film-forming concrete sealer
The whole process from digging to a walk-able slab takes about a weekend for a typical 12x16 patio, with the pour day being the most labor-intensive. You can use the same step-by-step approach to go from an existing concrete slab to a new patio surface as well how to turn a concrete slab into a patio.
If you've been thinking about tackling a related project, the same foundations covered here apply whether you're working on steps, installing pre-cast patio slabs, or converting an existing slab into a finished patio space. Once you have your base and slope dialed in, the same concrete methods apply when you build steps for a patio concrete patio steps. Get the planning and prep right, and the pour itself is the easy part.
For a step-by-step guide on how to install concrete patio slabs, follow the sequence from planning and excavation through curing and finishing. If you want the step-by-step walkthrough, start with how to put in a concrete patio and follow the sequence from layout to finishing.
FAQ
Can I build a new patio concrete slab over an existing concrete slab?
Yes, but only if you control moisture and movement. Add a vapor retarder and keep the same slope, then avoid pouring new concrete directly onto loose or powdery old surfaces. Roughen the existing slab (grind it) and remove any sealers or contaminants, then consider a bonded overlay only after evaluating adhesion. If the old slab is already cracked or moving, it is usually better to install the patio slab on its own base rather than tie it into the existing concrete.
How do I know when it is the right time to tool or saw-cut control joints?
Cutting control joints earlier than you should can cause raveling and messy joints, and waiting too long increases random cracking. A practical DIY check is to saw when the blade can cut cleanly and the edges do not crumble, which depends on heat, wind, and mix. If you miss the window, tool or saw joints later can still work, but you may see less consistent crack locations.
What deicer can I use on a new concrete patio slab in winter?
If your patio will be exposed to freeze-thaw or deicing chemicals, avoid rock salt and calcium chloride on new concrete for at least the first winter (and ideally longer if you can). They accelerate scaling and surface loss. For traction, spread sand or an approved alternative that does not chemically attack concrete.
What is the most common mistake with mesh reinforcement in a patio slab?
You want reinforcement to be correctly placed, not just present. That means elevating mesh on chairs or spacers so it ends up in the lower-middle of the slab with proper cover. If the mesh stays on the base or floats upward during the pour, it reduces tensile performance and can lead to wider cracking even if the slab does not collapse.
How can I avoid ending up with a patio that has low spots or standing water?
Don’t rely on a “looks level” check. Re-check finished height and slope at multiple points after the gravel is compacted, and verify again after setting forms because small form bumps translate into drainage problems. A useful tip is to measure from a fixed reference point (like a string line on posts) to the form top at several locations.
Is 4 inches always enough for a patio concrete slab?
If the slab is for light foot traffic, a 4-inch thickness with the right base and joints is usually fine. For concentrated loads like a hot tub, heavy grill, or where a vehicle may overhang, increase thickness and consult local guidance if you are unsure. Also plan for stronger subbase and more closely managed joint layout, because thicker concrete alone does not fix poor compaction or slope.
What should I do if I cannot finish the entire patio pour in one day?
You can pour multiple adjacent slabs in phases, but movement joints or saw-cut joints should still align with your crack control plan. Avoid stopping a pour in the middle of where you want a tight, square panel, and keep surfaces protected from sun and wind during downtime. If you must stop, follow best practices for construction joints (cleaning and bonding) rather than treating it like a continuous pour.
What happens if I finish too early or too late after the pour?
It depends on how much bleed water is present and what finish you are targeting. Waiting until the sheen is gone helps avoid a weak, dusty surface, but if you wait too long, broom finishing can tear the surface and create inconsistent texture. If you miss the timing, the safer move is to re-finish only what is still workable or lightly adjust the texture rather than overworking the same area.
How long should I wait before sealing, especially in cool or humid weather?
Sealing timing matters. Applying sealer before adequate cure and off-gassing can trap moisture and lead to hazing, reduced performance, or uneven appearance. If you cannot wait a full 28 days, follow the specific sealer product directions, and consider that some products still require longer cure windows on thick slabs or in cool, damp weather.
How should I maintain control joints after the patio is sealed?
For long-term durability, keep joints clean and maintain them. Refill control joints with flexible polyurethane joint filler when openings exceed about a hairline, and clean debris so the filler can bond. Also re-inspect after freeze-thaw seasons, not just the first year, because repeated expansion and contraction can widen gaps.