Building a concrete patio slab from scratch is absolutely a DIY project you can pull off in a weekend (or two), as long as you plan carefully, prep the base properly, and don't rush the cure. If you want a step-by-step walkthrough of how to install concrete patio slabs, follow the full process below from site prep through curing and sealing.
How to Concrete Patio Slab: DIY Steps, Pouring and Repair

Silas Morrison
28 Apr 2026
If you want a complete walkthrough on the full process, including base prep, forms, pouring, and curing, start with our guide on how to install a concrete patio how to install concrete patio. If you’re specifically looking for how to install concrete patio slabs, follow that step-by-step guide for the base, forms, and proper curing timeline.
The basic workflow goes like this: mark and excavate the area, compact a gravel base, set your forms with the right slope, add reinforcement, pour and screed the concrete, finish and cut control joints, then cure it for at least a week before sealing. If you’re starting from scratch, following these steps in order is the best way to construct a concrete patio that lasts.
If you already have a concrete slab in place, you can still turn it into a patio by resurfacing or overlaying it for a durable, finished look turn a concrete slab into a patio. Every one of those steps matters, and skipping or rushing any of them is how patios crack, heave, or turn into puddles after the first rain.
If you want the complete workflow, these steps for concrete patio construction cover everything from base prep to curing and sealing every one of those steps. If you need a clear, step-by-step plan, this guide on how to install concrete patio slabs walks you from base prep through curing and sealing.
Planning and site prep
Start by deciding exactly where the slab goes and what size you need. If you're starting from a plain concrete slab, use the same site-planning basics from this article, then follow how to turn a concrete slab into a patio for the exact steps and finishes. Measure the space, stake the corners, and run string lines to define the perimeter. At this stage you also need to think about slope. A patio must drain water away from your house, the standard recommendation from QUIKRETE and the IRC is [at least 1/8 inch of drop per running foot](https://www.
reddit. com/r/Concrete/comments/o27jbf). In a wet or snowy climate, bump that up to around 3/8 inch per foot for better drainage. Don't eyeball this.
Use your string lines and a line level or a long level on a straight board to set the correct grade before you dig a single shovelful. If you want a step-by-step walk-through for the full build, including the exact pour and curing steps, see our guide on how to build a patio concrete slab.
If you want the complete step-by-step method for putting in a concrete patio from start to finish, follow our guide on how to build a patio concrete slab how to put in a concrete patio.
Once your slope is calculated, mark your excavation depth. For a residential patio, you need a minimum 3.5-inch concrete slab (IRC R506.1) plus a 4-inch compacted gravel base, so plan to dig down roughly 8 inches from your finished surface elevation. Strip the sod and topsoil completely, organic material under a slab is a recipe for settlement. After excavating, compact the soil with a plate compactor, lay your gravel base (crushed stone or compactable gravel works well), and compact that too in 2-inch lifts. A soft, spongy base is the number one reason residential patios crack and sink. Take your time here.
Before you do anything else, check with your local building department. Some municipalities require a permit for a new concrete slab, especially if it's attached to the house or over a certain square footage. It's a quick call that can save you a headache later.
Forms, base layer, and reinforcement setup
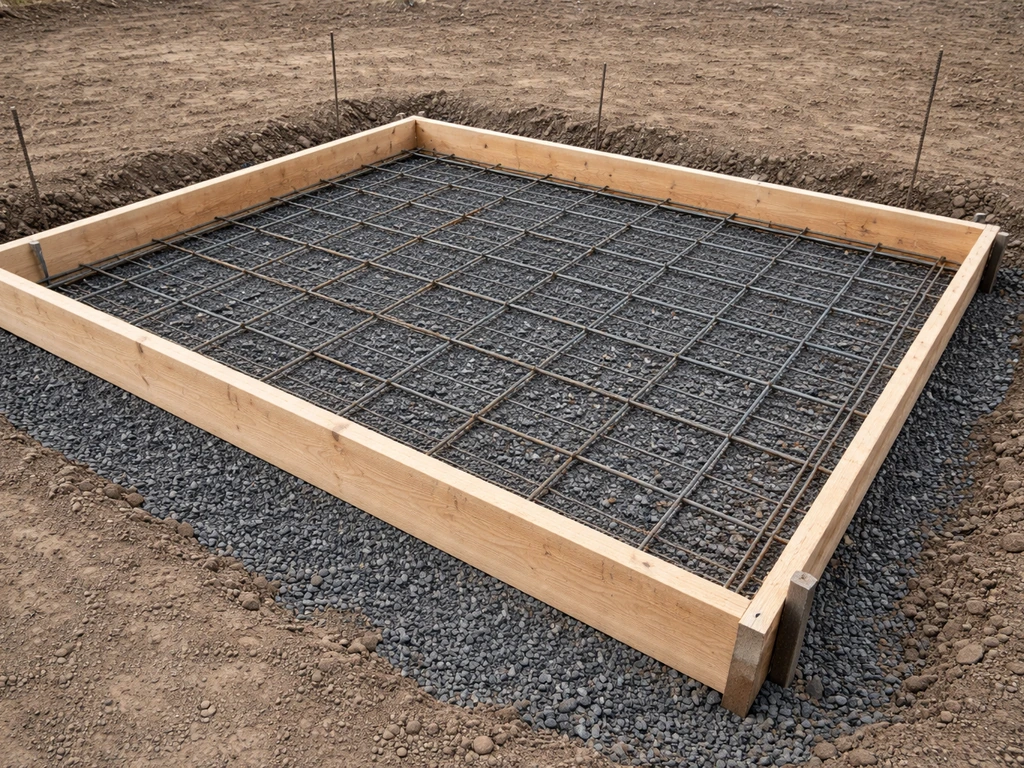
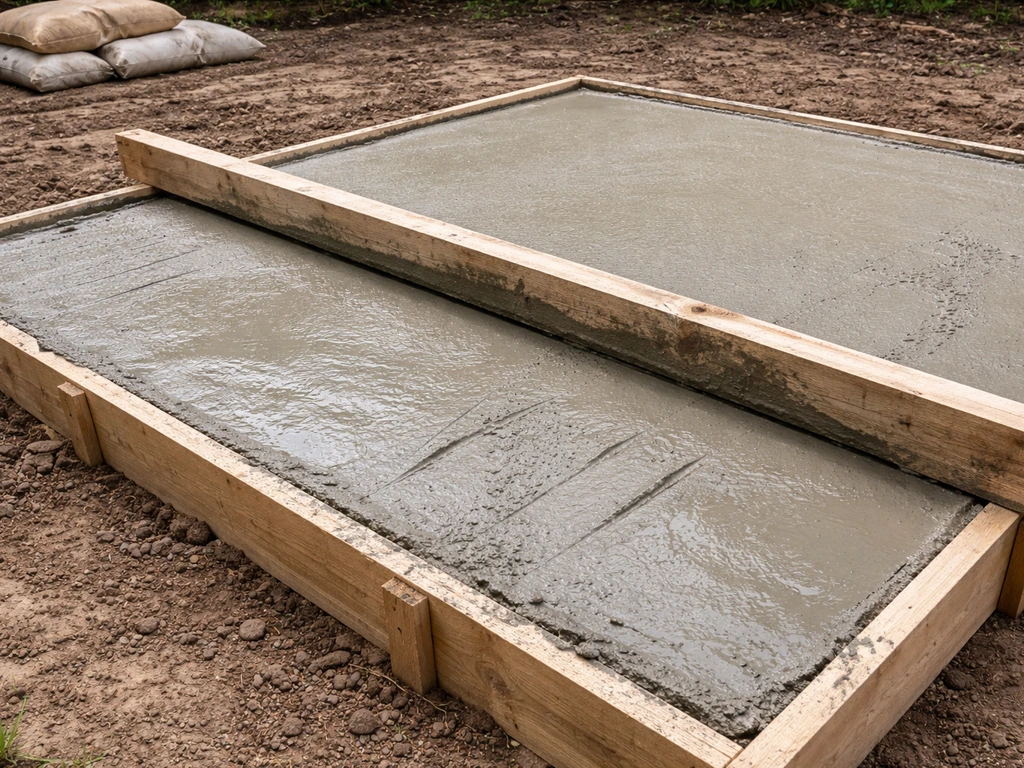
Forms are just the wooden frame that holds your concrete in place while it sets. For a standard patio, 2x4 or 2x6 lumber works great depending on your slab thickness. Drive stakes on the outside of the form boards every 2 to 3 feet to keep them from blowing out under the weight of the pour.
Your forms set the finished height and slope of the slab, so get them level (with the correct slope built in) before you pour anything. Double-check the slope measurement at multiple points along the form, a difference in elevation divided by the horizontal distance gives you inches per foot. For 1/8-inch-per-foot slope over a 12-foot patio, the far edge of the form should sit 1. 5 inches lower than the house side.
Reinforcement keeps your slab from cracking apart even if the ground shifts. For a residential patio, you have two common options: welded wire fabric (also called wire mesh) or rebar. Wire mesh is easier to handle for DIYers, roll it out over the gravel base and use small stones or purpose-made bar chairs to hold it at the mid-depth of the slab, not flat on the ground. Rebar (typically #3 or #4 bar) on 18-inch centers gives more strength and is worth the extra effort for heavier-use patios or areas with expansive soils. Either way, the steel needs to sit in the middle third of the slab thickness to do its job.
| Reinforcement Type | Best For | Difficulty | Relative Cost |
|---|---|---|---|
| Welded wire mesh (6x6 W1.4) | Standard residential patio, lighter loads | Easy | Low |
| Rebar #3 on 18-inch grid | Heavier use, clay/expansive soils, larger slabs | Moderate | Medium |
| Fiber-reinforced concrete | Crack resistance, no mesh handling needed | Easy (mixed in) | Low-medium |
For most backyard patios, welded wire mesh lifted to mid-slab is the practical choice. If you're on clay soil or your area goes through hard freeze-thaw cycles, lean toward rebar or ask your concrete supplier about fiber-reinforced mix. You can also combine fiber mix with mesh for extra insurance.
Mixing, pouring, and screeding the slab
Unless your patio is very small (under about 50 square feet), rent a mixer or order ready-mix concrete from a local supplier. Mixing bags by hand for anything bigger is exhausting and slows you down at exactly the wrong moment. For a standard patio, use a 4000 psi mix, most ready-mix suppliers and bagged concrete products like QUIKRETE 5000 hit that strength range. Avoid adding extra water to make the mix easier to work with. Too much water weakens the slab and increases cracking risk. The mix should be about the consistency of thick peanut butter, it holds its shape but isn't crumbly.
Pour the concrete starting at the far end of the form and work back toward the truck or mixer. Use a square shovel or concrete rake to distribute it evenly. Fill the form in sections, consolidating the mix against the forms and around your reinforcement as you go. Once a section is filled to the top of the forms, it's time to screed.
Screeding levels the surface by dragging a straight 2x4 or aluminum screed board across the tops of your forms in a sawing motion. One person pulls the screed toward them while another pushes concrete into any low spots. Go over each section twice. This step establishes your flat, sloped surface and removes high spots. After screeding, use a bull float, that long-handled flat tool, to close up the surface and embed aggregate just below the top. Run the bull float in overlapping passes, keeping the leading edge slightly raised so it doesn't dig in.
Finishing, curing, and joint placement
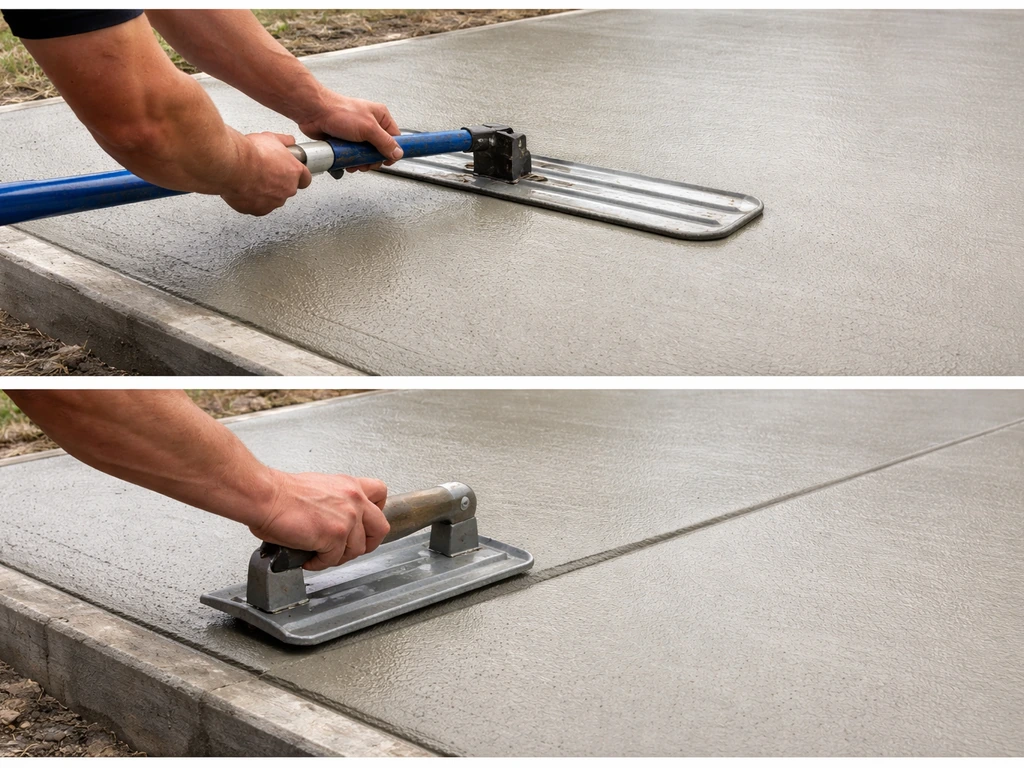
After bull-floating, wait for the bleed water to disappear from the surface before doing any more finishing. This is one of the most common DIY mistakes: working the surface while bleed water is still present brings up fines, weakens the top layer, and causes surface scaling later. When the sheen is gone and a footprint leaves about a 1/4-inch impression, you're ready to finish. For a broom finish (the standard for outdoor patios, it's slip-resistant), drag a stiff-bristle broom lightly across the surface in one direction. That's really all most patios need.
Control joints are grooves cut or tooled into the slab that give it a place to crack in a straight line instead of randomly across the surface. For a 4-inch slab, space control joints no more than 8 to 12 feet apart (that's 2 to 3 times the slab thickness in feet, per ACI 302. ACI 302.
1R content notes that contraction joint spacing is related to slab thickness (with spacing guidance given in terms of thickness and slab dimensions) [space control joints no more than 8 to 12 feet apart](https://files. engineering. com/files/8259ec1b-7b9e-49ca-9fb3-e07f812f168a/ConcslabACIf302. 1Chap3.
pdf). 1R guidelines). The joints should be at least 1 inch deep, one quarter of the slab thickness. You can tool them in with a grooving tool while the concrete is still green (freshly placed but firm enough to walk on), or cut them with a walk-behind saw within 6 to 18 hours of the pour.
Tooled joints are the practical DIY approach. Just run them at even intervals in both directions to create roughly square panels.
Curing is where patience pays off. Concrete doesn't just dry, it chemically hydrates, and it needs moisture to do that properly. Moist-cure your slab for at least 5 to 7 days. The easiest method is to cover the slab with plastic sheeting or wet burlap and keep it damp. You can also apply a spray-on curing compound right after finishing, products like QUIKRETE Acrylic Concrete Cure & Seal apply at about 200 square feet per gallon and meet ASTM C309 curing standards. Keep foot traffic off the slab for at least 24 to 48 hours, and don't put heavy furniture or loads on it for a full week.
Sealing, staining, and surface protection
Once the slab has cured for at least 28 days (the point where concrete reaches its rated strength), you can seal it, stain it, or both. Sealing protects the surface from water intrusion, freeze-thaw damage, oil stains, and general weathering. For a new patio, a penetrating silane-siloxane sealer is a smart first choice, it soaks in, doesn't change the look much, and lets the slab breathe. An acrylic cure-and-seal product (if you didn't apply one during the curing stage) pulls double duty and gives a slight sheen. Apply sealer on a dry day when temps are between 50 and 90 degrees Fahrenheit, using a roller or pump sprayer.
If you want more color or style, acid staining or water-based concrete stain can dramatically transform a plain gray slab. Acid stains react chemically with the concrete to create mottled, earthy tones, browns, tans, terra cotta. Water-based stains give more consistent, predictable color in a wider range of shades. Either way, apply stain before your topcoat sealer, not after. After staining, a coat of acrylic or polyurethane sealer locks in the color and protects the surface. Plan to reseal an outdoor patio every 2 to 3 years depending on traffic and climate.
Troubleshooting, leveling fixes, and concrete patio slab repair
Even well-built patios develop problems over time, and most of them are fixable without tearing out the whole slab. Here's how to handle the most common issues.
Hairline and surface cracks
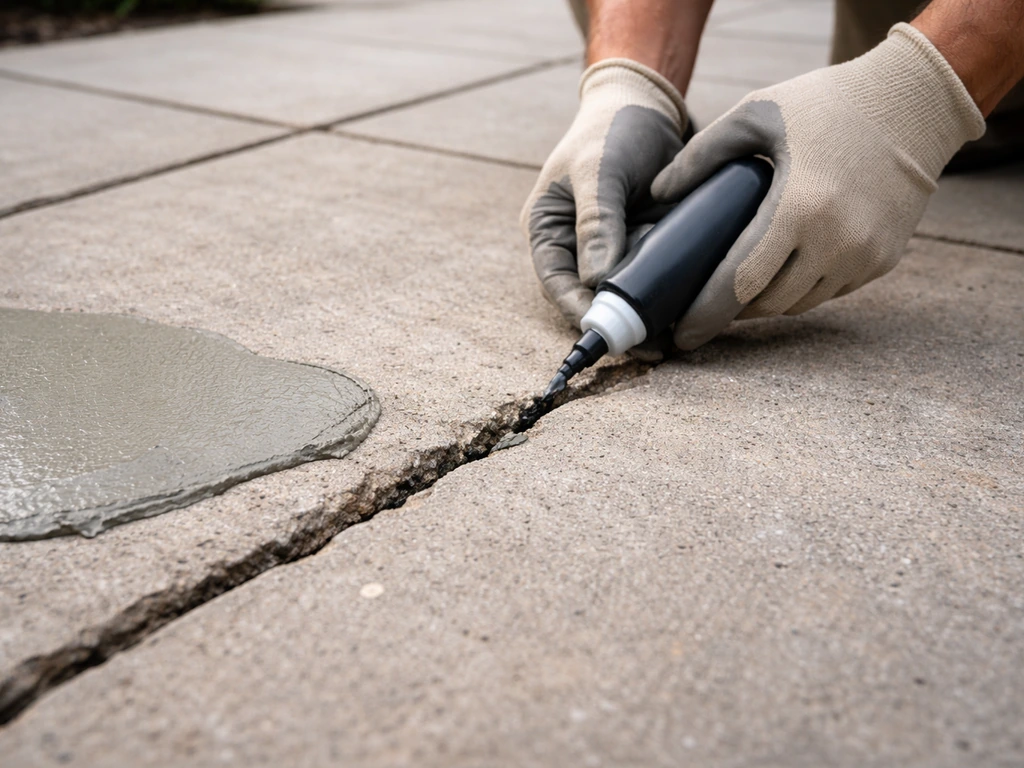
Narrow cracks up to about 1/4 inch wide are common and usually cosmetic. Clean the crack out with a wire brush and blow out the dust, then fill with a polyurethane or epoxy crack filler. For cracks that go all the way through the slab and are actively moving, structural epoxy injection is the right call, products like W.R. Meadows REZI-WELD are designed exactly for this. Inject the epoxy under low pressure from the bottom of the crack upward to fill the void completely. These aren't instant fixes, you need to prep the surface properly and follow product instructions, but they hold up well.
Spalling and surface deterioration
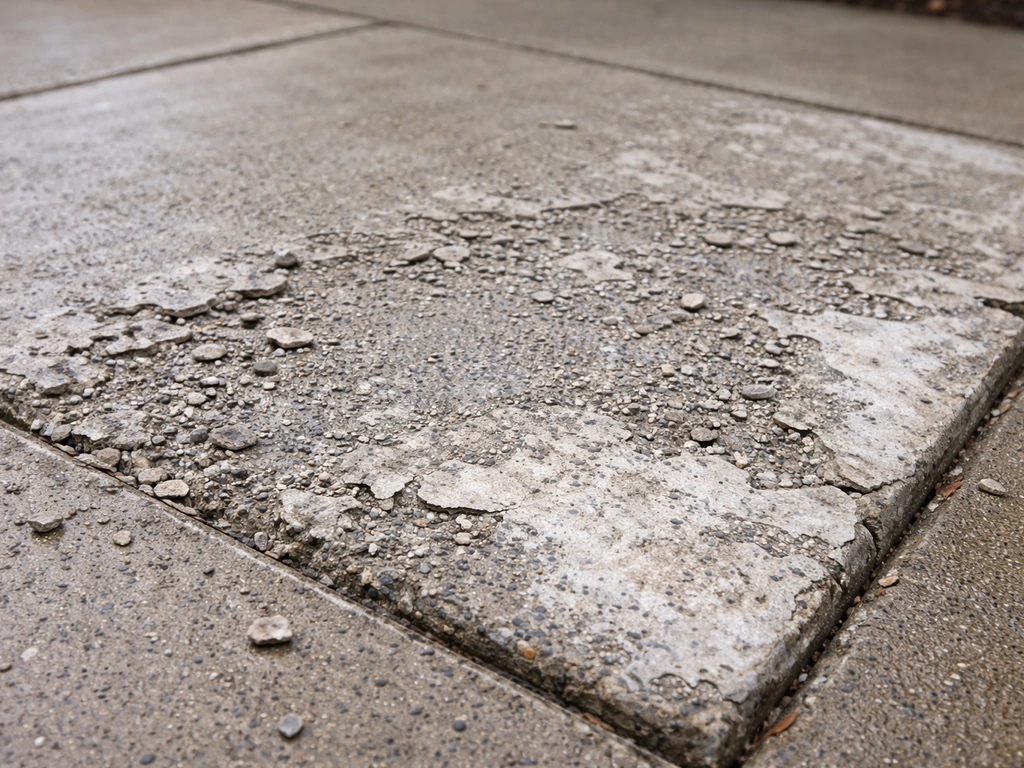
Spalling (flaking, pitting, or scaling of the top surface) is usually caused by freeze-thaw damage, deicing salts, or finishing the slab too early when bleed water was still present. For light spalling, a concrete resurfacer works well, products like W.R. Meadows MEADOW-PATCH T2 are designed specifically for patios, sidewalks, and driveways. The key is surface prep: use a pressure washer or grinder to open the surface, get it damp but not wet, then apply the resurfacer at the manufacturer's thickness. Most resurfacers go on at 1/4 inch or less. Feather the edges so there's no lip to catch a foot. After repair, seal the area to prevent future moisture intrusion.
Uneven or sunken sections
If one section of your patio has sunk or tilted, the problem is usually a soft or eroded base underneath. Small elevation differences of 1/2 inch or less can be addressed with a self-leveling concrete overlay, pour it on the low section, let it find its own level, and it bonds to the existing slab.
For bigger settlement problems (a panel that's dropped an inch or more), look into slabjacking (also called mudjacking or foam lifting), where material is pumped under the slab to raise it back up. This is a job for a professional with specialized equipment, but it's far cheaper than demo and repour. If the underlying soil issue isn't fixed, the slab will settle again, so make sure any drainage or void problems are addressed first.
Laying patio slabs over an existing concrete base
If your existing concrete slab is structurally sound but ugly, unlevel, or just needs a new look, you can install pavers or precast concrete slabs directly over it instead of pouring new concrete. The existing slab needs to be clean, free of major cracks or heaving sections, and reasonably flat (within about 3/8 inch over 10 feet). Use a polymer-modified thinset mortar bed at about 1/2 to 1 inch thick to set the new slabs, and fill joints with polymeric sand. This approach adds height to the finished surface, so check clearances at doors before you commit. It's a great way to upgrade an old slab without the cost and effort of a full demo.
Whatever repair approach you take, finish by sealing the repaired or resurfaced area. A consistent sealant layer across the whole patio ties everything together visually and gives the repair the best shot at lasting as long as the original slab. The goal is always a surface that sheds water, handles traffic, and doesn't become a project again in two years.
FAQ
How do I calculate the right patio slope if my patio is an odd shape or not a straight rectangle?
Work from the lowest point back to your house line, set string lines on the perimeter, then check grade at multiple spots using the same “inches per foot” ratio. If your shape is irregular, target a consistent drop across the short run between high and low edges rather than forcing one slope direction for the entire slab.
What should I do if I discover utility lines, sprinkler lines, or old footings during excavation?
Stop and reroute before you compact the base. Utilities and old concrete can create voids or uneven settlement later, so you may need to lower, protect, or cap lines and break up or remove interfering materials before you set forms and reinforce.
Can I pour a patio slab directly on compacted sand or native soil?
Avoid it for a long-lasting patio. The usual approach is strip topsoil and organics, compact native soil, then add a properly graded compacted gravel base in lifts. If you skip the gravel layer, you increase the chance of water movement, pumping, and cracking.
How far above grade should my finished slab sit, and how does that affect the slope?
Set the slab so it drains away from the house while keeping surface clearances at doors, steps, and lawn edges in mind. Build your forms to the finished height you measured with string lines, then double-check the slope after the forms are fully staked, not just during layout.
What’s the correct way to place reinforcement so it doesn’t end up at the bottom of the slab?
Use chairs or small stacked spacers so the steel sits in the middle third, not directly on the gravel. Keep rolls of mesh from shifting during the pour, and overlap mesh sheets by the recommended amount from your mesh product packaging to avoid weak seams.
Do I need reinforcement for every patio size and every climate?
Most patios benefit from reinforcement, but the decision gets stronger in freeze-thaw areas, on clay, or when the patio will handle heavy loads. For marginal cases, fiber-reinforced mix can add help, but it is not a substitute for proper base prep and correctly placed steel when conditions are harsh.
How much water is too much when mixing concrete for a DIY patio?
If the mix slumps or looks watery, you added too much. Too much water reduces strength and increases surface dusting and cracking, so aim for a thick, cohesive consistency that holds shape when placed, then adjust only with minor changes per the supplier instructions.
Should I use a vapor barrier under the slab in my backyard patio?
It depends on soil moisture and local climate. If your ground stays damp or you have a history of moisture problems, ask your local building department what they expect, but do not assume plastic automatically fixes drainage. Even with a barrier, you still need proper grading and a compacted base.
What is the best time window to cut or tool control joints after the pour?
Plan so joints are made while the concrete is green enough to hold clean edges, but not so early that the groove slumps. If you can’t tool them immediately, a walk-behind saw usually must be used within a limited time window after the pour, so schedule your saw rental and timing ahead of the pour day.
Do I need to seal immediately, or can I wait longer?
You can wait, but sealing timing matters. If you cured for at least 28 days and the slab is dry, you can seal, preferably on a dry day within the recommended temperature range. If you seal too early or while moisture is trapped, you risk uneven appearance and reduced protection.
How can I tell whether my slab is dry enough to stain or seal?
Perform a simple moisture check, like taping down a plastic square and watching for condensation or darkening after a set time. If you see moisture accumulating, delay sealing or staining until it passes so you get consistent penetration and avoid cloudy, blotchy results.
What causes the slab to develop dark patches or peeling near the surface?
Dark, blotchy areas can come from trapping bleed water, sealing or finishing too early, or applying products to a damp surface. Peeling or scaling is often linked to freeze-thaw stress, deicing salts, or surface finishing while bleed water is still present, so you may need resurfacer repairs plus a proper cure going forward.
Can I overlay pavers or another slab on an existing concrete patio if it has hairline cracks?
Usually hairline cracks are manageable, but heaving, significant settlement, and wide or actively moving cracks are not. Aim for a reasonably flat base within the stated tolerance, then repair or level problem areas first so the overlay does not telegraph defects or crack prematurely.
What should I do if a corner of the slab starts to heave or settle after the first winter?
Heave usually points to drainage problems, freezing moisture in the base, or inadequate base depth and compaction. For settlement, check for erosion or voids underneath. Before any cosmetic repair, address the underlying drainage or soil condition, otherwise the slab will move again.