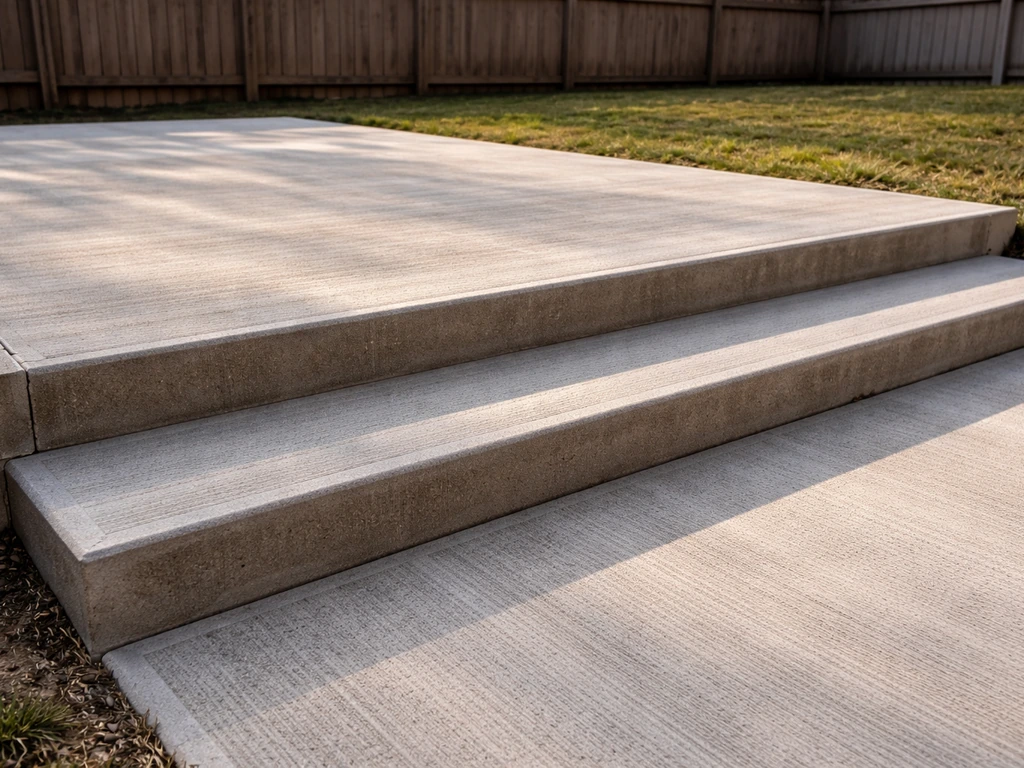
Building concrete patio steps takes about a weekend of real work: one day for prep and forming, one day for pouring and finishing, then a week of curing before you walk on them. The full process goes like this: lay out your run and rise, grade and compact the base, build your forms with proper reinforcement, pour the patio slab and steps in the right order, finish the surface for traction, and then cure everything properly. If you're adding steps to an existing concrete patio instead of starting from scratch, there's a slightly different path, and this guide covers both.
Steps for Concrete Patio: Build or Add Patio Step Runs

Silas Morrison
28 Apr 2026
Plan your step layout and calculate run and rise first
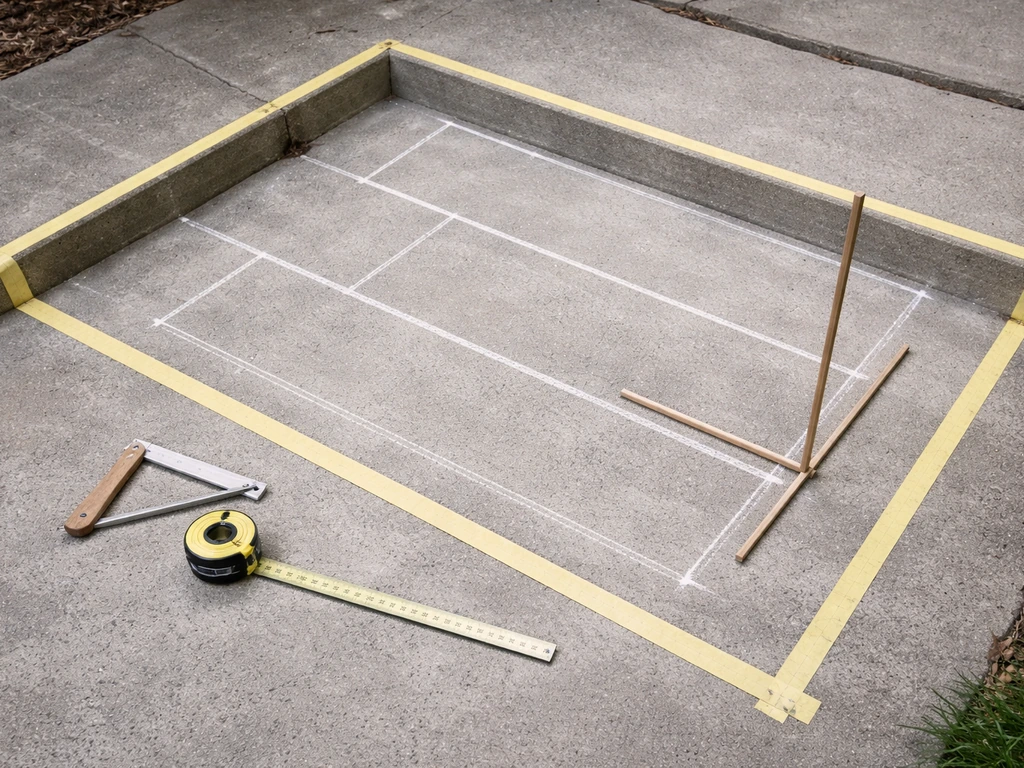
Before you touch a shovel, figure out your geometry. The total rise is the vertical distance from the ground to the top of your patio slab. Divide that by the number of steps you want, and you get your riser height. A good target is somewhere between 6 and 7 inches per riser. The 2010 ADA Standards for accessible exterior stairs set the range at a minimum of 4 inches and a maximum of 7 inches per riser, and that's a solid real-world guide even if your patio isn't required to meet ADA. Go over 7 inches and the steps feel steep; go under 4 inches and people trip on them.
Tread depth (the flat part you step on) should be at least 11 to 12 inches for exterior steps. The IBC limits tread depth variation across a flight to no more than 3/8 inch, which means you need to be precise when setting your forms. If one tread ends up even half an inch shallower than the others, it becomes a trip hazard and a code issue. Measure twice, form once. Sketch it out on paper: total rise divided by riser height equals number of steps, and total run equals number of treads multiplied by tread depth. That total run determines how far out from the patio edge your steps will reach.
Also account for the nosing. Concrete step nosings (the rounded or projected edge at the front of each tread) typically project no more than 1.25 inches over the tread below, which is the ADA maximum. When you plan your forms, that nosing detail affects where you position your risers, so build it into the layout from the start rather than trying to fix it at the finishing stage.
Site prep: grading, base, and drainage under the steps
This is the part most DIYers rush, and it's exactly why steps crack and sink within a few years. The ground under concrete steps needs to be stable, compacted, and well-drained. Start by excavating the footprint of your steps plus 6 inches on each side. Dig down at least 6 to 8 inches below the bottom of your lowest riser, or deeper if you're in a freeze-thaw climate. The frost line matters a lot here: if your footing sits above it, winter will heave your steps right off the patio.
Once you've excavated, grade the bottom of the trench slightly away from the house to direct water outward. Then lay down 4 to 6 inches of compacted gravel base (crushed stone or compactable gravel works well). Compact it in 2-inch lifts with a plate compactor, not just by hand-tamping. A poorly compacted base is the single biggest cause of step settlement. If your patio is already going through a construction process involving grading and base prep, coordinate the step footing excavation at the same time so you're not undercutting finished work later.
Drainage is non-negotiable. Water that pools under or behind your steps will freeze, expand, and slowly destroy the concrete from below. If the area behind your steps (against the patio or house) tends to collect water, consider running a small perforated drain pipe along the back edge of the step footing before you pour, then daylight it to the side of the project. A little drainage work now saves a lot of demolition later.
Build your forms and add reinforcement
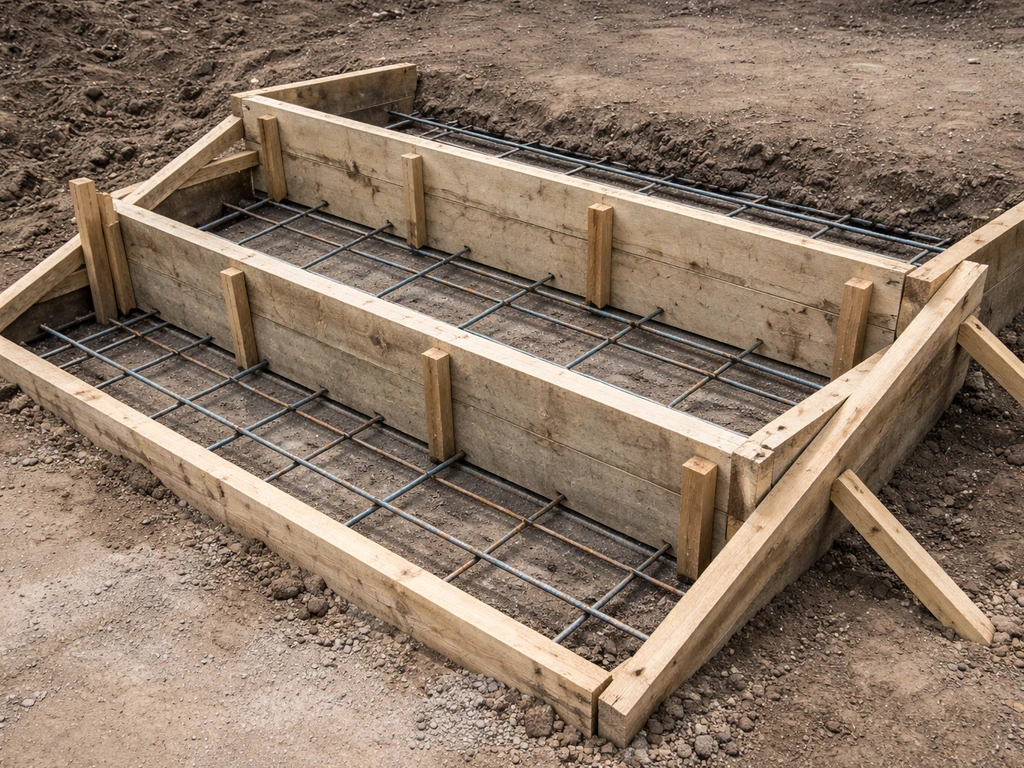
Concrete step forms are usually built from 2x8 or 2x10 lumber, depending on your riser height. The key is making them rigid: every form board needs to be staked firmly so it doesn't bow outward under the weight of wet concrete. Use 2x4 stakes driven into the ground every 2 feet along the outside faces, and screw the form boards to the stakes rather than nailing them so you can pull them cleanly later.
For the riser faces (the vertical boards), cut them to fit between the side forms and brace them from behind with diagonal 2x4 kickers staked into the ground. The riser forms hold back the wet concrete while it sets, so they take a lot of pressure. A riser form that shifts even a half-inch will throw off your tread depth uniformity for the whole flight.
Reinforcement for concrete steps is not optional. Use at least No. 3 rebar (3/8-inch diameter) in a grid pattern, with bars running both lengthwise and crosswise every 12 inches. In each tread, run a rebar bar about 2 inches below the top surface, and place another bar near the bottom of the footing. Tie the step reinforcement into the patio slab reinforcement if you're pouring both together. Keep the rebar at least 1.5 to 2 inches from any form surface using plastic chairs or dobies to maintain proper concrete cover. Wire mesh alone is not adequate for steps because it provides minimal structural depth.
If your steps will connect to an existing patio, drill and epoxy-grout rebar dowels into the existing slab at the connection point. Use a hammer drill with a concrete bit, drill at least 4 inches deep into the existing slab, and set the dowels with two-part epoxy. These dowels tie the new step concrete to the existing patio so they don't separate over time. This is an important step that many DIYers skip, and then wonder why the steps pull away from the patio after a few winters.
Pouring the patio and step concrete: order of work matters
If you're pouring the patio slab and the steps as part of the same project, pour the patio slab first and allow it to reach initial set before you pour the step section. When you build a patio concrete slab, the order of work and joint preparation should be planned so the steps and the slab act together. This is not about convenience: it's about preventing the wet step concrete from pushing against and deforming the still-plastic patio slab. In practice, you might pour the patio in the morning and pour the steps that same afternoon once the slab has stiffened enough to resist pressure.
When you do pour the steps against the slab, the bond between the two pours is a construction joint. For that joint to perform properly, the existing slab surface must be clean, free of laitance (that weak, dusty layer that forms on the surface of concrete as it sets), and moistened but not saturated before the new concrete is placed. Laitance removal can be done with a wire brush or light grinding. This is an ACI 318 requirement for construction joints, and it's the difference between steps that are mechanically bonded to the patio and steps that just sit next to it.
Use a concrete mix with a 4-inch to 5-inch slump for steps. Too wet (high slump) and the mix will sag down the risers; too stiff and it won't consolidate around the rebar. A 4,000 PSI mix with 3/4-inch aggregate is a good standard for exterior steps. If you're ordering ready-mix, tell the plant it's for steps and ask for air entrainment (typically 5 to 7 percent air) if you're in a freeze-thaw climate. Air-entrained concrete handles freeze-thaw cycling dramatically better than non-air-entrained mixes.
Pour and consolidate each tread from the bottom step up. Use an internal vibrator or a pencil vibrator to consolidate the concrete around the rebar and into the corners, especially at the riser-tread intersection. Tap the outside of the riser forms with a hammer as you go to help the concrete settle against the form face, which gives you a cleaner surface when you strip the forms. Overfill each tread slightly and then screed off the excess.
Finishing the surface: traction, edges, and curing
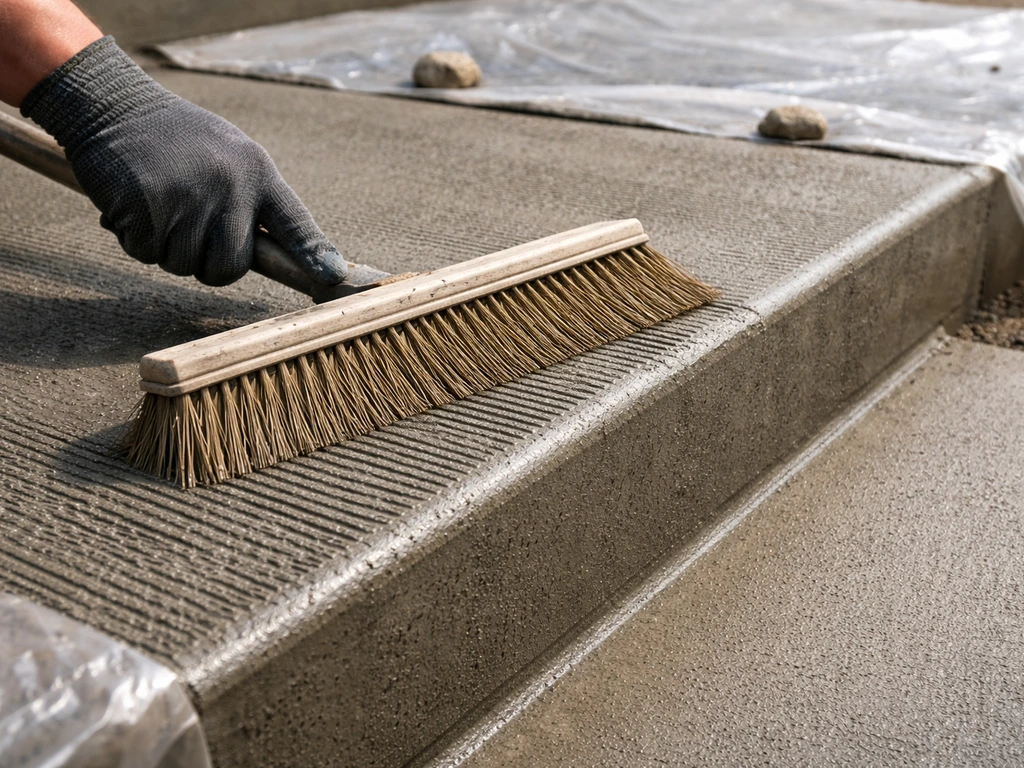
Exterior concrete steps need a slip-resistant surface. A broom finish is the standard approach: after you've screeded each tread flat and done an initial float pass, drag a stiff-bristled concrete broom across the tread from the back edge to the front nosing. The broom creates small ridges that give traction when the surface is wet. Do not broom the surface while bleed water is still visible on top. Finishing over bleed water traps moisture just below the surface, which causes delamination and scaling within a few freeze-thaw cycles. Wait until the sheen is gone.
Edge the front of each tread with a concrete edger to create a slightly rounded nosing. This prevents the sharp edge from chipping off under foot traffic. If you want a defined nosing profile, run the edger along the front before the broom texture so the broom lines run right up to the edge cleanly.
Strip your riser forms 24 hours after the pour, once the concrete is firm enough to hold its shape. The tread forms can come off the same time. After stripping, check the faces of the risers: any bug holes or voids can be patched with a stiff mix of cement and sand pressed in by hand and smoothed. Do this within the first 24 to 48 hours after stripping while the parent concrete is still green and the patch will bond better.
Curing is where a lot of DIY projects fall short. Concrete gains most of its strength during the first seven days, and that process requires moisture. Keep the steps covered with plastic sheeting or wet burlap for a minimum of 7 days, and keep the covering damp. If it's hot and sunny, you may need to wet the steps down twice a day under the cover. Seven days of proper moist curing is a widely cited minimum standard in concrete engineering guidance (including FHWA pavement curing research), and shortcutting it produces weaker, more porous concrete that won't hold up to weather or de-icing salts.
After curing, applying a penetrating concrete sealer is a smart move for steps. A silane-siloxane penetrating sealer soaks into the surface and repels water without changing the look of the concrete. It won't make a broom-textured surface slippery. Apply it after the steps have cured for at least 28 days (when concrete reaches full design strength) and reapply every 2 to 3 years.
Adding concrete steps to an existing patio
If your existing patio is already in place and you need to add steps, the approach is slightly different from building everything from scratch. If you are also wondering how to install a concrete patio, start with solid site prep, then follow the pour-and-cure steps so the base and slab perform as one how to install concrete patio.
If you are starting from scratch, follow a complete patio walkthrough so you can plan excavation, base prep, and pouring for a smooth, long-lasting concrete patio. Concrete patio installation steps follow the same fundamentals: excavation, base prep, forming, reinforcement, pouring, finishing, and curing how to install concrete patio.
Concrete patio installation steps follow the same fundamentals, and this guide walks through the full build, from excavation to curing for a patio concrete slab how to build a patio concrete slab. If you are starting from scratch, the next step is to learn how to construct a concrete patio from excavation to curing building everything from scratch.
The biggest challenge is achieving a clean mechanical connection between the new step concrete and the existing slab so they behave as one structure rather than two independent slabs that eventually separate.
Prepare the existing slab edge
Start by cleaning the edge of the existing patio where the steps will connect. If the slab edge has been sealed, grind or chip off the sealer in the connection zone so you're working with raw concrete. Use an angle grinder with a diamond cup wheel or a cold chisel and hammer to roughen the slab edge and remove any laitance or weak surface material. A rough, clean surface gives the new concrete something to bond to mechanically.
Next, drill and epoxy dowels into the existing slab as described earlier. Space them every 12 to 16 inches horizontally and at mid-depth of the slab. If the existing slab is 4 inches thick, drill into the center of the thickness. Apply a concrete bonding adhesive to the existing slab face just before you pour, following the manufacturer's open time guidelines. Both the dowels and the bonding adhesive working together give you the best chance of a durable connection.
Form and pour the new steps
With the existing slab as your back wall, build the step forms outward from the patio edge. Use the existing slab face as one side of your form system, bracing your riser boards off it. Make sure the top of your first riser is exactly at the height of the patio surface so the transition from patio to top step is flush. Even a 1/4-inch lip here becomes a trip hazard and looks sloppy.
Pour, consolidate, and finish exactly as described above. The connection joint between the new steps and the old slab will be a visible seam, and that's fine. What you want to avoid is that seam becoming a gap. The dowels, bonding agent, and properly prepared surface will keep it tight. After the steps have cured, run a bead of self-leveling polyurethane joint sealant into the seam between the existing slab and the new steps to keep water from infiltrating and undercutting the connection.
Common mistakes and how to troubleshoot them
Even experienced DIYers run into problems on step pours. Here are the ones I see most often and what to do about them.
| Problem | Likely Cause | Fix |
|---|---|---|
| Steps crack at the tread-riser joint | No rebar, bad base, or no control joint | Add a saw-cut control joint at the back of each tread (1/4 of slab depth) within 24 hours of finishing; next time use rebar |
| Riser faces are honeycombed after stripping | Insufficient vibration or too-stiff mix | Pack voids with a stiff cement-sand mortar within 48 hours of stripping |
| Tread depth is inconsistent across the flight | Riser forms shifted during pour | Grind high spots; if variation exceeds 3/8 inch, resurface with a bonded concrete overlay |
| Steps pulling away from existing patio | No dowels, no bonding agent, or laitance not removed | Drill and epoxy in rebar ties, then fill the gap with polyurethane sealant; rebuild if the gap is structural |
| Surface scaling after first winter | Finished over bleed water, or cured less than 7 days | Apply penetrating sealer immediately; resurface with polymer-modified overlay if scaling is extensive |
| Steps settled or tilted | Base not compacted, frost heave, or poor drainage | Remove and rebuild with deeper footing below frost line and compacted gravel base; add perimeter drainage |
One thing worth saying directly: if your total rise is more than about 30 inches (four or more steps), or if you're working on a sloped site with drainage complexity, this project gets into territory where a day's mistake means weeks of demolition and repair. There's no shame in getting a quote from a concrete contractor for the forming and pouring phase while doing the prep and cleanup work yourself. That hybrid approach saves money and keeps the critical technical work in experienced hands. If you decide to pour the full surface yourself, review the patio-wide workflow in how to turn a concrete slab into a patio so you can plan layout, drainage, and finishing as one continuous job.
For readers who are tackling the full patio slab alongside the steps, the process shares a lot of ground with other patio construction approaches: grading, base prep, forming, reinforcement, and curing are consistent fundamentals whether you're building steps into a new pour or constructing a standalone slab. If you are also building the patio slab itself, make sure you follow the full process for how to lay concrete for a patio from grading and base prep through curing patio construction sequence. Getting comfortable with the whole patio construction sequence will make the step integration feel less like a separate challenge and more like a natural extension of the same project.
FAQ
How do I calculate the number of steps and make sure the top step lands flush with the patio surface?
After you set your target riser height (about 6 to 7 inches), divide the total rise by that number, then round the riser count so the riser height becomes close to your target. The key check is that the top of the first riser equals the finished patio height, not the excavated grade. Dry-fit your layout with a tape measure along a string line so you can correct any small rounding differences before forming.
What should I do if my site has a slope and the steps need to be slightly “off level”?
You generally need consistent riser height within the flight, even if the ground line under the bottom is changing. Keep riser boards at the same height relative to a string line, then adjust the excavation and base thickness under the lowest area to maintain uniform treads. If the slope affects drainage or frost depth differently across the footprint, consider splitting the stair run into landings or getting local guidance on footing depth.
Can I install concrete patio steps without meeting ADA, and what measurements should I still follow for safety?
You can still build non-ADA steps, but you should keep risers and tread widths within similar ranges to avoid trips. Staying near 4 to 7 inches per riser and at least 11 to 12 inches per tread depth is a practical safety target. Also keep tread-to-tread variation tight, because even small differences are noticeable underfoot and increase the chance of stumbling.
How do I prevent the steps from pulling away from an existing patio if the joint is already there?
Start by removing any curing compound, sealer, or weak surface material at the connection zone so you bond to raw concrete. Then use drilled and epoxied dowels spaced consistently, and apply a bonding adhesive within its required open time right before you pour. Finally, seal the seam after curing with a suitable joint sealant to reduce water infiltration at the interface.
Is broom finish enough for traction, and when should I apply sealer to avoid making the surface slippery?
A broom finish is usually sufficient for traction when the surface is textured and not burnished. Apply penetrating sealer only after full curing, typically 28 days, and avoid over-applying so it does not glaze the broom ridges. If you want extra confidence, do a small test area on a scrap or hidden tread face first and check for any sheen after it dries.
What’s the correct slump for steps, and what symptoms mean my mix is too wet or too stiff?
Aim for a steps-appropriate slump (around 4 to 5 inches). If the mix is too wet, it tends to sag or “wash” down the risers, and consolidation leaves water and paste at the surface. If it is too stiff, it won’t fully flow around rebar and into corners, leaving voids and rough, weak edges. Adjust by reworking the mix at the plant or adding water only under strict control, since excess water increases cracking risk.
How thick should the gravel base be, and do I need to use a plate compactor?
Use compacted gravel base (typically 4 to 6 inches) and compact it in lifts, about 2 inches per lift. A plate compactor matters because hand-tamping often leaves soft spots that later settle under foot traffic. Before you pour, check that the base doesn’t rock when stepped on and that it holds the intended grade.
Do I need rebar or can I use wire mesh only?
Wire mesh alone is not a substitute for rebar in step pours because mesh does not provide the needed structural depth and reinforcement pattern. Use No. 3 rebar in a grid pattern and place bars at appropriate locations within the tread and footing. Keep reinforcement off the soil and off the form faces using chairs or dobies so concrete cover is consistent.
How should I consolidate concrete around the risers to avoid honeycombing and weak edges?
Consolidate as you pour each tread, using a small internal vibrator to work around rebar and into the corners where tread meets riser. Avoid over-vibrating in one spot, which can cause segregation. Tap the riser forms as you go to help settle the mix against the form face and improve the surface for finishing.
What are the most common formwork mistakes that lead to uneven treads or cracking?
Common issues include under-bracing riser forms so they shift under pressure, and not staked rigidly enough so side forms bow outward. If your tread depth varies, it usually starts with inaccurate form spacing and minor form movement during the pour. Check alignment with a straightedge before concrete goes in, and confirm riser-to-riser height consistency before you strip.
When can I strip forms and walk on the steps, and what’s the safe curing plan?
Strip riser and tread forms early enough that the concrete holds its shape (often around 24 hours for firm concrete), but do not treat that as “ready for traffic.” Maintain moist curing for at least about 7 days by keeping it covered and damp. After curing, wait longer before heavy use, and avoid de-icing salts until the concrete has reached full design strength.
Should I seal new steps, and will sealing interfere with traction?
Sealing can help reduce water absorption and staining, especially with penetrating silane-siloxane products. It generally should not make a broom-textured surface slippery if you apply it after full curing and avoid heavy over-application. If you live where ice-melt chemicals are used, sealing can be beneficial, but it is not a substitute for good finishing and curing.
Can I pour steps at the same time as the patio slab, or does the order matter?
Order matters most when you are tying steps directly against a slab that is still plastic. If you pour steps immediately into a fresh slab, the wet step concrete can push and deform the patio section. A safer approach is to pour the slab first, allow initial set so it can resist pressure, then pour the steps after that stiffness develops.
What joint should I create between the new steps and old patio, and how do I keep water out?
The bond zone acts like a visible construction joint, so treat it as a water-management detail. Ensure the connection is tight with cleaned surfaces, dowels, and bonding adhesive, then after curing apply a proper flexible joint sealant along the seam. This reduces the chance that freeze-thaw cycles force water under the connection and cause edge undermining.