
To fill a hole under a concrete patio, you need to first figure out how big the void is and what caused it, then choose the right repair method: surface patching with a cementitious or epoxy mortar for small holes, mudjacking or polyurethane foam injection for subsurface voids and settled slabs, or full slab replacement when the damage is too far gone. Most homeowners can handle surface repairs themselves in an afternoon. Subsurface lifting is possible as a DIY job for small, localized voids, but larger undermined areas usually call for a pro. This guide walks you through every step, from diagnosis to finishing, so you can make the right call and get it done right the first time.
How to Fill Hole Under Concrete Patio: DIY Fixes & Costs Guide

Silas Morrison
6 Aug 2026
What This Guide Covers (and When Replacement Is the Only Real Option)
This guide covers diagnosing and repairing holes, gaps, and voids in and under an existing concrete patio. It does not cover building a new patio from scratch, except in cases where the existing slab is so far gone that replacement becomes the repair. And that does happen. If your patio has large progressive vertical displacement (more than 1 to 2 inches), pervasive structural cracking that runs through the full slab thickness, active plumbing leaks undermining the base, or soil instability across a wide area, no surface patch or foam injection is going to hold long-term. In those situations, the honest answer is full demo and replacement. I will cover how to recognize those conditions and what replacement involves, but the bulk of this guide is dedicated to the repairs you can actually do yourself.
Diagnosing the Hole: Size, Location, and What Actually Caused It
Before you buy a bag of patch material or rent any equipment, spend 20 minutes figuring out what you are actually dealing with. The cause of the hole or void determines everything about the repair. Get it wrong and you will be doing this again in two years.
The Five Most Common Causes
- Erosion and washout: Water flowing under the slab carries away fine particles over time, leaving hollow pockets. This is by far the most common cause I see, and it often goes unnoticed until a corner cracks or settles.
- Poor compaction at installation: If the base material was not compacted properly when the patio was first poured, the soil consolidates under load over time and leaves gaps. You end up with a slab that sounds hollow when you tap it.
- Tree roots: Roots grow under the slab, lift it, then die or get cut back. When the root decays, a void forms exactly where the root was.
- Plumbing or irrigation leaks: A slow leak from a buried pipe constantly saturates and displaces soil. This is one of the more dangerous causes because the problem is active. Repair the leak first, always.
- Sinkhole or natural soil movement: Less common in most residential settings but worth ruling out, especially in limestone-heavy regions or areas with known subsurface instability. This one calls for a geotechnical evaluation, not a DIY patch.
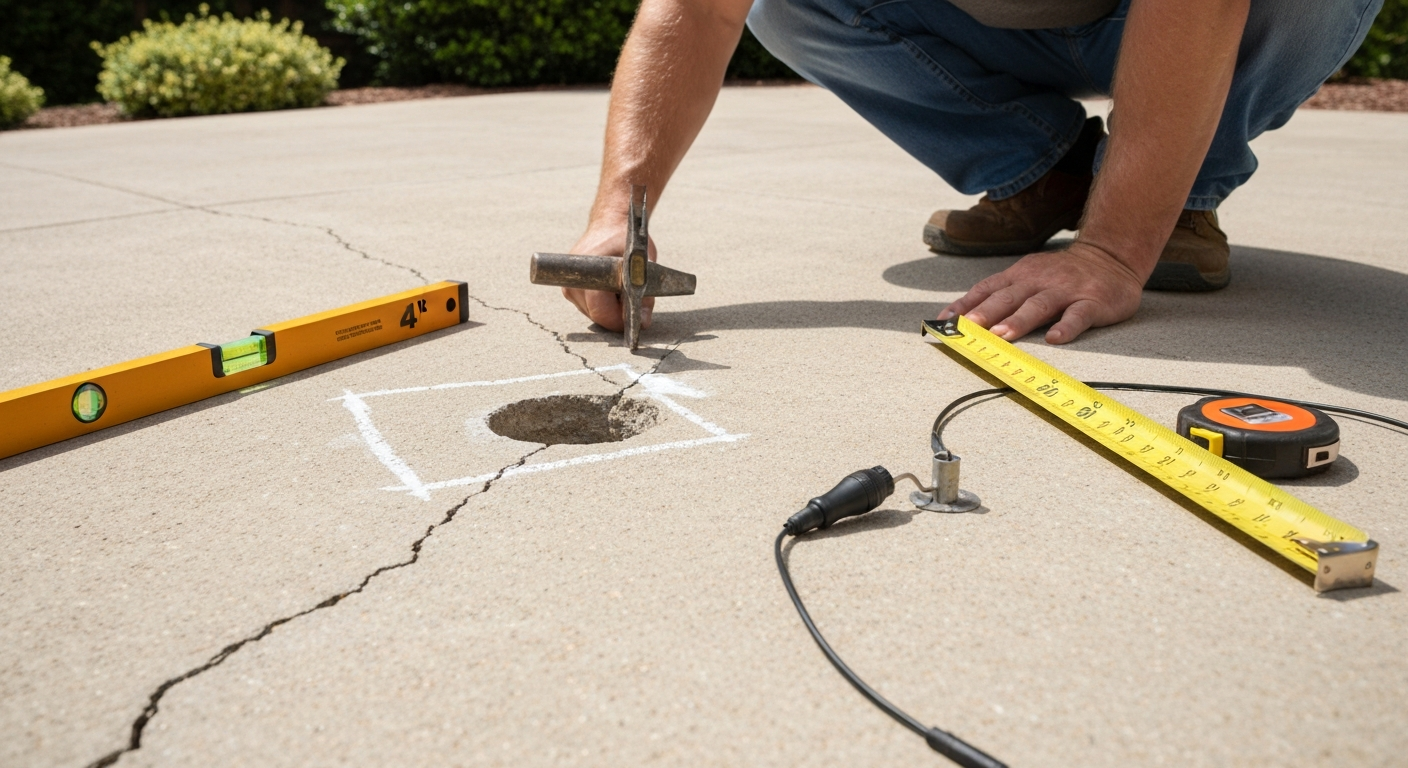
Start your diagnosis with a visual sweep. Look for cracking patterns, especially step cracks at corners, cracks that run parallel to edges, or places where one section of the patio sits noticeably lower than another. Water pooling in spots that did not used to pool is a telling sign. If you notice ponding after rain, that is worth tracking down carefully. Then do a sounding test: walk slowly across the slab and tap it with a steel hammer or a solid metal rod every two to three feet. A solid slab makes a sharp, dense thud. A hollow void underneath gives you a distinctly duller, almost drum-like sound. Mark every hollow spot with chalk as you go.
How to Measure and Map the Void Before You Touch Anything
Once you know roughly where the problem is, you need to understand its scale. I made the mistake early on of patching what looked like a small surface hole only to find out three months later that the void underneath extended four feet in every direction. Mapping first saves time and money.
Tools for the Job
- A 4-foot level or a laser level to check for surface elevation differences across the slab (measure on a 4 to 5 foot grid for a thorough picture)
- A zip level or water-tube level for accurate elevation mapping across larger patio areas
- A steel hammer or metal rod for sounding (tapping the surface to find hollow areas)
- A rotary hammer drill and a 1/2-inch bit to drill a small probe hole over a suspected void
- A borescope or inspection camera (you can rent one or use a cheap USB type) to visually confirm and estimate the size of a subsurface void through a drilled hole
- A straightedge and chalk for marking and measuring gap widths
For larger or more complex patios, ground-penetrating radar (GPR) is the gold standard for mapping hidden voids without any drilling. Engineering firms and specialty contractors use GPR regularly for exactly this purpose, and it can detect voids and delaminations beneath slabs with accuracy. It is not something you rent at a home center, but if you have a large undermined area and are unsure of the full extent, it is worth a few hundred dollars to have a contractor run a GPR scan before committing to a repair approach.
To measure a surface gap or hole, simply use a tape measure and a piece of wire to probe depth. For a subsurface void, drill a 1/2-inch hole over the sounding-confirmed hollow area and drop a thin wire or rod in to feel for the void boundary. A borescope through that same hole gives you a visual. For elevation differences, set your level or laser across the patio and measure the gap at multiple points. A displacement of less than one inch with limited cracking generally points to a candidate for mudjacking or foam injection. More than one to two inches of vertical drop, or cracking across multiple panels, starts pushing toward professional evaluation.
DIY or Call a Pro? How to Make the Right Call
I am as much a DIY advocate as anyone, but I have also seen homeowners spend money patching something that needed a structural fix, then end up spending more to redo it properly. Use this decision framework honestly.
| Situation | DIY Feasible? | Recommended Approach |
|---|---|---|
| Surface hole or spall, 1 inch diameter or smaller, shallow depth | Yes | Cementitious or epoxy patch mortar |
| Small gap between slab and wall, decorative/non-structural | Yes | Polyurethane backer rod and sealant |
| Localized hollow sound, slab settled less than 1 inch, limited cracking | Possible | DIY mudjacking or foam injection kit for small areas; pro for larger areas |
| Void confirmed under slab, slab settled 1 to 2 inches, stable soil | Pro preferred | Professional mudjacking or polyurethane foam leveling |
| Settlement greater than 2 inches, structural cracking, wide undermining | No | Professional structural or geotechnical evaluation; likely slab replacement |
| Active plumbing or irrigation leak underneath | No — fix leak first | Repair leak, then reassess void after soil dries and stabilizes |
| Known sinkhole risk, soil instability, or repeating movement after prior repair | No | Geotechnical engineer evaluation required |
Cost is a real factor too. Mudjacking runs roughly $3 to $25 per square foot depending on region and job complexity. Fixr lists mudjacking at about $3–$25 per sq ft and polyurethane foam leveling at about $8–$25+ per sq ft (Concrete Leveling Cost | Mudjacking Cost | Fixr (cost estimator)). Polyurethane foam leveling typically runs $8 to $25 per square foot or more. Full slab replacement costs significantly more and takes days to a week including demolition, base prep, pour, and cure time. A small surface patch you do yourself costs $20 to $50 in materials. The jump in cost from DIY patch to professional slab leveling is real, but so is the cost of patching something that needs leveling.
Tools and Materials You Will Need
For Small Surface Holes and Shallow Gaps
- Cold chisel and hammer (or angle grinder with diamond cup wheel) to cut back damaged edges
- Wire brush and stiff-bristle brush for cleaning the repair area
- Shop vac or compressed air to remove dust and debris
- Garden hose or pressure washer
- Concrete bonding agent (acrylic or epoxy-based)
- Polymer-modified cementitious patch mortar (products like Sakrete Top 'N Bond or Quikrete Vinyl Concrete Patcher) for shallow surface holes
- Two-component epoxy or polyurethane repair mortar for hairline cracks and small voids requiring higher strength or chemical resistance
- Margin trowel, pointing trowel, and float
- Mixing paddle and drill (for larger batches)
- Plastic sheeting or damp burlap for curing
- Textured finishing brush or sponge to match surface texture
For Subsurface Void Repair (Mudjacking or Foam Injection)
- Rotary hammer drill with 1.5 to 2.5-inch core bit (for cementitious mudjacking) or 5/8-inch bit (for polyurethane foam)
- Grout pump or pressure injection equipment (rentable or contractor-supplied for mudjacking)
- Cementitious grout mix: Portland cement, clean soil or fly ash, and water (no stones or roots to avoid clogging pumps)
- Two-component polyurethane foam kit for DIY small void filling, or professional injection rig for larger jobs
- Pressure gauge to monitor injection pressure
- Hydraulic grout packer or injection nozzle
- Patch mortar to close drilled holes after injection
- Safety glasses, gloves, and dust mask rated for concrete dust
- Knee pads, hearing protection for rotary hammer use
Safety, Site Prep, Permits, and Protecting What Is Around the Patio
Concrete work is physically demanding and involves real hazards. Concrete dust contains crystalline silica, which is a serious lung hazard with repeated exposure. Always wear an N95 or better respirator when cutting, grinding, or drilling. Eye protection is non-negotiable when chiseling or using a rotary hammer. For any mudjacking or foam injection, wear chemical-resistant gloves because both cementitious grouts and polyurethane components are irritants.
Before any drilling, call 811 (in the US) to have underground utilities marked. A buried irrigation line or electrical conduit under your patio is exactly the kind of surprise you do not want to hit with a rotary hammer. Give utilities at least two business days to respond before you start drilling.
Protect adjacent landscaping before you start patching. Cover plants and lawn within three feet of your work area with plastic sheeting. Cement and bonding agents are alkaline and will burn foliage on contact. If you are pressure washing, direct runoff away from garden beds. For mudjacking, protect any adjacent structures (house foundation, retaining walls, steps) because injecting grout under pressure near a foundation can push material in unintended directions if the void is connected. Check with your local building department about permits. Many jurisdictions do not require a permit for routine concrete patching, but significant structural repair or full slab replacement often does. A quick call takes five minutes and can save you from a problem during a home sale.
Step-by-Step: Patching Small Surface Holes and Shallow Gaps
This method works for holes up to about 1 inch in diameter and spalls or surface pitting up to roughly 1 inch deep. See the SAKRETE Flo‑Coat Concrete Resurfacer Mix product page (Home Depot) for manufacturer installation recommendations and cure times See the SAKRETE Flo‑Coat Concrete Resurfacer Mix product page (Home Depot) for manufacturer installation recommendations and cure times.. For anything deeper or wider, you will need to use a repair mortar with extended aggregate or move to the subsurface void repair methods further down.
- Clean out the damaged area completely. Use a cold chisel and hammer to remove any loose or flaking concrete around the hole until you are down to solid, sound material. For a cleaner result, use an angle grinder with a diamond cup wheel to cut back the edges at a slight undercut angle (this gives the patch something to grip rather than a feathered edge that will pop off). Vacuum or blow out all dust and debris.
- Pressure wash or scrub the area with water and a stiff brush. You need a clean, dust-free surface for the bonding agent to work. Let it dry to a surface-dry but still slightly damp condition. Fully saturated concrete will dilute your bonding agent; bone-dry concrete will absorb it too fast.
- Apply a concrete bonding agent. Brush or roll a thin, even coat into the hole and onto the surrounding surface. Follow the manufacturer's working time, which is usually 20 to 40 minutes. Apply the patch while the bonding agent is still tacky, not after it has fully dried. This is the step most people skip, and it is exactly why patches fail.
- Mix your polymer-modified patch mortar. For small holes, a pre-mixed trowel-grade product like Quikrete Vinyl Concrete Patcher works well. Mix according to the bag directions, usually to a peanut-butter consistency. Do not add extra water to make it easier to spread; a wet mix shrinks and cracks as it cures.
- Pack the mortar firmly into the hole in layers no more than 1/2 inch thick for deeper repairs. Press each layer down firmly to eliminate air pockets. Overfill the patch slightly above the surrounding surface.
- Tool and finish to match the surrounding texture. Use a trowel to bring the patch level with the surrounding slab, then duplicate the texture: a broom finish gets a light drag with a stiff-bristle brush; an exposed aggregate surface needs a sponge float. Do this while the patch is still workable, typically within 15 to 30 minutes of application.
- Cure the patch. Cover with plastic sheeting or damp burlap and keep it moist for at least 24 hours. Most polymer-modified mortars allow foot traffic in 3 to 8 hours but reach full strength over several days. Avoid vehicle traffic for at least 72 hours.
- Once fully cured, apply a concrete sealer over the patch and blend it into the surrounding area. This protects the repair and helps visually unify it with the existing slab.
Step-by-Step: Epoxy and Polymer Repair Mortars for Hairline Cracks and Small Voids
Epoxy and polyurethane repair mortars are a step up from standard cementitious patch material. They bond extremely well to existing concrete, resist chemicals and freeze-thaw cycling better, and are the right choice when the repair area will see heavy wear, oil exposure, or water pressure. Use them for hairline cracks (under 1/16 inch wide), small surface voids, and anywhere you need higher compressive or tensile strength than a standard cement patch can deliver. They do cost more, and they have shorter working times, so know what you are getting into before you open the cans.
When to Choose Epoxy or Polymer Mortar Over Standard Cementitious Patch
- Hairline cracks or cracks up to about 1/4 inch wide where a flexible, high-bond repair is needed
- Areas subject to oil, fuel, or chemical exposure (driveways, workshop areas)
- Repairs near drains or areas with standing water where moisture resistance matters
- When the surrounding concrete is very hard or dense and a standard bonding agent may not give adequate adhesion
- Thin repairs under 1/4 inch where a standard mix would shrink and delaminate
Mixing and Application
- Read the full technical data sheet (TDS) before you open anything. Two-component systems have fixed mix ratios by volume or weight (often 1:1 or 2:1 Part A to Part B). Getting this wrong means the material will not cure properly.
- Condition the components to the temperature range specified in the TDS, usually between 60 and 90 degrees Fahrenheit. Cold components mix poorly and cure slowly or incompletely. Hot conditions shorten working time dramatically.
- Pre-clean and prepare the surface the same way as for a cementitious patch: remove all loose material, vacuum clean, and achieve a surface-dry condition. Many epoxy systems do not require a separate bonding agent because the epoxy itself bonds directly to prepared concrete, but confirm with the manufacturer.
- Combine Part A and Part B in the specified ratio in a clean container. Mix thoroughly for the full time recommended in the TDS, typically 2 to 3 minutes, scraping the sides and bottom of the container as you go. Under-mixing leaves uncured streaks.
- Apply the mixed material into the crack or void immediately. Working time is typically 20 to 45 minutes at 70 degrees Fahrenheit, but it shortens significantly in heat. For hairline cracks, use a squeeze bottle or injection tip to force material deep into the crack. For small surface voids, pack in with a trowel and tool flush.
- Do not apply in layers thicker than the TDS specifies. Many epoxy systems generate exothermic heat during cure; thick layers can get hot enough to crack.
- Finish the surface to match surrounding texture while the material is still workable. Once epoxy cures, it is very hard to grind flush.
- Allow the full cure time before loading. Many epoxy mortars achieve foot-traffic strength in 4 to 8 hours, but full chemical cure for heavy loads takes 24 to 72 hours. Check your specific product.
One practical note: epoxy repairs do not stain the same way as concrete. If you plan to apply a concrete stain or color coat over your patio afterward, test the epoxy patch with your stain product on a small area first. Epoxy surfaces are non-porous and most acid stains will not penetrate them the way they do concrete. A UV-stable epoxy coating tinted to match your slab color is often a better finishing strategy over an epoxy patch than trying to force a stain to take.
Repairing Subsurface Voids: Mudjacking vs Polyurethane Foam vs Replacement
If your diagnosis confirmed a genuine void under the slab, whether the slab has settled or just has an air gap underneath, you have three real options: cementitious mudjacking (slabjacking), polyurethane foam injection (polyjacking), or full slab replacement. For step‑by‑step instructions on how to fix low spot in concrete patio, see our detailed guide on leveling and repairing settled slabs. For a step-by-step walkthrough on lifting and releveling slabs, see how to fix uneven concrete patio. Here is how they actually compare.
| Method | Hole Size Needed | Typical Cost (per sq ft) | Cure/Return Time | Best For | Limitations |
|---|---|---|---|---|---|
| Cementitious mudjacking | 1.5 to 2.5 inches diameter | $3 to $25 | Hours to 1 day | Large voids, significant settlement, heavy slabs | Heavy equipment, messy, heavier fill material, larger patched holes |
| Polyurethane foam (polyjacking) | 5/8 inch diameter | $8 to $25+ | Minutes to hours | Smaller voids, precise lift control, tight spaces | Higher cost, requires trained operator, not DIY for large areas |
| Full slab replacement | N/A (full demo) | Significantly higher | Days to 1 week (with cure) | Pervasive damage, active soil movement, structural failure | Most disruptive and expensive; requires subgrade correction first |
How Mudjacking Works (and How to Do It)
Mudjacking pushes a cementitious slurry (typically Portland cement, clean loam or fly ash, and water) under pressure through holes drilled in the slab. The grout fills the void and can lift the slab to restore grade. According to ACI Repair Application Procedure RAP-11, holes for cementitious grout are typically spaced 5 to 10 feet apart and drilled to 1.5 to 2.5 inches in diameter. The key discipline in mudjacking is limiting lift at any single hole to no more than 1/4 inch per injection interval and monitoring pressures carefully. Normal nozzle pressures run about 10 to 20 psi. A sudden pressure spike usually means the void is filled and grout is beginning to travel. Mixes that are too stiff cause localized buildup around the hole (what field crews call 'stools') rather than traveling to fill the full void, so maintain a pumpable, flowing consistency.
- Mark your injection hole locations based on your sounding map. Stagger them across the void area, spacing roughly 5 feet apart and closer over heavily cracked sections.
- Drill holes to 1.5 to 2.5 inches in diameter using a rotary hammer and core bit. Drill straight through the slab thickness into the void space below.
- Mix your grout to a pumpable, flowing consistency. Portland cement, clean fly ash or loam, and water. No gravel, stones, or organic material that could clog the pump.
- Insert the grout packer or injection nozzle and begin pumping. Monitor the pressure gauge. Pump until grout flows from an adjacent hole, confirming the void is filled between those two points.
- Limit lift at each hole to 1/4 inch at a time. Check elevation with your level between intervals. Do not try to achieve full lift in one shot.
- Once the area is filled and the slab is back at grade, remove the nozzle and patch each injection hole with a cementitious repair mortar. Trowel flush and texture to match.
How Polyurethane Foam Injection Works
Polyjacking uses a two-component expanding polyurethane foam injected through much smaller holes, typically 5/8 inch in diameter. The two components are mixed at the injection tip and expand rapidly to fill the void and lift the slab. Professional systems operate at high pressures (around 800 to 1000 psi) with temperature-controlled components and precise metering. The result is lighter fill material than cementitious grout, smaller and less noticeable patched holes, and very fast cure times, often allowing traffic return within hours. For residential homeowners, DIY two-component pour-in-place polyurethane foam kits exist for small void filling, but they lack the pressure control of professional systems. For anything beyond a minor localized void, hire a contractor certified in polyurethane slab leveling.
When Full Slab Replacement Is the Right Answer
Full replacement means demolishing the old slab, excavating to a proper subgrade, placing and compacting a granular base (commonly 4 inches of compacted aggregate, compacted to roughly 95% of maximum dry density), placing reinforcement, pouring new concrete, finishing, curing, and sealing. This is a multi-day job at minimum. It is the right answer when the soil instability is broad and ongoing, when structural cracking compromises the slab integrity, when active water intrusion has never been resolved, or when the existing base was so poorly done that repeated void formation is inevitable. Permits are commonly required for full replacement. Check with your local building department before scheduling the demo.
Drainage and Backfill Fixes to Stop the Problem From Coming Back
Filling the void without addressing why it formed is just buying time. For detailed steps on preventing and repairing soil erosion beneath slabs, see the guide on how to fix erosion under concrete patio. Most subsurface voids under residential patios trace back to water: rainwater running under the slab edge, irrigation oversaturation, poor slope directing water toward the foundation. Fix the drainage and you fix the root cause. For step-by-step instructions on directing water away from your slab, see our guide on how to drain concrete patio.
- Regrade the soil around the patio edges to slope away from the slab at a minimum of 1 inch per foot for the first 6 feet. This alone eliminates a huge percentage of recurring erosion problems.
- Extend downspout extenders so roof runoff discharges at least 4 to 6 feet away from the patio perimeter, not directly against the slab edge.
- Where water consistently pools at the slab edge or flows under it, install a French drain: a perforated pipe in a gravel-filled trench routed to a discharge point away from the patio. This intercepts surface and subsurface water before it reaches the void zone.
- After any mudjacking or foam injection, backfill and compact the soil around the slab perimeter with granular fill to eliminate the gap that allowed water to enter in the first place.
- Consider a concrete edge seal or expansion joint sealant around the perimeter of the patio to physically block water entry at the slab edge.
If you are also dealing with water pooling on the surface of the patio, that is a related but separate issue worth addressing at the same time. Resurfacing to restore proper slope, or adding a slot drain, can prevent the surface water from ever reaching the slab edge and working its way underneath.
Finishing to Match Texture, Color, and Stain
Getting a patch to blend visually is genuinely the hardest part of concrete repair for most homeowners. Fresh patch mortar is lighter in color than weathered concrete, and it tends to stay that way. There are a few things you can do to minimize the mismatch.
- For texture matching: replicate the finish method used on the original slab. Broom-finished concrete gets a light broom drag with a stiff brush while the patch is still fresh. Exposed aggregate gets a sponge float while the surface is plastic. Salt-finished or stamped surfaces are harder to match and may require a full resurfacer coat over a larger area.
- For color matching: allow the patch to fully cure (at least 7 days) before assessing color. Fresh patches always look bright. Once cured, you can apply a concrete stain or color wash over the patched area and blend it into the surrounding surface. Acid stains produce variable results on patch mortars, so a water-based concrete stain gives more predictable color.
- For large patched areas: consider applying a thin concrete resurfacer over the entire patio surface. This gives you a consistent new layer to stain or seal and eliminates the patchwork appearance. Products like Sakrete Flo-Coat or similar resurfacers bond well to existing concrete and can be textured to match.
- Always seal the patio after any patching or resurfacing. A penetrating silane/siloxane sealer protects both the patch and the surrounding concrete from water infiltration, which is exactly what caused the problem in the first place.
Expected Time and Cost Summary
| Repair Type | DIY Time Estimate | DIY Material Cost | Pro Cost Estimate |
|---|---|---|---|
| Small surface hole or spall (under 1 in) | 1 to 2 hours | $20 to $50 | $150 to $300 (minimum service call) |
| Epoxy or polymer mortar repair (hairline cracks, small voids) | 2 to 4 hours | $40 to $120 | $200 to $500+ |
| Mudjacking (small area, DIY) | Half day to full day | $100 to $300 (equipment rental + materials) | $300 to $1,500+ depending on area |
| Polyurethane foam injection (professional) | Hours (contractor) | N/A | $500 to $2,500+ depending on area and extent |
| Full slab replacement | Days to a week (if DIY) | $500 to $2,000+ materials only | $3,000 to $10,000+ depending on size and region |
These ranges are broad because regional labor rates, job size, and void complexity vary significantly. For mudjacking and foam injection, always get at least two local quotes. The numbers above are national market averages, not guarantees.
Signs You Should Stop and Call a Professional
Even if you are comfortable with tools and have done concrete work before, there are situations where the right move is to put down the drill and call someone. Do not ignore these.
- The slab has moved more than 1 to 2 inches vertically and the movement appears to be ongoing, not historical
- You found an active water or plumbing leak underneath and do not know where it is coming from
- Multiple slab panels are affected and cracking runs through the full slab thickness in multiple directions
- After a prior mudjacking or foam injection, settlement recurred within a year
- You are in an area with known sinkhole activity or expansive clay soils that shift seasonally
- The void extends to within a few feet of the house foundation
- Any part of the repair involves a structural load (covered patio roof posts, outdoor kitchen bases, stairs connected to the house)
Maintenance Tips to Protect Your Repair Long-Term
The best repair is the one you never have to redo. Once you have filled the hole, fixed the drainage, and finished the surface, a small amount of annual maintenance goes a long way.
- Inspect the patio each spring after freeze-thaw season. Look for new cracking, any fresh settlement, or gaps opening at the perimeter. Small problems caught early are cheap fixes.
- Reseal the patio every 2 to 3 years with a penetrating sealer. Sealer keeps water out of the concrete and out of the soil below.
- Keep expansion and control joints clean and filled with a flexible polyurethane joint sealant. Cracked or missing joint sealant is a direct water entry point.
- Trim tree roots that are approaching or growing under the slab. Root barriers are available at landscaping suppliers and are much cheaper than repairing a root-lifted slab.
- Check downspout extenders and site grading after any major storm. Erosion can redirect drainage in ways that put water right back under your patio.
FAQ
How do I diagnose the size and cause of a hole, gap or void under my concrete patio?
Start with a visual survey: look for settled areas, cracks, ponding water and displaced edges. Tap the slab with a hammer—hollow or “drummy” sounds indicate voids. Measure elevation differences with a level or laser/zip level on a 4–5 ft grid to map settlement. Probe edges by hand‑digging or use a small core/auger to inspect the underside. For hidden/large voids use a borescope through a small drill hole or ground‑penetrating radar (GPR) to map void extent. Check for likely causes: erosion or washout (signs of scoured soil, exposed aggregate), poor compaction (uniform settlement, soft fill under edges), tree roots (root fragments, lifted slabs near trees), plumbing leaks (wet soil, active moisture, dye test), or freeze/thaw damage. Monitor over days or weeks for active movement or new water to distinguish ongoing settlement from historical problems.
What decision criteria tell me whether this is a DIY repair or I should hire a professional?
DIY is reasonable when: holes/spalls are small (≤1 in diameter or shallow surface loss), settlement is minor (<1 in) and localized, no active leaks or progressive movement, and the slab is otherwise intact. Hire a pro when: vertical displacement is >1–2 in, widespread or progressive settlement, extensive or structural cracking, large undermined areas, active plumbing leaks or sinkhole indications, poor or unknown subgrade conditions, or when mudjacking/polyjacking or replacement is required. Also hire a licensed contractor for jobs requiring permits, engineered compaction, or when you need guarantees/insurance-backed warranties.
What tools and materials do I need for small surface hole/patch repairs?
Tools: hammer/chisel, wire brush, stiff broom, pressure washer (optional), angle grinder with diamond cup or mortar raking wheel (optional), mixing bucket, margin trowel, pointing trowel, float, water spray bottle, disposable gloves, eye protection. Materials: concrete bonding agent (polymer latex), polymer‑modified cementitious patch or epoxy/polymer mortar (per product TDS), clean water, concrete resurfacer (for texture match), sand or aggregate if specified, and stain/sealer to match finish. Follow product SDS/TDS for ratios and additives.
Step‑by‑step: How do I repair small surface holes, spalls and gaps in a concrete patio?
1) Safety and prep: wear gloves/eye protection, remove furniture, and clear area. 2) Clean: remove loose concrete, dust and debris with brush/pressure wash; allow to dry to damp‑but‑not‑saturated. 3) Square the edges/backcut if necessary so patch bonds to sound concrete. 4) Dampen substrate and apply bonding agent per manufacturer. 5) Mix patch material (polymer‑modified cement or epoxy mortar) to recommended consistency. 6) Apply in layers if deep (don’t exceed product depth limits); compact/press mortar into hole to eliminate voids. 7) Tool and texture to match surrounding finish (float/trowel or stipple). 8) Cure per product instructions (keep damp if required). 9) After curing, stain/seal to match color and protect patch. Expect foot traffic in hours to days depending on material; full strength in days.
How should I repair subsurface voids and settled slabs (options and when to use each)?
Three practical options: 1) Mudjacking (cementitious slab jacking): pump a cementitious grout under the slab to fill voids and lift the slab. Use when settlement is localized, lifts required are modest, and subgrade is stable. Pros: lower material cost, good long‑term mass. Cons: larger drill holes, longer cure, heavier material that may not stop recurring settlement. 2) Polyurethane polyjacking: inject two‑component expanding polyurethane foam through small holes (~5/8 in) to fill voids and lift quickly. Use for irregular voids, tight spaces, fast cure, and minimal hole patching. Pros: quick cure/traffic return, fewer holes, lightweight. Cons: higher cost, requires trained installer and temperature control. 3) Full slab replacement: demo and replace slab when displacement >1–2 in, slab is fractured/structurally compromised, soil instability or ongoing subsidence exists, or plumbing/geotechnical problems require excavation. Replacement is the durable engineered fix when underpinning and regrading are needed.
What are the step‑by‑step procedures for mudjacking (cementitious grout slabjacking)?
1) Map settled areas and mark drill locations (spacing typically ~5–10 ft for slurry). 2) Drill holes (1.5–2.5 in diameters typical for grout), positioned to access voids. 3) Set up grout pump, hoses and packers. 4) Mix pumpable cementitious grout (portland cement, selected fines/topsoil in some practices, water; avoid coarse stone). 5) Inject grout under slab at controlled pressure and volume; monitor lift and stop when slab reaches target elevation or grout flows to adjacent holes. Limit lift increments (ACI recommends ≤1/4 in per interval) and monitor pressures. 6) Finish holes with patch mortar or replace cores. 7) Clean site and allow cure as recommended (may need days before heavy traffic). Note: avoid overly stiff mixes that create stools; professional equipment improves control.