A slippery concrete patio is almost always fixable with DIY methods, and most of the time you can dramatically improve traction in a single weekend. The right fix depends on what's actually causing the slipperiness: algae or mildew buildup, a glossy sealer, an overly smooth original finish, water pooling in low spots, or surface damage. Identify the cause first, then match the fix to it. That's the whole game.
How to Fix a Slippery Concrete Patio: DIY Step-by-Step

Silas Morrison
3 Jul 2026
Why your concrete patio gets slippery
Concrete isn't naturally slippery, but several things can make it that way. Most patios I've worked on have one or two overlapping causes, so it's worth running through the whole list before you start buying products.
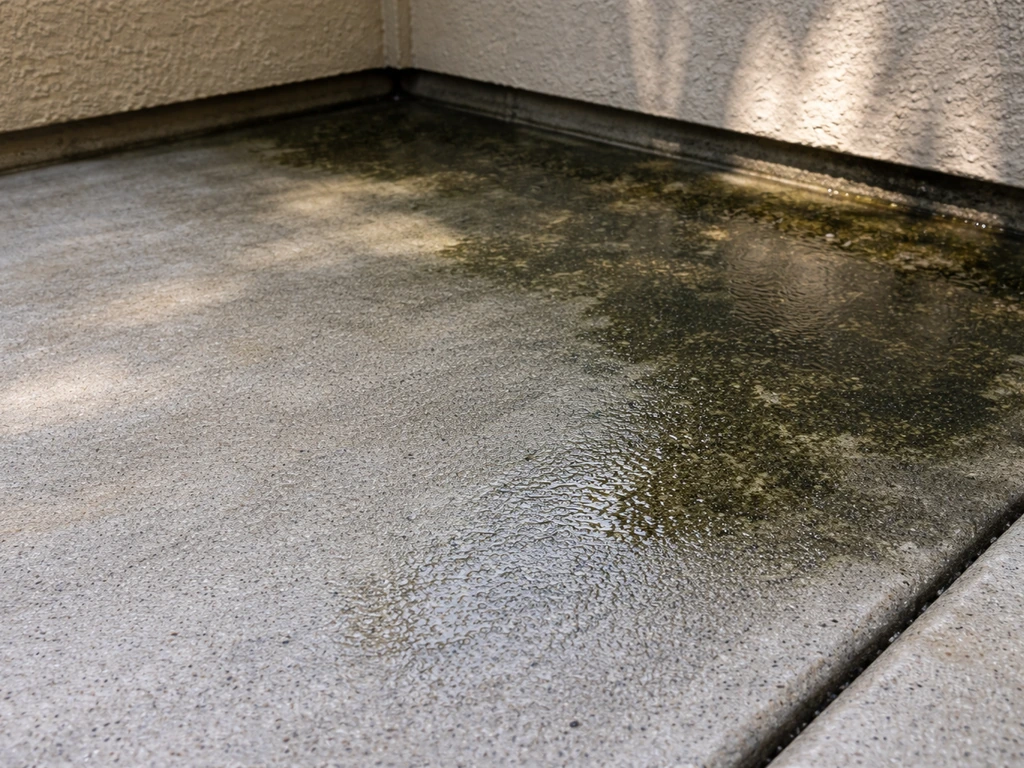
- Algae, mold, and mildew: Shaded or damp areas grow a thin biofilm that feels like wet soap underfoot. This is the most common culprit and the easiest to fix.
- Glossy or film-forming sealers: High-gloss topical sealers fill in surface texture and create a film that water rides over like a lubricating layer. If your patio was sealed in the last few years and it's worse when wet, this is likely your problem.
- Over-troweled or burnished finish: Some patios were finished too smooth during the original pour. Power-troweled surfaces meant for interior slabs occasionally show up on outdoor work and are genuinely hazardous when wet.
- Water pooling: Standing water is slippery on any surface. Low spots and inadequate slope (less than 1/4 inch drop per foot) let water sit instead of shed.
- Oil, grease, or grime buildup: BBQ grease, car drips, and general organic grime soak into concrete and create a slick film, especially when wet.
- Worn texture: Old patios that once had a broom finish can wear down over years of foot traffic until the profile is nearly flat.
- Efflorescence: Powdery white, yellow, or brown mineral deposits near cracks or joints indicate moisture moving through the slab. The chalky residue itself adds to slipperiness and signals an underlying water problem.
Quick safety steps and diagnosing your specific problem
Before you do anything else, make the patio temporarily safer while you work on the permanent fix. For the complete step-by-step approach to fix a concrete patio safely, follow the sections on safety steps and diagnosing your specific problem. Lay out rubber-backed outdoor mats or anti-slip tape strips over the worst areas. These are a stopgap, not a solution, but they matter if family or guests are using the space.
Now diagnose the actual cause. Walk the patio and look closely. If you see green, black, or brown discoloration, especially in shaded corners or near downspouts, you have algae or mildew. If the surface looks clean but feels slick when wet and has a slight sheen, check whether it's been sealed. A simple test: flick a few drops of water on the surface. If the water beads up and sits on top, you have a film-forming sealer. If the water soaks in within a few seconds, the surface is unsealed. You can also look for faint white scratch marks when you drag a key lightly across the surface, which shows up on sealed coatings. If the surface looks clean, passes the water-drop test (no beading), and is still slippery, the problem is likely the original finish being too smooth or the texture being worn down. Finally, look for areas where water collects after rain. Even a quarter inch of standing water turns any concrete into a skating rink.
Clean it first: removing algae, mildew, mold, and oils
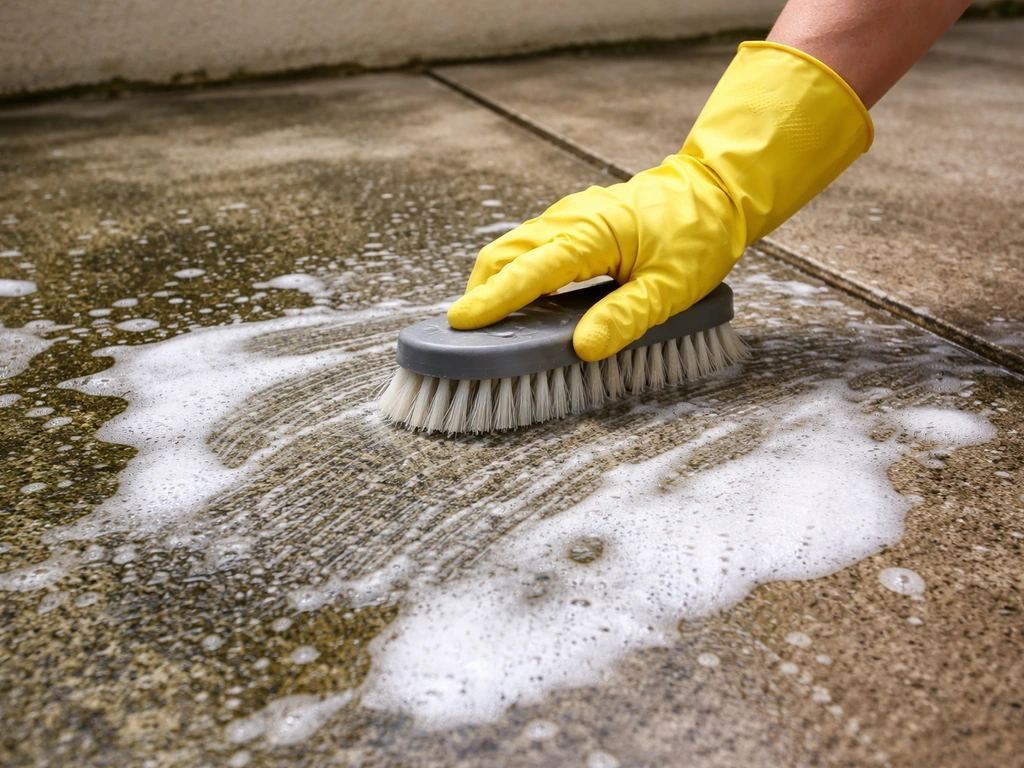
Cleaning is always step one, even if you plan to resurface or reseal later. No coating bonds properly to a dirty surface, and sometimes a deep clean alone restores enough traction to solve the problem.
For algae, mold, and mildew
You have two main options: a bleach-based cleaner or an oxygen-based non-caustic cleaner. Bleach (sodium hypochlorite) diluted in water works fast and kills biological growth effectively. A common mix is roughly one cup of household bleach per gallon of water. Apply it, let it dwell for 10 to 15 minutes so it actually kills the growth rather than just rinsing it around, then scrub and rinse thoroughly. Critical safety note: never mix bleach with any other cleaner, acid, or ammonia-based product. Mixing bleach with acids or ammonia releases toxic chlorine gas or other dangerous fumes. Use it alone, keep the area ventilated, and wear gloves and eye protection.
If you prefer a less harsh approach, products like Wet & Forget work well for ongoing algae and mildew problems, especially on shaded surfaces. Homeowners on a Reddit HomeImprovement thread report that Wet & Forget works over time for algae and mildew, especially on shaded surfaces products like Wet & Forget work well for ongoing algae and mildew problems, especially on shaded surfaces.. The product dilutes at roughly 1 part concentrate to 5 parts water. You spray it on and leave it to work over days and rain cycles. It won't give you instant results like bleach, but it's gentler on surrounding plants and doesn't require the same safety precautions. Rust-Oleum Moldex Outdoor Wash is another solid non-bleach option that uses an oxygen-foaming action to lift mildew and algae stains and is safe to use with a rinse.
When pressure washing, use a fan-tip nozzle (25- or 40-degree) rather than a zero-degree (pencil) tip. Hold it at least 12 inches from the surface and keep it moving. High-pressure water used too close or with too narrow a nozzle can actually etch grooves into concrete, damaging the surface texture you're trying to preserve or restore. A standard homeowner pressure washer at 1,500 to 2,000 PSI with the right nozzle is fine for cleaning without surface damage.
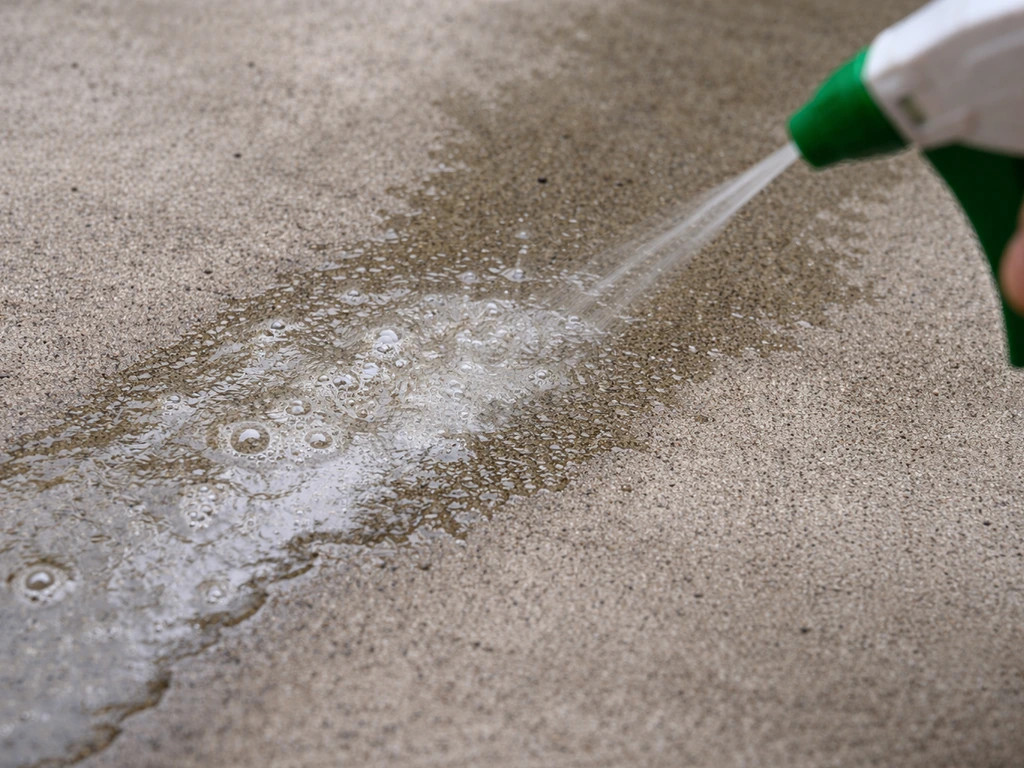
For oil, grease, and grime
Oil needs a degreaser, not just water. Apply a concrete degreaser or a heavy-duty dish soap concentrate, work it into the stain with a stiff-bristle brush, let it sit for several minutes, and rinse. For old, ground-in grease near a grill or under a car overhang, you may need two or three applications. Don't skip this step before applying any sealer or coating: oil contamination under a sealer breaks the bond and leads to peeling.
Increase grip by changing the surface texture
If cleaning alone doesn't solve the problem, the next step is to physically increase the surface texture, or profile. This matters most when the original finish is too smooth, when a sealer has filled in the texture, or when the surface has worn down over time.
Acid etching
Acid etching with a diluted muriatic acid solution is the most accessible DIY method for opening up a smooth concrete surface. It dissolves a thin layer of the cement paste and exposes aggregate, creating a slightly rough profile similar to 120-grit sandpaper. This falls in the lower range of the ICRI Concrete Surface Profile (CSP) scale, roughly CSP 1 to 3, which is enough to improve traction and help coatings bond. Mix according to product directions (typically 1 part muriatic acid to 10 parts water, always adding acid to water, never the reverse), apply evenly, allow it to fizz and react for 5 to 10 minutes, then neutralize with a baking soda and water solution and rinse thoroughly. Wear chemical-resistant gloves, eye protection, and rubber boots. Work in a ventilated area and don't let the acid dry on the surface.
Mechanical grinding or shot blasting
For serious smoothness problems, mechanical methods give you more control over the final profile. Angle grinders with diamond cup wheels or concrete grinding discs work well for smaller areas. For a full patio, rentable walk-behind concrete grinders or shot blasters are worth the day-rate. Shot blasting can achieve CSP 3 to 7 depending on the equipment and media, which is a genuinely aggressive texture. For most homeowners just trying to improve traction, you don't need to go past CSP 3 or 4. Tremco’s traffic coatings manual relates CSP 2 to 4 surface profile expectations to the finish outcome after surface preparation like blasting and grinding Tremco Traffic Coatings Manual. The goal is a surface that looks and feels like fine sandpaper, not gravel. Equipment rental yards at big-box stores carry surface grinders; expect to pay around $50 to $100 for a half-day rental.
Resurfacing with a textured overlay
If the surface is worn, pitted, or just chronically smooth, applying a concrete resurfacer with a broom or trowel texture is a great all-in-one solution. Products like Quikrete Concrete Resurfacer, SikaQuick Concrete Resurfacer, and similar overlays bond to the existing slab (as thin as a feather edge up to about 1/2 inch) and let you add a fresh broom finish on top. After you pour and spread the material, drag a stiff broom across the wet surface before it sets to create the linear texture pattern that sheds water and grips shoe soles. Bond is entirely dependent on surface prep: the existing concrete must be clean, sound, and damp (not wet). Any loose material, oil, or standing water under the overlay will break the bond. This approach also addresses the surface damage issues covered in the repair section below. If your patio has broader crumbling or pitting problems, look at dedicated guidance on how to fix a crumbling or pitted concrete patio before you resurface.
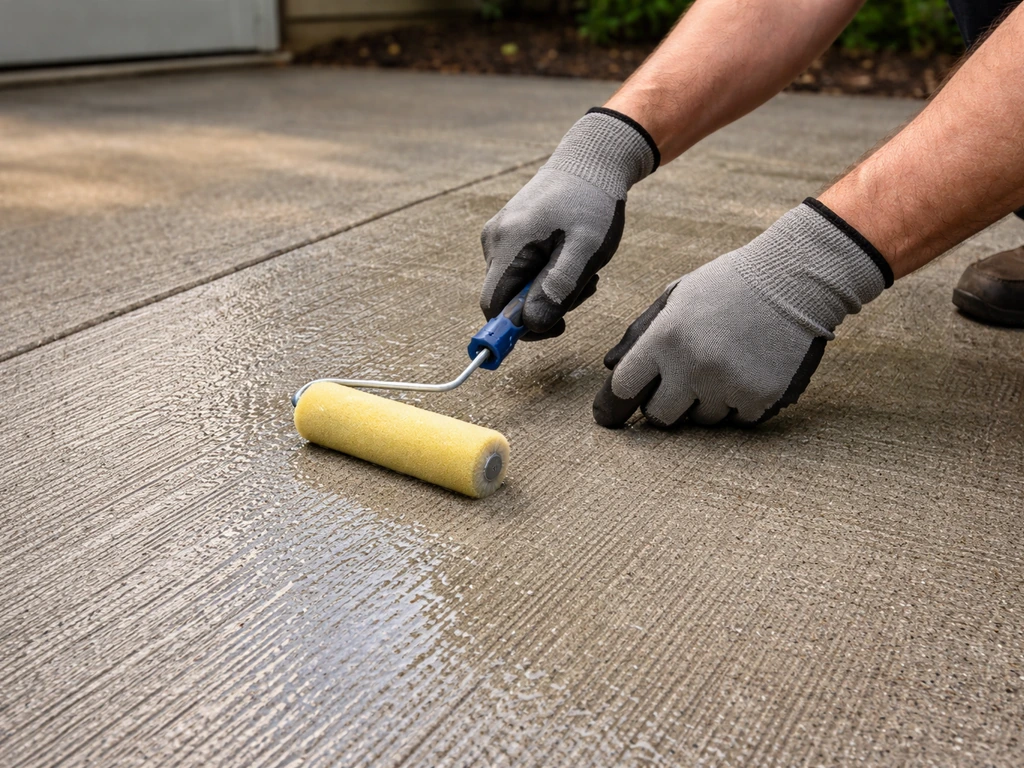
Choosing and applying the right sealer or coating
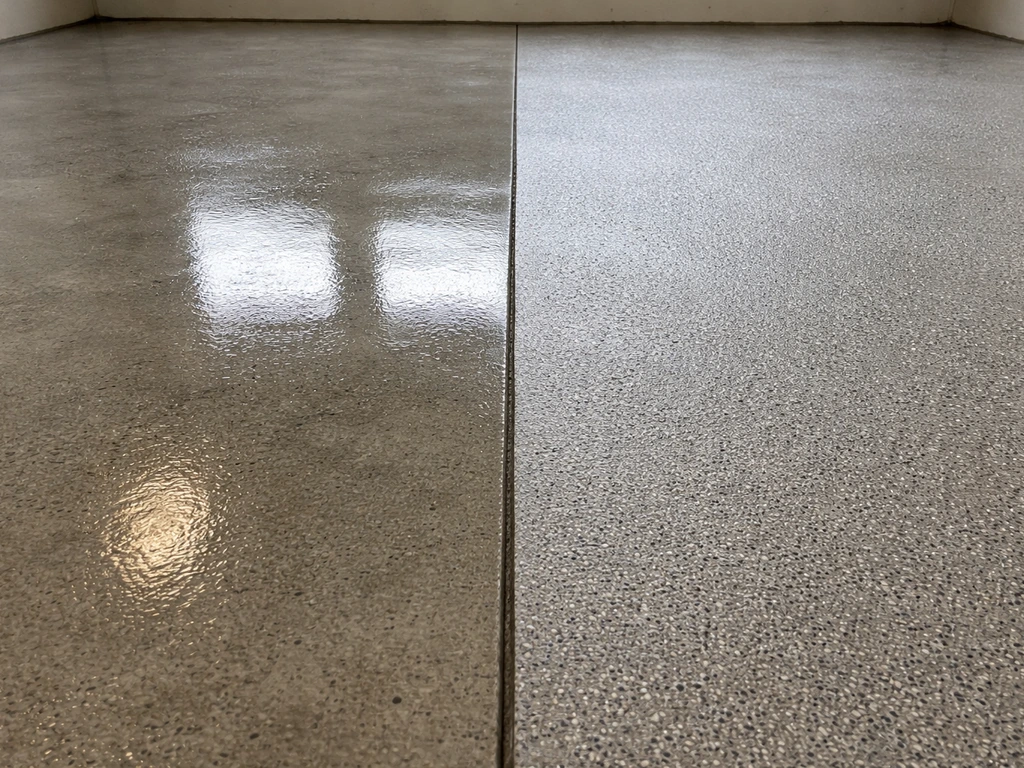
Sealers are where a lot of homeowners accidentally make the slipperiness worse. A high-gloss acrylic or epoxy sealer applied to a smooth surface is a slip hazard because the film fills in texture and water creates a lubricating layer on top. Here's how to choose the right one.
| Sealer/Coating Type | Traction Effect | Best For | Notes |
|---|---|---|---|
| High-gloss acrylic or epoxy sealer (no additive) | Reduces traction when wet | Decorative indoor-style finishes | Avoid on outdoor patios unless you add grit |
| Matte or satin acrylic sealer | Neutral to slight improvement | General patio protection | Better than gloss but still benefits from anti-slip additive |
| Penetrating/silane-siloxane sealer | Preserves or slightly improves traction | Unsealed concrete you want to protect | Doesn't film over texture; good choice for most exterior patios |
| Anti-slip additive in sealer (e.g., Rust-Oleum Anti-Skid Additive) | Meaningful improvement | Any existing sealer or new sealer application | Broadcast or mix into topcoat; add more for steeper areas |
| Dedicated anti-slip coating (e.g., Watco Safety Grip, Rust-Oleum Concrete Saver) | Strong improvement | High-traffic or high-risk areas, pool surrounds | Aggregate embedded in wet coat; may need surface prep/primer on very smooth surfaces |
| Pedestrian deck coating (e.g., Tremco Vulkem OC810) | Strong improvement | Exposed decks, elevated patios | Rubberized with mildew resistance; needs moisture evaluation before application |
The easiest upgrade to an existing sealer situation is to add an anti-slip grit additive to a fresh topcoat. Products like Rust-Oleum Anti-Skid Additive mix directly into epoxy, latex, or acrylic sealers and coatings. You can also broadcast the grit onto a wet coat before it dries. For pool decks or areas that stay consistently wet, a dedicated anti-slip system with embedded aggregate (like Watco Safety Grip) is worth the extra effort. Note that Watco and similar systems warn that very smooth or power-floated concrete usually needs priming before the anti-slip coat will bond properly.
Penetrating sealers (silane, siloxane, or silane-siloxane blends) are my preferred choice for most exterior concrete patios where the main goal is protection. They soak into the concrete rather than forming a film, so they don't change the surface texture or reduce traction. They won't make a slippery patio non-slip on their own, but they won't make things worse either, and they protect against moisture intrusion that causes freeze-thaw damage and efflorescence.
When applying any sealer, check that your concrete meets the manufacturer's moisture requirements first. Applying a coating over damp or recently wet concrete causes adhesion failure. Most products need the surface to be dry for at least 24 to 48 hours before application. Traffic-coat systems like Vulkem OC810 specifically require evaluating concrete moisture and cure conditions before application. A typical exterior sealer may be trafficable within 24 hours but reach full cure in 7 days, so plan accordingly.
Repair cracks, low spots, and drainage problems
Cracks and uneven areas contribute to slipperiness in two ways: they create trip hazards and they collect water. A low spot that holds even a quarter inch of standing water turns the whole area slick. This is where the drainage and repair side of the fix becomes important.
Patching cracks and spalls
For narrow cracks and shallow spalls, use a polymer-modified concrete patching product. Options like Quikrete Vinyl Concrete Patcher, Sakrete Top 'N Bond, and Nox-Crete Feather Patch are all designed to taper to a thin feather edge, which is critical for surface repairs. A patch that creates a raised edge becomes a new trip hazard and collects water at its margin. Clean the repair area thoroughly, remove loose concrete, dampen the substrate (don't leave standing water), and apply the patch material per instructions. For small surface spalls and pitting, pressing the material in firmly and feathering the edges flat is the main skill. Let it cure fully before walking on it or applying any sealer over the repair. For more extensive surface deterioration, this falls into the same territory as a full resurfacing project, and the approach for a pitted or crumbling patio is worth reviewing separately.
Fixing water pooling and slope issues
The standard target for patio drainage is a slope of about 1/4 inch per linear foot, which works out to roughly a 2% grade. If your patio was built without adequate slope or has settled unevenly, water will pool in low spots. For minor low spots, a self-leveling or troweled-on overlay can build up the area to redirect water flow. For larger slope problems, you may need a thicker overlay or a channel drain installed at the low point. A channel drain is a more involved project but it permanently solves pooling in a specific zone without requiring you to rebuild the whole slab. Correcting grading issues also helps with efflorescence, since water pooling on the slab surface eventually works its way into cracks and joints, dissolves minerals, and deposits them on the surface as chalky residue when it evaporates.
Keep it safe long-term: prevention and maintenance
Once you've fixed the problem, keeping it fixed takes less effort than most people expect. A basic routine goes a long way.
- Clean the patio at least twice a year, or more often if it's shaded or near trees. A simple rinse and scrub with a mildew-fighting cleaner in spring and fall prevents algae and mildew from building up a foothold.
- Reseal on a schedule. Exterior sealers don't last forever. Their lifespan depends on sun exposure, foot traffic, and formulation, but most penetrating sealers last 3 to 5 years and most film-forming sealers last 2 to 4 years. Do a water-bead test each spring. If water soaks in quickly rather than beading, it's time to reseal.
- When you do reseal, choose the right product. Stick to penetrating sealers or matte-finish topcoats with anti-slip additive. Avoid high-gloss products on any horizontal exterior surface that gets wet.
- Keep water moving off the slab. Clean gutters and downspouts so they're not dumping water directly onto the patio. Check that the slope is still shedding water after any significant freeze-thaw cycles, which can shift or heave slabs over time.
- Address cracks and spalls as soon as you notice them. Small repairs are quick and cheap. Ignored cracks let water in, which accelerates surface damage and creates more pooling.
- Avoid using steel shovels on the surface in winter. Metal shovel edges chip the surface profile over time, and deicing salts (especially calcium chloride and rock salt) deteriorate concrete texture and contribute to spalling. Use a plastic shovel and sand for traction instead of salt.
The biggest mistake I see homeowners make is applying a new glossy sealer to a freshly cleaned patio and then wondering why it's slippery again the first time it rains. That one step, swapping a gloss sealer for a matte or penetrating product with anti-slip additive, prevents most repeat problems. Get the diagnosis right, match the fix to the cause, and your patio should stay safe and grippy for years without much ongoing effort.
FAQ
Can I fix a slippery concrete patio just by cleaning it?
Yes, but do it in the right order. Clean first to remove algae film, oil, and dust, then let the patio dry and do the water-drop test again. If water still beads after cleaning, you likely have a sealer film to remove or you need to switch to a system (anti-slip additive or a penetrating treatment) designed for sealed concrete.
How do I know if grinding or shot blasting actually improved traction?
Rentals and DIY grinders can create a surface that looks gritty but still be too smooth if the profile is uneven. After grinding or shot blasting, vacuum thoroughly and test traction with wet shoe sole contact (or a bucket water spray) before sealing or overlaying, so you do not trap a weak bond under a coating.
What if my patio has cracks and it also pools water?
Avoid treating it as a quick “one-and-done” if you have cracks plus pooling. Even if you add anti-slip grit, water trapped in low areas keeps the surface lubricated and can undermine patches or overlays. Fix drainage or low spots first, then add the traction system after the repairs cure.
What should I do if the water beads up, which suggests a sealer?
If you see beading, test for sealer presence before doing any acid etching or resurfacer. Acid can fail to provide good bonding over some coatings, and you can also create a patchy surface. In sealed situations, the safer path is usually mechanical profiling and/or using products specifically compatible with existing sealers, followed by thorough bond testing.
How long should I wait after using bleach or oxygen cleaner before sealing or overlaying?
Yes, but take extra care. After you scrub with bleach or oxygen cleaners, rinse until there is no chemical residue, then fully dry before any sealing or patching. If the cleaner residue remains, it can interfere with adhesion and cause coating failures or dark spot reappearance.
What’s the safest way to pressure wash concrete for traction without damaging it?
Pressure wash at too-close distance or with a pinpoint tip can etch the concrete and create a different, sometimes weaker texture that later sheds coatings or exposes smooth planes. Use a fan tip, keep the nozzle moving, and stop once the surface is clean and uniform rather than trying to “polish off” the slab.
How can I tell if oil contamination is still causing slipperiness?
Oil and grease contamination can be hidden under algae, and it often shows up again after cleaning. Do a simple wipe test using a rag with mineral spirits on the area; if the rag picks up oily residue, degrease again and rinse, then let it dry before any acid etching, resurfacer, or sealer.
Can I add anti-slip grit to fix a glossy or slippery sealer?
Apply anti-slip grit to a fresh topcoat while the coating is still workable, and avoid uneven broadcast that creates hard spots and soft spots. Also, remember that some high-traffic areas need an embedded-aggregate system with priming, especially over very smooth or power-floated concrete.
Is it worth prioritizing drainage and moisture control over just adding a non-slip coating?
In many climates, freeze-thaw makes traction and durability inseparable. If water is staying on the slab, slipping is the symptom, and moisture intrusion is the underlying cause. Choose traction-safe repairs or resurfacing with good slope/drainage, then consider penetrating sealers to reduce moisture movement.
Why does mildew or algae come back even after I clean it?
Do not assume all “mildew” is mildew. If the growth is mainly in shaded corners near downspouts, focus on water management, not just scrubbing. Also, check gutter/downspout discharge so runoff does not keep feeding biology back onto the surface.
How soon can I walk on patching or resurfacer after it dries?
Walk on repaired or resurfaced concrete only after full cure per the product label, not “when it looks dry.” Early traffic can create micro-voids and weak edges that fill with water and become slip-prone, and can also compromise the bond under the next coating.