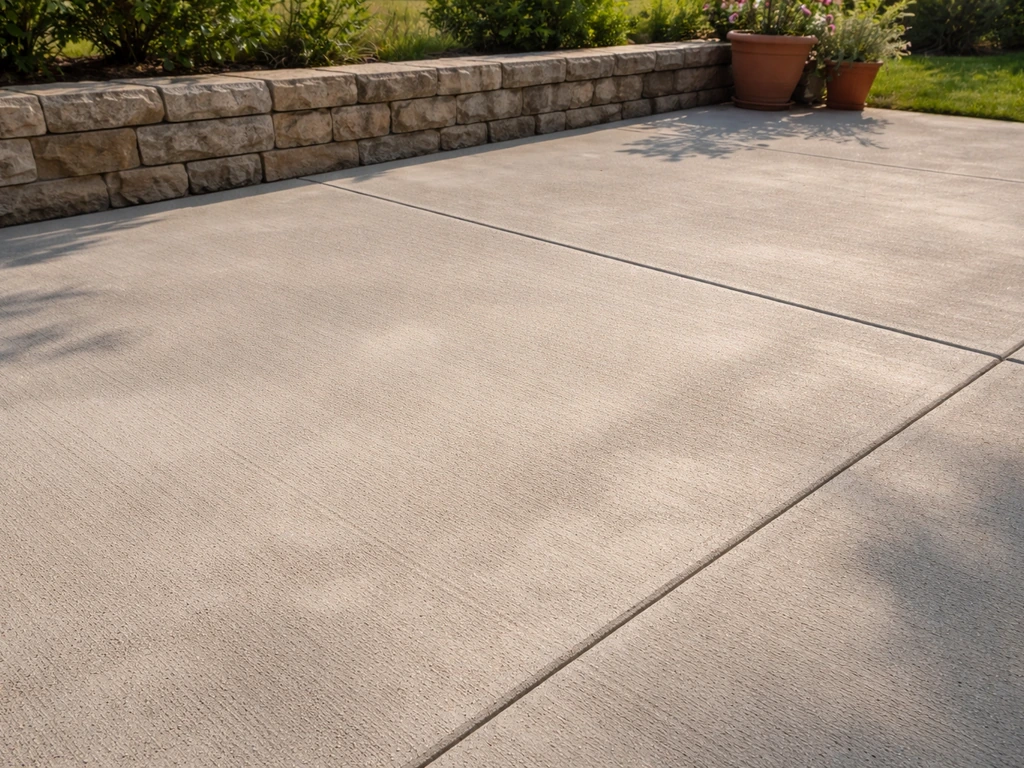
The fastest way to spruce up a concrete patio is to deep clean it, fill any cracks or spalled spots, apply a stain or resurfacer for a fresh color, and lock everything in with a quality sealer. That four-step sequence works for most patios. But the right path for your specific patio depends on what's actually wrong with it right now, so before you buy anything, spend 20 minutes doing a quick condition check. If you're wondering what to do with a concrete patio that feels rough, stained, or failing, start with this condition check before choosing any fix. That assessment changes everything.
How to Spruce Up a Concrete Patio Step by Step

Silas Morrison
16 Jun 2026
Quick assessment: what to fix vs what to upgrade
Walk the whole slab and be honest about what you see. There are really two categories of problems: cosmetic issues (dullness, stains, fading, mold) and structural issues (cracks, spalling, pitting, soft or crumbling spots). Cosmetic problems respond well to cleaning, staining, and sealing. Structural problems need to be repaired before any coating goes on, or that coating will fail within a season. I've watched homeowners skip this step, paint right over a spalled slab, and peel it all back off six months later. Don't be that person.
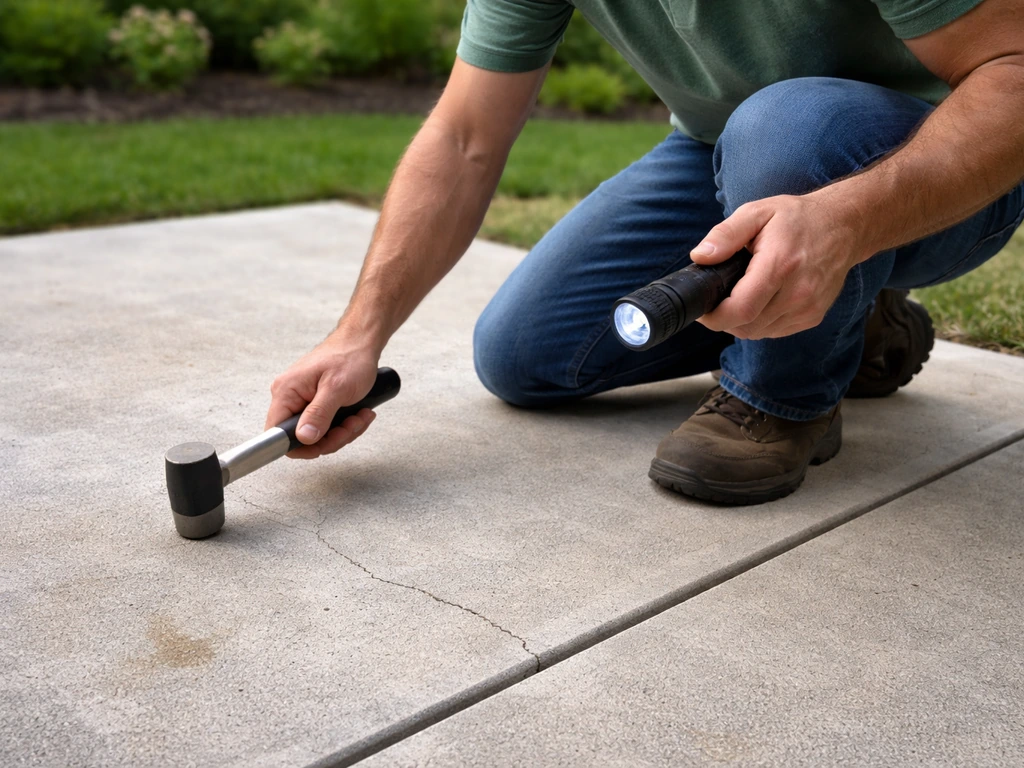
Two simple field tests will tell you what you're working with. First, tap the surface with a hammer or a coin. A solid knock means sound concrete. A hollow or chalky thud means the top layer is delaminating and needs to come off before any repair or coating. Second, do the water droplet test: pour a small splash of water on the slab. If it beads up and sits on top, there's still an old sealer or coating in place and you'll need to either strip it or recoat with a compatible product. If the water soaks in and darkens the concrete within about 30 seconds, the surface is open and ready to accept a new penetrating sealer or stain.
There's a third test worth knowing if your slab is in a shaded area, is below grade, or you're planning to apply an epoxy or thick overlay. Tape a 18x18-inch piece of plastic sheeting to the slab with all edges sealed and leave it for 16 to 24 hours (this is the ASTM D4263 plastic sheet test). If you lift it and find moisture or condensation on the underside of the plastic, the slab has active capillary moisture moving through it. Coating over that will trap moisture and cause bubbling or delamination. You'll need to address drainage or use a vapor-tolerant sealer designed for that condition.
| What you see | What it means | Right path |
|---|---|---|
| Dull, gray, faded surface | Cosmetic only | Clean + stain or seal |
| Mold, algae, efflorescence | Surface contamination | Deep clean first, then coat |
| Hairline cracks only | Normal shrinkage, low risk | Fill + seal or stain |
| Wide cracks (>1/4 inch) or shifting | Potential movement issue | Fill + consult on cause |
| Spalling or pitting | Surface damage | Repair with resurfacer, then coat |
| Peeling paint or sealer | Failed coating or moisture | Strip, identify cause, recoat |
| Old sealer still beading water | Sealer active | Light clean + compatible topcoat |
| Hollow sound when tapped | Unsound/delaminating layer | Remove unsound material before anything |
Deep clean and prep
Nothing you apply on top of a dirty slab will stick properly or look right. Cleaning is the most underrated step in any patio upgrade project, and it usually makes a bigger immediate visual difference than anything else. Plan to spend at least half your total project time here.
General cleaning
Start with a pressure washer at 2,000 to 3,000 PSI with a 25-degree tip. Keep the wand moving and hold it 6 to 12 inches from the surface. This removes loose dirt, algae, mildew, and most surface debris. Let the slab dry completely after washing (usually 24 to 48 hours depending on weather and sun) before doing any other treatments.
Mold and mildew
If you have black or green growth, mix one part household bleach with three parts water and scrub it into the affected areas with a stiff-bristle brush. Let it dwell for 10 to 15 minutes, then rinse thoroughly. Wear gloves, eye protection, and old clothes. Keep the solution off nearby plants or rinse them well before and after. For stubborn biological growth, sodium hypochlorite-based concrete cleaners do the same job at a stronger concentration.
Oil and grease stains
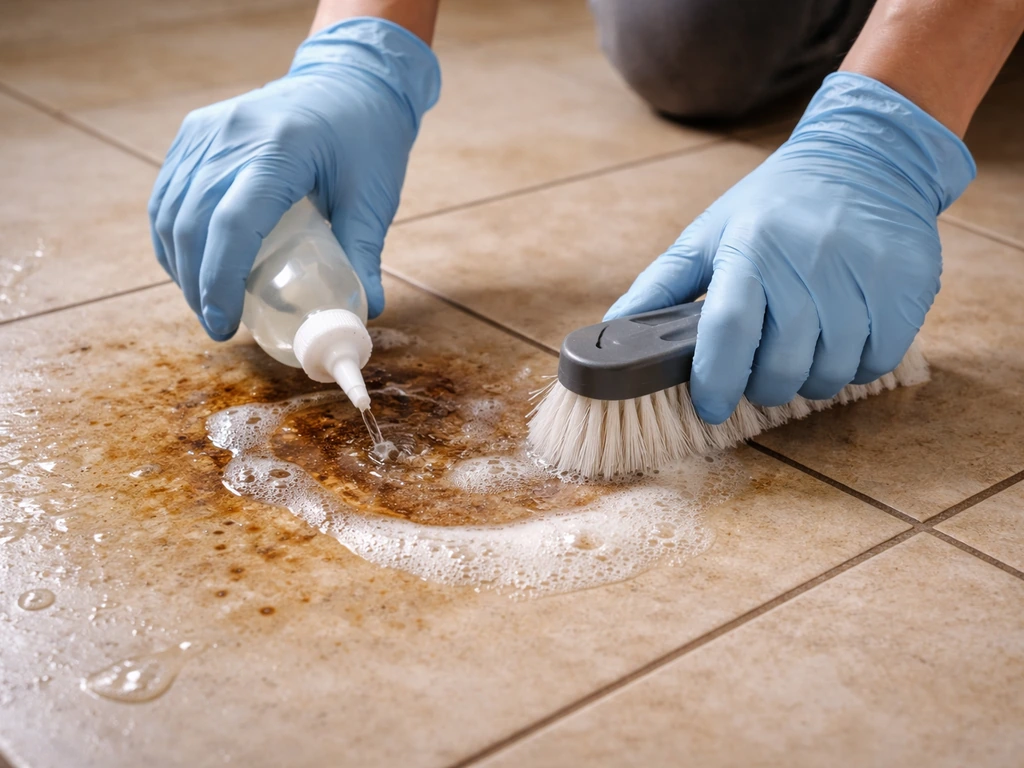
Pour a generous amount of a degreaser like TSP (trisodium phosphate) or a dedicated concrete degreaser directly on the stain, work it in with a brush, and let it sit for 15 to 20 minutes. Then agitate and rinse. Really embedded oil stains sometimes need a poultice: mix an absorbent material like kitty litter or baking soda with a solvent, spread it over the stain, cover with plastic, and let it draw out the oil over 24 hours. Repeat if needed.
Efflorescence
Efflorescence is that white chalky mineral deposit that appears when water moves through concrete and deposits salts on the surface. Scrub it first with a stiff dry brush to knock off as much as possible. Then apply a diluted muriatic acid solution (one part acid to ten parts water, always add acid to water, never the reverse), scrub it in, let it fizz for two to three minutes, then rinse completely. This is the one step where I'd say safety gear is non-negotiable: rubber gloves, eye protection, and good ventilation. Acid wash any stained or contaminated area you're planning to stain, since stains won't penetrate evenly through contamination.
Stripping old coatings
If the water droplet test showed an existing sealer and you need to apply something incompatible (like an acid stain over a sealer, or a new epoxy over an old acrylic), you have to strip the old coating first. Use a chemical stripper rated for concrete coatings, apply it per the manufacturer's directions, and then scrub and rinse. For thick or stubborn paint, a floor grinder or shot blaster gives much better results than chemical stripping alone. Renting a floor grinder for a weekend is worth it if your slab has multiple layers of old coatings.
Concrete repair basics
Sound concrete is the foundation for everything else. Before you spend money on stain or sealer, get the surface solid. The rule I follow: only patch what's structurally attached to the slab. If a chunk is hollow or loose, remove it first. Patching over unsound concrete means your repair will delaminate right along with the compromised layer underneath it.
Hairline and narrow cracks
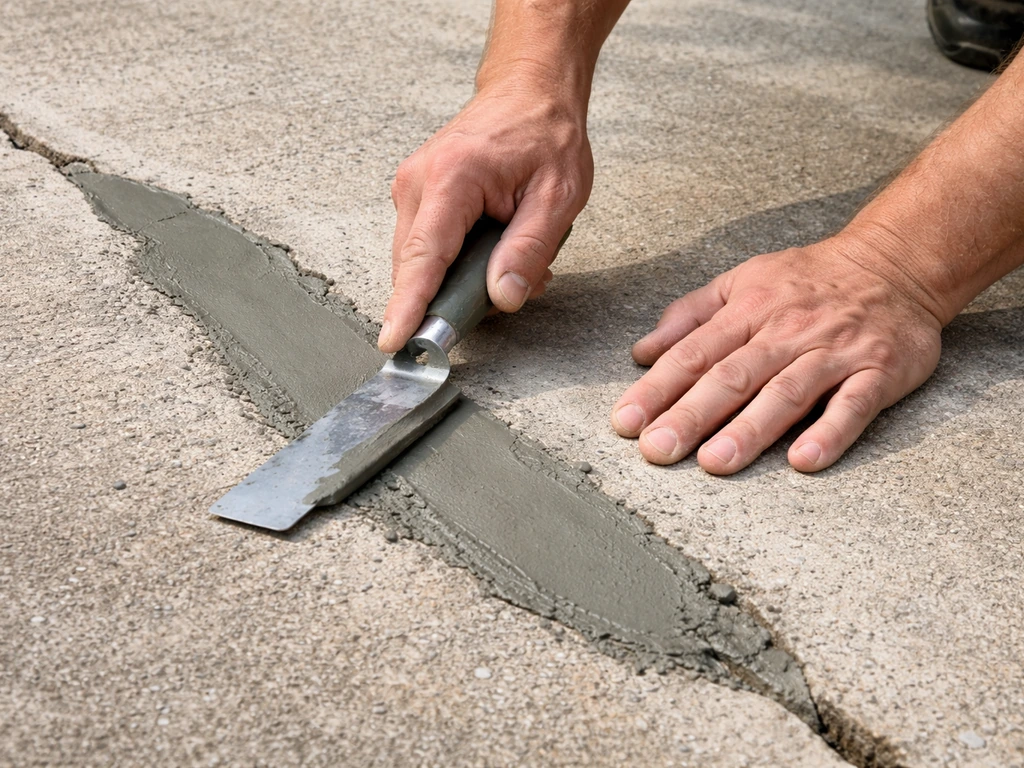
Cracks under 1/4 inch wide and stable (not actively moving or widening) are common shrinkage cracks and don't indicate a structural problem. Clean them out with a wire brush or angle grinder equipped with a crack chaser blade to widen the opening slightly so repair material can bond. Blow out the dust. Fill with a flexible polyurethane or epoxy crack filler, overfilling slightly, then feather it flat with a putty knife. Let it cure fully per the product label (usually 2 to 6 hours for surface dry, 24 hours before coating).
Wide cracks or cracks with movement
If a crack is wider than 1/4 inch or you can see that one side has shifted up or down relative to the other, that's a more significant issue. The crack itself can still be filled with a semi-rigid polyurethane filler, but you should understand that if the ground underneath is settling or shifting, the crack will keep moving. In that case, filling buys you cosmetic improvement but won't stop the progression. If you notice multiple wide cracks or significant displacement, it's worth getting a concrete contractor to assess whether there's a drainage or base problem before you invest in a full resurfacing.
Spalling and pitting
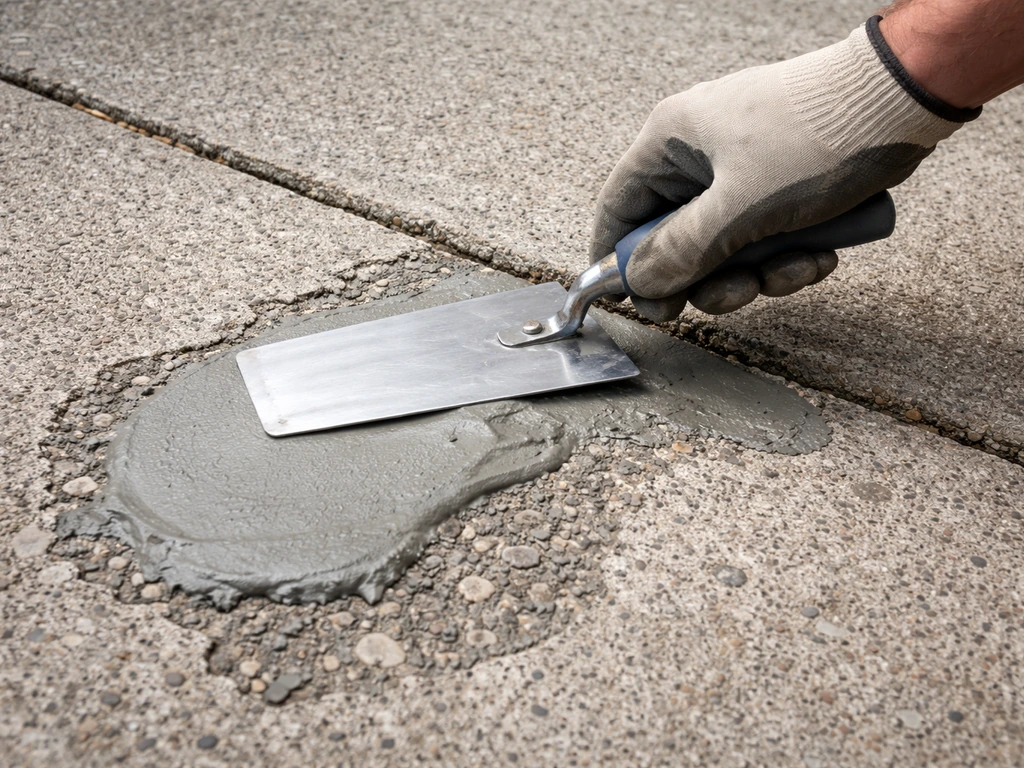
Spalling (where chunks of the surface layer have popped off) and pitting (small surface craters) are best handled with a polymer-modified concrete patching compound or a thin-set mortar mix for shallow repairs under 1/2 inch. For deeper voids, use a vinyl concrete patcher or hydraulic cement. Key steps: clean the area thoroughly, dampen (but don't saturate) the concrete so it doesn't wick moisture from your repair, trowel the compound in and slightly overfill, then screed or feather to match the surrounding level. Most patching compounds need 24 hours before you can coat over them, though some fast-setting products allow coating in as little as 4 to 6 hours.
Uneven spots and trip hazards
Minor high spots (raised edges, aggregate protrusions) can be ground down with an angle grinder fitted with a diamond cup wheel. Low spots or dips under about 1 inch can be built up with a self-leveling concrete underlayment, which you pour and it flows flat on its own. For dips over an inch, you're better off using a stiff mortar mix and screeding it level. Either way, give the repair material full cure time before applying any color or sealer.
Color and finish options
This is where most people start, but as you've already seen, it's really the third step, not the first. Once your slab is clean, sound, and repaired, you have several genuinely good options for changing its look. The right one depends on your budget, how much condition variation there is across the slab, and what aesthetic you're after.
| Option | Best for | Typical cost (DIY) | Durability | Look |
|---|---|---|---|---|
| Concrete stain (acid) | Sound, porous slabs; natural mottled look | $0.30–$0.80/sq ft | 10+ years with sealer | Variegated, stone-like, permanent |
| Concrete stain (water-based) | Any sound slab; more control over color | $0.40–$1.00/sq ft | 5–10 years with sealer | More uniform color, less depth |
| Concrete paint/epoxy floor paint | Covering flaws, solid color look | $0.50–$1.50/sq ft | 3–7 years | Solid, opaque, hides imperfections |
| Concrete resurfacer | Worn or pitted slabs needing a fresh layer | $0.50–$1.50/sq ft | 5–15 years with sealer | Smooth or textured new top layer |
| Decorative overlay | Major transformation, custom patterns | $2.00–$5.00/sq ft | 10–20 years with sealer | Stamped, slate, wood-look, tile patterns |
Acid staining
Acid stain reacts chemically with the minerals in concrete to create permanent, mottled color that genuinely looks like natural stone. It can't be painted over or covered up if you don't like it, so do a test patch in an inconspicuous corner first. Apply with a plastic garden sprayer (not metal, the acid will corrode it), let it react for 2 to 8 hours, then neutralize with a baking soda and water solution, scrub, and rinse thoroughly. Always wear acid-resistant gloves, eye protection, and a respirator when working with acid stain.
Water-based stain
Water-based concrete stains are much more forgiving than acid stains. They don't require neutralization, come in a huge range of colors including non-earthy tones, and can be layered to blend colors. Apply with a brush, roller, or sprayer, working in sections to avoid lap marks. They dry in 2 to 4 hours and you can typically apply a second coat the same day. The color sits more on the surface than acid stain, so it depends more on the sealer topcoat for long-term durability.
Concrete paint and epoxy coatings
Standard concrete paint is the most budget-friendly option and does a decent job of making a worn slab look clean and uniform. The trade-off is that it's a surface film, not a penetrating treatment, so it's more susceptible to peeling, especially if moisture pushes up from below. Epoxy floor paint is a significant step up: it's much harder, bonds better, and holds up against foot traffic, furniture, and UV better than latex paint. Two-part epoxy systems (where you mix a resin and hardener) outperform one-part products by a wide margin. For epoxy, surface prep is critical: the concrete must be profiled (either by acid etching or light grinding) so the epoxy has something to grip. Mix and apply per manufacturer instructions, as pot life (working time after mixing) is usually only 20 to 30 minutes.
Concrete resurfacer
A resurfacer is essentially a thin new layer of cementitious material you pour and spread over the existing slab. Products like Quikrete Concrete Resurfacer or similar are mixed to a pourable consistency and spread with a long-handled squeegee. They self-level somewhat and create a fresh, smooth (or lightly textured) surface. You can tint many resurfacers or stain/paint over them once cured. A standard resurfacer coat is typically 1/8 to 1/4 inch thick, needs to stay moist-cured for 24 hours, and should cure for at least 28 days before heavy use, though light foot traffic is usually fine at 24 hours.
Decorative overlays
Decorative overlays are a step up from basic resurfacers: they can be stamped with patterns (brick, flagstone, wood plank) while still workable, or textured and stained afterward. This is a more involved DIY project and honestly one where skill matters. If you're comfortable with concrete work and want a dramatic transformation, overlays are amazing. If you're newer to concrete, a clean resurfacer plus stain and sealer will give you 80% of the visual payoff at a fraction of the complexity.
Sealing and topcoats
Whatever finish you apply, a sealer is what actually protects it and determines how long it lasts. If you want specific guidance on how to improve a concrete patio, choose the sealer and topcoat based on the problems you found in your condition check how to improve concrete patio. Skipping sealer is the number one reason patio upgrades look worn-out within two or three years. There are three main sealer types for exterior concrete patios, and picking the right one matters.
| Sealer type | How it works | Sheen level | Reapplication | Best over |
|---|---|---|---|---|
| Penetrating silane/siloxane | Soaks in, repels water from inside | None (invisible) | Every 3–5 years | Natural concrete, acid stain |
| Acrylic sealer | Film-forming surface coat | Low to high gloss | Every 1–3 years | Stained or resurfaced concrete |
| Polyurethane/epoxy topcoat | Hard, thick film | Satin to high gloss | Every 3–7 years | Epoxy coatings, overlays |
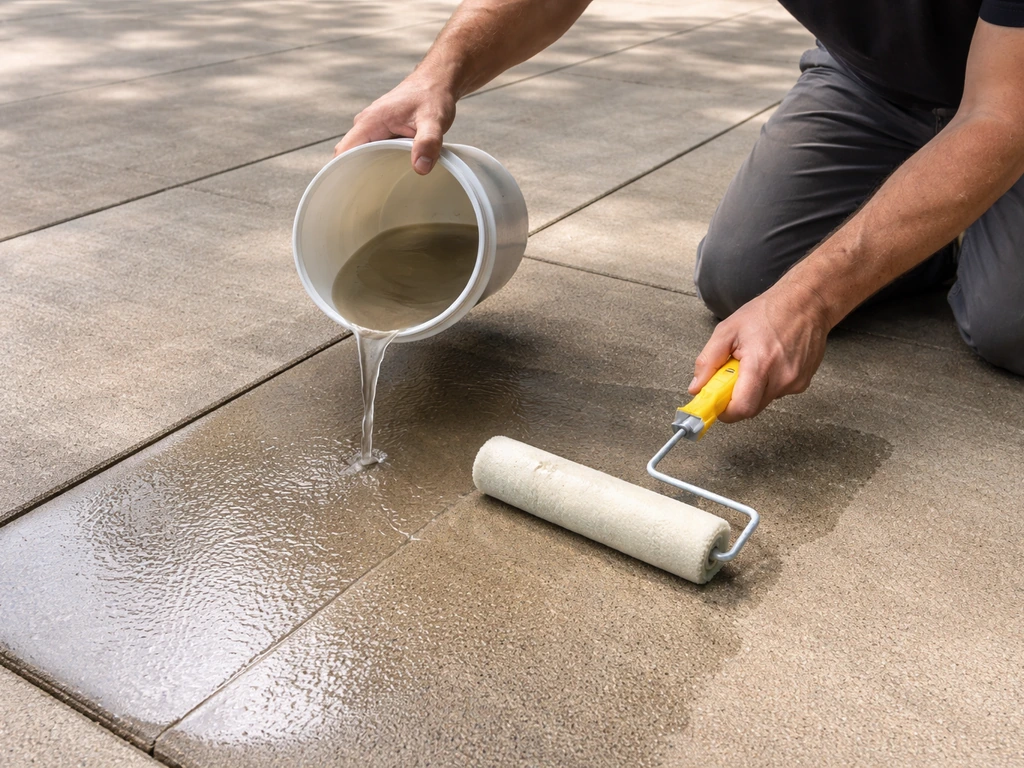
For most DIY patio staining projects, a solvent-based or water-based acrylic sealer is the practical go-to. It enhances the color depth, adds a sheen you can choose (matte, satin, or wet-look gloss), and can be rolled on easily. Apply in two thin coats rather than one thick coat. Let the first coat tack up (usually 1 to 2 hours) before applying the second. Full cure is typically 24 to 72 hours before returning furniture or heavy foot traffic to the slab.
If you're sealing bare concrete without stain, a penetrating silane-siloxane sealer is the most durable option because it doesn't leave a film that can peel. It protects against moisture intrusion, freeze-thaw damage, and staining without changing the appearance of the concrete. Apply it with a roller or pump sprayer, let it penetrate for 5 to 10 minutes, then spread any puddles. One generous coat is usually sufficient.
For slip resistance, especially on a wet patio surface, add a non-slip additive to your topcoat sealer before rolling it on. Products like polymer grit or aluminum oxide particles mix directly into the sealer and create texture you can't see but can feel underfoot. This is especially important around pool areas or any spots that stay damp.
Maintenance plan and troubleshooting
A freshly spruced patio can stay looking great for years with minimal effort if you follow a simple maintenance rhythm. Most problems that develop, like peeling, bubbles, or fading, trace back to either skipped prep or deferred maintenance. Here's how to stay ahead of it.
Ongoing maintenance schedule
- Every spring: pressure wash the slab and do the water droplet test. If water soaks in within 30 seconds, it's time to reseal.
- Every 1 to 3 years (acrylic sealers): clean thoroughly, lightly scuff the surface with a fine nylon pad or 220-grit sandpaper to help adhesion, and apply a fresh topcoat of the same sealer product.
- Every 3 to 5 years (penetrating sealers): reapply after thorough cleaning. These are low maintenance and simply need a fresh application when the water bead test shows absorption.
- Immediately after spills: rinse off oil, wine, or acidic liquids as soon as possible. Even sealed concrete is not stain-proof, just stain-resistant.
- Each fall: inspect for new cracks and fill them before winter. Water in cracks that freezes and thaws causes serious damage.
Peeling sealer or paint
Peeling is almost always a moisture problem or an adhesion problem from inadequate prep. If you're seeing widespread peeling, do the plastic sheet test to check for active moisture migration. If moisture is the culprit, you may need to improve drainage around the slab or switch to a vapor-tolerant coating system. If it's a prep failure (coating applied over dust, contamination, or a poorly profiled surface), strip it back, clean aggressively, profile the surface, and start over. Partial repairs on a peeling film coating rarely last.
Bubbles or blistering
Bubbles in a freshly applied sealer or paint usually mean one of three things: the slab was damp when you coated it, you applied too thick a coat (trapping solvents), or the temperature was too high and the product dried too fast on the surface before solvents could escape. Ideal application temperature for most concrete sealers is between 50 and 85 degrees Fahrenheit, out of direct sun. If you see bubbles forming as you apply, stop and check conditions. Pop existing bubbles, let the area dry completely, and re-apply in a thinner coat under better conditions.
Fading color
Acid stain colors are permanent and won't fade (they're a chemical reaction in the concrete itself), but the sealer over them can dull and chalk with UV exposure. Water-based stains and concrete paint fade more noticeably over time, especially in high-sun areas. UV-resistant sealers (look for UV-stable or UV-inhibitor on the label) slow this significantly. When color starts looking washed out, clean and reseal rather than restaining. If you're restaining, test a small area first to make sure the new stain can penetrate through the existing sealer.
Traction and slip issues
A glossy sealer can make a wet patio dangerously slick. If you applied a high-gloss acrylic or epoxy and it's become slippery, you have two options. First, add a non-slip topcoat: a water-based anti-slip sealer with grit can go over most existing sealers after a light scuff-sand. Second, if the slip problem is severe, broadcast fine silica sand into your next topcoat while it's still wet to create permanent texture. Don't just rough up the surface with sandpaper without resealing, as that opens the coating to moisture.
When to call a pro
Most of what's covered in this guide is solidly in DIY territory with a weekend or two of work. Call a concrete professional if you have cracks wider than 1/2 inch with visible displacement between sections, if you suspect a sub-base or drainage issue causing ongoing movement, if the plastic sheet test reveals severe moisture migration and you can't identify the source, or if you want a full decorative overlay with stamped patterns and you haven't done concrete work before. The surface prep and timing required for stamped overlays are unforgiving, and a botched decorative overlay is expensive to undo.
If you're also thinking beyond the slab itself, issues like furniture layout, shade structures, and planters that interact with your concrete surface tie into how you decorate and use the space around the patio. This guide can also help you plan how to decorate a concrete patio around your chosen stain, sealer, and finish so the final look stays cohesive. And if you have dogs using the patio, there are specific surface texture and sealer considerations worth addressing separately for safety and cleanability. When you plan how to make a concrete patio dog friendly, focus on slip-resistant sealer and an easy-to-clean finish so paw marks and messes do not get ground in dogs using the patio. But start here: get the slab clean, solid, colored, and sealed, and you'll have a patio that genuinely looks like new. If you want the look to feel finished, use the right outdoor furnishings, colors, and accessories to dress up your concrete patio how to dress up a concrete patio.
FAQ
Can I spruce up a concrete patio without pressure washing?
You can do it with heavy-duty scrubbing and chemical cleaners, but you will usually get better results by pressure washing first. If you skip it, surface dust and embedded grit often interfere with adhesion, which makes sealers peel or fail early. If you cannot use a pressure washer, use a stiff brush with a concrete cleaner and rinse until runoff stays clear, then let the slab dry fully before any coating.
What should I do if the water droplet test is mixed, part beads up and part soaks in?
That usually means the slab has uneven sealer residue, different concrete density, or patches of contamination. Treat the entire patio as “needs compatibility confirmation,” scuff-profile the surface, and test a small area with your chosen topcoat after cleaning. If the product still fails to wet out evenly, you will likely need partial stripping and localized recoating instead of a one-size application.
Is it okay to acid wash and then seal the same day?
Not usually. After an acid wash, you need thorough rinsing, neutralization, and complete drying before sealing. Even if the surface looks dry, trapped moisture can cause bubbles or poor bond. Plan for extra dry time, especially in shade, and only seal once the slab passes a basic “no visible wet sheen” check and smells neutral (no lingering acid odor).
How do I know whether to use a stain or a resurfacer first?
Choose based on surface condition. If you have spalling, pitting, or uneven texture, fix those first with patching and leveling, then decide between staining (color on existing concrete) or resurfacer (new uniform surface). Applying stain over a rough patchwork surface can create obvious color variation, while resurfacer over deeply contaminated concrete can lock in the problem. In many cases, the best sequence is clean and repair first, then either stain/seal or resurface and then stain/paint and seal.
Can I apply epoxy or epoxy-based coatings to exterior patio concrete?
Yes, but exterior epoxy systems are more sensitive to moisture and surface prep than acrylic sealers. You must ensure the slab is dry, compatible, and properly profiled, and you may need a product designed for exterior UV exposure to avoid chalking. If you see any active moisture migration on the plastic sheet test, do not assume epoxy will solve it, consider a vapor-tolerant system or address drainage first.
Do I need to neutralize after using concrete cleaner products that are not muriatic acid?
Only if the product label requires it. Bleach-based growth cleaners typically need thorough rinsing, while many “concrete cleaner” solutions are meant to be scrubbed and rinsed without a chemical neutralizer step. Always follow the product directions, because over-neutralizing or incomplete rinsing can leave residues that block penetration or cause patchy sealer performance.
What’s the most common reason a sealer starts peeling or flaking?
Most failures come from coating on top of contamination (dust, curing compounds, old peeling sealer) or applying when the slab is too damp. Even if the patio looks clean after washing, fine dust and residue can remain. If you get widespread peeling, strip back to sound material, profile if needed, and redo prep plus sealing as a complete system rather than “spot touch-ups.”
How thin is “thin coat” when applying acrylic sealer?
Thin usually means enough coverage without pooling or puddling. If you can see wet streaks that are still heavy, it may be too thick. Apply two coats, keep a wet edge, and avoid overworking the sealer. If your first coat dries with uneven sheen, do not immediately add a thick second coat, instead lightly scuff and apply the next coat after tack-up timing is right.
Will furniture scratch or mark a newly sealed patio?
Yes, especially before full cure. Many sealers are touch-dry quickly, but full cure can take 24 to 72 hours, depending on the product and weather. Use pads under furniture and place items only after the sealer reaches full cure, or you may imprint the topcoat and create dull spots that don’t blend easily.
How do I make a sealed patio safer if it’s slick, without changing the whole finish?
Try a targeted slip-resistance upgrade. Lightly scuff the surface, then apply a non-slip topcoat that includes grit or add silica sand into the next application while it is still wet. Avoid rough sand alone because it can create open texture that traps moisture or leads to uneven wear. If the patio is severely slippery, switch to a more textured system rather than adding grit to an incompatible coating.
Can I cover old paint or a previous sealer with stain?
Often no. Stain needs a concrete surface it can react with or penetrate. If the plastic sheet test indicates sealer residue, you typically need stripping or thorough profiling and then use a compatible product approach. If you want “new look” with less risk, consider resurfacer or paint systems that are designed to bond to profiled coatings, but confirm compatibility before committing.
When should I call a contractor instead of DIY resurfacing?
If cracking shows clear vertical displacement, multiple wide cracks keep re-opening, or the plastic sheet test shows strong moisture migration that you cannot identify, DIY solutions usually fail. Also call if you plan stamped overlays and have no prior concrete leveling and timing experience, because repair errors show up quickly and are expensive to undo. A contractor can also check drainage and base issues that cosmetic upgrades cannot fix.