You can improve most concrete patios yourself with a weekend, a few targeted products, and the right sequence: clean thoroughly, fix cracks and spalls, level or resurface if needed, then seal. If you want a simple way to spruce up a concrete patio, follow the same plan: clean, repair, level or resurface if needed, and then seal how to spruce up a concrete patio. The order matters more than anything else. Skip steps or reverse them and you'll be redoing it in two years. Nail the sequence and a beat-up slab can look and perform like new for a decade or more.
How to Improve a Concrete Patio: DIY Fixes and Finishes

Silas Morrison
27 Jun 2026
Quick diagnosis: what to fix first on your concrete patio
Before you buy anything or start mixing, spend 15 minutes doing a real assessment. Walk the whole slab, crouch down to eye level across the surface, and tap suspect areas with a screwdriver handle. A hollow sound means delamination or a void underneath. That area needs attention before you apply anything on top.
Here's what you're looking for and what each symptom tells you:
| Symptom | What It Means | Priority |
|---|---|---|
| Hairline surface cracks (under 1/4 inch wide, stable) | Shrinkage or minor settling; cosmetic concern | Medium — fix before sealing |
| Wider cracks with displacement (one side higher than the other) | Structural movement or erosion under slab | High — may signal replacement need |
| Spalling (flaking, pitting, or surface peeling) | Freeze-thaw damage, deicing salt damage, or poor original mix | High — resurface or patch |
| Scaling (surface mortar flaking off) | Frost or salt scaling; ranges from light to very severe | High if severe; patch if localized |
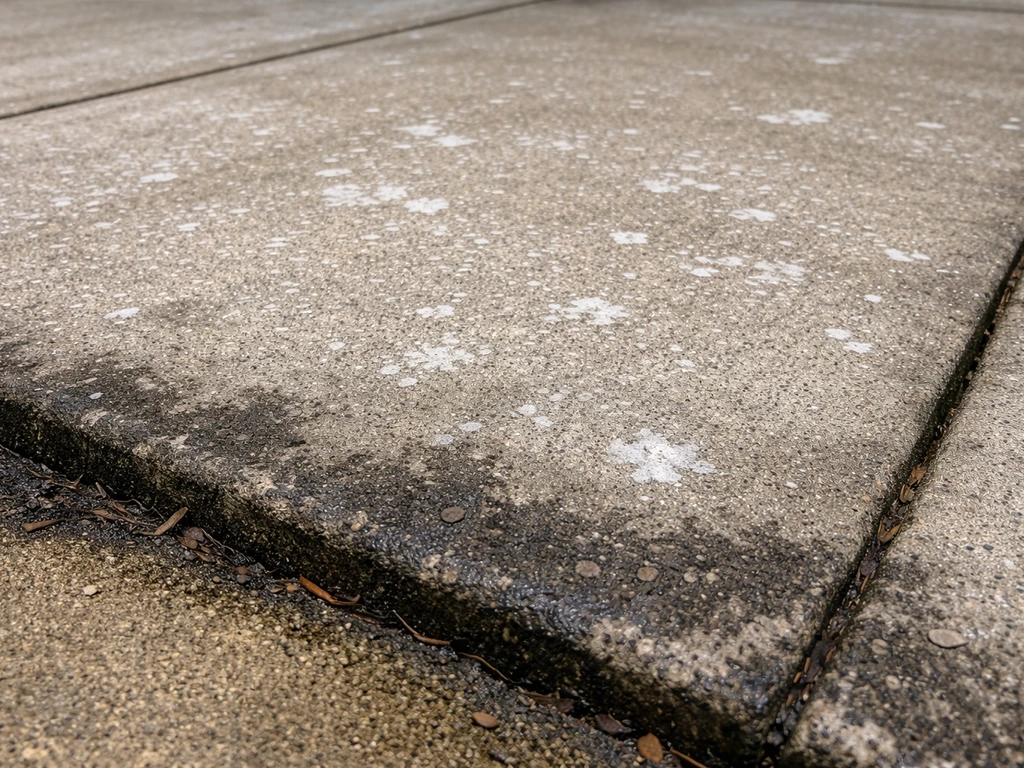
| White powdery deposits along edges or low spots | Efflorescence — salts left by evaporating moisture | Medium — clean first, check drainage |
| Uneven or sunken sections | Settlement, washout, or tree root activity | High — level or replace depending on severity |
| Dull, stained, or discolored surface | UV exposure, organic stains, oxidation | Low — cosmetic; address after repairs |
The big decision you need to make at this stage is whether to repair or replace. The honest rule of thumb: if settlement is ongoing (meaning the slab keeps moving), if there's widespread deep spalling where the coarse aggregate is fully exposed across most of the surface, or if cracks show significant vertical displacement throughout the slab, replacement is the smarter path. Resurfacing or patching over a failing substrate just delays the inevitable and wastes your money. But if problems are localized, the slab is stable, and spalling is moderate, you're in good repair territory.
Cleaning and preparation steps that make improvements last
This is the step most people rush, and it's the one that determines whether your repair or finish actually bonds and holds. I've seen beautifully applied resurfacers peel up in months because the slab underneath wasn't properly cleaned. Don't be that person.
Start with a pressure wash
Rent or use a pressure washer at 3,000 PSI minimum for a patio. After you’ve pressure washed, you’ll be ready to choose the right repair or resurfacing plan for your concrete patio pressure washer. Go over the entire surface, paying extra attention to low spots, edges, and any areas with biological growth (moss, algae, mildew). Let the slab dry completely, at least 24 hours in warm weather, longer in cool or humid conditions.
Deal with efflorescence and stains
Efflorescence, those white powdery deposits you often see along slab edges, forms when water moves through concrete, picks up soluble salts, and deposits them on the surface as it evaporates. It looks bad but it's not structural. To remove it, use a dilute acid wash (muriatic acid mixed roughly 1 part acid to 10 parts water, applied carefully with a stiff brush, then neutralized with a baking soda solution and rinsed thoroughly). Always wear gloves and eye protection. For oil or rust stains, use a concrete degreaser or an oxalic acid-based cleaner before moving on. If you see efflorescence and it keeps coming back after cleaning, the real fix is improving drainage so water doesn't keep pushing through the slab.
Profile the surface if you're applying a coating or resurfacer
If you're planning to stain, resurface, or apply an overlay, the surface needs to be slightly rough so the product can grip. After cleaning, check whether water beads up on the concrete. If it does, there's a sealer or contamination layer present and you'll need to either grind it off or use an acid etch (same dilute muriatic acid solution) to open the surface pores. Rinse extremely well after etching and let it dry completely.
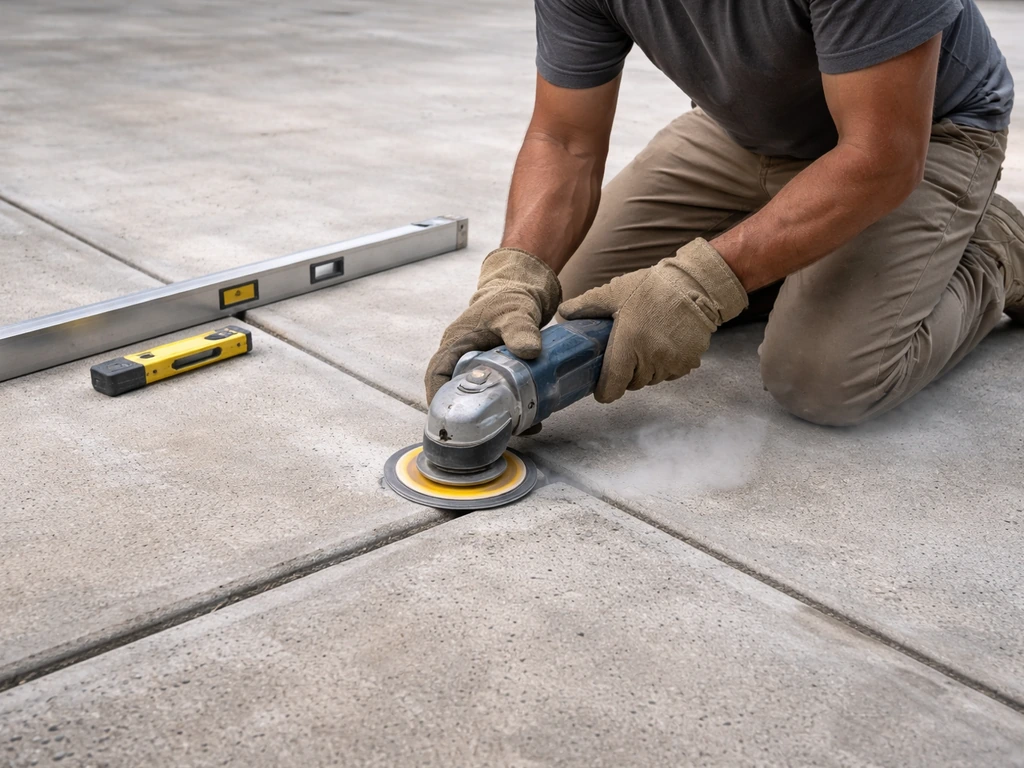
Repairing cracks, spalling, and damaged areas
Match your repair method to the type and depth of damage. An ACI RAP Bulletin 7 provides step-by-step repair guidance and emphasizes matching the concrete repair approach to the specific condition and deterioration type, such as spalls step-by-step repair bulletin guidance. Using the wrong product wastes time and money and can make things worse.
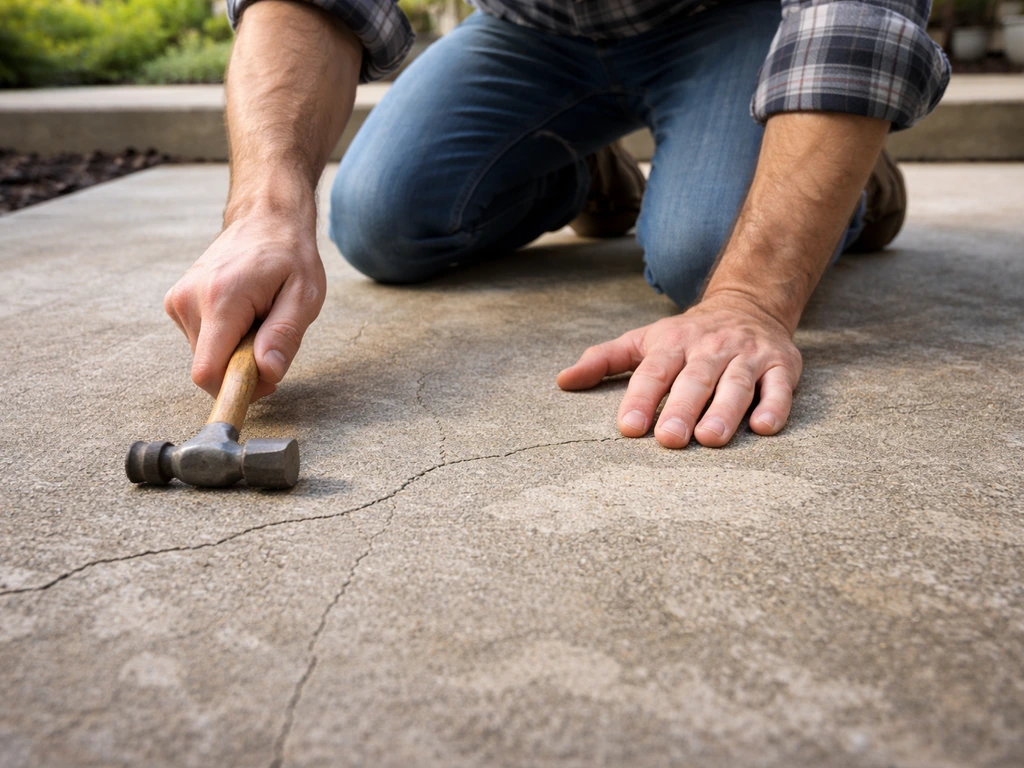
Cracks
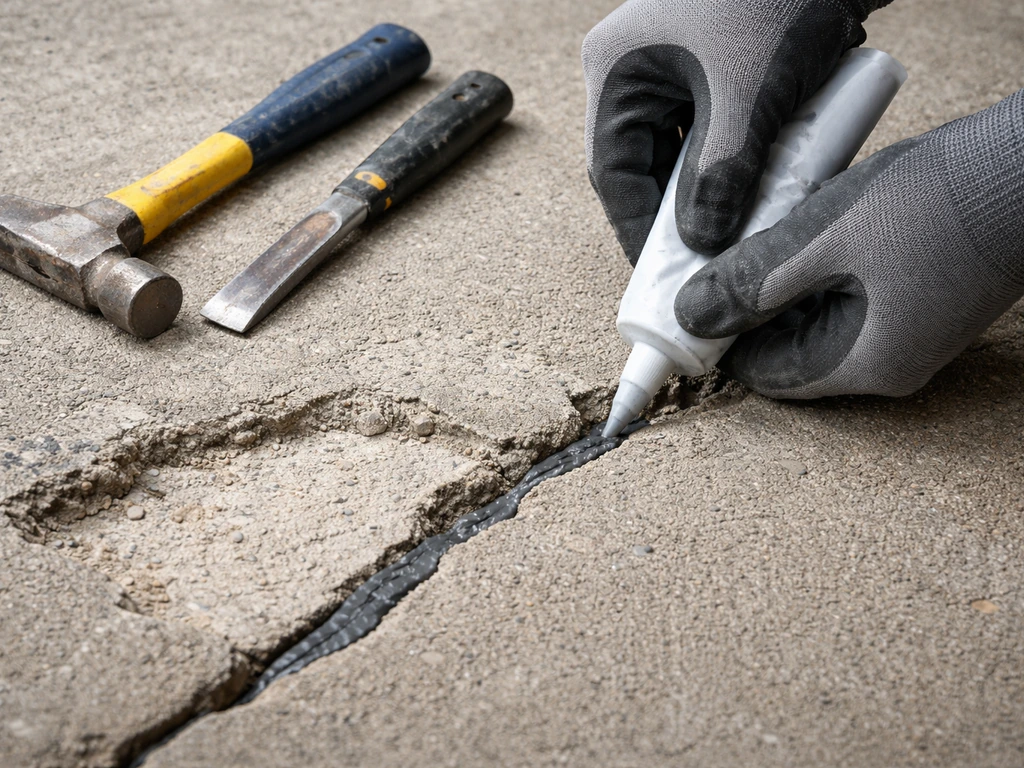
For hairline to 1/4-inch stable cracks, use a polyurethane or epoxy crack filler. Widen the crack slightly with a cold chisel or angle grinder to create a V-groove profile (this helps the filler bond). Clean out debris, fill with filler, and tool it flush. For wider or moving cracks, use a flexible polyurethane caulk rather than a rigid epoxy, rigid repairs in moving joints crack again quickly.
Spalling and surface scaling
Spalling is surface deterioration where the concrete flakes, chips, or pits. Scaling specifically refers to the mortar layer at the surface flaking off and is classified by depth: light scaling has no exposed aggregate, medium scaling exposes aggregate up to about 10 mm deep, severe is 11 to 20 mm, and very severe goes beyond 20 mm. Light to medium spalling responds well to a partial-depth patch or a full resurfacer applied over the whole slab. Severe spalling with deep aggregate exposure usually needs individual area patching with a polymer-modified concrete mix, followed by full resurfacing. Very severe deterioration covering most of the slab is a strong signal to consider replacement.
For partial-depth patches: chip out the damaged area to a depth of at least 1/4 inch with a cold chisel or angle grinder so you're getting back to sound concrete (knock away anything that sounds hollow). Clean out all dust and debris, dampen the area slightly (but no standing water), apply a bonding agent, then pack in a pre-mixed vinyl concrete patch or polymer-modified mortar and finish flush with the surrounding surface. Follow the manufacturer's cure time before walking on it.
Deep repairs that go below about half the slab thickness technically qualify as full-depth repairs and are generally beyond DIY territory. Call a concrete contractor if you're finding deterioration that goes that far down.
Leveling and flattening uneven concrete
Uneven concrete is both a tripping hazard and a water-pooling problem. How you fix it depends on what caused it and how bad it is.
Patch vs. resurfacing vs. mudjacking vs. replacement
For high spots or lips at control joints where one section is raised slightly above another, grinding down the high edge with an angle grinder and diamond cup wheel is often the simplest fix. For sunken sections, you have a few options. If the slab is otherwise sound and the settlement is minor (under about an inch), mudjacking (also called slabjacking or foam lifting) pumps material under the slab to raise it back up and is best left to a contractor. If the sunken area is small and stable, a self-leveling concrete overlay can bring the surface up level without replacing the whole slab.
Self-leveling overlays are poured on and flow into low spots on their own. They work well on slabs with up to about 1 inch of variation and where the underlying concrete is structurally sound. Follow the product instructions closely on minimum and maximum thickness and surface prep requirements. They typically need a bonding primer applied first.
If settlement is ongoing, meaning the slab moves seasonally or you can see the cause hasn't been fixed (tree roots, eroded base, poor drainage), no surface fix will last. Address the cause first or replace the section. Putting a resurfacer over a sinking slab is like putting new flooring over a wet subfloor.
Stain, color, and finish upgrades
Once the slab is sound, clean, and level, you can genuinely transform how it looks. A gray concrete patio doesn't have to stay gray. There are several practical options depending on how much visual change you want and how much prep you've already done.
Concrete stains
Acid-based stains chemically react with the concrete to create mottled, earthy, permanent color that won't peel. They work only on clean, uncoated concrete and produce browns, tans, and terra cottas, not bright colors. Water-based stains give you more color options including blues, greens, and grays, are easier to apply, and don't require acid handling, but the color sits more on the surface than in it. Both types require sealing afterward. Plan on a day to apply the stain, a cure period, then a day to seal.
Concrete resurfacers and overlays
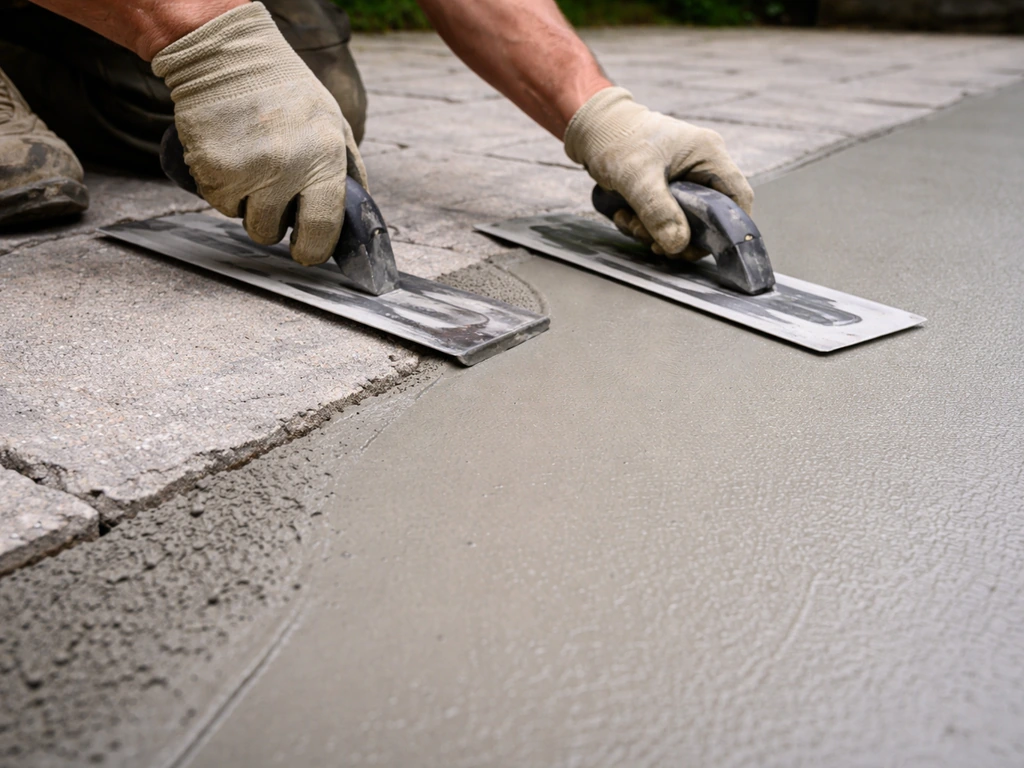
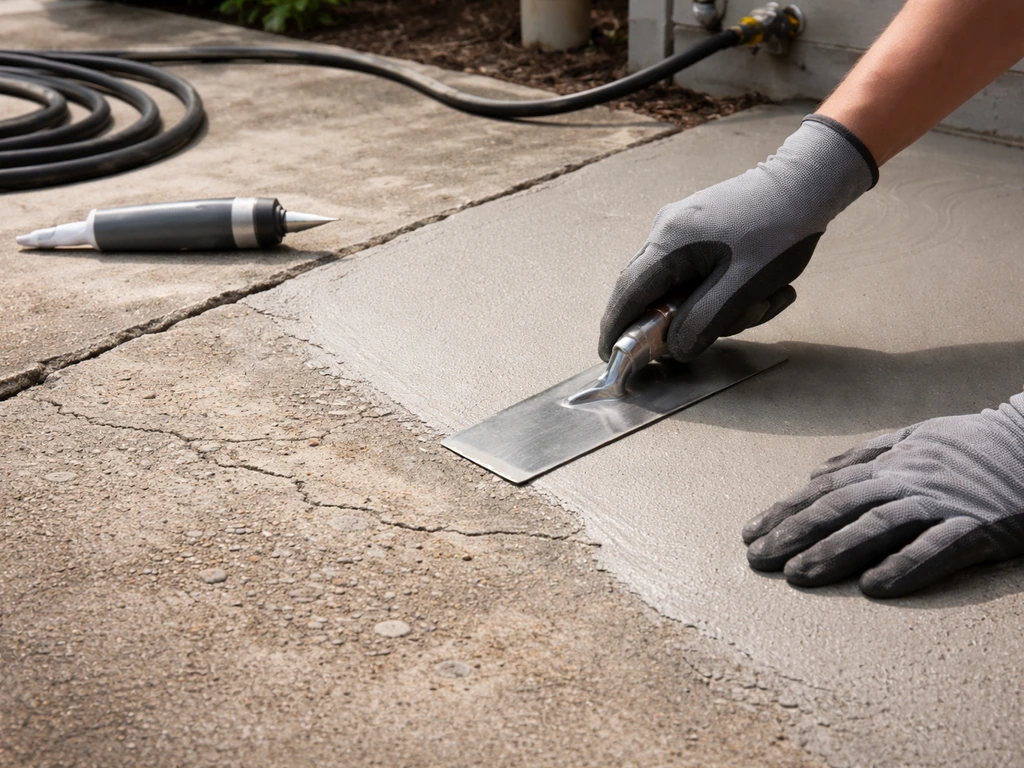
A concrete resurfacer is a cementitious product you trowel or squeegee over the existing slab to create a fresh surface. It hides minor surface damage, gives you a uniform appearance, and can be stamped or broomed for texture. Typical thickness is 1/8 to 1/4 inch. Products like Quikrete Concrete Resurfacer are widely available and DIY-friendly. After curing (usually 24 hours), apply a sealer on top for protection and sheen. Resurfacers should not be applied over loose, heavily spalled, or structurally compromised concrete, fix those problems first.
Decorative overlays and coatings
Epoxy coatings give a high-gloss finish that's very durable and easy to clean, making them popular for patios that pull double duty as work areas. They come in solid colors and can include decorative flake. The downside is moisture sensitivity during application and potential for peeling if moisture migrates up from below. Concrete paint is the lowest-cost option but also the least durable, expect to reapply every few years.
For more ideas on giving the surface a completely different character, the topics of how to make a concrete patio look better and how to dress up a concrete patio go deeper into decorative approaches. Concrete stains, overlays, and other finish upgrades are the fastest way to make a concrete patio look better once the slab is clean and stable how to make a concrete patio look better.
Sealing and long-term protection
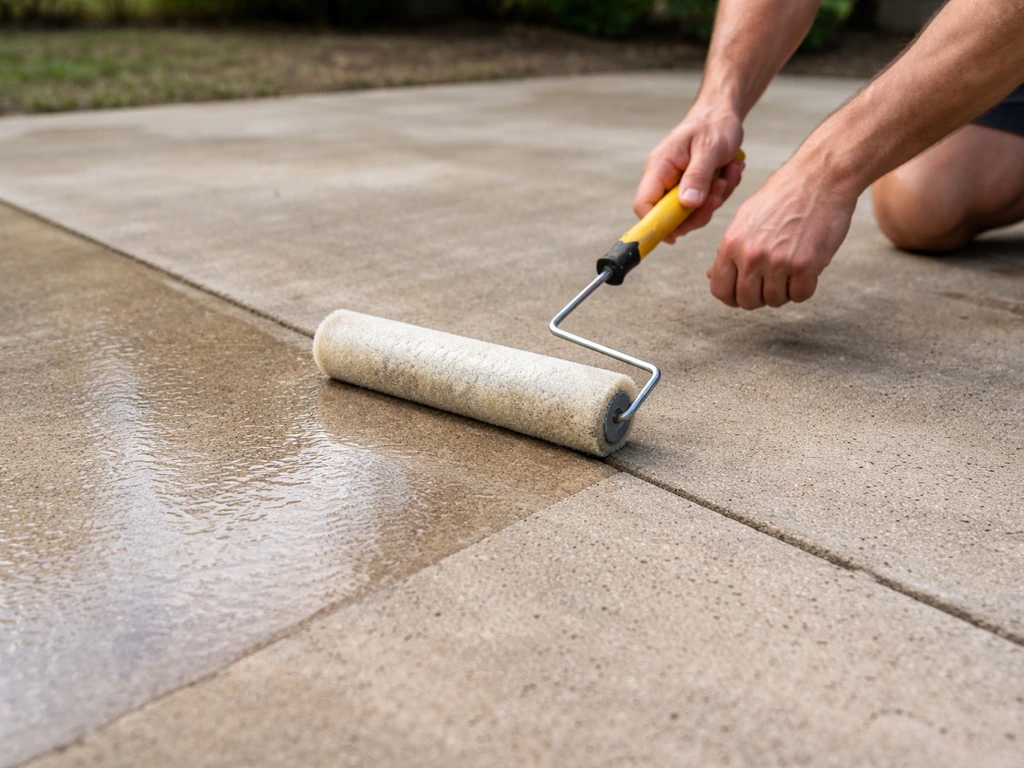
Sealing is not optional if you want your work to last, especially in climates with freeze-thaw cycles. Water that penetrates unsaled concrete can freeze, expand, and cause exactly the kind of spalling and scaling you just repaired. Chloride-based deicing salts accelerate this process significantly, so if you use ice melt on or near your patio in winter, a good sealer is essential protection.
Choosing the right sealer
| Sealer Type | Best For | Finish | Reapply Every |
|---|---|---|---|
| Penetrating silane/siloxane sealer | Freeze-thaw climates, plain concrete, natural look | Invisible/matte | 3 to 5 years |
| Acrylic sealer (solvent or water-based) | Resurfaced or stained concrete, easy DIY application | Satin to gloss | 2 to 3 years |
| Polyurethane sealer | High-traffic patios, coated or stained surfaces | Satin to high gloss | 3 to 5 years |
| Epoxy sealer | Garage-style patios, heavy use | High gloss | 3 to 5 years |
For most homeowners with a plain or resurfaced patio, an acrylic sealer is the sweet spot: easy to apply with a roller, available at any home center, and effective. Penetrating sealers are the best choice if you live somewhere with hard winters and you want maximum freeze-thaw protection without changing the look. Apply sealer only to a fully dry, clean slab. Most products require at least 48 hours after any patching or resurfacing work.
Timing your seal
Late spring or early fall is ideal for sealing, temperatures between 50 and 90 degrees Fahrenheit, no rain in the forecast for 24 to 48 hours, and low humidity. Applying sealer in direct summer sun causes it to dry too fast and leave lap marks or bubbles. Apply in the morning or shade the work area.
Maintenance routine and common mistakes to avoid
A sealed, repaired patio doesn't require much ongoing work, but a little regular attention prevents small issues from becoming expensive ones. Once your surface repairs and cleaning are done, you can tailor your patio finish and sealing plan to help keep the concrete dog friendly.
Simple annual routine
- Sweep and rinse the patio each spring to clear winter debris, salt residue, and grit.
- Inspect for new cracks or spalling. Catch and fill hairline cracks before water gets in and freezes.
- Check whether the sealer is still working by splashing water on the surface — it should bead up. If it soaks in, it's time to reseal.
- Clean efflorescence deposits if they've appeared using a dilute acid solution, then check that water drains away from the slab properly.
- Reapply sealer on the appropriate schedule for your product type.
Mistakes that undo your work
- Skipping surface prep: the single biggest cause of coating failure. No amount of good product overcomes a dirty or unsound base.
- Applying resurfacer or sealer over old sealer without stripping: adhesion will fail and you'll peel up both layers.
- Using deicing salts directly on concrete: even a sealed slab gets damaged over time. Use sand for traction instead, or sand-based ice melt products.
- Patching too thin: patches under 1/4 inch thick don't bond well and pop off. Always cut back to sound concrete and go deep enough.
- Rushing the cure: walking on a fresh patch too soon, or sealing before the concrete has fully dried, causes immediate failure. Follow the cure times on the label — they're there for a reason.
- Ignoring drainage: water that pools against or under your slab will keep causing problems no matter how many times you repair the surface. Grade soil and add drainage if needed.
Your action plan based on what you found
Here's how to think about next steps based on your diagnosis. If your patio has isolated cracks and surface staining but is otherwise structurally sound, you can handle everything in one weekend: clean, fill cracks, apply a resurfacer or stain, then seal. If you've got moderate spalling across a significant portion of the slab, plan two weekends, one for patching and prep, one for resurfacing and sealing.
If you've got ongoing settlement, major structural cracking, or very severe spalling with deep aggregate exposure across most of the slab, get a contractor's opinion before spending money on surface work. And if the patio just looks dull and dated but is otherwise solid, honestly the sealer and stain alone can make a dramatic difference with very little effort. Start with the diagnosis, match your response to what you actually have, and work the sequence.
That's how you get a result that lasts.
FAQ
Can I seal or stain my patio if it already has an old sealer or coating on it?
Yes, but only in the shallow “dull and dirty” cases. If you still have active efflorescence, moisture coming through, or peeling coatings, sealing over it traps moisture and salts, which can cause new scaling or blistering. Do a quick water test (see if water beads after cleaning). If it beads, you likely have a sealer or contamination layer that must be removed before staining or sealing.
How long should I wait between repairs, resurfacing, staining, and sealing?
For most DIY work, plan on curing times from the product label and add a safety buffer. Patch and resurfacer products often need at least 24 hours before light foot traffic, and sealer typically needs longer, commonly 48 hours after patching or resurfacing. Also wait longer if the weather is cool or humid, because trapped moisture can create pinholes, whitening (blushing), or poor adhesion.
What should I do if my patio sealer looks tacky after it dries?
If the sealer “stays wet” longer than the label’s recoat guidance, it is often because the surface is not fully dry or still has dust or residue. In that case, don’t apply another coat. Let it dry fully, then lightly re-clean if the manufacturer allows (some require abrading). Applying on a contaminated or still-damp slab is a common reason for tackiness and early failure.
Which crack repair material should I use if my crack is at a joint or shows vertical offset?
Don’t treat every crack the same. If the crack is at a control joint or shows visible vertical offset, movement is more likely and a rigid filler (epoxy) tends to fail. A flexible polyurethane caulk is usually the better choice for moving joints, but only if the crack is clean and dry. For cracks with ongoing settlement, fixing movement causes is still necessary.
Why do patches or overlays sometimes peel up even after I followed the steps?
Use a curing-and-bonding strategy, not a “thick coat” approach. For patches, the key is chipping back to sound concrete (no hollow-sounding edges), applying the bonding agent correctly, and finishing flush without leaving feathered edges that can debond. For resurfacing, the slab needs to be properly profiled so the overlay grips, then primed if the product requires it.
Does sealing prevent damage from winter de-icing salts and freeze-thaw cycles?
A sealer can make de-icing easier to manage, but it does not prevent all freeze-thaw damage. Avoid chloride-based ice melt near the patio, because salts can accelerate deterioration and staining even under sealer. If you need traction, consider sand or calcium-free products, and clear snow promptly to reduce the time water and salts stay in contact with the surface.
Can I apply a sealer over both acid and water-based stains, and will the sheen look even?
Yes, but test for bond first. If you apply acrylic sealer over stain that is fully cured and properly neutralized (for acid stains), it usually works well. If the stain is still outgassing, you can get uneven sheen or color fading. Do a small test patch, and make sure you rinse and dry thoroughly after any acid etching or staining.
Should I grind my patio or use acid etching to improve adhesion for resurfacer or stain?
Not always. Grinding works for removing minor surface contamination and high spots, but for a beading water surface you often need profiling or chemical etching based on what’s underneath. If the patio has an unknown old coating, grinding may be required to expose fresh concrete for adhesion. The water-bead test helps decide whether you need removal versus just cleaning and etching.
When does a concrete patio problem become too big for DIY fixes, even if the surface looks repairable?
Generally, no for structural risks. If you have ongoing settlement, deep aggregate exposure across much of the slab, or cracks with vertical displacement, DIY resurfacing or overlay is usually a short-term fix. A contractor can evaluate the base and drainage, and they may recommend partial replacement, stabilization, or mudjacking rather than a finish-only approach.
How do I choose a finish that is durable but not slippery when the patio gets wet?
For a patio that will be used for grilling, rolling chairs, or foot traffic in the same spots, match slip resistance to the finish. High-gloss coatings can be slippery when wet. If you want better traction, choose a sealer or coating system rated for exterior floors, and apply it in the recommended thickness, because overly thin coats can reduce uniform protection while overly thick coats can lead to hazing.