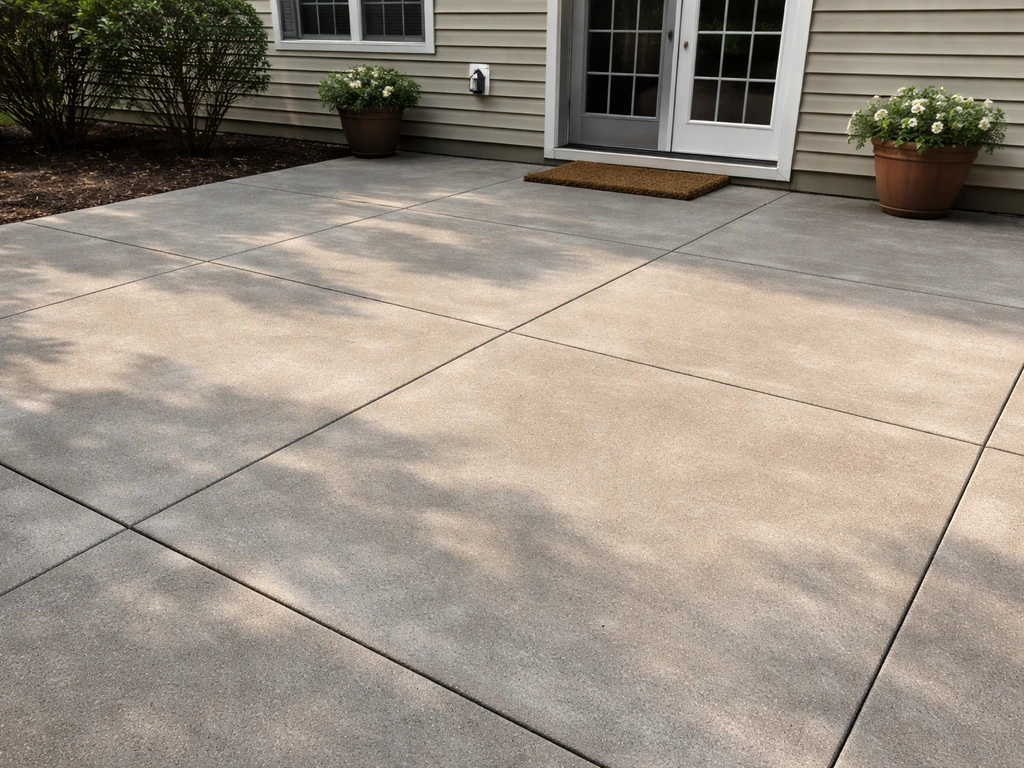
The right move for your concrete patio depends almost entirely on what condition it's in right now. If it's just dull and stained, a thorough clean and a fresh coat of sealer or stain can transform it in a weekend. For a detailed walkthrough of the whole process, see our guide on how to spruce up a concrete patio. If it has cracks, spalling, or a drainage problem, you need to fix those first before touching any cosmetic work. And if it's severely uneven or heaving, that's a job for a pro or a lifting specialist. Most patios fall somewhere in the middle, which means a DIYer with a Saturday afternoon and the right products can genuinely fix them. Here's how to figure out exactly where yours stands and what to do about it today.
What to Do With a Concrete Patio: Repair and Upgrade Guide

Silas Morrison
1 Jul 2026
Quick triage: what condition is your patio in?
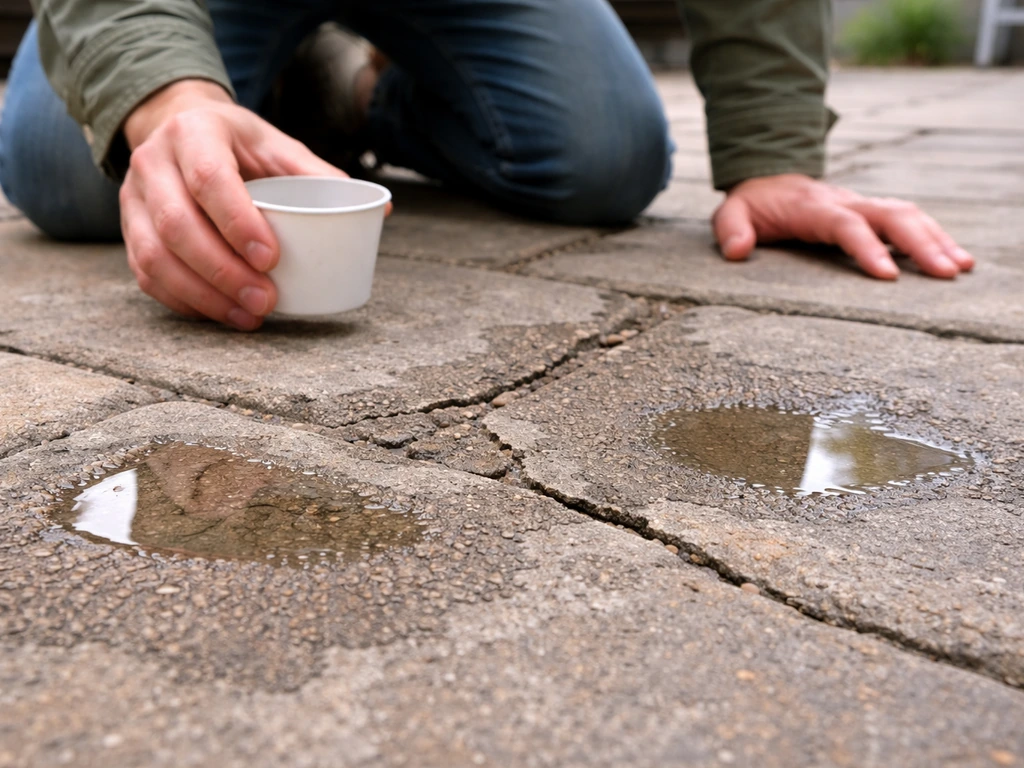
Before you buy a single product, walk the patio and do an honest assessment. Get down low and look at the surface, check the edges, and pour a cup of water in a few spots to see where it flows (or pools). The condition you're dealing with determines every decision that follows.
Here's a quick breakdown of what you might be looking at and what it means:
| What you see | What it means | Likely path forward |
|---|---|---|
| Dull, dirty, or stained surface | Cosmetic only, slab is healthy | Clean, then stain or seal |
| White powdery deposits (efflorescence) | Moisture is moving through the slab; possible drainage issue | Fix drainage, clean with acid wash, then seal |
| Surface flaking, peeling, or shallow pitting | Freeze-thaw and/or deicing salt damage (spalling/scaling) | Patch and resurface, then seal |
| Cracks (hairline to 1/4 inch wide) | Shrinkage or minor settling; watch for water intrusion | Fill cracks, monitor, then seal |
| Cracks wider than 1/4 inch or growing | Settlement or structural movement | Repair and evaluate cause; pro consult likely needed |
| One side noticeably lower than the other | Soil settling beneath slab | DIY leveling foam or pro mudjacking/lifting |
| Water pooling on surface after rain | Drainage slope issue or low spots | Grinding, self-leveling topping, or regrading |
Efflorescence (those chalky white streaks or deposits) is worth paying attention to specifically. It happens when water moves through the concrete, dissolves salts inside the slab, and deposits them on the surface as the water evaporates. It's not just cosmetic. It's a signal that moisture is getting in somewhere, whether from poor drainage, ponding water, or a grading problem. Fix the water path first, or any surface treatment you apply will fail early.
Cleaning and surface prep for any project
No matter what you plan to do next, start with a thorough clean. This isn't optional prep work you can skip to save time. Stain won't penetrate a dirty or sealed surface. Patching compound won't bond over grime. Sealer won't stick to efflorescence or oil. Every single job starts here.
Basic cleaning steps
- Sweep off all loose debris and let the surface dry completely if it's been wet.
- Spray the whole patio with a garden hose to wet it down.
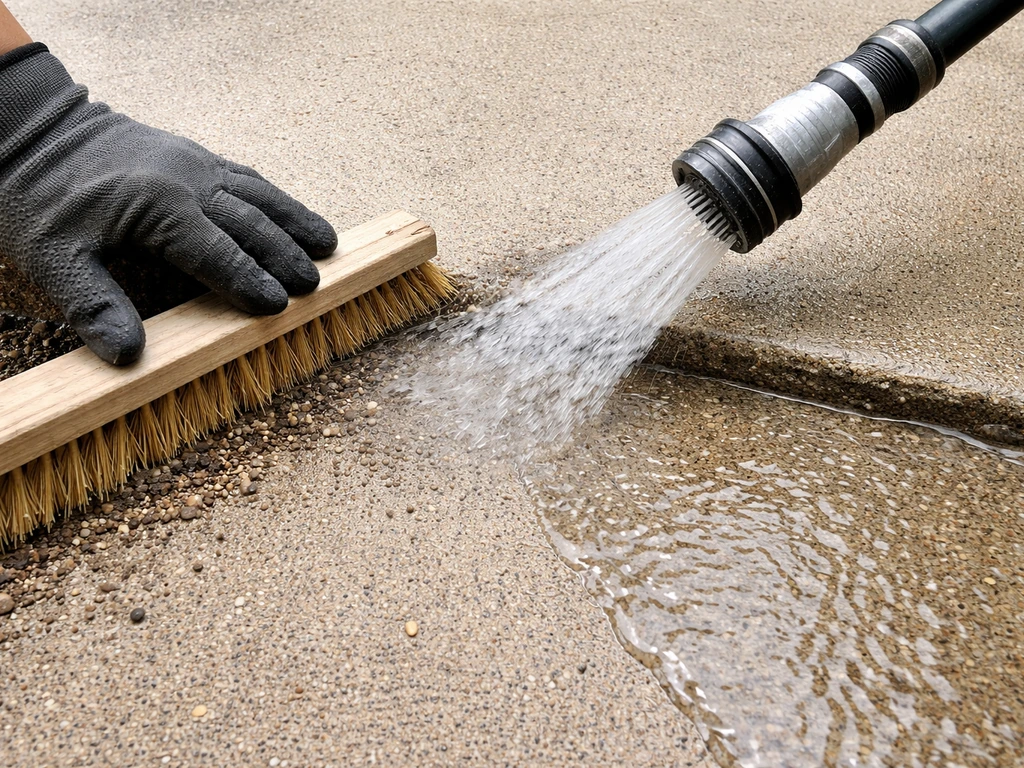
- Apply a concrete degreaser or cleaner to any oil stains, let it dwell for 5 to 10 minutes, and scrub with a stiff-bristle brush.
- Pressure wash the entire surface at 1,500 to 3,000 PSI. Use a fan tip (25 or 40 degree), not a pinpoint tip that can etch the surface.
- If you have efflorescence, use a diluted muriatic acid solution (roughly 1 part acid to 10 parts water) or a commercial etching cleaner after pressure washing. Wet the surface first, apply, scrub, and rinse thoroughly.
- Let the slab dry completely before moving forward. In warm weather that's typically 24 to 48 hours.
If you're planning to stain or apply a resurfacer, you also want to etch the surface so it's open and porous enough to accept the product. Many acid stains handle this automatically, but if you're using a water-based stain or a resurfacer, a light acid etch or mechanical scarification with a rented floor grinder gives you better adhesion.
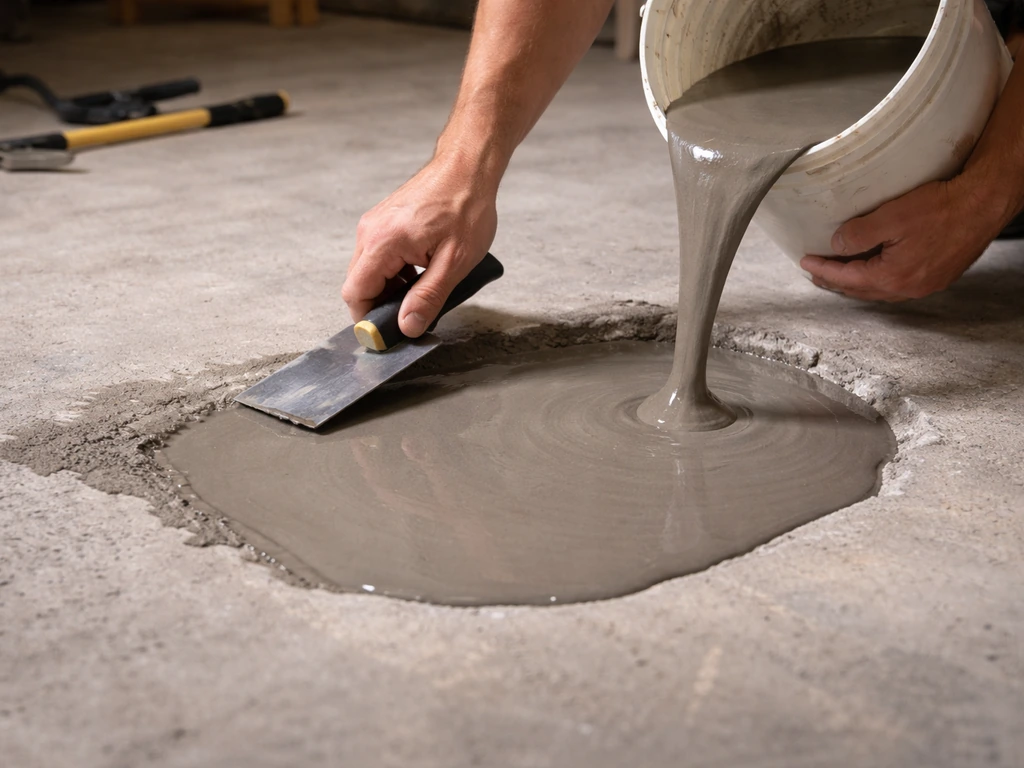
Cracks, spalling, and patch repair steps
Spalling (surface flaking) and scaling are almost always caused by the same culprits: repeated freeze-thaw cycles, deicing salts, or both. What happens is water gets into the top layer of the concrete, freezes, expands, and pops little chips off the surface. If you've been throwing rock salt on your patio every winter, that accelerates the process significantly. Pitting, which looks like small craters scattered across the surface, tends to come from the same combination of moisture and freeze-thaw stress. The fix is the same regardless: clean it up, patch it, and seal the heck out of it so water can't get back in.
How to repair cracks
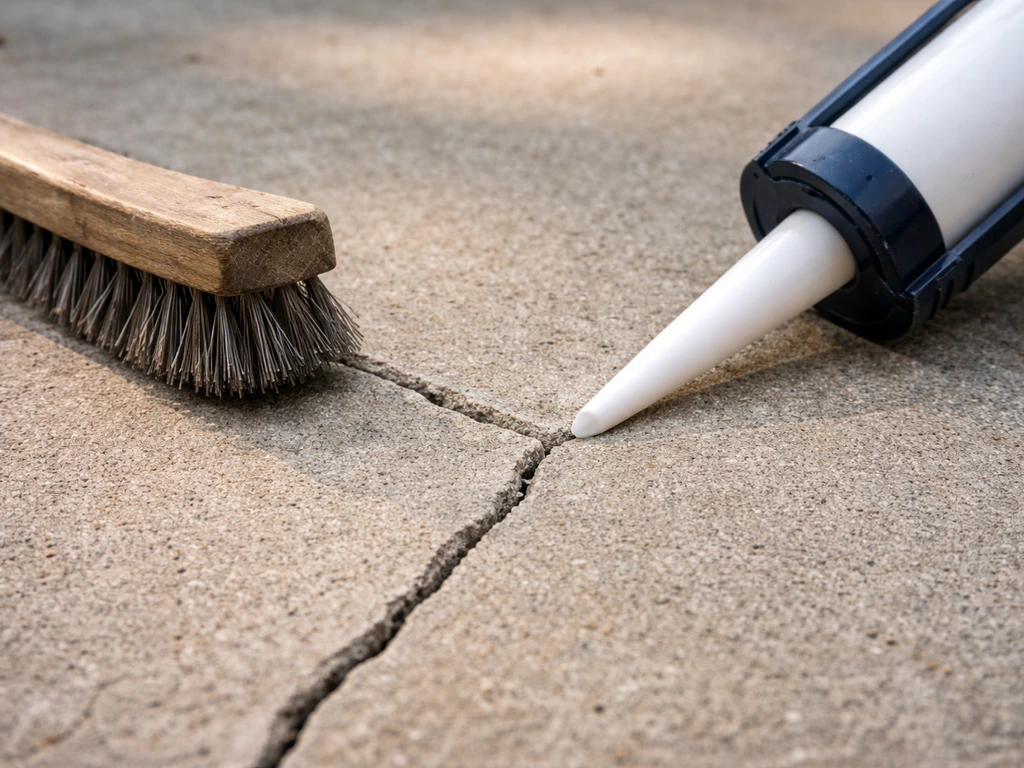
- Clean the crack with a wire brush and blow or vacuum out all debris and dust.
- For hairline cracks (under 1/8 inch): use a concrete crack filler or polyurethane caulk rated for concrete. Overfill slightly, let it cure, then scrape flush.
- For cracks 1/8 to 1/2 inch wide: use a vinyl concrete patching compound or a hydraulic cement product. Undercut the crack edges slightly with a cold chisel to give the patch something to grab onto (called a dovetail cut), dampen the crack, and press the compound in firmly.
- For cracks wider than 1/2 inch or cracks that are actively growing: fill them temporarily, but get a pro involved to assess whether the underlying soil movement is ongoing.
How to patch spalling and pitting
- Remove all loose, flaking concrete. A cold chisel and hammer or angle grinder with a cup wheel works well here. You want to get down to solid material.
- Clean the area thoroughly with a wire brush and rinse.
- Apply a concrete bonding adhesive to the repair area if your patch compound doesn't include a bonding agent. Let it get tacky.
- Mix your vinyl concrete patching compound or polymer-modified mortar to a peanut butter consistency and press it firmly into the area, slightly overfilling.
- Feather the edges so the patch blends with the surrounding surface.
- Allow full cure time before walking on it (typically 24 to 72 hours depending on the product). Don't rush this step.
One thing I've learned from doing these repairs: if the spalling covers more than about 30 to 40 percent of your patio surface, stop patching individual spots and consider a full concrete resurfacer applied over the whole thing. Patching dozens of areas is tedious, the patches will always look different from the surrounding concrete, and a resurfacer gives you a uniform finished surface that actually looks good.
Fixing unevenness and drainage issues (when to DIY vs hire)
A patio that holds water is a patio that keeps getting damaged. If you want a dog-friendly concrete patio, start with getting water draining away from the house so the surface stays safer for paws. Concrete needs to drain away from the house at a minimum slope of 1/8 inch per foot, ideally 1/4 inch per foot. If yours is flatter than that, or if one section has settled lower than the rest, water is pooling and doing ongoing harm.
DIY options for minor unevenness
- Self-leveling concrete overlay: pour over the low area, it finds its own level, and you feather the edges to match the surrounding slab. Works well for depressions up to about 1 inch deep.
- Concrete resurfacer with a squeegee: for very shallow low spots, a resurfacer applied with a floor squeegee can fill in minor dips and improve overall drainage slope.
- Foam lifting (DIY kits available): if a slab panel has settled, two-part polyurethane foam injection kits let you drill small holes and pump foam underneath to raise the slab. It's genuinely effective for mild settling and costs a fraction of professional mudjacking.
When to call a professional
Call a pro if you have multiple panels that have settled significantly (more than an inch or two), if the slab is cracked all the way through and has shifted vertically, or if there's a void beneath the slab you can feel when you walk on it (a hollow, drumming sound is a giveaway). Mudjacking and slab lifting are reasonable-cost professional services in most areas, typically ranging from $500 to $2,000 depending on the scope. That's almost always cheaper than removing and replacing the slab.
A big drainage issue around the perimeter of the patio, like water from the yard consistently flowing toward the slab or the house, is also a job that involves regrading and possibly a French drain. That's worth a professional conversation because no amount of surface sealing fixes a grading problem.
Refinishing options: stain, paint, resurfacer, or overlays
Once the slab is clean, repaired, and draining properly, the fun part begins. There are four main routes for giving a concrete patio a better look, and they have very different results, costs, and durability profiles. Once you choose your finishing route, you can start decorating the space around it with furniture, lighting, and accessories concrete patio.
| Option | What it does | DIY-friendly? | Typical cost (materials) | Durability |
|---|---|---|---|---|
| Acid stain | Reacts chemically with concrete for a variegated, permanent color | Moderate (requires safety gear) | $0.15–$0.25/sq ft | Excellent if sealed |
| Water-based concrete stain | Penetrates and tints the surface, more uniform color | Yes, beginner-friendly | $0.10–$0.20/sq ft | Good if sealed |
| Concrete paint/epoxy coating | Sits on top of surface, opaque color | Yes | $0.20–$0.40/sq ft | Fair to good; can peel over time |
| Concrete resurfacer | Thin new layer over old slab, fixes surface flaws | Yes | $0.10–$0.30/sq ft | Very good |
| Decorative microtopping or overlay | Thicker new surface with texture options | Moderate to difficult | $0.50–$1.50/sq ft | Excellent |
Acid stain is my personal favorite for a patio that's in decent shape with a clean, open surface. If you end up wanting a full makeover instead of a stain, you can build off the same prep work by following how to dress up a concrete patio with options like paint, resurfacer, or overlays more than just prepping for stain. The results look genuinely beautiful and nothing else replicates that natural mottled, stone-like finish. The trade-off is that it requires more prep, more safety awareness (muriatic acid is no joke), and you can't fully control the outcome since every slab reacts a little differently. If you want predictable, consistent color, a water-based stain or a good concrete paint with a primer coat is a more reliable route.
Resurfacers are the best choice when you have widespread surface flaws like spalling, pitting, or lots of old patches you want to hide. Brands like Quikrete's Re-Cap Concrete Resurfacer or similar polymer-modified products go on at 1/16 to 1/4 inch thick and create a smooth, fresh-looking surface. You can broadcast texture into them while wet, or add concrete stain after they cure.
If you're also thinking about how to make your patio look better through furniture, planters, and decor layered on top of the surface work, there's a lot of room to get creative once the slab itself is solid and finished. The surface treatment you choose here sets the foundation for all of that.
Sealing and protecting the slab after work (how and when)
Sealing is not optional. It's the step that makes everything else you've done last. An unsealed or poorly sealed concrete patio is constantly absorbing water, and that water is what drives all the damage you just fixed: freeze-thaw spalling, efflorescence, staining, pitting. A good sealer locks the surface, makes cleaning easy, and extends the life of any stain or finish underneath.
Choosing the right sealer
- Penetrating/impregnating sealers (silane, siloxane, or silane-siloxane blends): soak into the concrete and chemically bond with it without forming a surface film. They don't change the look at all, they're very durable (5 to 10 years), and they're the best choice for unsealed slabs that just need moisture protection.
- Acrylic sealers: form a thin film on top of the surface, add a sheen (from matte to high gloss), and protect stains or resurfacers underneath. They're the most common choice for finished patios. Reapply every 2 to 3 years.
- Epoxy or polyurethane topcoats: more durable film-forming options, typically used over epoxy paint systems or overlays. Better chemical and abrasion resistance but harder to recoat.
How to apply sealer correctly
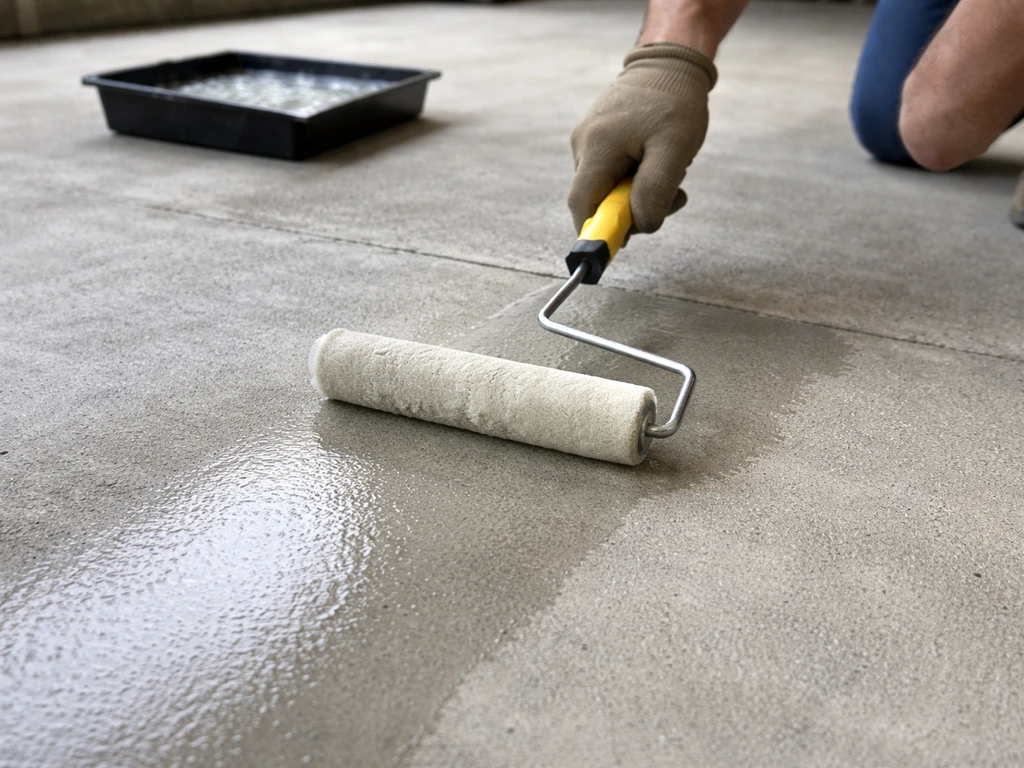
- Make sure the surface is completely dry. 24 to 48 hours after cleaning is the minimum; if you've just done repairs or resurfacing, wait the full cure time specified on that product before sealing (often 72 hours to 7 days).
- Apply sealer in thin, even coats using a roller (3/8-inch nap) or a pump sprayer on a low-pressure setting.
- For film-forming sealers, two thin coats beat one thick coat every time. Apply the second coat before the first is fully dry (check product specs, usually 1 to 4 hours apart) and apply it perpendicular to the first.
- Avoid applying in direct sun when the surface is hot, or when rain is expected within 24 hours.
- Keep foot traffic off for 24 hours and full use for 72 hours.
Maintenance plan and common mistakes to avoid
A well-maintained concrete patio can last 30 to 50 years without major structural work. The maintenance is genuinely minimal if you stay ahead of it. Here's what a realistic schedule looks like:
- Every spring: pressure wash the surface, inspect for new cracks or spalling, and check that water is draining away from the house properly.
- Every 2 to 3 years (for acrylic sealers): reapply a fresh coat of sealer. You don't need to strip the old sealer if it's still adhering well; just clean the surface and roll on a new coat.
- Every 5 to 10 years (for penetrating sealers): do a bead test. Drop water on the surface and see if it beads up. If it soaks in flat, the sealer is exhausted and it's time to reapply.
- Every winter in freeze-thaw climates: switch from rock salt to sand or a magnesium chloride-based deicer. Rock salt (sodium chloride) is brutal on concrete and accelerates scaling.
- Immediately when noticed: fill any new cracks before they let water in over winter. A tube of concrete crack filler is cheap insurance.
Common mistakes that ruin concrete patio projects
- Skipping the prep: applying stain, paint, or sealer over a dirty, sealed, or contaminated surface guarantees peeling and failure. The prep is the job.
- Sealing too soon after repairs: patching compounds and resurfacers need to cure fully before you seal over them. Read the label. Sealing too early traps moisture inside and causes the exact problems you were trying to prevent.
- Using too thick of a sealer coat: thick coats of acrylic sealer turn white (blushing) and peel. Thin coats are always better.
- Ignoring drainage before doing cosmetic work: if water is pooling or draining toward the house, no finish will last. Fix the drainage first.
- Using rock salt as a deicer after sealing: this is the single most common cause of new spalling on freshly refinished patios in cold climates.
- Patching over loose concrete: if you don't remove all the loose, deteriorated material before patching, the patch will pop off. Chase the damage until you hit solid material.
The bottom line is that almost every concrete patio problem is fixable with the right approach. Whether you're dealing with a surface that's just lost its spark, persistent cracks, widespread spalling, or a slab that's settled unevenly, there's a clear, doable path forward. Start with an honest assessment, fix the structural and drainage issues before touching the surface, choose a refinishing option that matches the condition you're working with, and seal it properly when you're done. You can use these steps as a practical roadmap for how to improve concrete patio performance, look, and longevity. Do that, and your patio can look and perform better than it has in years.
FAQ
What should I do first if my concrete patio has both stains and cracks?
Treat the drainage and crack-related issues first, then do your deep cleaning. Stains and efflorescence often come from moisture movement, so sealing or coating before fixing water pathways can trap moisture and make discoloration return quickly.
Can I just paint or stain over a concrete patio that has efflorescence?
Usually no. Chalky deposits indicate salts and moisture movement at the surface, and coatings will often fail if they’re applied over active efflorescence. Let cleaning and water-path fixes fully resolve the deposits before coating.
How do I tell whether the patio is settling versus just having surface cracking?
Surface cracking that doesn’t change height is usually non-structural. If you see vertical displacement, doors or steps around the patio show misalignment, or you hear a hollow/drummy sound when walking, get a pro to check for voids and slab lifting options.
Is sealing enough, or do I need resurfacer or patching?
Sealing alone only helps when the slab is structurally sound and the problems are mainly dullness or minor surface wear. If you have active spalling, pitting, or widespread patched areas, resurfacer usually gives a uniform surface and reduces repeating spot repairs.
What happens if I skip etching before using stain or resurfacer?
Adhesion can be weak, and you may see peeling, patchy color, or rapid wear. Etching (or mechanical scarification) opens the surface so products can bond into the concrete rather than sitting on top.
How many times should I seal a newly resurfaced or stained patio?
After resurfacer cures, apply the sealer according to the product’s label, typically with a second coat if the finish looks uneven or the system calls for it. The key is making sure each layer cures fully before adding the next, otherwise the finish can haze or stay tacky.
What’s the safest way to handle muriatic acid for acid staining?
Use chemical-resistant gloves and eye protection, keep children and pets away, and neutralize and rinse exactly as the product instructions specify. If you’re unsure you can manage ventilation and disposal safely, switch to a water-based stain system.
Can I use deicing salt safely on a patio that’s been repaired and sealed?
You’ll extend life, but repeated salt and freeze-thaw can still stress the surface. Use as little deicer as possible, prefer sand for traction, and avoid letting meltwater pond near the slab.
My concrete patio has a small low spot that pools water, should I patch it?
If water is pooling due to grading, patching the surface won’t solve the root cause. Focus on regrading and fixing the slope, or consult about subsurface drainage solutions if the low area corresponds to a settled section.
When should I consider full slab replacement instead of resurfacing or lifting?
If the slab is severely heaved, has major vertical shifting across multiple areas, or has widespread structural failure beyond workable voids, resurfacing may only hide symptoms. A pro can assess whether lifting, jacking, or removal is the more durable long-term option.
How can I prevent color mismatch after patching or resurfacing?
Patches and older concrete cure and absorb products differently, so small spots often show variation. If coverage defects are large (roughly 30 to 40 percent), a whole-patio resurfacer helps create a consistent look by using a single finishing layer over the same base.