You can completely transform a concrete patio with the right combination of surface prep, a finish like stain or overlay, a protective sealer, and thoughtful decor. The catch is that the approach depends heavily on whether your slab is new or existing and what shape it's in. Nail the prep and protection first, then layer on the design. Skip either step, and even the best decor looks rough within a season.
How to Decorate a Concrete Patio: DIY Guide for Stain, Paint, More

Silas Morrison
30 May 2026

First, figure out what kind of concrete you're working with
Before you buy a single can of stain or roll of outdoor rug, take ten minutes to actually look at your slab. Is it new poured concrete, or an older existing slab? That question changes everything about what you can do with it.
New concrete needs to fully cure before you apply anything to it. Most contractors quote 28 days for full strength, and that's roughly right for coatings too. More importantly, new slabs hold a lot of moisture internally, and applying stain, paint, or sealer over a wet slab is one of the most common ways decorative finishes fail. The moisture pushes the coating off from underneath, causing bubbling and peeling.
You can do a simple plastic sheet test (known as ASTM D4263) to check: tape a roughly 18x18-inch piece of polyethylene film to the concrete surface, seal all four edges with tape, and wait 16 hours. If condensation or water droplets appear on the underside of the film or on the concrete beneath it, the slab is too wet.
For a more precise read before applying a finish system, a calcium chloride test (ASTM F1869) measures moisture vapor emission rate, and many coating manufacturers specify a threshold of less than 3 lbs of water per 1,000 sq ft per 24 hours before their product goes down.
Existing slabs have different issues. Older concrete can have oil stains, mildew, efflorescence (that white chalky salt deposit), settled cracks, or flaking from previous sealers. You need to know what you're dealing with before choosing your finish. Walk the slab and note: any cracks wider than a hairline, any raised or moving cracks, expansion joints, low spots that hold water, and any areas that feel soft or hollow when you tap them. Raised or moving cracks are a real problem for overlays specifically because if the slab keeps moving, the overlay will crack too. For those areas, you'll want to address the root cause before covering anything up.
Surface prep: the work that actually makes the difference
I'll be honest: prep is the boring part, but it's where most DIY patio projects succeed or fail. A stain applied over a greasy, dusty, or damp slab will look patchy and peel within a year. Spend the time here and everything else goes smoothly.
Cleaning the slab
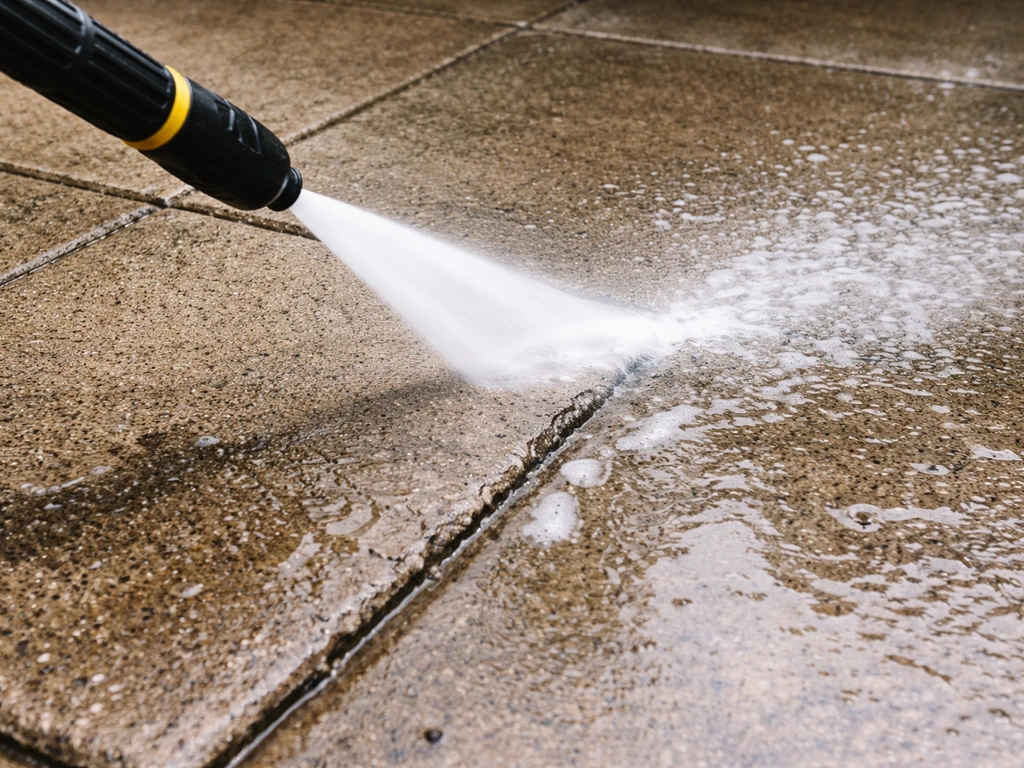
Start by clearing everything off the patio: furniture, pots, rugs, all of it. Then do a first pass with a stiff broom to knock off loose debris. For a deeper clean, apply a degreaser or concrete cleaner as a pretreatment, let it dwell per the label, then pressure wash. Using a pretreatment lets you work at a lower pressure and still get the surface clean. A working range of around 2,500 to 3,000 PSI is appropriate for residential concrete, using a 25-degree or 40-degree fan tip rather than a turbo/rotary nozzle, which can etch or pit the surface. Keep the wand moving and maintain a consistent distance from the surface.
If you see white crusty deposits, that's efflorescence. It's water-soluble mineral salts migrating to the surface, and it has to come off before you apply any finish or it will interfere with bonding. Start by dry-scrubbing with a stiff brush and pressure washing. For stubborn deposits, apply a diluted acid solution: white vinegar works for light efflorescence; diluted muriatic acid handles tougher cases. Always wet the concrete first before applying any acid cleaner, and neutralize and rinse thoroughly afterward. Skipping the neutralization step can leave acid residue that continues eating into the surface.
For mildew and algae (common in shaded or damp patios), an oxygen-based outdoor wash is a solid non-bleach option that's safe for concrete and effective on biological growth. One product listing for an oxygen-based outdoor wash describes it as “safe, powerful, bleach-free” and suitable for outdoor surfaces such as concrete and foundations. Follow the label for dwell time and rinse well.
Patching cracks and holes
Once the slab is clean and dry, deal with any cracks or divots. For shallow repairs up to about 1/4 inch deep, a standard concrete and mortar repair product works well, and you're looking at roughly 48 hours of dry time at that depth before it's ready to coat over (more in cold or humid weather). For deeper repairs over 1/2 inch, build up in layers of about 1/4 inch each, letting each layer dry 3 to 5 hours before adding the next. Rushing layered repairs is how you get patchy results. For anything that feels structurally soft or crumbling, use a polymer-modified concrete resurfacer, which bonds better to aged concrete than plain repair mortars.
After patching, let the repairs cure fully before moving to the next step. The general rule for any cementitious repair product is to protect it from sun and wind during cure so it doesn't dry too fast and crack.
Confirming the slab is dry enough
After cleaning and patching, the slab needs to be genuinely dry, not just surface dry. The plastic sheet test (ASTM D4263) is free and easy to do before you apply anything. Tape a sheet of plastic film to the slab, leave it 16 hours, and check for condensation. If you want a more quantitative answer before a major finish investment, a calcium chloride test (ASTM F1869) or an in-situ RH probe test (ASTM F2170) will give you actual numbers. Many coating systems specify their acceptable moisture thresholds in their technical data sheets, so check the specific product you're planning to use.
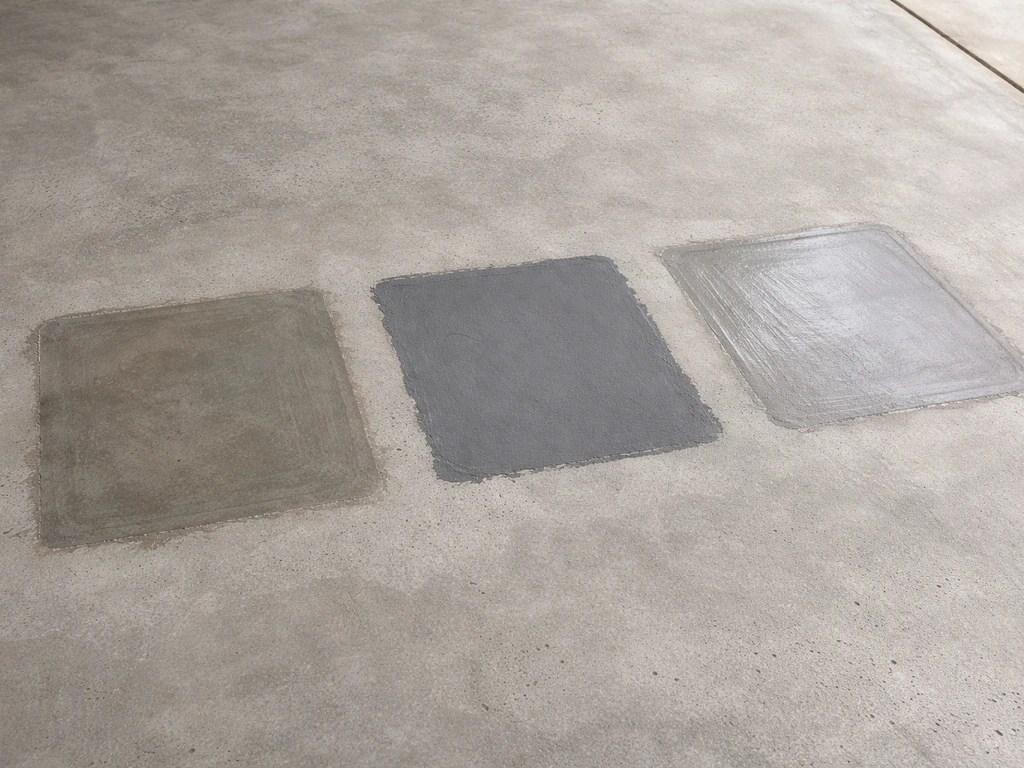
Finishes that change how the concrete looks: staining, painting, and overlays
This is the part that makes the biggest visual impact. You have three main routes: staining the concrete, painting it, or applying a concrete overlay. Each one has a different look, different prep requirements, and a different expected lifespan. Here's how to think about them.
| Finish Type | Best For | Look & Feel | Key Limitation |
|---|---|---|---|
| Acid Stain | Existing slabs in decent shape, looking for rich, variegated color | Mottled, earthy tones; semi-transparent; looks like natural stone | Permanent, unpredictable variation (feature, not a bug); requires sealing |
| Water-Based Stain | Most slabs; more color control than acid stain | More uniform, wider color range; can be layered | Less depth than acid stain; requires sealing |
| Concrete Dye | Indoor or covered patios; fast color penetration | Vivid, bright color options | Less UV-stable outdoors; fades without proper sealer |
| Masonry/Concrete Paint | Slabs with mild surface imperfections; budget-friendly refresh | Solid, opaque color; hides blemishes | Peels over time; requires surface profiling and re-coating every few years |
| Concrete Overlay | Worn, stained, or pitted slabs; want a fresh texture | Smooth, broom-finish, or stamped look; hides most damage | Must fix moving/raised cracks first; high-resin overlays don't take stain well |
Staining is my favorite route for existing slabs that are structurally sound but ugly. Acid stains react chemically with the minerals in the concrete and produce those rich, coffee-and-copper tones you can't fake with paint. Water-based stains give you more color control and are easier to apply. Neither will hide cracks or major texture issues, which is why prep matters so much. If you want stain over an overlay, use an overlay with high cement content rather than a high-resin formula, since resin-heavy overlays don't absorb stain well.
Concrete paint (or masonry paint) is the easiest and cheapest option, and it works fine as a temporary refresh. The honest downside is that it forms a film on the surface, and that film will eventually peel, especially outdoors where temperature swings, foot traffic, and UV exposure stress it constantly. Expect to repaint every 2 to 4 years on a patio that gets real use.
Concrete overlays are the right tool when the slab surface itself is too damaged or stained to just clean and stain. A polymer-modified overlay applied at about 1/4 inch thick reskins the surface, giving you a fresh canvas for staining, texturing, or just a clean neutral gray. The critical thing with overlays: fix any moving or raised cracks in the substrate first. If the slab moves, the overlay cracks. Expansion joints especially need to be honored through the overlay, not covered over.
One finish to approach carefully for outdoor use is standard epoxy. It looks great in product photos, but exterior epoxy has well-documented problems: it's vulnerable to UV (chalking and hazing over time), doesn't handle freeze-thaw cycling well, and if moisture gets under any weak spot, you get peeling and delamination. If you want an epoxy-like look outdoors, look at polyurea or polyaspartic coatings, which are far more UV-stable and flexible.
Sealing your patio for lasting color and protection
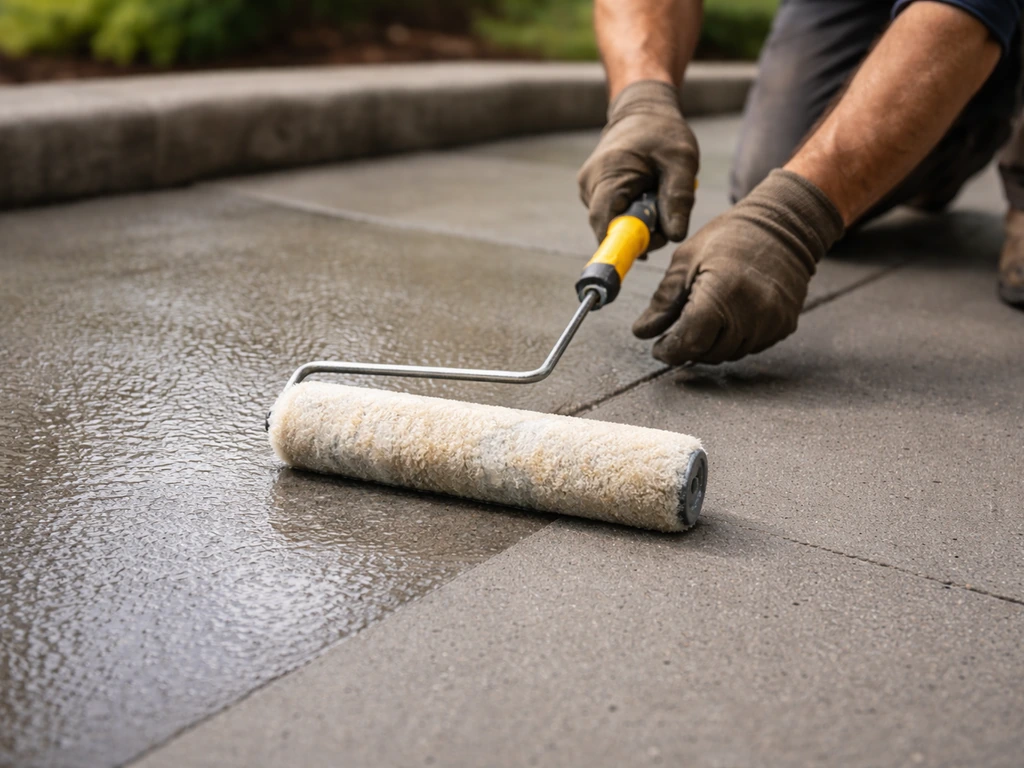
Whatever finish you apply, seal it. Full stop. Outdoor concrete without a sealer absorbs oil, water, and UV, and colors fade or stain within a season. The right sealer depends on your finish and your climate.
Penetrating sealers (silanes, siloxanes, silicates, siliconates) soak into the concrete and form a chemical moisture barrier without leaving a film on the surface. They're ideal when you want to preserve a natural, matte look, and they're the better choice for climates with hard freeze-thaw cycles because there's no surface film to peel under thermal stress. Film-forming sealers aren't well-suited for exterior concrete in freeze-thaw climates for exactly that reason.
Film-forming sealers (acrylics, urethanes, epoxies) sit on top of the surface and add sheen while protecting the color of a stain or overlay. Acrylic sealers are the most common for DIY patio use and come in matte, satin, and gloss finishes. The sheen level matters for design: a high-gloss sealer on a stamped overlay looks intentional and decorative, while a satin or matte finish reads more like natural stone. Urethane sealers are more durable than acrylics and handle foot traffic and UV better, which makes them worth the extra cost for patios that get heavy use.
On application: coverage rates vary by product, but a rough rule of thumb is around 250 sq ft per gallon for a single coat. Most systems want two coats. For penetrating sealers that need two coats, apply the second coat wet-on-wet while the first coat is still tacky. For film-forming sealers, follow the recoat window on the label (often around 1 hour for acrylics). Walk-on time and full cure are different things: you might be able to walk on the sealer after a few hours, but full weather resistance can take 24 to 72 hours or longer depending on temperature and humidity. Don't put furniture back too soon.
Layout and design strategy for small concrete patios
Once the surface looks good, the design work starts. If you want it to stay looking great, use the tips above to choose the right finish, seal it properly, and then add decor that complements the concrete how to make a concrete patio look better. Small patios are honestly easier to decorate than large ones because every element does double duty. The goal is to make the space feel intentional, not cramped.
Zone the space even if it's small
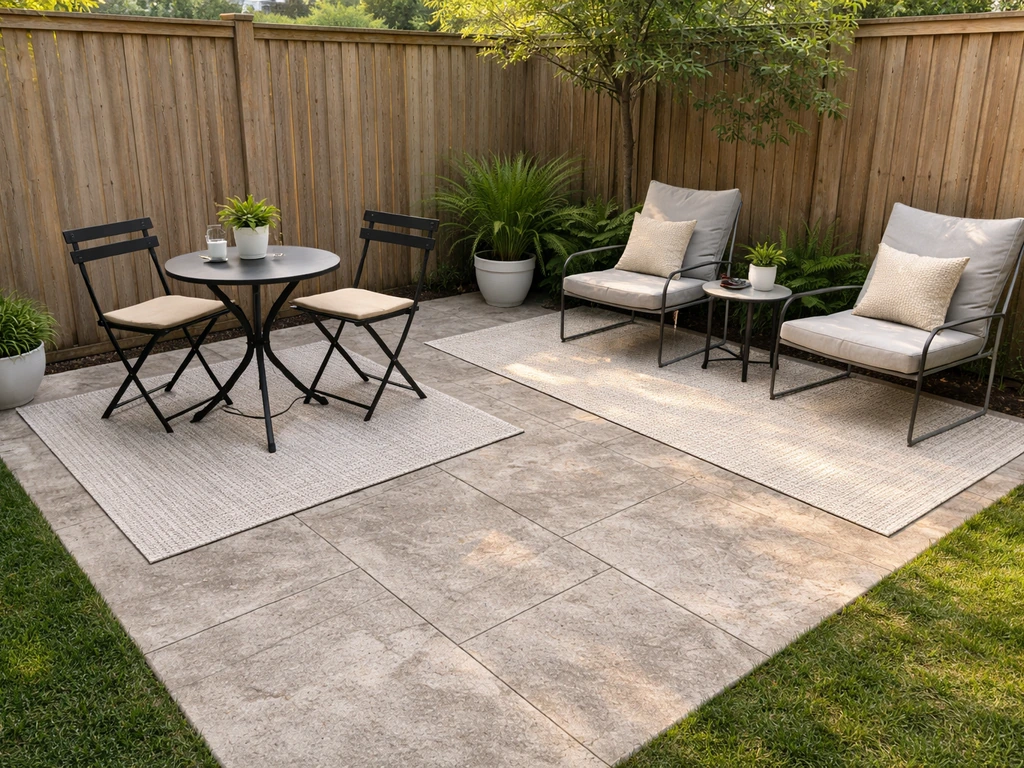
Even a 10x12-foot patio can have a dining zone and a lounging zone if you arrange it right. The key is defining those zones with anchors: a table and chairs define dining, a small sofa or pair of chairs with a low table defines lounging. An outdoor rug under each grouping visually separates the zones without needing a wall or divider. If the patio is too small for two zones, pick one function and commit to it fully rather than cramming in furniture for both.
Scale furniture to the space
Oversized furniture is the fastest way to make a small patio feel like a storage unit. Measure the space before you buy anything. For a small slab, look for bistro tables, loveseat-scale sofas, and chairs with open or slatted frames that don't visually block the space. Leave at least 3 feet of clearance around dining chairs for pull-out room, and at least 18 inches between a coffee table and a sofa. Foldable or stackable furniture is worth every penny on a small patio: it lets you reconfigure the space for different uses without permanently allocating square footage.
Go vertical to add depth
Vertical elements make a patio feel larger by drawing the eye up. Tall planters, a wall-mounted trellis with climbing plants, privacy screens, and pergolas all add visual height without eating floor space. A simple 4-post pergola over a small patio creates a sense of room and overhead enclosure that makes even a basic slab feel like a proper outdoor space. String lights or a pendant from a pergola beam also add lighting without taking up any floor space.
Lighting makes a small patio feel twice as big at night
Layered lighting is the single most underused trick for small patios. String lights overhead create ambient glow that blurs the boundaries of the space. Low solar stake lights along the perimeter or in planters add ground-level warmth. A small wall sconce or lantern at the house keeps things functional. Avoid a single overhead floodlight: it creates harsh shadows and makes the space feel like a parking lot. Warm white bulbs (around 2700K) make concrete and plants look their best.
Decor add-ons that actually work with concrete
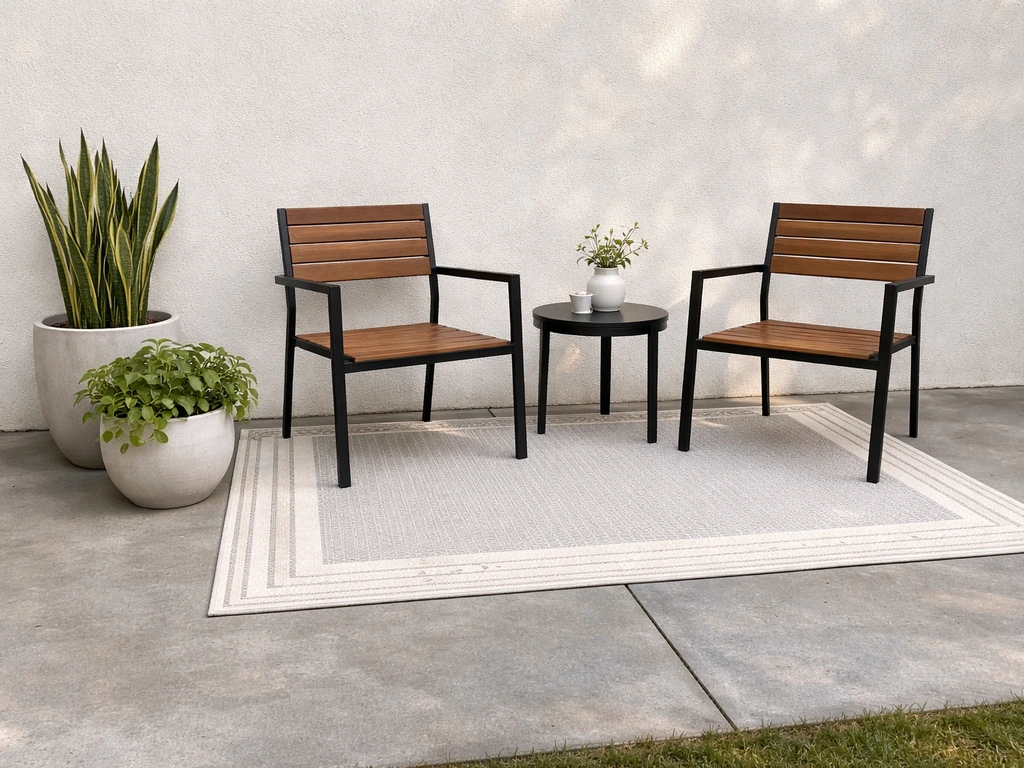
Concrete is a great base for almost any outdoor decor style. The texture and neutral color play well with wood, metal, wicker, and fabric. Here are the elements worth investing in and what to watch for with each.
- Outdoor rugs: A weather-resistant polypropylene rug anchors your furniture arrangement, adds color, and softens the hardness of the slab underfoot. Choose a rug sized so the front legs of your furniture sit on it. On a sealed slab, make sure the rug has some airflow underneath (check periodically for trapped moisture, which can stain or damage a fresh sealer).
- Planters and containers: Large planters at corners or entry points frame the space and add softness. Concrete itself is heavy, so lightweight alternatives like fiberglass or resin planters are easier to rearrange. Grouping planters in odd numbers (three or five) looks more natural than a single pot in each corner.
- Privacy screens: Freestanding lattice panels or cedar screen frames on the perimeter block sightlines from neighbors and wind, and they double as a surface for climbing plants or wall-hung decor. Make sure freestanding screens are anchored with base weights or ground stakes so they don't tip in wind.
- Pergola or shade structure: A pergola transforms a bare slab into an outdoor room. Even a simple kit pergola screwed into the concrete at four corners makes a dramatic difference. For a small patio, a retractable awning or shade sail is a lower-cost option that also reduces summer heat on the slab surface.
- Edges and accents: Concrete paver borders, stepping stone paths leading to the patio, or a painted or stained border around the perimeter of the slab are simple ways to break up a plain gray expanse. A contrasting stained border in a darker tone costs almost nothing extra if you're already staining the slab.
- Lighting (hardscape-integrated): Solar-powered post cap lights on fence posts, recessed deck lights set into planters or steps, and low-voltage pathway lights along the patio edge all add dimension without requiring electrical work.
Keeping it looking good: your maintenance plan
The work doesn't stop when the last piece of furniture goes down. A decorated concrete patio needs periodic maintenance to stay looking good, and the good news is it's not much work if you stay on a simple schedule.
Regular cleaning
Sweep or blow off debris weekly during use season. For deeper cleaning, a mop with a pH-neutral cleaner works well on sealed concrete and won't degrade the sealer the way acidic cleaners can. Avoid bleach directly on stained or decoratively finished concrete, as it can lighten or discolor certain stain products. For mildew or algae that builds up in shaded areas, an oxygen-based outdoor wash is the safe choice. When pressure washing a finished slab, keep the PSI on the lower end (around 1,500 to 2,000 for maintenance cleaning) and avoid holding the wand in one spot.
Re-sealing schedule
Acrylic sealers on an outdoor patio typically need reapplication every 2 to 3 years, sometimes sooner on a south-facing slab that gets full sun. Urethane sealers last longer, often 3 to 5 years. Penetrating sealers are more durable and may only need a refresh every 5 to 10 years depending on exposure. The easy field test: pour a tablespoon of water on the surface.
If it beads up, the sealer is still working. If it soaks in quickly, it's time to reseal. Before resealing, do a thorough cleaning and light prep, and make sure the surface is dry. You typically don't need to strip the old sealer if it's not peeling, just clean, lightly etch or scuff if needed, and apply a new coat.
Touch-ups on stains and painted surfaces
Painted patios will show wear spots and scuffs before anything else. Keep a small amount of your original paint for spot touch-ups. For stained surfaces, touch-up is harder because acid stain reacts with the concrete and new spots rarely match aged ones perfectly. The better approach on stained patios is to reseal on schedule so the stain color is protected from UV and abrasion rather than needing frequent spot repairs. If a section of overlay cracks or chips, spot-repair with the same overlay material, feather the edges carefully, and reseal the area to blend the sheen.
Done right, a decorated concrete patio can look genuinely great for years without expensive ongoing maintenance. The investment is front-loaded in prep and the right finish system, and the payoff is a space that actually gets used. Start with the surface assessment, work through prep honestly, choose a finish appropriate to your slab's condition, seal it properly, and then layer on the decor.
For a dog-friendly concrete patio, make sure the sealer and finish you choose are pet-safe and stand up to paw traffic and accidents seal it properly. Following this plan for how to improve concrete patio results in a finish that stays looking great rather than just looking good at first. If you want practical steps, this guide on how to spruce up a concrete patio walks through surface prep, finishes, and sealing.
Once your finish is sealed, you can focus on the fun part: choosing outdoor rugs, plants, and furniture that dress up the space without fighting the concrete seal it properly. That sequence is what separates a patio that looks good in May from one that still looks good three summers from now.
FAQ
How do I know if my concrete has old sealer or wax that will ruin my finish?
Most DIY failures come from coating over a slab that is still outgassing moisture or still has residue from old sealers, paint, or curing compounds. Before staining or painting, do a moisture test (plastic sheet or calcium chloride), then confirm the surface is bond-ready by sprinkling a few drops of water after cleaning. If water beads instantly in a patchy way, you likely have lingering sealer and should plan for scuffing or a removal step before applying your finish system.
Can I decorate and seal a concrete patio in hot weather or right after a storm?
Yes, but it requires a different strategy. Use a color-stable patio sealer system designed for exterior UV, and expect maintenance schedules to be stricter in full sun. Also, be careful with “fast-dry” products, they often trap moisture in the slab and can increase peeling risk if the concrete is not fully dry and cured.
What should I do if my patio sealer is peeling or flaking?
If the slab is sealed already and the seal is peeling, you cannot rely on just cleaning. Peeling indicates loss of adhesion, so coatings and stains will not tie in consistently. Plan to remove loose material and then re-test moisture and adhesion before reapplying, otherwise you may get lifting that spreads under the new layer.
Which finish type is best for a patio that has stains, slight scaling, and a few small cracks?
Choose based on whether you want to preserve concrete color and texture or create an even, uniform look. Stain preserves a natural, translucent look but will not hide major surface damage. Paint hides flaws but has a film layer that can peel over time. Overlays provide the most camouflage for worn surfaces, but they require addressing moving cracks and respecting expansion joints first.
How do I decide whether a crack is safe to patch or too risky for an overlay?
Look at the crack width and whether it moves with seasons. Hairline, non-moving cracks are often manageable with standard patching and crack-appropriate repair products. Anything that is raised, widening, or you can feel as you walk is a movement issue, and overlays or thick paint systems usually fail there unless you stabilize the cause and treat those cracks differently.
What is the most common mistake when applying patio sealer that causes streaks or uneven color?
Don’t assume “one coat” coverage means complete protection. For film-forming sealers and paints, missing areas or thin spots create fast-fading lanes and uneven sheen. Measure your actual square footage, use the product’s stated coverage rate, apply at the recommended film thickness, and keep a wet edge to avoid streaks.
Can I seal over dust, minor residue, or sanding marks to save time?
For film-forming sealers, the target is a surface that is visibly clean and dry, without dust. Light scuffing can help adhesion, but over-aggressive grinding can create dust-filled pores that later show as pinholes. After scuffing, vacuum thoroughly and do a final wipe as recommended by the sealer manufacturer, then apply within the recoat window.
How soon can I stain or paint after using an oxygen cleaner or acid wash?
For oxygen-based cleaners and acids, the key edge case is residue left behind after rinsing or neutralizing. Even small leftover chemistry can interfere with bonding and cause blotchy discoloration under stain or paint. Always rinse thoroughly, let the slab dry fully, and avoid applying finishes until the surface passes your moisture checks.
My slab looks dry after power washing, but my sealer still fails. Why?
Concrete can look “dry” while still holding moisture below the surface, which is why surface tests are not enough for coating decisions. Use the plastic sheet test or a quantitative moisture test for any finish that forms a bond layer. If the slab fails, the fix is time plus improved drying conditions, not thicker coats.
Should I fill expansion joints before applying an overlay or decorative coating?
Don’t cover expansion joints or any joint that is meant to move. Overlays should honor them by cutting and filling the joint according to the overlay system’s instructions, then using joint filler appropriate for movement. If you bridge joints, the overlay typically cracks along the joint line.
What if efflorescence comes back after I sealed the patio?
If you see efflorescence after you’ve started sealing, stop and correct the root issue. Efflorescence is driven by water migrating through concrete, so re-sealing without addressing water entry can trap salts under the new layer. Identify where water is coming from (drainage, sprinkler overspray, grading), clean the salts again, ensure full dryness, and then reseal.
Why do stains or tinted sealers look blotchy even when the surface was cleaned?
Mixing can be a problem if you tint or combine batches that aren’t identical. Follow the exact mixing ratio, mix enough material to complete an entire area without stopping, and keep conditions consistent. If you must stop, plan your cut lines for a location that matches natural breaks, then keep blending before the product sets.
What should I look for in a sealer if my patio needs to be dog-friendly?
For dog or pet traffic, prioritize traction and chemical safety. Glossy sealers can become slippery when wet, so consider matte or satin finishes, and ensure the product label states it is safe for pets after cure. Also, seal for stain resistance but plan for paw abrasion, some sealers scuff sooner and need more frequent maintenance.
How do I tell if my concrete is too weak for a coating or overlay?
If your concrete is soft or has “powdery” surface loss, it is usually a surface stability problem. Paint and stain will not fix that, and overlays can delaminate because the base is not sound. Use a spot test (scrape and tap), and if material flakes or feels hollow, you may need to remove weak concrete or use a resurfacing system specifically designed for weak substrates.