
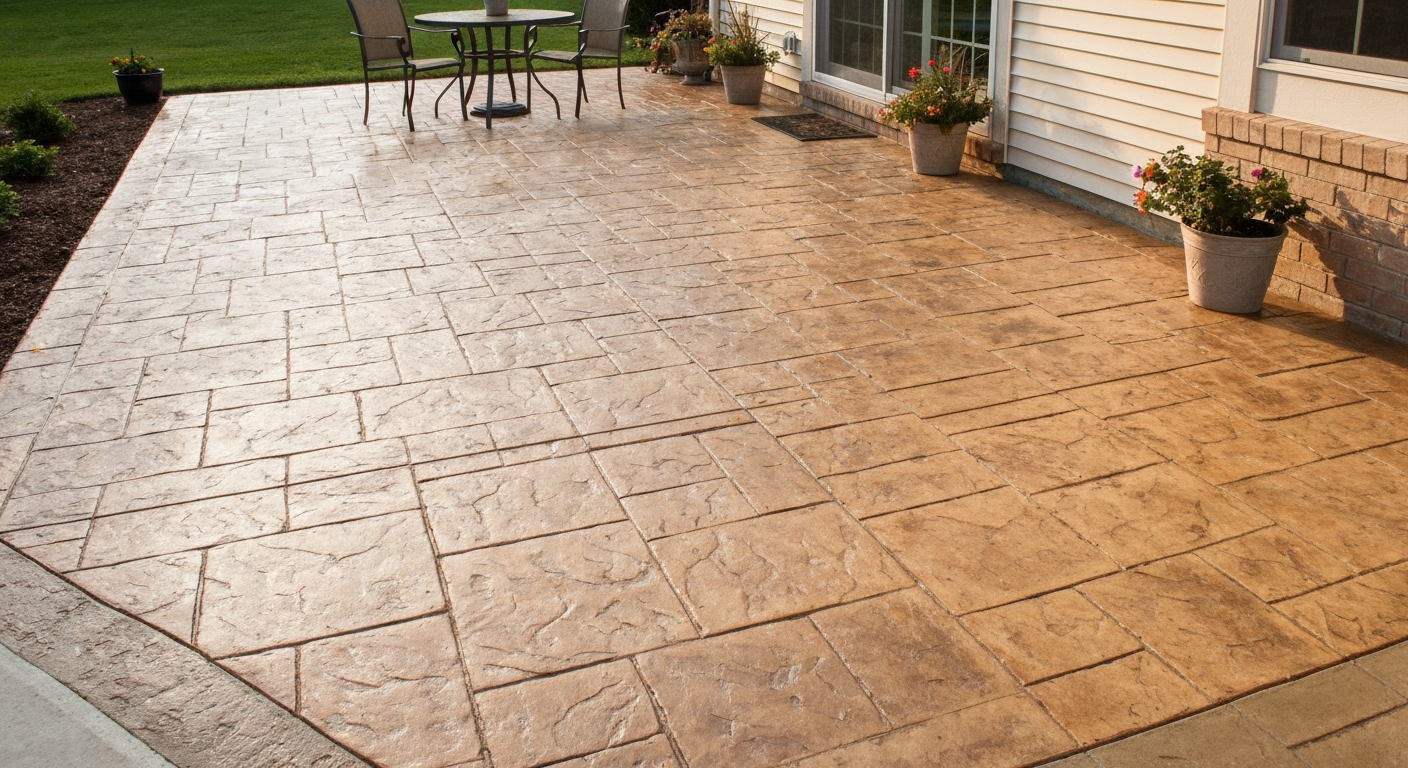
Yes, an existing concrete patio can be stamped. You do it by applying a stampable overlay (typically 3/8 inch to 3/4 inch thick polymer-modified cement) over the cleaned, prepared slab and pressing stamp mats into the fresh material before it sets. The result looks nearly identical to freshly poured stamped concrete. The catch is that the process only works reliably when the slab underneath is structurally sound, free of active movement, and properly prepared for bonding. Skip those conditions and the overlay will delaminate, crack, or peel inside a season or two.
Can an Existing Concrete Patio Be Stamped? DIY Guide

Silas Morrison
29 Jul 2026
Quick answer and decision framework
Before you buy a single bag of overlay mix, run through this decision tree. It takes about 30 minutes with a hammer and a spray bottle, and it will tell you whether stamping over your existing slab is genuinely viable or whether you are better off replacing it.
- Is the slab structurally intact with no settling, heaving, or vertical displacement greater than 3/8 inch at any joint or crack? If no, stop — assess for removal and replacement first.
- Are there fewer than minor surface cracks (hairline to 1/8 inch), with no actively widening cracks? If cracks are wide, recurring, or moving, stop — overlay will not bridge structural movement.
- Is spalling or delamination limited to less than 10 to 15 percent of the total surface area? If delamination is widespread, the substrate is too compromised.
- Has the slab been dry and stable for at least 28 days, with no seasonal water intrusion from below? High moisture vapor emission can lift an overlay.
- Can you get water to bead on the surface rather than absorb? If yes, a sealer or curing compound is likely present and must be removed before any overlay will bond.
- After removing contaminants and mechanically profiling the surface, does a bonded mortar patch stay put after 24 hours? If it peels, the substrate tensile strength is too low.
- If you answered yes to all of the above, your slab is a candidate for a stampable overlay.
The key thresholds to keep in mind: surface tensile strength at or above 200 psi (confirmed by pull-off test), in-slab relative humidity at or below 75 percent unless you install a moisture-mitigation barrier, and no active vertical displacement. Crack width alone is less important than whether the crack is moving. A static hairline crack can be filled and overlaid successfully. A crack that opens and closes with temperature or moisture is a dealbreaker without addressing the underlying cause first.
DIY vs. hiring a pro: who should tackle this job
I will be straight with you: stamping an overlay is harder than stamping fresh concrete. You have a narrower working window, the mix consistency is more critical, and a seam left between stamp impressions is almost impossible to fix once the material starts to set. That said, confident DIYers handle this job every weekend. If you're attempting this yourself, see our detailed guide on stamped concrete patio do it yourself for step-by-step instructions and a complete tools and materials checklist. For step-by-step guidance and tool lists for a do it yourself concrete patio, see our detailed DIY patio guide. Here is how to figure out which category you fall into. If you want detailed, step-by-step instructions, see our guide on concrete patio how to do it yourself for tools, timing, and step sequences tailored to DIYers.
Skill and tool requirements
- You need to be comfortable mixing and placing mortar-like materials to a specific consistency, working quickly (most stampable overlays have a working time of 20 to 45 minutes depending on temperature).
- You need access to a walk-behind floor grinder or shot blaster for surface preparation — rental is fine, but you need to know how to use it.
- Stamp mats are expensive (a basic set of four to six mats runs $150 to $400 to rent or $500 to $1,500+ to buy). Renting is usually smarter for a one-time project.
- A drill with a mixing paddle and at least a 1/2-inch chuck is essential for proper overlay consistency.
- You need a helper. Stamping alone almost guarantees seam lines or timing failures on anything larger than 80 to 100 square feet.
When to call a professional
- Your patio is larger than 300 square feet. At that scale, maintaining consistent overlay thickness and stamping speed requires a crew.
- The slab has significant moisture issues that require an epoxy moisture-mitigation primer (products like LATICRETE NXT or Sikafloor-81 EpoCem). Applying these correctly requires measuring moisture levels per ASTM F2170 or F1869 and following precise film-thickness specs — errors are costly.
- Pull-off test results show substrate failure rather than cohesive failure, or readings below 200 psi. A pro can do more aggressive remediation or advise on replacement.
- You want a complex multi-color design, borders, or saw-cut scoring combined with stamping. Pattern alignment across a large area requires experience.
- The patio is adjacent to the house foundation and drainage or slope is borderline. Getting slope wrong under an overlay means water pools at the door — not a mistake you want to fix twice.
Inspecting your patio: the full condition checklist
Walk the slab systematically before you spend a dollar on materials. I always do this with a notepad, a piece of chalk, and a regular framing hammer. The whole inspection takes an hour on a typical residential patio and saves you from nasty surprises mid-project.
Visual survey
- Map all cracks with chalk. Note their width, length, and whether edges are level with each other or vertically offset.
- Mark spalled areas (surface scaling, pitting, or peeling deeper than 1/4 inch). Large or concentrated spalls need to be patched before overlaying.
- Look for discoloration patterns that indicate oil, grease, or chemical contamination. These must be degreased and mechanically removed — overlay will not bond over them.
- Check for efflorescence (white mineral deposits). This signals moisture moving through the slab.
- Photograph everything. You will want the before-and-after record, and photos help you explain the situation if you end up hiring a contractor.
Hammer-sounding for delamination
Walk the entire slab tapping firmly with your hammer every 12 to 18 inches in a grid pattern. A solid, dense thud means good concrete. A hollow or ringing sound means delamination or a void just below the surface. Advanced nondestructive testing such as impact‑echo, ultrasonic testing, ground‑penetrating radar, and infrared thermography are commonly used when hammer sounding is inconclusive Advanced nondestructive testing such as impact‑echo, ultrasonic testing, ground‑penetrating radar, and infrared thermography are commonly used when hammer sounding is inconclusive.. Mark every hollow spot. If hollow areas cover more than 15 percent of the slab, the substrate is too compromised for a bonded overlay to perform well long-term. On larger patios, dragging a length of chain across the surface achieves the same result faster and covers more ground.
Surface condition checks for existing sealers, stains, and stamps
- Water test: spray or pour a small amount of water onto the surface. If it beads up or sits on top for more than a few seconds before absorbing, a sealer, curing compound, or wax is present and will act as a bond breaker.
- If the patio is already stamped or stained, the surface almost certainly has a sealer. Plan for mechanical removal (grinding) regardless.
- Previously stamped surfaces have surface relief (peaks and valleys from the original stamp pattern). You will need to fill low spots and grind high points before applying a new overlay to achieve a flat, consistent thickness.
- If the existing stamp is in good shape and you only want a color refresh, that is a different (simpler) process — recoloring and resealing rather than a full overlay stamp.
Slope and elevation
Use a 6-foot level and a tape measure. Patios need a minimum slope of 1/8 inch per foot away from the house for adequate drainage (1/4 inch per foot is better). Measure the actual slope in multiple directions. If the slab is flat or pitches toward the foundation, your overlay plan needs to account for this or water will pool against the house. An overlay can correct minor slope issues if you build up one end slightly, but it cannot fix a fundamentally backward-draining slab without careful planning.
Adhesion and surface tests you must run
The visual inspection tells you what you can see. These tests tell you what is happening at the bond interface, which is where overlay failures actually start.
DIY bond patch test
Mix a small amount of your intended overlay product (or a polymer-modified mortar) to the manufacturer's specified consistency. Clean a 12-by-12-inch section of the slab by grinding or wire-brushing it down to bare concrete. Apply the mortar patch about 1/4 inch thick, let it cure for the time specified by the manufacturer (usually 24 to 48 hours), then try to pry it off with a stiff putty knife. If it delaminates cleanly from the concrete surface (adhesion failure), the substrate is weak or contaminated and needs more prep or is unsuitable. If it breaks apart within the mortar itself or pulls up chunks of the old concrete (cohesive failure), the bond is stronger than the substrate, which is what you want.
Water absorption (water test)
After grinding or profiling a test area, pour about a cup of water on the surface. Sound, prepared concrete should absorb the water within 30 to 60 seconds. If the water beads or sits for longer, contamination remains. Repeat the prep and test again. Most overlay manufacturers specify that the surface must be saturated surface dry (SSD) at time of application, meaning damp but not pooling water.
Moisture testing
Two standard methods are used: ASTM F2170 (in-situ relative humidity probes inserted at 40 percent of slab depth) measures moisture inside the slab, and ASTM F1869 (calcium chloride test) measures the surface moisture vapor emission rate (MVER) in pounds per 1,000 square feet per 24 hours. A common conservative threshold for polymer-modified cement overlays is in-slab RH at or below 75 percent and MVER at or below 3 lb/1,000 ft2/24 hr, but always check your specific product's technical data sheet because these numbers vary. See ASTM F1869 & F2170 guidance (field data sheet example noting 3 lb and 75% as common limits) for supporting industry thresholds and testing details. If your slab exceeds these thresholds, moisture-mitigation systems like LATICRETE NXT Vapor Reduction Coating or Sikafloor-81 EpoCem can be applied as a primer layer, but they must be installed precisely per their specifications.
Professional pull-off test
If your DIY bond patch test is borderline or you are spending serious money on materials and labor, get a professional pull-off test done. This uses a calibrated device (per ASTM C1583 or ASTM D4541) to apply a measured tensile load to a bonded disc on the concrete surface. The result gives you actual psi values and, critically, a failure-mode classification. Cohesive failure in the substrate at 200 psi or higher generally means you are good to proceed. Adhesive failure (bond breaks at the interface) at any value below 250 psi is a red flag. Many contractors who do overlay work can perform this test, or you can hire a concrete testing firm.
Structural limits: when to remove and replace instead
No overlay product on the market can fix a failing slab. It can cosmetically cover problems for a while, but you will be back in the same spot or worse within a few years if the structural issues are real. Here are the conditions that push you firmly into removal-and-replacement territory.
- Vertical displacement of 3/8 inch or more at any crack or joint. This means the slab panels have settled or heaved unevenly, and an overlay cannot bridge that offset without cracking.
- Active movement: cracks that are visibly widening, joints that open and close with seasons, or panels that rock when you walk on them. Overlay over active movement will fail within one freeze-thaw cycle.
- Recurring cracking in the same locations despite previous repairs. This indicates ongoing ground movement, tree root pressure, or subbase failure.
- Severe spalling or delamination covering more than 15 to 20 percent of the surface, especially if the delamination goes deeper than 1/2 inch.
- Contamination from oil or chemicals that has penetrated deeply into the slab and cannot be removed by surface mechanical prep. Some industrial contamination situations require slab removal.
- Compressive strength below roughly 2,500 psi (typically revealed if cores are taken and tested per ASTM C42). Most overlay manufacturers require a minimum substrate compressive strength in this range.
If your slab fails one of these criteria but you are not ready for a full replacement, talk to a structural concrete contractor about mudjacking or foam lifting for settlement, and slab grinding for minor displacement before ruling out an overlay entirely.
Joints, slope, and drainage: what to sort out before you overlay
This section is one people skip and then regret. I have seen overlays fail specifically because the installer ignored the control joints in the original slab.
Honoring existing control and expansion joints
Existing control joints in the slab exist to control where cracks form. If you bury them under your overlay without reflecting them through, the slab will crack on its own terms and pull the overlay apart wherever it wants to. The rule is simple: every joint in the original slab must be re-sawn or reflected through the overlay. After the overlay cures, saw-cut over the original joint locations to the same depth (typically 1/4 to 1/3 of the overlay thickness) and fill them with a flexible joint sealant rather than rigid filler. This lets the slab move without tearing the overlay.
Slope and drainage corrections
Target a minimum of 1/8 inch per foot of fall away from the house (1/4 inch is safer). If your existing slab drains adequately and meets this minimum, a uniform overlay thickness will maintain the slope. If you need to correct slope, you can feather the overlay thicker at the high end (toward the house) and thinner at the outer edge, but check that your overlay product allows feathered edges. Many polymer-modified cement overlays have a minimum thickness of 3/8 inch and cannot be feathered to zero without cracking. Self-leveling underlayments can help build up low spots before the stampable topping layer goes on.
Re-sawcutting after overlaying
Plan your stamp pattern layout so that joint lines fall where the original joints were, if possible. This is easiest with a grid-pattern stamp (flagstone, cobblestone, brick). After the overlay cures to the manufacturer's specified strength, use a 4-inch angle grinder with a diamond blade or a concrete saw to re-cut joints. Cut while the overlay is still green (usually 24 to 48 hours after placement) to reduce cracking risk. Fill with a polyurethane or polyurea joint sealant matched to the joint width.
Thickness and product guide: choosing the right overlay
Not all overlay products can be stamped. Some are too thin, some cure too fast, and some do not have enough body to hold stamp impressions cleanly. Here is how the main product types compare.
| Product Type | Typical Thickness | Best Use | Stampable? | Notes |
|---|---|---|---|---|
| Stampable polymer-modified cement overlay | 3/8 to 3/4 inch (10 to 19 mm) | Full texture and pattern stamping over existing slab | Yes — primary choice | Designed specifically for this. Most consumer and contractor products fall here. Examples: Quikrete Concrete Resurfacer (thicker applications), Brickform Stampable Overlay. |
| Self-leveling underlayment (SLU) | 1/4 to 3/4 inch (6 to 19 mm) | Leveling uneven substrates before a topping layer | No | Too fluid to stamp. Use as a base layer under a stampable topping when corrections are needed. |
| Microtopping / skim coat | 1/16 to 3/16 inch (1.5 to 5 mm) | Color and texture refresh on sound, flat surfaces | Minimal texture only | Too thin for conventional stamp mats. Better for recoloring or light texture. Good option if you have an existing stamped patio in good condition and just want a color change. |
| Epoxy or polyaspartic topping | 1/8 to 1/4 inch (3 to 6 mm) | High-durability, decorative flake or solid-color finish | No | Not a concrete stamping product. Mentioned for comparison — excellent for durability but different aesthetic. |
For most homeowners wanting a stamped look, a stampable polymer-modified cement overlay at 3/8 to 1/2 inch is the right product. It has enough body to take stamp impressions clearly, bonds well to prepared concrete, and is available from multiple manufacturers at home improvement stores and concrete supply yards. The thicker you go (up to 3/4 inch), the more forgiving the stamping process is and the more surface irregularities you can hide, but the heavier and more expensive the application becomes.
Surface profile requirements by product type
The International Concrete Repair Institute (ICRI) publishes Concrete Surface Profile (CSP) standards from CSP 1 (very smooth) to CSP 10 (extremely rough). Microtoppings need a light profile (CSP 1 to 3), achieved by light diamond grinding or acid etching where permitted. Stampable polymer-modified cement overlays typically require CSP 2 to 4, achieved by diamond grinding or shot blasting. Self-leveling underlayments and heavier overlays may require CSP 4 to 6. Always check the CSP requirement in your specific product's technical data sheet and match your prep method accordingly.
Materials and tools checklist
This is what you need to have on hand before starting. Split across prep, application, and finishing so you can check off each phase.
Surface preparation
- Walk-behind floor grinder with diamond cup wheels (rental, 7 to 10 inch) or shot blaster (rental) for achieving the correct CSP
- Angle grinder with diamond cup wheel for edges and tight areas
- Wire brush and stiff broom
- Industrial wet/dry vacuum (at least 5 gallon) for dust and debris removal
- Concrete degreaser or TSP (trisodium phosphate) for oil-contaminated areas
- Crack filler: polyurethane caulk or semi-rigid epoxy crack filler for cracks up to 1/4 inch wide
- Hydraulic cement or polymer-modified repair mortar for filling spalls deeper than 1/4 inch
- Concrete grinder pads or shot blasting media (if not included with rental equipment)
- Moisture test kit: calcium chloride test kit (ASTM F1869) for MVER, available at flooring supply stores
- Concrete bonding agent or primer as specified by your overlay product (many stampable overlays require a slurry prime coat mixed from the same product)
Overlay mixing and application
- Stampable polymer-modified cement overlay product (calculate coverage at your chosen thickness: a 50 lb bag typically covers 25 to 40 sq ft at 3/8 inch depth)
- Heavy-duty 1/2-inch drill with mixing paddle (not a standard hand drill — it will burn out)
- 5-gallon mixing buckets (at least 2, ideally 3 for continuous production)
- Gauge rake or notched squeegee for spreading overlay to uniform thickness
- Magnesium float or fresno for smoothing before stamping
- Spray bottle with water for light surface moisture maintenance during stamping
Stamping and coloring
- Stamp mats in your chosen pattern (rent a set of 4 to 6 mats matching your pattern; ensure mats have texture rollers or touch-up skins for areas stamps cannot reach)
- Release agent: powder release (most common for overlays, creates color variation and prevents mat sticking) or liquid release
- Integral color: either pre-colored overlay product or dry color hardener broadcast onto fresh overlay surface before stamping
- Accent color (optional): antiquing release or liquid antiquing agent for second-color depth effect
- Rubber mallet for seating stamp mats without shifting them
- Grout roller or texture roller for tight areas and borders
Sealing and finishing
- Concrete sealer matched to the overlay product: acrylic solvent-based sealer (highest gloss, most common for stamped overlays, 2-coat application), water-based acrylic (lower VOC, slightly lower sheen), or polyurethane (highest durability)
- Garden-pump sprayer or solvent-resistant sprayer for sealer application
- Lambskin roller (3/8-inch nap) as an alternative to sprayer for sealer
- Saw and diamond blade for re-cutting joints after cure
- Polyurethane or polyurea joint sealant and application gun for filling re-cut joints
- Non-slip additive (fine sand or polymer grit) to mix into top sealer coat for traction — critical for exterior applications
Safety
- N95 or P100 respirator for grinding and mixing (concrete dust contains silica)
- Safety glasses or goggles
- Chemical-resistant gloves for overlay and sealer work
- Knee pads for stamping work
- Hearing protection if using a shot blaster or saw
Surface preparation: the step that determines everything
I cannot stress this enough: 80 percent of overlay failures trace back to inadequate surface preparation. For a complete, step-by-step walkthrough on how to stamp a concrete patio, see our detailed how-to guide on how to stamp a concrete patio. The overlay can be mixed perfectly and stamped beautifully, but if the substrate was not properly cleaned and profiled, it will peel. Here is the sequence that works.
- Clean the surface thoroughly: remove all furniture, sweep, then pressure-wash. Degrease oil spots with a concrete degreaser, scrub, and rinse. Let dry completely.
- Mechanically profile the surface: rent a walk-behind floor grinder with a medium-grit diamond cup wheel and grind the entire surface to achieve a CSP 2 to 4 profile (it should feel like medium-grit sandpaper and look uniformly dull gray with no sheen). Do not rely on acid etching alone for a bonded overlay — most manufacturers do not accept it as the sole prep method.
- Repair spalls and cracks: fill cracks wider than a hairline with a semi-rigid epoxy or polyurethane filler. Fill spalls deeper than 1/4 inch with a polymer-modified repair mortar, feather to the surrounding level, and allow to cure fully before overlaying.
- Vacuum thoroughly: use an industrial vacuum to remove all dust and debris. Dust contamination is a bond killer.
- Perform the water test: spray water on the prepared surface. It should absorb within 60 seconds. If it does not, grind more aggressively.
- Apply bonding slurry or primer coat: most stampable overlay systems require you to brush or scrub a slurry coat (the same overlay product mixed thin) into the prepared surface just before placing the overlay. This mechanically keys the overlay to the substrate. Follow the specific product's instructions — applying the overlay too long after the slurry coat flashes off will hurt bond.
Coloring options: integral color vs. color hardener vs. stains
Color is where the design really comes together, and there are a few different ways to get it into a stamped overlay. Integral color is mixed directly into the overlay product before application, giving consistent color throughout the thickness. This is the most foolproof for a uniform base color. Color hardener is a dry pigmented powder broadcast onto the freshly placed overlay surface and troweled in before stamping. It concentrates pigment at the surface for vibrant, consistent color and also increases surface hardness. Antiquing release agent is applied to stamp mats before each impression and leaves a secondary color in the recesses of the pattern, creating the two-toned depth that makes stamped concrete look realistic. You can combine all three: integral color for the base, color hardener for surface intensity, and antiquing release for depth.
Sealing and curing: locking in your work
Allow the stamped overlay to cure for the time specified by the manufacturer before sealing. Most products specify a minimum of 24 hours but ideally 3 to 7 days of curing time in moderate temperatures (50 to 90 degrees Fahrenheit). Do not apply sealer if rain is forecast within 24 hours or if temperatures will drop below 50 degrees. Apply two coats of a solvent-based acrylic sealer (the most common choice for stamped concrete): first coat by pump sprayer or roller, let it tack up for 1 to 2 hours, then apply the second coat perpendicular to the first. Add a non-slip grit additive to the final coat for outdoor safety. Re-seal every 2 to 3 years or when water stops beading on the surface.
If you are working on a patio that was previously stamped and you are refreshing rather than re-overlaying, the process is simpler: clean the surface, lightly scuff with a 220-grit screen, apply a compatible concrete stain or tinted sealer, and reseal. For step-by-step guidance on restoring and refinishing existing stamped surfaces, see our guide on how to refinish stamped concrete patio. That workflow is essentially a recoloring and refinishing project rather than a full overlay job. For step-by-step instructions on repainting or staining an existing stamped surface, see how to recolor a stamped concrete patio.
FAQ
Can an existing concrete patio be stamped?
Yes — but only when the existing slab is structurally sound and properly prepared. A stamped overlay can be applied to an existing patio if the slab has no active movement, is not severely delaminated/spalled, has acceptable moisture conditions (or is mitigated with a manufacturer‑approved moisture barrier), and the surface contamination (sealers, curing compounds, oils) is removed and the surface profile meets the overlay manufacturer's CSP requirement. If the slab has extensive delamination, significant settlement, severe cracking with movement, or patching that cannot be made sound, removal and replacement is the correct option.
How do I decide: stamp over the slab, reseal/recolor, or replace?
Use this decision framework: 1) Inspect visually and hammer‑sound the slab for delamination; map cracks, spalls, joint condition, slope/drainage, and surface contaminants. 2) Run moisture tests (ASTM F2170 RH probes and/or ASTM F1869 calcium‑chloride) if coatings/overlays are planned. 3) Do pull‑off tests (ASTM C1583/D7234) to confirm bondable tensile strength in representative areas. 4) If NDT / hammer sounding indicate voids or ambiguity, do cores to confirm. 5) If slab is sound, joints stable, and tests meet manufacturer limits (or moisture mitigation is used), you can resurface and stamp. Replace when: active movement/settlement, extensive delamination/voids, rebar corrosion causing spalling across large areas, or slab is too thin/unsupported for a bonded overlay.
Step‑by‑step: How to stamp over an existing concrete slab (DIY/procedure)?
1) Evaluate slab condition: visual, hammer/chain‑drag, measure slope/drainage, document joints and contaminants. 2) Test: moisture (F2170/F1869) and pull‑off adhesion tests in several locations. 3) Remove coatings/curing compounds/sealers by mechanical means (diamond grind, shotblast) until you reach the CSP specified by the overlay TDS; grinding is common for CSP 1–3, blasting/scarifying for heavier profiles. 4) Repair cracks/spalls: rout & clean cracks, install appropriate epoxy or cementitious crack repair per manufacturer; treat isolated delaminations by removing unsound concrete to sound substrate and patching. 5) Treat joints: maintain/replicate control and movement joints (sawcut or rout as needed) or install bond breaker/expansion joints per spec; do not bridge active movement joints with a rigid overlay. 6) Clean and prep: vacuum, pressure‑wash and allow to dry; remove dust and contaminants. 7) Apply primer or moisture mitigation if required by the overlay system. 8) Mix and apply the polymer‑modified cement overlay or microtopping to the recommended thickness. 9) While the overlay is green, apply release agent and impression mats and stamp according to pattern; remove mats and brush off release. 10) Cure per product instructions; apply chosen sealer after proper cure window. 11) Final joint sealing and cleanup. Always follow the overlay manufacturer's technical data sheet (TDS) for mixing, temperatures, and substrate limits.
Step‑by‑step: How to recolor or refinish an existing stamped patio?
1) Inspect and test adhesion/condition of existing sealer and stamp surface (pull‑off if uncertain). 2) Remove existing sealer/coating using stripper + pressure wash or mechanical abrasion (diamond grind or light sanding) until the coating is eliminated and a proper CSP is achieved. 3) Repair any damaged areas or delaminations and reestablish crisp joint edges. 4) Clean and dry; perform moisture testing if planning new coatings. 5) If recoloring a stamped surface, choose between acid stain (penetrating) or color hardener/dry shake overlay products — note acid stain penetrates and is affected by substrate chemistry, while topical colorants and cementitious recolors sit on the surface. 6) Apply stain or color as directed; for topical color or antiquing, use compatible cementitious tint or masonry paint designed for exterior concrete. 7) Reapply release agent effects if re‑stamping texture or apply new release/antiquing wash techniques for depth. 8) Seal with an appropriate exterior sealer (penetrating or film‑forming polyurethane/acrylic/epoxy recommended for stamped patios) following cure windows and recoat times. 9) Maintain per sealer recommendations.
Materials and tools checklist for stamping over existing concrete
Materials: polymer‑modified cement overlay or microtopping (manufacturer approved for stamping), primer/moisture mitigation system (if needed), crack repair epoxy or cementitious patch, colorants (integral or topical), release agent, sealer (acrylic, polyurethane, or epoxy as recommended), joint sealant, and clean water. Tools: diamond grinder or shot blaster, pressure washer, power broom/vacuum, mixing drill and paddle, trowels and squeegees, floats, stamp mats and handles, tamping tools, brushes or brooms for finishing, pull‑off test kit (or arrange lab), RH probes or calcium‑chloride kits, and PPE (respirator, gloves, eye protection).
Thickness and product guidelines (overlays, polymer‑modified cement, microtoppings)
Typical thickness ranges: microtoppings/dense skim coats: 1/16"–1/8" (0.8–3 mm) — best for smoothing and color changes but require excellent substrate prep and minimal profile variation; thin bonded overlays/polymer‑modified cement: 1/8"–1/2" (3–12 mm) — common for stamped overlays; thicker polymer overlays or cementitious toppings: 1/2"–1" (12–25 mm) and above — used when thickness is needed to correct slope or hide minor imperfections. Always choose a product rated for stamping and follow the manufacturer's minimum and maximum thickness and substrate tensile strength requirements. For moisture‑sensitive slabs, select systems that allow moisture mitigation or use a manufacturer‑approved moisture barrier.