
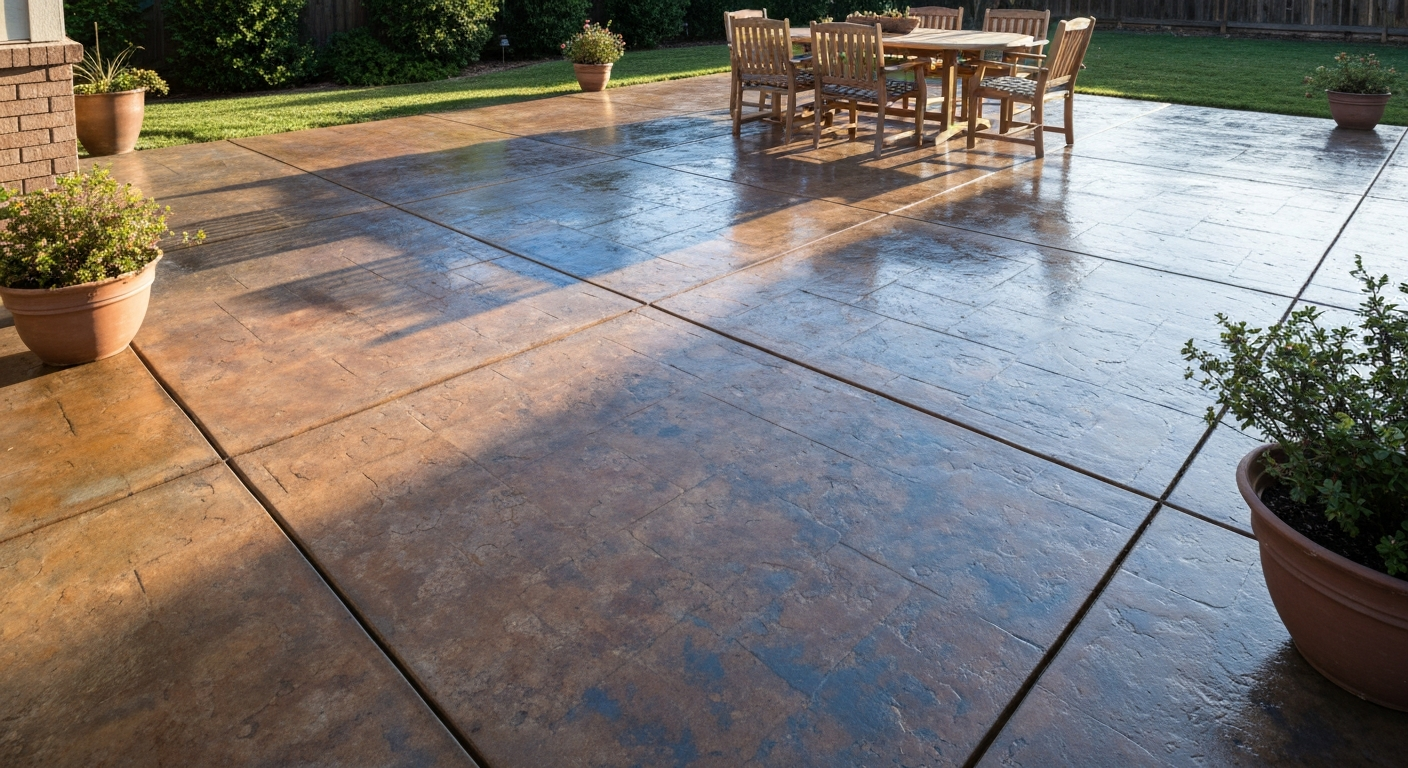
You can color an existing concrete patio using acid stains, water-based stains, concrete dyes, acrylic or epoxy paints, tinted sealers, or thin overlay systems. For step-by-step instructions, see our how to concrete stain a patio guide. The right choice depends on your concrete's condition, whether it has an old coating, your budget, and the look you want. Acid stains give you earthy, permanently bonded color. Dyes hit vivid blues, greens, and reds. Overlays let you hide damage and add texture or stamped patterns. Any of these methods works as a DIY project if you do the prep properly, and that prep is where most projects succeed or fail.
How to Color an Existing Concrete Patio: DIY Methods & Tips

Silas Morrison
25 Jul 2026
What you're actually choosing between
Before you buy anything, it helps to understand what each coloring method actually does to the concrete. Some penetrate and chemically bond. Some sit on top as a film. Some let the concrete texture show through; others cover everything. Here's a straight-up comparison of the five main methods.
| Method | How it works | Color range | Durability | Best for | Biggest drawback |
|---|---|---|---|---|---|
| Acid (reactive) stain | Reacts with calcium hydroxide in cement to form permanent metalite salts | Earth tones: browns, ambers, terra cottas, greens | Permanent; won't peel or chip off | Natural, mottled, variegated looks on sound bare concrete | Limited palette; unpredictable on patched or contaminated areas |
| Water-based / solvent stain or dye | Penetrates pores; dye molecules lodge in capillaries | Very wide, including vivid blues, reds, greens | Good but UV-sensitive without a UV-stable sealer (dyes fade faster) | Bold or designer colors; predictable uniform coverage | Not chemically bonded; needs quality topcoat to hold |
| Acrylic or epoxy paint / coating | Film-forming; sits on top of concrete | Virtually unlimited | Moderate (acrylic 3-5 yrs); good (epoxy 5-10 yrs with proper prep) | Solid opaque color; garages, utility patios, maximum stain hide | Can peel if moisture or prep is off; hides concrete character |
| Tinted sealer | Penetrating or film-forming sealer with pigment added | Limited to product's palette, usually subtle tones | Sealer lifespan: 2-5 yrs depending on type | Quick refresh or tint shift over existing color | Thin coverage; not a standalone color solution for major changes |
| Microtopping / overlay | Thin polymer-modified cement layer 1/16 to 1/8 inch over existing slab | Any: colored during mixing or stained/dyed after | Excellent if bonded well; matches new construction durability | Hiding damage, changing texture, stamped or stone looks | Most labor-intensive; requires best surface prep of any method |
Picking the right method for your situation
Walk your patio before you decide anything. Look for existing coatings, heavy staining, cracks, spalling, or discoloration from repairs. Each of those factors points you toward or away from certain methods.
If your concrete is in decent shape, bare, and you want a natural look with visible texture, acid stain is hard to beat. I've used L. M. Scofield Lithochrome Chemstain on a 15-year-old back patio and the result looked like expensive flagstone at a fraction of the cost. Just know that any patch, repair spot, or contaminated area will react differently and you'll get uneven color there. That's not always bad, but you need to expect it.
If you want a specific color (say, a slate blue or forest green), go with a water-based dye or stain. Products like BEHR Premium Solid Color Concrete Stain give you a much wider palette and more predictable results than acid stains. Solid-color formulas hide old discoloration better too.
If there's existing paint, an old sealer, or moderate cracking and spalling, an overlay or microtopping gives you a fresh canvas. It's the most work upfront, but it's also the only method that truly resets what you're working with. If you want to go further and make your patio look like stone or marble, overlays combined with staining or stenciling are how the pros do it.
- Sound bare concrete with minor weathering: acid stain or water-based dye
- Concrete with old paint or sealer: remove coating first, then stain/dye, OR apply a compatible overlay
- Heavy cracking, spalling, or pitting: patch and overlay, then color
- Tight budget, DIY first project: acrylic paint or tinted sealer (forgiving application, easy to recoat)
- Stamped pattern or stone look: overlay system with stamping or stenciling
- Vivid, bold color: water-based or solvent-based concrete dye with UV-stable sealer
Prep and repair checklist before you touch any color
This is where I see most DIY projects go wrong. People buy the stain, skip real cleaning, and wonder why the color is blotchy or peeling six months later. Proper prep is not exciting, but it is the whole job. Run through every item below before you open a single product container.
- Test for existing sealer or coating: drop water on the surface in several spots. If it beads up, there's a sealer present. Also wipe a small hidden area with acetone on a white rag; if the rag picks up a film or softens a coating, you have a topical product that must come off before staining.
- Remove old coatings: mechanical grinding or shot blasting is the most reliable removal method. Chemical strippers work on some coatings but require careful neutralization and don't give you the surface profile that coatings need for adhesion.
- Clean the slab with an alkaline degreaser: oil and grease contamination is the number one cause of adhesion failure. Apply a commercial degreaser (like Krud Kutter Concrete & Driveway or a Rust-Oleum Concrete Prep product), let it dwell per the label (usually 5-15 minutes), scrub, then pressure-wash. Studies show alkaline degreasers remove 80-90% of oil versus about 40-50% with water alone.
- Pressure wash at 2,500-3,200 PSI: use a 25- or 40-degree fan tip and keep the wand moving. For lighter cleaning you can drop to 1,500-2,000 PSI, but for baked-on dirt or organic growth, push it higher.
- Rinse until the water runs clear, then let the slab dry fully: minimum 24-48 hours in dry weather. Concrete that looks dry on top can still be holding moisture internally.
- Check moisture levels: for paint or overlay systems, this matters a lot. A simple plastic sheet test (tape a 2x2 ft sheet of plastic to the slab for 24 hours and check for condensation) gives you a rough pass/fail. For serious coatings or overlays, use ASTM F2170 in-situ RH probes or ASTM F1869 calcium chloride tests. Most coating manufacturers publish RH limits in their tech data sheets, commonly no more than 75-85% RH by F2170 and MVER under 3-6 lb/1,000 ft²/24 hr by F1869.
- Fill cracks: use a low-viscosity epoxy injection resin (like Sikadur-52) for structural or moving cracks. For stable, non-moving cracks and surface spalls, polymer-modified patchers (Quikrete Vinyl Concrete Patcher, Sakrete products) work well. Let patches cure fully per the manufacturer's timeline before applying color.
- Profile the surface for the chosen method: bare concrete for acid staining needs light etching or cleaning only; paint and overlays need a CSP (Concrete Surface Profile) of at least 2-4 per ICRI Technical Guideline 310.2R, achieved by grinding or etching.
Surface prep techniques in detail
Acid etching
Diluted muriatic acid (typically 1 part acid to 10 parts water) or phosphoric acid opens the concrete's pores and removes laitance. For step-by-step instructions on safely etching a concrete patio, see how to etch concrete patio. It's a DIY-accessible method that creates a CSP 1-2 profile, suitable for light penetrating stains and some sealers. Apply to a damp surface, let it fizz for 5-10 minutes, scrub, neutralize with a baking soda solution (1 cup per gallon of water), rinse thoroughly, and let dry. Always add acid to water, never the reverse. Wear chemical-resistant gloves, eye protection, and work in ventilated conditions. Acid etching is not reliable for removing existing coatings and won't give you the profile needed for epoxies or thick overlays.
Mechanical grinding
A walk-behind floor grinder with diamond tooling removes coatings, laitance, and high spots while opening the surface to a CSP 2-4 profile. This is the method that professional overlay and epoxy installers favor because it gives consistent, measurable results and removes contaminants that cause delamination. Old Stone Restoration & Installation's industry how‑to on Epoxy Flooring, installation, surface prep and failure causes documents that mechanical profiling (diamond grinding or shot blasting) is strongly preferred over acid etching for reliable adhesion of high‑performance coatings and overlays Old Stone Restoration & Installation's industry how‑to on Epoxy Flooring — installation, surface prep and failure causes. Rental grinders are available at most equipment rental shops. It takes longer than etching but produces a surface you can rely on for any coating system. Pair it with a vacuum or wet-vac to control concrete dust, which is a silica hazard.
Shot blasting and abrasive blasting
Shot blasting propels steel shot at the surface using a self-contained machine that vacuums up the debris. It produces a CSP 3-6 profile and is the gold standard for large slabs receiving epoxy or urethane systems. It's typically a contractor-level method since the machines are expensive to rent and have a learning curve. For patios over about 500 square feet where you're committing to an overlay or epoxy coating, it's worth getting a quote for shot blasting as a stand-alone service.
Moisture testing
For any film-forming product (paint, epoxy, overlay), check slab moisture before applying. The ASTM F2170 in-situ RH probe method measures moisture deep inside the slab and is considered more accurate than surface-only tests. The ASTM F1869 calcium chloride test measures moisture vapor emission rate (MVER) at the surface. Both results matter: a slab that tests dry at the surface can still have high interior RH that drives moisture up after you seal it, causing bubbling or delamination. If your slab is on-grade (poured directly on soil) without a vapor barrier, assume moisture is a factor and test before you commit to a coating system. If RH is high, an ASTM F3010-compliant epoxy moisture mitigation membrane can be installed before the finish coat.
Product options and how to choose
Acid stains
Acid stains like L. M. Scofield Lithochrome Chemstain are metallic salt solutions in a dilute acid carrier. They react with the free calcium hydroxide in cured concrete to form permanent, insoluble compounds. The color is part of the concrete surface, not a film on top, so it cannot peel. Coverage runs about 200-400 sq ft per gallon depending on concrete porosity. After the reaction (typically 2-8 hours), you neutralize with a baking soda solution, rinse completely, let dry, and seal. Always read the product's technical data sheet (TDS) and safety data sheet (SDS) before mixing. The SDS will tell you about fumes, required PPE, and disposal.
Water-based and solvent-based stains and dyes
These are non-reactive colorants that penetrate the concrete's pore structure. Dyes give the most vivid colors but are the most UV-sensitive, which means on an outdoor patio you need a UV-stable sealer or topcoat or you'll see noticeable fading within a season. Water-based translucent stains are a middle ground: more colorfast than dyes, more predictable than acid stains, and available in a wide palette. Solid-color acrylic stains like BEHR Premium Solid Color Concrete Stain form a semi-penetrating film and offer maximum color coverage with good hide. Check the TDS for recoat windows, typically 4-24 hours between coats.
Acrylic and epoxy paints
Acrylic concrete paints are the easiest DIY option and the most forgiving of minor prep shortcomings. Expect 3-5 years before recoating is needed outdoors. Two-part epoxy coatings are much more durable (5-10 years on a well-prepped surface) and resist abrasion, chemicals, and moisture better than acrylics. The trade-off is that epoxies are less forgiving of moisture in the slab and require better surface profiling. Both types need the slab to be clean, profiled, and dry. Epoxies are not ideal for patios in areas with extreme UV exposure since they yellow over time; a urethane or polyaspartic topcoat over epoxy solves that.
Tinted sealers
Tinted sealers are best used to shift or enrich an existing color rather than establish a new one. They're a practical option when you want a subtle warm or cool tint over a stained surface, or when you need to refresh a fading color between full reapplication cycles. Acrylic-based tinted sealers are typical, with a 2-5 year service life outdoors.
Microtoppings and overlay systems
Microtoppings are polymer-modified cement mixes applied at 1/16 to 1/8 inch thickness. They bond to the existing slab, hide minor cracks and surface damage, and give you a fresh surface that can be stained, dyed, stenciled, or textured. Stampable overlays are thicker (up to 1/4 inch) and designed to be stamped with texture mats while wet, producing patterns that mimic stone, brick, or slate. Both systems require excellent surface prep (mechanical profiling, clean dry surface) and a primer coat. If you've been thinking about making your patio look like stone, a stampable overlay system is typically the most durable and realistic way to do it.
Tools and PPE for each method
| Method | Key tools | PPE | Estimated material cost (200 sq ft patio) |
|---|---|---|---|
| Acid stain | Pump garden sprayer or brush, plastic watering can, stiff scrub brush, wet/dry vac, mop | Chemical-resistant gloves, safety glasses, old clothes, respirator (N95 minimum) | $50-$120 stain + $40-$80 sealer |
| Water-based stain or dye | Pump sprayer, lambswool applicator or brush, roller | Nitrile gloves, eye protection | $40-$100 stain + $40-$80 sealer |
| Acrylic paint | Paint roller (3/8 in nap), brush for edges, paint tray | Nitrile gloves, eye protection | $60-$120 for 2 coats |
| Epoxy coating | Notched squeegee, 3/8 in roller, mixing paddle, drill, mixing buckets | Nitrile gloves, eye protection, respirator, shoe covers | $120-$300 for 2-part system |
| Microtopping/overlay | Gauge rake, rubber squeegee, trowel, mixing drill, bucket, texture tools/stamps | Gloves, eye protection, knee pads, dust mask for mixing | $150-$400 depending on system and area |
| All methods (prep) | Pressure washer (1,500-3,200 PSI), floor grinder (rental), diamond pads, angle grinder for edges, degreaser | Eye protection, rubber boots, hearing protection (grinder), silica dust respirator (grinding) | $50-$150 for prep products; rental $80-$200/day for grinder |
Step-by-step application for the main methods
Applying acid stain
- Prep and clean the slab completely (see checklist above). Surface must be bare concrete, oil-free, and dry to the touch.
- Wet the slab lightly with water if it's very porous. A slightly damp surface slows absorption and produces more even color.
- Pour stain into a plastic (not metal) pump sprayer. Apply in a circular or figure-eight pattern to avoid lap lines. Work section by section.
- Let the chemical reaction proceed for the manufacturer's recommended time, typically 2-8 hours. You'll see fizzing and color developing.
- Neutralize: scrub the slab with a baking soda solution (1 cup per gallon of water) or a commercial neutralizer, then rinse with clean water until runoff is pH neutral.
- Remove residue: scrub and rinse thoroughly. Residue left behind looks hazy when the sealer goes on.
- Let the slab dry completely, minimum 24 hours.
- Apply a concrete sealer: acrylic sealers (solvent or water-based) are most common, applied by roller or sprayer in 2 thin coats. Follow recoat windows in the TDS.
Applying water-based stain or dye
- Prep: clean, degreased, profiled surface (acid-etched or lightly ground). No existing sealer.
- Test your color on a small inconspicuous area first and let it dry; wet color looks darker than dry.
- Apply the first coat with a pump sprayer in a consistent overlapping pattern, or use a lambswool applicator for a tighter surface.
- Allow to dry per TDS (often 1-4 hours), then evaluate color depth. Apply a second coat if needed for richer color.
- For dyes outdoors: apply a UV-stable polyurethane or acrylic sealer within the same day to prevent early fading.
- Apply sealer in 2 thin coats; thick single coats trap air and turn milky.
Applying acrylic paint
- Clean, degrease, and profile surface; fill any cracks and let patches cure.
- Prime with a concrete primer/bonding agent if the product TDS requires it.
- Roll first coat at the recommended spread rate (typically 200-300 sq ft per gallon). Cut edges with a brush.
- Let cure for the full recoat time (usually 4-8 hours for acrylics); don't rush this.
- Apply second coat. Two thin coats always outperform one thick coat.
- Allow full cure before foot traffic: typically 24-48 hours, longer for vehicles.
Installing a microtopping or overlay
- Profile the slab mechanically (grind to a CSP 2-3 minimum). Vacuum all dust.
- Apply a primer/bonding slurry according to the overlay manufacturer's instructions; don't skip this step.
- Mix the overlay material in small batches per the TDS water ratio. Use a paddle mixer; hand mixing creates lumps.
- Pour and spread with a gauge rake or rubber squeegee at the target thickness. Work quickly; most overlays have 10-20 minute working times.
- Once base coat cures (often 2-4 hours), apply a finish coat or texture as required. For a stamp pattern, apply the stampable mix and press mats while still workable.
- After full cure (typically 24-48 hours), apply stain or dye if desired, then seal.
Decorative techniques: stenciling, texture, and faux stone or marble looks
Stenciling is one of the most underrated DIY concrete techniques. You apply a base color, tape down a concrete stencil (available in tile, stone, and geometric patterns), apply a contrasting color over it, let it tack up, then carefully peel the stencil. See our guide on how to stencil concrete patio for step-by-step instructions, stencil placement tips, and recommended products. The result looks like a tile or stone pattern at a small fraction of the cost of actual tile. The key is getting the base coat fully dry and using a foam roller or brush to apply the stencil color with minimal pressure to avoid bleeding.
For texture, you have two main options. For step-by-step instructions and tool recommendations, see our guide on how to texture concrete patio. First, you can broadcast aggregate (fine quartz sand or broadcast chips) into a wet paint or coating system before it cures. Second, you can apply a microtopping or skim coat and work the surface while wet with a knockdown knife, broom, or texture roller. A light broom finish on a microtopping is simple, slip-resistant, and looks clean on any patio. Heavier textures using stamp mats on an overlay give you the look of slate, fieldstone, cobblestone, or ashlar without the cost of real stone installation.
Faux marble finishes involve applying a base color, then using a feather or thin artist's brush to drag contrasting color in vein patterns while the base is still tacky, followed by softening with a dry brush. It takes practice, and I'd recommend doing it on scrap board before committing to the patio. A clear high-gloss sealer at the end is what sells the marble look. For a step-by-step guide on how to make a concrete patio look like marble, see our dedicated tutorial on that technique. For a more realistic stone appearance with depth and variation, combining an acid stain base with a water-based dye for accent areas can produce results that genuinely fool people at a glance.
Testing before you commit to the whole patio
Never skip sample testing on an existing patio. For step-by-step instructions and a materials checklist, see our guide on how to stain cement patio. The concrete you're working with has its own history: different batches, past sealers that may not be fully removed, repairs that react differently. A test swatch of about 2x2 feet in an inconspicuous corner will tell you more than any color chart or product photo.
For acid stains, do your test and let it go through the full neutralization and drying process before judging the result. Acid-stained concrete looks nothing like it does while wet. It typically lightens significantly as it dries. For water-based stains and dyes, apply the same number of coats you plan to use on the full surface, let it dry completely, then apply your sealer over the test area too, since sealer changes the apparent depth and sheen of the color.
- Do at least a 2x2 ft test in an out-of-the-way corner with the exact products and coat count you plan to use
- Let the test swatch go through a full drying cycle before evaluating: at least 24 hours
- Apply your sealer over the test area to judge final appearance accurately
- If you're doing an overlay, test the primer adhesion on a patched area, not just the original slab
- Check the test swatch after a week outdoors: look for fading, chalking, or adhesion issues
- For moisture-sensitive systems, do the plastic sheet moisture test over the test area 24 hours before applying product
- If the test shows poor absorption or uneven color, this is your signal to do more surface prep before proceeding to the full patio
Sealing and maintaining your finished patio
Sealer is not optional on a colored outdoor concrete patio. It protects the color from UV, moisture, traffic, and staining from food and organic material. Penetrating sealers (silane/siloxane based) are the most durable for raw or acid-stained concrete and do not change the appearance. Acrylic sealers (solvent or water-based) add sheen, pop the color, and are the most common choice for DIY projects. Polyurethane and polyaspartic topcoats are the most durable film-forming options and are necessary if you've applied a dye (which is UV-sensitive) or an overlay system.
Reapply sealer when water no longer beads on the surface or when the patio starts looking faded or dry. For most acrylic sealers outdoors, that's every 2-3 years. Between reapplications, sweep regularly, rinse off food spills quickly, and avoid harsh chemical cleaners that strip the sealer film. A pH-neutral concrete cleaner is your maintenance product of choice.
Troubleshooting common problems
| Problem | Likely cause | Fix |
|---|---|---|
| Blotchy or uneven stain color | Residual sealer, contaminants, or uneven porosity | Strip the area and re-prep; a second coat of stain on dry, fully prepped concrete usually evens things out |
| Peeling or flaking paint/epoxy | Moisture in slab, insufficient surface profile, or contamination | Grind off the failing coating, test for moisture, re-prep to CSP 2-3 minimum, and reapply |
| Sealer turning white or milky | Applied too thick, moisture trapped, or applied in cold/humid conditions | Strip and reapply in thin coats; check temperature and RH conditions on the product TDS |
| Overlay cracking or delaminating | Bond coat skipped or failed, insufficient surface prep, or overlay applied too thick | Grind off failed section, reapply primer/bonding slurry, and reinstall overlay |
| Acid stain color too light | Concrete too dense or sealed (even partially) | Ensure complete sealer removal; acid stain may need second application on dense slabs |
| Dye fading quickly outdoors | UV-stable topcoat not applied or insufficient coats | Apply a UV-stable sealer or polyurethane in 2 coats over the dye; a single thin coat won't protect outdoors |
Time and cost estimates
For a typical 200-300 square foot patio, plan on two full days for a stain project: one day for cleaning, degreasing, pressure washing, crack repair, and profiling, and one day for applying color and sealer. For concrete cleaning, professionals recommend pressure washers in the ~1,500–3,200 PSI range, about 1,500–2,000 PSI for light cleaning and 2,500–3,200+ PSI for heavy baked‑on grime, using appropriate fan nozzles and maintaining distance to avoid surface damage (Best Pressure Washers (This Old House)). Overlay projects add a day for the overlay application and cure time. Factor in at least 24 hours of drying time between major steps, which stretches most projects over a long weekend.
| Method | DIY material cost (200-300 sq ft) | Rental/tool cost | Time (prep + apply) | Expected lifespan |
|---|---|---|---|---|
| Acid stain + sealer | $90-$200 | $50-$100 (grinder, pressure washer) | 2 days | 10+ years (color permanent; reseal every 2-3 yrs) |
| Water-based stain/dye + sealer | $80-$180 | $50-$100 | 2 days | 5-8 years with UV sealer |
| Acrylic paint (2 coats) | $60-$150 | $30-$50 (pressure washer) | 1.5-2 days | 3-5 years before recoating |
| Epoxy coating system | $150-$350 | $100-$200 (grinder) | 2 days | 5-10 years |
| Microtopping or overlay + stain + sealer | $250-$600 | $150-$300 (grinder, pump) | 3-4 days | 10-15+ years if bonded well |
When to call a pro instead of going DIY
Most of what's in this article is genuinely DIY-able if you take the prep seriously and work methodically. But there are a few situations where I'd honestly recommend getting a professional involved. If your slab has significant structural cracking (wider than 1/4 inch, moving, or showing differential settlement), get a contractor to assess it before you spend money on cosmetics. If your moisture testing shows high RH or MVER, installing a proper ASTM F3010-compliant moisture mitigation membrane is a technical job that's easy to do wrong. And if you want a stamped overlay or decorative faux stone or marble finish that covers the whole patio, the working time pressure on overlay systems is real: you have 10-15 minutes per batch and need to stamp it all before it sets. For large areas, an experienced overlay installer will produce far better results than a first-timer racing the clock.
For everything else, whether it's acid staining, applying a water-based dye, rolling on an acrylic paint, or doing a basic stencil pattern, you can absolutely handle it yourself with good prep and the right products. Take your time, do the test swatches, read the TDS before you start, and you'll end up with a patio you're genuinely proud of.
FAQ
What are the main methods to color an existing concrete patio and how do they compare (pros/cons)?
Main methods: acid/reactive stains, water/solvent stains & dyes, acrylic/epoxy paints and solid stains, tinted sealers, and overlays (microtopping, stamped/texture overlays). Pros/cons: Acid stains = permanent, variegated, earth tones; limited palette, requires bare concrete and careful neutralization. Water-based stains/dyes = wider palette, vivid/translucent or opaque options; less chemical reaction so color can be more uniform but may fade with UV (dyes fade fastest). Acrylic/epoxy paints & solid stains = full coverage, many colors/patterns, easier to hide stains; film can peel if prep or moisture control is poor, epoxies may yellow in sun unless UV-stable. Tinted sealers = simple refresh, sacrificial, easiest DIY; limited color depth and durability. Overlays/microtoppings/stamped overlays = can fully change texture/appearance (stone, slate, marble), hide damage; more expensive, need skill for believable finishes and proper prep/profile. Mechanical prep (grind/shot-blast) is preferred for reliable adhesion of paints/overlays vs acid etch.
How do I decide which method is best for my patio?
Decide by priorities: durability & permanence (acid stains, overlays, quality epoxies), color range & uniformity (water-based stains/dyes or solid stains/paints), decorative patterns/textures (stencils, overlays, stamping), budget & DIY skill (tinted sealer, dyes, acrylic stains are easiest), and substrate condition (heavy damage favors overlay). Check site constraints: sun exposure (UV), moisture/vapor from slab (test per ASTM F2170 or F1869 if coatings are moisture-sensitive), and presence of old coatings (may require removal). If moisture or adhesion risk is high, choose breathable stains or install a moisture mitigation system before film-forming coatings.
What prep and repair steps are required before coloring? (compact checklist)
Prep & repair checklist: 1) Inspect for sealers/coatings – water-drop, solvent rub, adhesion patch. 2) Remove old films: mechanical (grind/shot-blast) or chemical strippers if necessary. 3) Clean: degrease oil/gas with alkaline degreaser, pressure-wash (1,500–3,200 PSI) and rinse until clear. 4) Repair: fill cracks/spalls with appropriate patch (polymer-modified patch, hydraulic cement, or epoxy injection for structural cracks). 5) Profile: achieve target surface profile (CSP) for chosen system—mechanical profiling preferred. 6) Moisture test: perform ASTM F2170 RH or F1869 MVER where required. 7) Allow substrate to dry per product TDS. 8) Test small area for adhesion and final color.
How do I identify and remove old sealers or coatings?
Identify: water-drop test (beading = sealed), solvent/MEK or acetone rub (film softens = organic sealer/paint), or small adhesion test. Removal: best is mechanical removal (diamond grinding, shot blasting) for reliable full removal and profiling to CSP levels. Chemical strippers can work for some films—follow SDS and neutralize—but may not achieve required profile and can be messy. After removal, clean and verify no residue before proceeding.
What products are available and how do I choose between acid stains, water/solvent stains, dyes, paints, tinted sealers, and overlays?
Product overview & selection tips: Acid/reactive stains: permanent, translucent earth tones; choose for variegated, natural look on bare concrete. Water-based stains/dyes: broad palette, more uniform or vivid colors; choose for brighter colors but expect some UV fade for dyes. Solvent-based dyes: deep, vibrant colors, penetrate better but have VOCs and higher fade risk. Acrylic/epoxy paints & solid stains: opaque coverage, many colors and patterns; choose when hiding imperfections or achieving consistent color. Tinted sealers: quick, inexpensive refresh; choose for low-budget or temporary color. Overlays/microtoppings/stamped overlays: used to retexture, create stone/marble looks, or fix severe damage; choose for major aesthetic change. Selection criteria: substrate moisture tolerance, UV exposure, traffic type, desired look, and manufacturer TDS for coverage and adhesion requirements.
Step-by-step: how to apply an acid/reactive concrete stain (DIY-friendly summary)
1) Confirm substrate is bare, clean, and sound; remove sealers/coatings. 2) Clean and neutralize oil stains; pressure-wash and let dry per TDS. 3) Test a small discrete area to preview reaction and color. 4) If recommended, slightly etch or profile surface (mechanical preferred). 5) Mix stain per manufacturer; apply evenly with sprayer or mop in manageable sections. 6) Allow reaction time (manufacturer-specified), then neutralize and rinse if required. 7) Let dry fully (per TDS—often 24–48 hours). 8) Apply recommended sealer (penetrating or film-forming depending on look/durability). Note: acid stains react with cement chemistry—color is not guaranteed; always test.