
You can texture a concrete patio in more ways than most homeowners realize, and the right method depends almost entirely on whether you're working with fresh concrete or an existing slab. New pours give you the most options: broom, trowel, stamped patterns, and exposed aggregate are all done while the concrete is still plastic. Existing slabs open up a different toolbox: cementitious overlays, acid etching, mechanical grinding, stenciling, and seeded-aggregate resurfacers can completely transform a dull or slippery surface without tearing anything out. Neither path is complicated once you understand the timing and prep requirements, and most of these methods are well within DIY reach.
How to Texture Concrete Patio: Step-by-Step Guide & Costs

Silas Morrison
20 Jul 2026
What texturing actually does for your patio
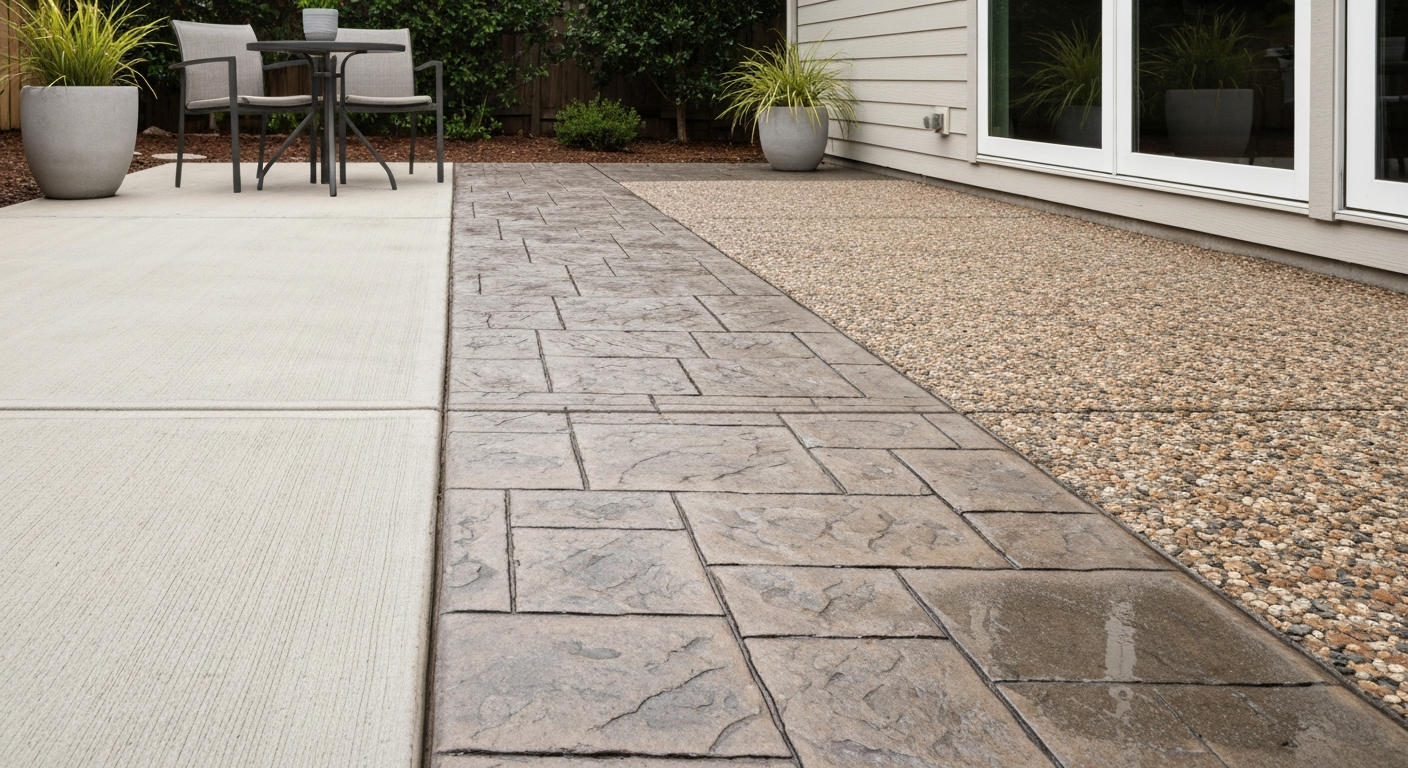
Texture does two jobs at once: it controls slip resistance and it controls how the surface looks. A broom finish on a new pour creates the fine ridges that give wet feet something to grip. A stamped pattern mimics the look of stone, brick, or slate. An exposed-aggregate wash reveals colorful stone locked inside the mix. On an existing slab, etching and grinding open the concrete's pores so overlays and coatings bond properly, that's texture serving a purely functional role. Understanding which job you need texture to do is the first step toward picking the right method.
Quick decision guide: new slab or existing slab, and what matters most
Before you buy anything, answer four questions. First: is this a new pour or an existing slab? That single answer eliminates half the methods immediately. Second: how important is slip resistance? A pool deck needs a more aggressive texture than a covered patio under a pergola. Third: what's your budget? Broom finishes cost almost nothing extra on a new pour; stamped concrete adds roughly $8–18 per square foot over plain concrete, and decorative overlays on existing slabs typically run $3–10 per square foot in materials alone. Fourth: how long do you want it to last? Integral finishes done at the pour (broom, stamp, exposed aggregate) are part of the slab itself and last decades. Overlays and coatings applied later are more renovation-like, excellent results are possible, but prep and bond quality are everything.
| Your situation | Best-fit approaches | Budget range (DIY materials) |
|---|---|---|
| New pour, want low-cost slip resistance | Broom or trowel finish | $0–$50 extra |
| New pour, want decorative stone/brick look | Stamped concrete with color hardener | $2–$5/sq ft extra in tools/materials |
| New pour, want natural stone aggregate look | Exposed aggregate (seeded or washed) | $0.50–$2/sq ft extra |
| Existing slab, slippery and plain | Broom-finish overlay or acid etch | $0.50–$3/sq ft |
| Existing slab, wants decorative upgrade | Stamped or cementitious overlay, stenciling | $3–$10/sq ft |
| Existing slab, needs coating bond prep | Acid etch or mechanical grinding | $0.25–$1.50/sq ft |
| Existing slab, cracked or uneven | Repair + self-leveling underlayment + overlay | $2–$8/sq ft |
Every texturing method compared at a glance
Here's an honest rundown of every practical method, including what it's best suited for, its real-world limitations, and whether a determined DIYer can pull it off.
| Method | Best for | Skill level | Key limitation | Approximate cost (DIY materials) |
|---|---|---|---|---|
| Broom finish | New pours needing slip resistance | Beginner | Timing-sensitive; must be done during set window | Minimal — just a concrete broom |
| Trowel finish | New pours wanting smooth, dense surface | Intermediate | Over-troweling traps air/water; not for exterior use without sealer | Minimal |
| Stamped concrete | New pours wanting decorative patterns | Advanced | Narrow impression window; crew coordination required | $2–$5/sq ft in mats, hardener, release |
| Cementitious overlay | Existing slabs needing full refresh | Intermediate | Bond depends entirely on surface prep | $1.50–$4/sq ft |
| Stamped overlay | Existing slabs wanting stone/brick look | Advanced | Thin section strength; prone to delamination if prep is poor | $3–$7/sq ft |
| Exposed aggregate (washed) | New pours wanting natural stone look | Intermediate | Retarder timing is critical; mix design matters | $0.50–$2/sq ft |
| Acid etching | Surface prep for coatings on existing slabs | Beginner-Intermediate | Chemical hazard; pH must be verified before coating | $0.25–$0.75/sq ft |
| Mechanical grinding | Leveling, CSP creation, coating prep | Intermediate | Equipment rental cost; dust management required | $0.50–$1.50/sq ft |
| Stenciling | Decorative patterns on existing slabs | Beginner-Intermediate | Surface must be clean and profiled first | $1–$3/sq ft |
| Hand-texturing | Small areas, accent work, artistic effects | Intermediate | Labor-intensive; inconsistent if done without practice | Minimal tool cost |
Tools and materials: master checklist and per-method breakdown
Don't show up on pour day without this gear sorted out. Missing a bull float or running out of release agent mid-stamp is the kind of mistake that costs you the whole slab. Here's what you need organized by phase.
Universal tools (every method)
- Stiff-bristle push broom or concrete finishing broom
- Garden hose with spray nozzle (rinse and neutralization)
- Bucket, mixing drill, and paddle mixer (overlays and patching)
- Long-handled squeegee or rubber float
- Wet/dry shop vacuum
- pH test strips (required after acid etching, before any coating)
- Kneeling boards or knee pads
- Tape measure and chalk line
New-pour finishing tools
- Screed board or roller screed
- Bull float (magnesium or aluminum, 4–6 ft)
- Magnesium hand float
- Steel finish trowels (at least two sizes: 12" and 16")
- Power trowel (walk-behind or ride-on) — rent for slabs over 400 sq ft
- Edger tool (1/4" or 3/8" radius)
- Groover/jointing tool
- Concrete broom (stiff or medium bristle depending on desired coarseness)
Stamped concrete additions
- Full-size rubber or urethane stamp mats (rent sets from a concrete supply house)
- Flex skins or border mats for edges and tight areas
- 15–20 lb stamp tamper or hand tamper
- Color hardener (powdered or liquid) — plan 60–80 lb per 100 sq ft
- Release agent (powder or liquid spray) — powder gives stronger antique contrast
- Low-pressure washer or garden hose for release removal
- Concrete cure-and-seal product rated for stamped surfaces
Overlay and resurfacing materials
- Cementitious resurfacer (e.g., MAPEI Concrete Renew, ARDEX CD, or similar) — apply at feather edge to 1/4" per most product TDS
- Concrete bonding primer/slurry (required by most overlay manufacturers)
- Texture roller, squeegee, or trowel per product instructions
- Self-leveling underlayment for uneven slabs (LATICRETE NXT Level or equivalent)
- Mixing bucket and drill paddle
- Gauge rake or notched squeegee for overlay spreading
Etching and mechanical profiling tools
- Muriatic acid (hydrochloric acid) or phosphoric acid-based etcher
- Plastic watering can or garden sprayer (acid-resistant)
- Stiff nylon-bristle scrub brush (no metal bristles)
- Baking soda (sodium bicarbonate) for neutralization — roughly 1 cup per gallon of rinse water
- Diamond cup grinding wheel or angle grinder (for spot work)
- Walk-behind diamond floor grinder (rent for full slabs)
- HEPA dust shroud and vacuum
Safety and site prep: don't skip this part
I'll be honest, I've been impatient on projects before and skipped prep steps that came back to bite me. Every shortcut in surface prep shows up later as peeling, delamination, or a texture that wears through in two seasons. Here's the non-negotiable checklist.
PPE by task
| Task | Required PPE |
|---|---|
| Acid etching | Chemical splash goggles (not safety glasses), acid-resistant nitrile gloves, rubber boots, long sleeves, N95 or P100 respirator |
| Mechanical grinding | Safety glasses, hearing protection, N95 dust mask minimum (HEPA respirator preferred), knee pads |
| Concrete placing and finishing | Safety glasses, waterproof gloves (concrete is caustic — prolonged skin contact causes chemical burns), knee pads, rubber boots |
| Overlay application | Safety glasses, nitrile gloves, knee pads |
| Sealing | Chemical splash goggles, solvent-resistant gloves, respirator if solvent-based sealer |
Weather and drainage prep
- Do not pour or apply overlays when air or surface temperature is below 50°F or above 90°F without special admixtures or protection
- Avoid working in direct sun on hot days — the surface can dry too fast and prevent proper finish or bond
- Check the forecast: no rain for at least 24–48 hours after any overlay or sealer application
- Ensure the slab drains away from the house — minimum 1/8" per foot slope; fix drainage before applying any texture or coating
- Wet the substrate (but not puddled) before applying cementitious overlays to prevent the dry slab from pulling water out of the mix too fast
- Set up shade or windbreaks for new pours in hot, windy conditions to control evaporation rate
Chemical and fall hazards
- Always add acid to water — never water to acid — when diluting muriatic acid
- Keep a bucket of neutralizing solution (baking soda and water) nearby during any acid work
- Ventilate enclosed spaces thoroughly; acid fumes are heavier than air
- Mark off the work area to prevent people walking onto wet or chemically treated surfaces
- Ground-fault circuit interrupter (GFCI) outlets required for all power tools near wet concrete or rinse water
Repair and leveling before you texture anything
No texture method fixes structural problems underneath. If your existing slab has cracks, spalling, or low spots, address them before you do anything decorative, otherwise you'll see those defects telegraph right through an overlay or stencil pattern. Here's how to work through the repair sequence.
Crack repair
Hairline cracks (under 1/16") can often be consolidated with a penetrating concrete sealer or a thin slurry of bonding agent before overlaying. Wider cracks need to be routed or chased out with an angle grinder to create a V-groove or U-groove profile, this gives the repair material more surface area and better mechanical grip. Fill with a flexible polyurethane or epoxy crack filler for moving (live) cracks, or a rigid cement-based patching compound for dormant cracks. Let the repair cure fully before proceeding, typically 24–48 hours minimum.
Patching spalls and surface damage
For spalled areas (flaking or pitting surface), use a polymer-modified cement patching compound. Feather the edges of the damaged area with an angle grinder to create a minimum 1/4" depth for the patch, thin spots over a sharp edge pop out within a season. Apply bonding slurry to the primed patch area, pack the compound in, and screed flush. Give it a full 24–48 hours before grinding or overlaying on top.
Control joints and expansion joints
Don't fill or bridge control joints with an overlay unless you want new cracks appearing through your finished surface exactly where the joints were. Honor existing joints by cutting the overlay along the same lines after it cures, or use a saw-cut joint detail in the overlay. Expansion joints filled with foam backer rod and flexible sealant should be re-sealed before overlaying if they're dried out or crumbling.
Leveling low spots with self-leveling underlayment
If your slab has dips or humps more than about 3/8" over 10 feet, a self-leveling underlayment (SLU) is your best friend before any decorative overlay. Products like LATICRETE NXT Level are designed for this: they're aggregate-rich, flow to a flat plane under their own weight, and in some formulations can be polished or overlaid within 24 hours. Prime the slab first with the manufacturer's recommended primer, skipping this step is how SLUs delaminate. Pour the mixed SLU and guide it with a gauge rake; it self-levels across the surface. Let it cure fully per the TDS before applying your decorative layer.
Surface profiling: etching vs. mechanical methods
Surface profiling is how you create the microscopic roughness that lets overlays, coatings, and stains bond to concrete. The industry measures this roughness using the ICRI Concrete Surface Profile (CSP) scale, which runs from CSP 1 (nearly smooth, suitable only for thin paint-type coatings) up to CSP 10 (rough as a broken sidewalk, for thick structural overlays). Your product's technical data sheet will specify the required CSP, always check it before choosing your profiling method.
Acid etching: when it works and how to do it
Acid etching with muriatic (hydrochloric) acid works well on uncoated, clean concrete that has never been sealed and has no contamination from oils, paint, or previous coatings. It's the most accessible method, you can do it with a plastic watering can and a stiff brush, and it produces a CSP of roughly 1–3, appropriate for penetrating stains, thin-film coatings, and lighter overlays. ASTM D4260 is the governing practice, and ASTM D4262 covers post-etch pH verification, which is required before applying any coating.
- Clean the slab thoroughly — degrease, remove any paint or sealer, and rinse completely
- Pre-wet the concrete surface with clean water (the slab should be damp but not puddled)
- Mix your etch solution by adding acid to water — common working dilutions range from 1:10 (acid:water) for light profiling up to 1:4 for heavier action on dense or trowel-finished concrete
- Apply with a plastic watering can or acid-resistant sprayer, working in 10–15 sq ft sections
- Scrub immediately with a stiff nylon brush — you should see a fizzing reaction; if there's no fizz, the surface may be sealed or contaminated
- Let dwell for 3–5 minutes, then rinse thoroughly with clean water
- Neutralize with a baking soda and water solution (roughly 1 cup baking soda per gallon of water), scrub, and rinse again
- Test pH with litmus strips — the surface must read 7–9 before any coating or overlay is applied; re-rinse and re-test if the pH is still low
A word of caution: acid etching won't remove existing sealers, oils, or paint. If your slab has any of those, you need mechanical profiling first. Etching over a contaminated surface creates a false sense of prep, the coating bonds to the contamination, not the concrete, and will peel.
Mechanical profiling: grinding and shot-blasting
Diamond grinding and shot-blasting are the professional standard for reliable, verifiable surface profiles. The ICRI Concrete Repair Bulletin discusses shotblasting and diamond grinding as preferred mechanical methods for achieving consistent CSPs and removing contaminants ICRI Concrete Repair Bulletin (discussion of shotblasting and grinding for CSP) — ICRI. They remove contamination, sealers, and weak surface layers while creating a consistent CSP. For DIY work, diamond grinding is the practical choice, you can rent a walk-behind grinder from most equipment rental yards. Shot-blasting is typically a professional-hire service for larger areas.
For grinding, start with a coarse metal-bond diamond tooling segment to create the required CSP and remove any surface issues, then step up through finer grits if you need a smoother profile for your specific overlay product. The bond of the diamond segment (hard bond for soft concrete, soft bond for hard concrete) matters more than most DIYers realize, check the tooling manufacturer's guide for your substrate hardness. Always use a HEPA dust shroud and vacuum. Concrete dust contains crystalline silica and is a serious respiratory hazard.
Which method should you use?
| Scenario | Recommended method | Why |
|---|---|---|
| Clean, uncoated, never-sealed slab, thin overlay or stain planned | Acid etch | Achieves CSP 1–3; low cost; accessible for DIY |
| Slab with existing sealer or paint | Mechanical grinding first, then etch if needed | Only grinding removes existing coatings reliably |
| Oil contamination present | Degrease, then mechanical grind | Acid doesn't penetrate or remove oil |
| Heavy overlay or polymer topping planned (needs CSP 3+) | Shot-blast or diamond grind | Consistent high CSP; manufacturer preference |
| Full decorative resurfacing system | Mechanical grind per product TDS CSP requirement | Most overlay TDS specify mechanical prep for warranty |
New-pour finishes: broom and trowel step by step
Getting the finish right on a new pour is almost entirely about timing. There's no product you can buy to fix bad timing, if you trowel too early, you weaken the surface; if you broom too late, the bristles skip instead of cut. Here's how to read the slab and execute both finishes correctly.
The sequence from pour to finish
- Place and screed: strike off the concrete to level using a screed board or roller screed, working in a sawing motion
- Bull-float: immediately follow screeding with a bull float (magnesium for exterior, aluminum for interior) to embed aggregate, remove screed marks, and close the surface — work with overlapping passes
- Wait for bleed water to evaporate: bleed water appears as a sheen on the surface — do not begin any finishing until this sheen disappears and the surface begins to firm up; this is the most important timing call you'll make
- Edge and joint: run your edger along all form edges to create a radius and prevent chipping; cut control joints with a groover at this stage
- Magnesium or wood float pass: open the surface slightly to help remaining moisture escape and prepare for steel trowel work (for trowel finish only)
- Steel trowel (for smooth/trowel finish): first pass is light pressure with a slightly open blade angle — you're just beginning to consolidate; wait again for the slab to firm further, then make successive passes with progressively flatter blade angles and firmer pressure; 2–4 passes is typical
- Broom finish (instead of or after final trowel pass): drag a concrete broom across the surface in one smooth, continuous pull per stroke — work perpendicular to the direction of foot traffic for best slip resistance; bristle coarseness determines texture depth
Timing cues: how to read the set
Temperature, humidity, wind, water-cement ratio, and admixtures all affect how fast concrete sets, there's no single clock time that works. Instead, check the surface by pressing your thumb firmly into it. When your thumbprint is about 3/16" deep with moderate pressure, you're in the broom-finish window. When it's 1/8" or less, you're in the steel-trowel zone. When it's under 1/16", the trowel window is closing. Hot, dry, windy days compress these windows dramatically, sometimes to 20–30 minutes for a 400 sq ft slab. Cold or humid days can extend them by hours.
Common mistakes and how to avoid them
- Finishing over bleed water: this is the most common cause of surface scaling and dusting — wait for the sheen to fully disappear
- Over-troweling air-entrained exterior concrete: repeated steel trowel passes on air-entrained mixes can trap air voids just below the surface, causing popouts and spalling within the first freeze-thaw cycle — one or two passes is usually enough for exterior work
- Brooming too late: the bristles skip and tear rather than creating clean lines; if this happens, you've missed the window
- Uneven broom pressure: keep the handle angle and walking speed consistent across the whole slab for uniform texture depth
- Forgetting to cure: cover the finished slab with curing compound or wet burlap and plastic sheeting immediately after finishing — don't let it air-dry; 7-day moist cure is the standard
Controlling the look and slip resistance
Broom coarseness is your main variable. A fine-bristle broom creates shallow, light lines, good for a refined look but less grippy. A stiff utility broom creates deep, aggressive grooves, maximum traction but rougher underfoot. For a patio used barefoot around a pool, a medium-bristle broom dragged in one direction gives the best balance. If you want a subtle swirl or fan pattern for visual interest, a round brush pulled in arcs works well but takes practice to keep uniform.
Stamped concrete: process, timing, and what can go wrong
I'll be upfront: stamped concrete is the most technically demanding finish you can attempt on a new pour, and the impression window is brutally short. On a 90°F day with light wind, you might have 20–30 minutes from the end of floating to complete an entire patio. You need a coordinated crew, all your mats staged and ready, and zero hesitation. That said, if you've got the crew and preparation, the results are spectacular and the finish is integral to the slab.
- Complete screeding, bull-floating, and any color hardener application — broadcast color hardener by hand in two perpendicular passes, float in each time
- Apply release agent to stamp mats and optionally to the concrete surface — powder release gives a stronger antique effect; liquid spray gives a subtler tone
- Begin stamping at a straight-edge boundary (a wall, a form edge, a chalk line) — set the first mat perfectly; every subsequent mat registers off the previous one
- Use the 15–20 lb hand tamper to seat each mat — work across the mat in a grid pattern, not just the center; unseated edges leave indistinct lines
- Use flex skins for the final 6–12" at edges where full mats don't fit
- Overlap mat joints slightly and align texture lines carefully — misaligned joints are visible in the finished product
- Wait 24–72 hours, then wash off excess release agent with low-pressure water and a soft brush
- Cure for the manufacturer's specified period, then apply a concrete sealer rated for stamped surfaces — this step protects both the color and the texture
The most common stamping mistake is waiting too long between sections. The concrete at one end of the patio sets faster than the other because it was placed first. Have one person working each end of the patio simultaneously if it's over 200 sq ft. If you press a mat and the impression is shallow or fuzzy, the concrete has gotten too stiff, stop, call it a day, and plan for a stamped overlay on the existing slab instead.
Texturing existing slabs: overlays, resurfacers, and stenciling
If you already have a concrete patio and want to change its texture or appearance without demolition, overlays and resurfacers are your best tools. The results can be genuinely impressive, a properly installed cementitious overlay looks nothing like a patch job. But the prep is everything, and skipping steps here is how you end up with a peeling surface two years later.
Cementitious resurfacers
Products like MAPEI Concrete Renew and ARDEX CD are polymer-modified cement mixes designed to bond to existing concrete at thicknesses ranging from a feather edge up to about 1/4". ARDEX CD, for example, mixes at roughly 5 quarts of water per 40-pound bag, has a pot life of about 30 minutes and a working time of 10–15 minutes, and is walkable in about 2 hours with a 28-day compressive strength around 4,000 psi. Apply with a squeegee or gauge rake, then texture with a brush or texture roller while still workable. You can broom-finish a resurfacer to replicate a new-pour broom texture on an existing slab.
Stamped overlays for existing slabs
A stampable overlay is a polymer-modified mix applied at 3/8–1/2" thick that can be stamped with the same mats used for new concrete. It's how you get a stamped-concrete look on an existing slab. The catch: at that thickness, you have even less margin for error in mix consistency and application timing than a new pour, and the bond to the substrate is entirely dependent on your prep work. Mechanical grind the slab to CSP 3 or higher, apply the manufacturer's primer, and have your mats staged before you mix. The same impression-window urgency applies.
Stenciling on existing slabs
Stenciling is one of the more beginner-friendly decorative options for an existing slab. You lay adhesive-backed stencil film on the prepared surface, apply a thin colored overlay or concrete paint, then peel the stencil to reveal the pattern. The surface needs to be clean, profiled (etched or lightly ground), and free of any sealer. For step-by-step advice on prepping and coloring concrete surfaces, see our guide on how to stain a cement patio which covers materials, surface prep, and application tips. Stenciling pairs naturally with coloring work, if you're thinking about ways to add color alongside texture, the stenciling and concrete staining processes overlap significantly in terms of prep requirements. If you also want to learn how to color existing concrete patio, see a step-by-step guide covering stains, dyes, and pigmented overlays to pair color with your new texture.
Exposed-aggregate finishes
Exposed aggregate creates a naturally textured surface by revealing the decorative stone in the concrete mix. There are two approaches: the surface-retarder method (done during the original pour) and the seeded method (broadcasting selected aggregate onto a fresh pour). Both require the work to happen at the pour.
Surface retarder method
Apply a surface retarder to the freshly placed, bull-floated slab surface, the retarder chemically delays hardening of the top paste layer while the body of the slab sets normally. The typical removal window is 12–24 hours after placing, but this varies with temperature, mix design, and retarder concentration, so it's worth testing a small patch. Concrete Surface Retarders & Deactivators - Concrete Network notes a typical removal window of about 12–24 hours that varies with mix and weather, and recommends testing a small patch to confirm timing. Pressure-wash or hand-scrub the retarded paste off to expose the aggregate beneath. The depth of exposure is controlled by the retarder's strength and dwell time.
Seeded aggregate method
Broadcast your chosen decorative aggregate (colored stone, glass, pea gravel) onto the bull-floated surface immediately after initial floating while the concrete is still plastic but no longer has free bleed water visible. Float the aggregate in with a magnesium float until it's embedded just below the surface level. Once the slab has set, pressure-wash the cement paste off the tops of the aggregate to expose them. This method lets you use materials not native to the mix design, colored glass, for instance, for a more customized look.
How texture and color work together
Texture and color are most powerful when they're planned together, not added as afterthoughts. Color hardener (broadcast during a new pour) and integral pigments work best under stamped or broom-finished surfaces. Acid stains and water-based stains penetrate the texture's ridges and valleys, creating natural variation that makes the surface look more like stone. For a step-by-step approach to staining a patio so it resembles natural stone, see how to stain concrete patio to look like stone. If you're planning to stain your patio after texturing, the texture profile actually helps the stain look better, flat, sealed surfaces stain too uniformly and lose the natural variation. Decorative finishes that mimic stone or marble rely on a combination of profile texture and layered coloring to read as realistic. For step-by-step instructions on how to make concrete patio look like marble, see the dedicated guide that walks through materials, coloring, and finishing techniques.
Sealing and maintaining textured concrete
A sealer is not optional on any textured exterior concrete surface. Texture creates surface area, and surface area means more entry points for water, freeze-thaw damage, oil, and staining. The right sealer type depends on your finish.
| Texture type | Recommended sealer | Reapply frequency |
|---|---|---|
| Broom finish (plain gray) | Penetrating silane/siloxane sealer | Every 3–5 years |
| Stamped concrete | High-gloss or satin acrylic cure-and-seal | Every 2–3 years |
| Exposed aggregate | Penetrating sealer or low-gloss acrylic | Every 2–4 years |
| Cementitious overlay | Per overlay manufacturer TDS — typically acrylic or polyurethane | Every 2–3 years |
| Stained/colored surface | UV-stable acrylic or polyurethane (non-yellowing) | Every 2–3 years |
For maintenance, keep textured surfaces clear of standing water and debris. Fine aggregate textures trap leaves and dirt in the grooves, an annual pressure wash at low pressure (under 1,500 PSI on overlays) keeps them clean without eroding the surface. Reapply sealer as soon as water stops beading on the surface rather than waiting for visible wear.
Troubleshooting: when things go wrong
| Problem | Likely cause | Fix |
|---|---|---|
| Overlay peeling at edges | Insufficient surface profile or missed primer coat | Grind off, re-profile to required CSP, re-prime, re-apply |
| Broom lines uneven or skipping | Broomed too late or uneven pressure | Sand lightly and apply thin resurfacer; prevent by reading set correctly |
| Stamp pattern fuzzy or shallow | Concrete too stiff when stamped | Stamp overlay on the existing slab |
| Acid etch produced no fizz | Surface has a sealer or hardener applied | Mechanical grind to remove sealer, then re-etch or grind to final CSP |
| Hairline cracks appearing through overlay | Control joints not honored or slab is moving | Re-cut joints through overlay above existing joints; use flexible joint sealant |
| Surface scaling after first winter | Finished or sealed over bleed water, or sealer applied too soon | Remove scaling, re-profile, re-seal with penetrating silane/siloxane |
| Sealer peeling | Applied over damp surface, wrong sealer type, or insufficient cure time | Strip sealer, allow full cure, verify surface dryness, re-apply compatible sealer |
DIY vs. hiring a pro: the honest breakdown
Most homeowners can handle a broom finish on a new pour, a basic cementitious resurfacer on an existing slab, acid etching, and stenciling, especially with a weekend of research and the right tools. Where I'd seriously consider calling a pro: full stamped concrete on a pour over 300 sq ft (the timing and crew coordination requirement is real), shot-blasting for large-area CSP work, and any overlay system with manufacturer warranty requirements that specify certified installers. The cost of a bad stamped pour, tearing it out and replacing it, far exceeds the labor cost of hiring a qualified decorative concrete contractor.
| Method | DIY-friendly? | When to hire a pro |
|---|---|---|
| Broom/trowel finish | Yes | For very large pours or when using a power trowel for the first time |
| Stamped concrete | With experience and crew | Any slab over 200–300 sq ft; complex multi-pattern layouts |
| Cementitious overlay | Yes | When warranty or commercial specs require certified installer |
| Acid etching | Yes | Rarely — DIY is fine with proper PPE |
| Diamond grinding | Yes (rental) | Large areas or when shot-blasting is specified |
| Exposed aggregate | Yes (with planning) | Complex seeded-aggregate patterns or large slabs |
| Stenciling | Yes | Multi-color systems or intricate patterns |
Whatever method you choose, the biggest factor in a successful outcome isn't skill, it's preparation and patience. Read the product TDS before you buy anything, not after. Stage your tools before the concrete arrives. Test your timing on a small section if you're trying a new technique. The methods in this guide are all proven and accessible; the homeowners who struggle with them are almost always the ones who skipped the prep.
FAQ
What are the main decision criteria for choosing a texture method for a concrete patio?
Decide based on whether the slab is new or existing, required slip resistance, budget, durability, aesthetic goal, and DIY skill. New pours allow broom, trowel, stamped, or exposed‑aggregate during finishing. Existing slabs can be textured via overlays, stamped/skin overlays, exposed‑aggregate washes, acid or mechanical profiling plus coatings, grinding, stenciling, or hand‑texturing. For high slip resistance choose broom, exposed‑aggregate, or coarse texture; for decorative stone/brick looks choose stamping or overlays; for low budget choose broom/trowel or simple acid etch + stain; for long life and heavy traffic choose properly installed stamped concrete or cementitious overlays.
What tools and materials do I need for texturing a new poured concrete patio (broom, trowel, stamped)?
Essential tools: concrete mixer/truck, screed board, bull float, edging tool, jointer, magnesium or wood float, steel trowels (hand or power), broom, stamp mats and tampers (for stamped), powdered/liquid release, color hardener (optional), curing compound or plastic sheeting, finishing rakes, shovels, wheelbarrow, personal PPE (gloves, safety glasses, long sleeves, respirator for powders). Materials: correct concrete mix, admixtures (air entrainment if exterior), color hardener, release agent, curing compound or curing blankets.
Step-by-step: how to apply a broom finish on a new pour?
1) Place, consolidate and screed to line. 2) Bull‑float to embed aggregates and remove high spots. 3) Let bleed water evaporate until surface loses sheen and will support broom (read the set; timing varies by mix/weather). 4) Edge and join. 5) Use a stiff‑bristled broom perpendicular to expected traffic to drag texture across the surface; keep strokes even and overlapping. 6) Cure per product instructions (water cure, curing compound or coverings) immediately after final set to avoid cracking.
How is a trowel (smooth) finish done and what are the cautions?
Progress from screeding → bull‑floating → edging → power/magnesium float → successive steel trowel passes as slab stiffens. Finishers 'read the set' and stop when the surface is stiff enough to trowel without marring. Cautions: over‑troweling on exterior air‑entrained mixes can trap moisture/air and cause surface defects; smooth trowels are slippery when wet—add slip‑resistant treatment or textured banding in high‑traffic areas.
How do I do stamped concrete on a new pour (workflow & timing)?
Place and screed concrete, bull‑float, apply color hardener if used, broadcast release agent then position stamp mats during the narrow plastic window after floating but before set. Use tampers to seat mats. Remove mats carefully, allow concrete to gain initial strength, then rinse/wash off excess release per manufacturer (often 24–72 hrs). Cure and then seal the surface following product directions.
Can I stamp an existing slab? What are my options?
You cannot stamp fully hardened slab like fresh concrete. For existing slabs use a cementitious overlay with rubber/urethane stamp skins or an imprintable overlay product. Surface prep (mechanical profiling to proper CSP, crack repair, priming) is required. Overlays allow stamped patterns, coloring, and antiquing similar to new stamped concrete.