
You can absolutely recolor a stamped concrete patio yourself, the process involves stripping the old sealer, repairing any surface damage, applying a stain or tinted sealer, and locking everything in with a fresh topcoat. A full weekend is usually enough time if the surface is in decent shape. The catch is that recoloring only works when the texture and underlying concrete are sound. If the stamps are crumbling, the slab is cracked through, or large sections are delaminating, you're looking at a refinish, overlay, or restamp instead of a simple color refresh. If you need a full refinish, see our guide on how to refinish a stamped concrete patio for step-by-step instructions and product recommendations.
How to Recolor a Stamped Concrete Patio: Step-by-Step Guide

Silas Morrison
12 Aug 2026
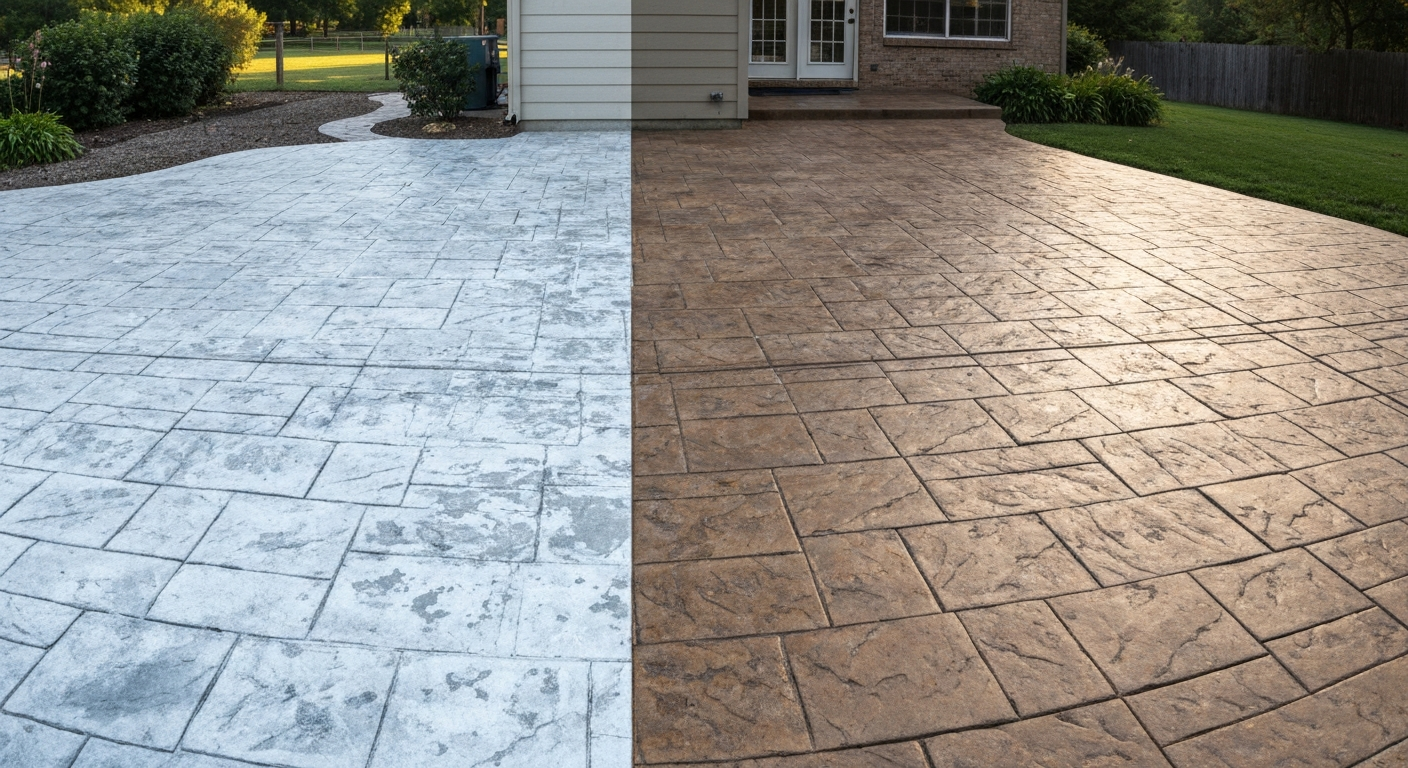
What recoloring can and can't do for your patio
This guide is written for homeowners who have a stamped concrete patio that looks dull, blotchy, or faded but is still structurally intact. Maybe the original color has washed out after years of sun and weather. Maybe someone applied the wrong sealer and now the tones look muddy. Either way, you want a refreshed look without tearing everything up. Recoloring, through acid stain, water-based stain, dye, or a tinted sealer, can dramatically restore the appearance of a faded stamped surface and make it look close to new. What it cannot do is fix lost texture, repair deep structural cracks, or make a lumpy or unlevel slab flat. If you've been reading about refinishing options more broadly, a lot of the prep work here overlaps with a full refinish, so the decision below matters before you buy a single product.
Recolor, refinish, overlay, or restamp, make this decision first
I've seen homeowners spend $200 on stain and supplies only to realize mid-project that what they actually needed was an overlay. Spend ten minutes on this checklist before you go any further. It'll save you real money and frustration.
Quick decision checklist
| Condition of your patio | Best path forward |
|---|---|
| Color is faded or sealer is worn, but texture and surface are intact | Recolor with stain or tinted sealer — this guide |
| Surface has minor scuffs and hairline cracks but is otherwise sound | Recolor after minor repairs — this guide |
| Sealer is peeling or flaking but concrete underneath is hard and textured | Strip, repair, recolor — this guide |
| Texture is damaged, worn smooth, or partially missing | Thin overlay or microtop to restore texture, then color |
| Multiple large cracks (wider than 1/4 inch), major spalling, or hollow sections | Full repair or overlay before any color work |
| Slab is heaving, unlevel, or has drainage problems | Address structural issue first — color is pointless otherwise |
| You want a completely different stamp pattern | New overlay with restamping or pour a new slab |
The right answer for most faded patios is recoloring. A patio that still has its original stamped texture but has lost its color, or has a worn, hazy sealer, is a perfect candidate. If you're unsure whether your patio could simply be restamped rather than replaced, that's worth looking into separately. See can an existing concrete patio be stamped for details on when and how an existing slab can be restamped rather than replaced. And if you're starting from scratch or building a new stamped patio as a DIY project, the prep and installation steps are a different workflow entirely. For step-by-step instructions, see this stamped concrete patio do it yourself guide.
Assessing your existing patio before you buy anything
Walk the entire patio surface before you commit to a color system. I always do this with a notepad and take photos, because it's easy to underestimate how much prep is needed once you're standing in front of a supply rack. Here's what to check:
- Sealer type and condition: Look for a film on the surface. Solvent-based acrylics tend to look glossy or hazy when failing. Water-based acrylics often go chalky or white. Peel a flaking piece and see if it comes up in a thin plastic-like sheet — that's a film-forming topical sealer, and it must come off before any stain can penetrate. Do a quick water-bead test: drop a few tablespoons of water on the surface. If it beads up hard and fast, there's an active sealer present.
- Surface soundness: Tap across the slab with a coin or the handle of a screwdriver. A hollow or dull thud means delamination or a void below — that section needs repair before you color over it. Solid concrete rings clearly.
- Crack mapping: Walk every crack and note its width and depth. Hairline cracks (under 1/16 inch) are cosmetic. Cracks wider than 1/4 inch, especially those running the full depth or showing vertical displacement, need structural repair.
- Spalling and chips: Note any areas where the surface has popped off or pitted. These need patching before staining because a stain will highlight imperfections rather than hide them.
- Texture check: Run your hand across the stamped pattern. If the ridges and valleys are still well-defined, you're a good candidate for recoloring. If they're worn soft or partially missing, you may need a microtop or skim coat first.
- Drainage: Make sure water still flows away from the house. If you have low spots pooling water, address the grade issue separately — a color job won't fix standing water.
- Oil and grease stains: Mark them. These need degreasing before any color work, because stains won't bond to contaminated concrete.
Once your assessment is done, you'll have a clear picture of how much prep is ahead of you. Most faded patios need sealer removal, light crack repair, and a good cleaning. That's a manageable DIY weekend.
Everything you'll need: tools, materials, and consumables
Here's a full list organized by phase. I'd recommend pulling everything together before you start Day 1 so you're not running to the store mid-project.
Cleaning and prep supplies
- Concrete degreaser (alkaline cleaner, such as Purple Power or a concrete-specific degreaser)
- Chemical sealer stripper (xylene-based or newer water-based stripper — check compatibility with your sealer type)
- Muriatic acid (10 percent solution) or citric acid cleaner for light etching and neutralization after acid stain
- Pressure washer (at least 2,000 PSI — 3,000 PSI preferred for sealer removal)
- Stiff-bristle push broom and deck brushes
- Garden hose with high-pressure nozzle for rinsing
- Plastic sheeting and painter's tape to protect adjacent surfaces, joints, and landscaping
Repair products
- Polymer-modified cementitious patching mortar (e.g., Quikrete Vinyl Concrete Patcher) for spalls and chips
- Two-part epoxy or polyurethane crack injection cartridges for cracks wider than 1/8 inch
- Crack filler or caulk-style polyurethane sealant for narrow working cracks (cracks that still move seasonally)
- Putty knife, margin trowel, and a grout bag or caulk gun for application
Color products (choose one system)
- Acid stain (reactive, muriatic or hydrochloric acid-based with metallic salts) — sold by the quart or gallon
- Water-based concrete stain (pigment/dye dispersion) — wider color range, easier application
- Concrete dye (solvent/acetone-based) — use UV-stable formulas only for outdoor applications
- Tinted concrete sealer (film-forming acrylic or urethane with pigment added) — covers and colors in one step
- Antiquing or release powder (for layered, mottled, natural-stone look)
Sealer (topcoat)
- Acrylic concrete sealer (solvent-based for better penetration and durability, water-based for easier cleanup and lower VOCs)
- Polyurethane or epoxy topcoat sealer for maximum durability in heavy-use areas
- Sealer applicator (lambswool roller for smooth application, brush for edges and crevices)
Application equipment
- Plastic (non-metal) pump sprayer — 2 gallon capacity minimum — for acid stain application
- Foam rollers (3/8 inch nap) and roller frames for water-based stains and sealers
- Natural-bristle or synthetic brushes for cutting in edges and working color into texture valleys
- Low-pressure airless sprayer (optional but faster for large patios over 400 square feet)
- Buckets, mixing sticks, and measuring containers
Safety, weather, and timing, don't skip this section
I learned the hard way on one early project that applying sealer in 90-degree direct sun causes it to bubble and peel within a week. Weather and timing are not just suggestions, they affect whether your entire color job holds up over time.
PPE you actually need
- Chemical-resistant gloves (nitrile or neoprene) — required for acid stain, strippers, and degreasers
- Safety glasses or goggles — acid splash to eyes is a real hazard
- NIOSH-approved respirator (N95 minimum for dust; organic vapor cartridge respirator for solvent-based strippers, stains, and sealers)
- Old clothes and closed-toe shoes — acid stain will permanently mark anything it touches
- Knee pads if you're doing detailed brush work close to the surface
Weather windows and curing times
- Temperature: Work between 50°F and 90°F (10°C to 32°C). Stains and sealers applied below 50°F won't cure properly; above 90°F they dry too fast and can streak or peel.
- Humidity: Below 85 percent relative humidity for sealer application. High humidity extends cure times and can cause cloudiness in solvent-based sealers.
- Rain: Concrete must be fully dry before staining or sealing — typically 24 to 48 hours after rain. Check a 48-hour forecast and plan your project start accordingly.
- Sun exposure: Apply stains and sealers in the shade or on an overcast day if possible. Direct midday sun heats the slab surface well above air temperature.
- Acid stain reaction time: Allow 2 to 4 hours minimum for the acid-mineral reaction to develop; overnight is ideal for deeper color.
- Stain dry time before sealing: 24 hours minimum for acid stain after neutralizing and drying; 4 to 6 hours for water-based stains (check product TDS).
- Sealer recoat window: Most acrylics allow a second coat in 1 to 2 hours when dry to touch; full cure before foot traffic is 24 hours, before furniture is 48 to 72 hours.
Surface preparation: cleaning, degreasing, and stripping old sealer
This is the phase that makes or breaks a recolor job. A stain applied over a dirty or sealed surface will look blotchy, peel early, or simply refuse to penetrate. Spend as much time on prep as you do on the color application itself, it's worth it.
- Clear the patio completely. Remove all furniture, planters, grills, and rugs. Cover any landscaping beds at the patio edge with plastic sheeting.
- Degrease oil spots first. Apply a concentrated alkaline degreaser to any oil, grease, or rust stains. Scrub with a stiff brush and let it dwell 10 to 15 minutes, then rinse thoroughly with the pressure washer. Repeat for stubborn spots. Skipping this step means your stain won't bond in those areas.
- Apply chemical sealer stripper. If your water-bead test confirmed an active sealer, apply the chemical stripper according to the manufacturer's directions. Spread it evenly with a push broom, cover with plastic sheeting to slow evaporation, and let it dwell for the specified time (usually 20 to 60 minutes). The stripper softens the sealer film so it can be scrubbed and lifted.
- Scrub and pressure wash. Use the stiff broom to agitate the softened sealer, then hit the entire surface with the pressure washer at 2,500 to 3,000 PSI, using a 15- to 25-degree fan tip. Work in overlapping passes. The stamped texture means you need to work the wand at an angle to clean the valleys — don't just skim the surface.
- Check adhesion. Let the surface dry for at least an hour and perform the water-bead test again. If water still beads, the sealer is not fully removed. Repeat the stripping step. This may take two rounds on older solvent-based acrylics.
- Light acid wash if needed. If the concrete still shows residue or you plan to use an acid stain, a light application of diluted muriatic acid (1 part acid to 10 parts water, applied with a plastic sprayer) will etch the surface and open the pores. Apply, let fizz for 2 to 3 minutes, then neutralize with a baking soda and water solution (1 cup per gallon) and rinse thoroughly.
- Final rinse and dry. Rinse the entire surface twice with clean water. Let the concrete dry completely — 24 hours minimum in warm dry weather, 48 hours in cool or humid conditions. Do not proceed to color until the surface is fully dry and no longer cool to the touch.
One note on mechanical stripping: diamond grinding and shot-blasting are effective, especially on chemically resistant coatings, but they physically remove surface material and can soften or alter the definition of your stamped texture. Common methods to remove existing topical sealers are chemical stripping, pressure‑washing (with or without detergent or acid pre‑treatment), and mechanical abrasion (diamond grinding, shot‑blasting, scarifying); the choice balances effectiveness, speed, environmental and safety concerns, and impact to stamped texture Methods to remove topical sealers. I reserve those methods as a last resort on decorative surfaces. Chemicals are slower but much kinder to the pattern detail.
Repairing the concrete before you apply any color
Color will not hide imperfections, it amplifies them. A stain draws the eye directly to a patched crack if the repair isn't done well. Do your repairs after the initial clean and strip but before the final prep, so you can sand or blend the patches into the surrounding texture.
Hairline and narrow cracks (under 1/8 inch)
These can be filled with a concrete crack filler applied from a squeeze bottle or caulk-style tube. For a tighter fill, use a polyurethane-based crack sealant rated for outdoor concrete. Tool the sealant flush with the surface using a putty knife and feather the edges so there's no raised ridge. These cracks are cosmetic and not structural, so flexibility matters more than hardness in the repair product.
Wider cracks (1/8 to 1/4 inch) and structural cracks
Use a two-part epoxy or polyurethane injection system for cracks that go full depth. If the crack is an active working crack (it moves seasonally), a semi-rigid polyurethane is better than a rigid epoxy, which could re-crack. Fill from the bottom up using a caulk gun, slightly overfill, and let cure completely per the manufacturer's instructions before sanding flush.
Spalls, chips, and surface pitting
Use a polymer-modified cementitious patching mortar like Quikrete Vinyl Concrete Patcher for surface spalls and chips. Dampen the area first, pack the mortar in firmly with a margin trowel, and feather the edges as thin as possible. If the spall is in a stamped area, try to recreate the texture while the patch is still wet using a piece of the stamp pattern, an old brush, or even a gloved finger to simulate the original impressions. Let the patch cure fully (24 to 48 hours minimum), then sand any high spots smooth before proceeding.
Low spots
True leveling of low spots in a stamped patio is tricky without affecting the pattern. For minor low spots (under 1/4 inch deep) with no standing water issues, a self-leveling polymer overlay or skim coat can be feathered in. For deeper issues or drainage problems, consult a concrete contractor, this is one of the cases where DIY becomes genuinely complicated.
Choosing your color system: what actually works on stamped concrete
This is where most of the research and decision-making happens. There are five real options for recoloring a stamped concrete patio, and each has a different look, a different application method, different durability characteristics, and different requirements from your substrate. Here's an honest breakdown.
| Color system | How it works | Best for stamped concrete? | DIY difficulty | UV stability (outdoor) | Approximate cost per 100 sq ft |
|---|---|---|---|---|---|
| Acid stain | Chemical reaction with calcium hydroxide in concrete; color is embedded in the pores | Yes — produces natural, variegated, stone-like tones that complement stamped patterns beautifully | Moderate — requires neutralization and careful technique | Excellent once sealed | $30–$60 in stain + sealer |
| Water-based stain | Pigment dispersion penetrates pores without chemical reaction; wide color palette | Yes — easier to control color, good for bold or uniform tones | Easy to moderate | Good with UV-stabilized sealer | $25–$55 in stain + sealer |
| Concrete dye (solvent/acetone) | Fast-penetrating dye; intense, vivid color; translucent | Use with caution outdoors — only UV-stable outdoor dye formulas are suitable | Moderate — dries very fast, hard to fix mistakes | Moderate to poor unless UV-stable formula used | $35–$65 in dye + sealer |
| Tinted film sealer | Color and protection in one product; sits on top of the surface | Yes — great for a quick refresh when surface is lightly faded; covers uniformly | Easy | Good if UV-stable acrylic or urethane is used | $40–$80 for sealer alone |
| Concrete paint or coating | Opaque pigmented coating; completely hides original color and texture detail | Generally not recommended — obscures the stamped texture and pattern depth; tends to peel | Easy to apply, hard to remove if it fails | Moderate — prone to peeling and chipping outdoors | $20–$50 in paint + potential removal cost |
| Antiquing (release or tinted wax/stain) | Applied over base color to add shadowing in valleys; mimics aged stone or brick | Excellent — specifically designed for stamped concrete; enhances texture definition | Moderate — requires layering and blending technique | Good when topcoated with sealer | $15–$40 additional as an accent layer |
My honest recommendations by situation
- For a natural, high-end look that resembles real stone or slate: acid stain with an antiquing accent layer, sealed with a solvent-based acrylic. This is the combination most contractors use for a reason — the variegated, mottled color looks intentional rather than painted.
- For bold color or a specific tone match (like matching your home's exterior): water-based stain. The wider palette and easier application make it the better DIY choice when you need a predictable, uniform result.
- For a fast one-day refresh on a lightly faded patio: tinted sealer. Strip the old sealer, clean thoroughly, apply the tinted version. Not as deep or nuanced as staining, but fast and effective.
- For adding depth to an existing base color: antiquing stain or release-powder technique over a freshly water-based stained surface. This is what turns a flat-looking color job into something that looks three-dimensional.
- Avoid opaque concrete paint on stamped surfaces unless you are completely fine with losing the texture detail. Paint fills in the valleys that give stamped concrete its character, and it's the hardest finish to remove if it starts peeling later.
The test patch rule
Before you apply any color to the full patio, do a test patch in an inconspicuous corner, behind a planter or near the back wall. Apply the stain exactly as you plan to do the whole patio, let it develop, neutralize (if acid stain), dry, and then seal it. Wait 24 hours. This tells you whether the color will penetrate properly, whether the porosity is consistent, and whether you like the result. Skipping this step is one of the most common mistakes DIYers make with concrete staining. Concrete stain is not paint, you can't roll over a color you don't like.
Applying the color: step-by-step by product type
Acid stain application
- Mask off all edges, control joints, and any surfaces you don't want stained. Plastic sheeting over landscaping is non-negotiable — acid stain will kill plants.
- Fill your plastic (non-metal) pump sprayer with the acid stain. Use a plastic sprayer exclusively — metal components react with the acid and contaminate the stain.
- Apply in a circular or figure-eight motion, overlapping passes to avoid hard lines. Work from the far end of the patio back toward an exit so you don't walk through wet stain.
- Allow the reaction to develop for a minimum of 2 hours, and up to overnight for deeper color. You'll see the surface bubble lightly as the acid reacts with the concrete's calcium hydroxide. This is normal.
- Neutralize the reaction: apply a solution of baking soda and water (1 cup per gallon) or the manufacturer's specified neutralizer, scrub gently with a brush, and rinse thoroughly with clean water. This step is essential — un-neutralized acid will interfere with sealer adhesion.
- Let the surface dry completely — at least 24 hours in warm conditions.
- Evaluate the color. A second coat can deepen the tone if needed; apply and neutralize again.
- Once dry, apply antiquing stain or accent tones if desired, then seal.
Water-based stain application
- Stir the stain thoroughly — pigment settles in the container.
- Apply the first coat with a pump sprayer, foam roller, or brush. Work in small sections to keep a wet edge and avoid lap marks.
- Allow the first coat to dry per the manufacturer's instructions (usually 2 to 4 hours).
- Apply a second coat at a 90-degree angle to the first to ensure even coverage. Multiple thin coats build more depth and evenness than one heavy coat.
- No neutralization is required. Once the final coat is dry (typically 4 to 6 hours), you're ready to seal.
Antiquing technique
An antiquing stain or tinted wax is applied over a dry base stain to add shadowing in the recessed valleys of the stamped pattern, creating the illusion of depth. Apply it with a brush or sponge, work it into the valleys of the pattern, and then wipe the raised peaks partially clean with a dry rag. The peaks should be lighter; the valleys darker. This mimics the way natural stone absorbs dirt and weathering over time. It's one of the more satisfying steps in the whole project, the patio genuinely looks like real stone once you see the depth emerge. For detailed, step-by-step instructions on installing and finishing a stamped concrete patio, see how to stamped concrete patio.
Sealing after recoloring: don't skip this and don't rush it
The sealer is what protects your color investment. Acid stain is often described as permanent because it bonds chemically into the concrete pores, but without a sealer, UV light, abrasion, and water penetration will still degrade it over time. Water-based stains and dyes are even more sealer-dependent for long-term durability outdoors. Water-based stains color surface pores without a chemical reaction and typically require more frequent recoating and UV protection than reactive acid stains Water-based stains color surface pores without a chemical reaction and typically require more frequent recoating and UV protection than reactive acid stains..
- For acid-stained or water-based stained patios, a solvent-based acrylic sealer (20 to 25 percent solids) gives excellent penetration and enhances color depth with a slight sheen. Apply two thin coats with a lambswool roller.
- For tinted sealer systems, the sealer is the product — follow the manufacturer's specific application instructions for that product.
- Apply sealer in cool, shaded conditions. Starting too early in the morning when dew is still present, or too late in the afternoon when temperature drops fast, leads to cloudiness.
- Apply thin coats. A single thick coat traps solvents and causes bubbling or peeling. Two thin coats outperform one thick coat every time.
- Allow 24 hours before foot traffic and 48 to 72 hours before replacing heavy furniture.
Maintaining your recolored patio long-term
Recoloring a stamped concrete patio isn't a once-and-done project. The sealer is the sacrificial layer that protects the color, and it needs periodic maintenance. On most outdoor patios in average climates, reseal every 2 to 3 years, or whenever you notice water no longer beading on the surface. Before resealing, clean the patio with a pH-neutral cleaner and light pressure washing. You typically don't need to strip the old sealer each time if it's still bonding well, a light scuff with 80-grit sandpaper on a pole sander or a brief pass with a floor buffer improves adhesion for the new coat without full removal. Sweep regularly to prevent grit and debris from abrading the sealer surface, and clean oil and grease spills promptly before they penetrate.
Troubleshooting common problems
| Problem | Likely cause | Fix |
|---|---|---|
| Stain won't penetrate — color is blotchy or sitting on surface | Sealer not fully removed; concrete still sealed | Strip sealer completely, re-test with water bead, then restain |
| Color looks uneven or splotchy after acid stain | Uneven porosity, previous sealer residue, or inconsistent application | Add a second acid stain coat; a light antiquing layer helps blend uneven tones |
| Sealer is turning white or hazy (blushing) | Applied in high humidity, applied too thick, or applied over wet concrete | Strip the cloudy section with chemical stripper, let dry fully, apply two thin coats in better conditions |
| Sealer is peeling or flaking | Applied over unsealed or contaminated surface; sealer incompatibility; too-thick application | Strip all peeling sealer, clean and degrease thoroughly, apply compatible thin coats |
| Color mismatch between patched areas and original | Repair mortar has different porosity and absorbency than original concrete | Pre-wet patches before staining; apply extra stain coats to patched areas; use antiquing to blend |
| Cracks visible through the color | Repairs not blended well; hairline cracks absorb stain differently | Fill cracks with matching repair mortar before staining; use antiquing accent in cracks to disguise them naturally |
Cost and time estimates for a DIY recolor
On a typical 200 to 400 square foot patio in fair condition, here's what a realistic DIY recolor project looks like from a time and budget standpoint:
| Phase | Time required | Approximate DIY material cost |
|---|---|---|
| Surface prep (cleaning, degreasing, stripping) | Half to full day | $40–$80 (cleaner, stripper, sandpaper) |
| Crack and spall repair | 2–4 hours (plus cure time) | $20–$50 (patching mortar, crack filler) |
| Color application (acid or water-based stain) | 4–6 hours including dry time | $60–$120 per gallon, coverage varies by product |
| Antiquing accent (optional) | 1–2 hours | $20–$40 |
| Sealing (2 coats) | 2–3 hours | $50–$100 for sealer |
| Total project (2-day weekend) | 12–20 hours of active work | $190–$390 in materials |
A professional recolor on the same size patio typically runs $3 to $8 per square foot in labor and materials, or $600 to $3,200 for 200 to 400 square feet. The DIY route saves significant money, but it takes genuine commitment on prep.
When to call a professional instead
I'm a strong advocate for DIY concrete work, but there are a few situations where hiring out makes more sense than muscling through yourself. If your patio has widespread delamination (large sections where the top layer has separated from the slab), significant structural cracking with vertical displacement, or a sealer that simply won't respond to chemical stripping and needs shot-blasting or diamond grinding, a professional with the right equipment will get a better result. The same applies if you want a complex multi-tone or faux-slate look, that kind of layered decorative work requires a practiced hand to look right. And if you've never applied acid stain before and you're working on a very large, highly visible patio, consider hiring a decorative concrete contractor for the color phase and doing the prep work yourself to save on labor cost.
For most homeowners with a faded but intact stamped patio, though, this is completely achievable as a weekend DIY project. The steps are sequential and logical, the materials are available at any decent home improvement store or concrete supply house, and the result, a fully refreshed patio that looks like it was just installed, is genuinely satisfying. For step-by-step instructions on building, repairing, or working on a concrete patio yourself, see our guide on concrete patio how to do it yourself. For full step-by-step instructions on building and finishing your own patio, see the do it yourself concrete patio guide. Take your time on prep, do the test patch, and don't apply anything in the rain or direct afternoon sun. Those three habits alone will get you 90 percent of the way to a professional-looking result.
FAQ
When is recoloring a stamped concrete patio the right choice versus refinishing, overlaying, or restamping?
Choose recoloring (stain or tinted sealer) when the slab is structurally sound, texture/pattern is intact, only color or sealer wear is present, cracks/spalls are limited and small, and you want lower cost and faster turnaround. Opt for overlaying or restamping when there is widespread delamination, large spalls, major level or slope problems, or you want a different texture/pattern.
What decision‑checklist should I follow before starting a recolor project?
1) Identify existing sealer type (water‑based film, solvent acrylic, penetrating). 2) Check surface soundness (tap for hollow areas, look for flaking/delamination). 3) Map cracks/spalls and measure widths/depths. 4) Do a porosity test (drop water — it should absorb on an unsealed surface). 5) Try a small test patch that includes sealer removal (if required), repair, recolor, and sealer to verify appearance and adhesion. 6) Decide product: acid stain for variegated, permanent tones; water‑based stain for wider palette/easier use; tinted sealer for simple tone change; coatings/paint only if sealing and wear needs are understood.
What tools and materials will I need for DIY recoloring?
Cleaning/strip: pressure washer (2000–4000 psi), chemical sealer stripper (if needed), scrub brushes, degreaser. Preparation/repair: crack injection epoxy or polyurethane, polymer‑modified patch mortar, grinders or diamond cup wheel (optional), silica sand for broadcast (if needed). Color application: acid stain or water‑based stain, concrete dye or tinted sealer, pump sprayer (plastic), brushes/rollers, respirator, gloves, eye protection. Sealing: chosen sealer (penetrating or film), sprayer or roller, anti‑slip additive (optional). Misc: tarps, tape, neutralizer for acid stain, shop vac, rags, waste containment and disposal supplies.
Step‑by‑step workflow for recoloring a stamped concrete patio (high level)?
1) Inspect & decide (use the checklist). 2) Remove furniture, cover plants and nearby surfaces. 3) Strip existing film sealer (chemical stripper, light mechanical abrasion, or both) and thoroughly clean (pressure wash + degreaser). 4) Repair cracks and spalls with suitable epoxy/patch mortar; allow full cure. 5) Test for porosity and run a color test patch in an inconspicuous area. 6) Apply chosen color system per manufacturer instructions (acid stain application + neutralize and rinse; water‑based stain multiple thin coats; tinted sealer applied after color). 7) Let color dry/cure fully. 8) Apply recommended sealer(s) — penetrating sealer for longevity or film sealer for gloss/color depth — including non‑slip additive if desired. 9) Cure time per products before foot/vehicle traffic and perform maintenance schedule.
How do I remove an existing sealer without ruining stamped texture?
For textured stamped surfaces use chemical strippers that can reach peaks/valleys while minimizing abrasion. Apply per label, scrub into texture, emulsify and rinse, then neutralize if required. If film is stubborn, use light mechanical abrasion (diamond cup wheel or shot‑blasting) carefully — be aware grinding can soften or alter crisp texture and create dust. Always test in a small area and contain runoff.
How do acid stains work and when should I use them?
Acid (reactive) stains chemically react with free lime in the concrete to create mottled, translucent, variegated color that penetrates pores — the result is considered permanent within the surface matrix but still needs a sealer for protection. Use acid stains for natural, variegated looks, good outdoor UV stability, and when the slab is unsealed and porous. Test patching is essential because results vary with concrete composition.